LawnDart's Build Thread

I'm not Lawndart (but I played with them as a kid)

:lmao:

but here is the technique I used. I wish I had prepped for General at the same time as I took a swing at it after my Tech exam and was two questions away from passing General. I got 100% correct on Tech with this approach though.

Go to HamStudy and taking one subsection at a time, read the questions, as well as the explanations, then when comfortable review the flash cards for that subsection. Do that in one sitting. After finishing all subsections do the flash cards for the full section. Once through with all sections, do flash cards for the full set of questions. Don't bother with the practice exams until going through the material.

Using this approach it's very easy to pass the Tech exam. I used idle time over the course of a week, probably about 15 to 30 minutes a day.

Good advice! I will be taking my exam in April as well. Got to get studied up ASAP!!!

Cheers!
 
[MENTION=124732]LawnDart[/MENTION]

Do you have any HAM study guide recommendations? Signed up for my test end of April. Depending on how things go, I'm planning on taking both the Tech and the General back to back.

Honestly, I bought the book, I read about half the book...and then I went to the free HAM test sites and just drilled and drilled until I could answer them perfectly. I found out on a thursday evening that the test was that saturday, so I drilled friday and passed with 34/35.

I think for trail use amateur is all that's needed. Frankly opening up other bands (quad band mobile units are extremely expensive) is cool, but general didn't offer me anything I felt would be useful for my needs. I'd like to pass general, but it's not on my priority list. Maybe if I get bored this summer.

Registration opens in 5 days, 12 hours, 35 minutes, and 20 seconds... you planning on going again? Would love to see the changes you've made in person...

I think I'm going to go, but I guess I am just not super thrilled about the FJS registration. I thought it wasn't money well spent. The meals really kind of sucked, the auction seemed like a cluster f*ck, and I got stuck on trail rides with a lot of folks who it seemed had never gone off road before.

So I'm gonna try to register, but if I can't get it, I may just show up and go on some trail rides with folks not signed up.
 
Got in to FJ Summit, and finalized the last of the major upgrades for the truck, and then moving on to the trailer.

Truck: I'm heading to Goose Gear on May 7th, after stopping by Overland Bound to crash with them. For 2-3 days we'll be doing our seat delete and platform that replaces the rear middle/right seats. We're also doing another Odyssey group 31 battery in a national luna power pack:

<iframe width="854" height="480" src="https://www.youtube.com/embed/b4U1cHou2N4" frameborder="0" allowfullscreen></iframe>

That'll go under the seat delete platform.

As for the trailer: We're expecting it to ship the week of the 17th, so to us before end of April and we'll scramble to get it built in time for a shake down before Overland Expo West.

I decided to go with the Alu-Cab tent (in black) because of the space it offers and how fast it is to open and close at camp. We're going with 3x Nitto 35/12.50R17s (one as a tailgate mounted spare) on matte black VTX Offroad Terra wheels. And the trailer's 3 main sides are getting wrapped in Multicam Black.

Should be an awesome camping setup!
 
Cool! Really looking forward to seeing the goose gear platform set up. Taking out the back seats opens up vast amounts of space, we're talking like noticeable cubic footage. :thumb:
 
Cool! Really looking forward to seeing the goose gear platform set up. Taking out the back seats opens up vast amounts of space, we're talking like noticeable cubic footage. :thumb:

It'll hide the power pack along with a small bag of dog supplies.

The idea is that the platform will be dedicated to where my dog will ride.
 
Would you mind posting some pictures of your anti-rock setup. What kit or size did you end up going with? How does it perform in an emergency steer scenario?

I saw your IG where you were doing some donuts, it did look pretty planted. I think this might be the route for me unless I can come up with a long travel KDSS system ha.
 
Lighting Question

As always love the photos and updates, and the time you take to answer questions. I had a quick question on the light at the back of your roof rack. Did you use a mount from Baja Design or did you use something else? I know the lights come with a mount if you used that did you end up drilling into the rack?
 
I get lost in the madness of all this. Do I recall correctly that you are running a Currie Antirock rear sway bar? Or you were considering it?

I ask cause I wanted to know, if you are running it, if you went full custom or if you used the AllPro kit for FJ Cruisers? Regardless, if you're running it how do you like it? Had one on my Jeep and thought it was great, albeit somewhat softer on-road versus stock.


Rear Antirock sway bar kit for FJ and 10+ 4Runner Trucks
 
As always love the photos and updates, and the time you take to answer questions. I had a quick question on the light at the back of your roof rack. Did you use a mount from Baja Design or did you use something else? I know the lights come with a mount if you used that did you end up drilling into the rack?

Thanks! I run Squadron Pros on the back, and inside the rear bumper (there's an S2 on the camp table vertical post. And I use the BD mounts. The rack already has holes, but I added two holes further to the corner so I could get the lights pointing out and down, since they're really more like work lights for me.

I get lost in the madness of all this. Do I recall correctly that you are running a Currie Antirock rear sway bar? Or you were considering it?

I ask cause I wanted to know, if you are running it, if you went full custom or if you used the AllPro kit for FJ Cruisers? Regardless, if you're running it how do you like it? Had one on my Jeep and thought it was great, albeit somewhat softer on-road versus stock.


Rear Antirock sway bar kit for FJ and 10+ 4Runner Trucks

I am running an Anti-Rock setup. It's not the one for the FJ Cruiser, it's kind of a custom made and modified one we bodged into place.

The results are great, especially for usable travel, and it keeps the rear end planted firmly in turns. I'll be honest, for those that have never driven a long travel 4runner, driving my truck can be a little disconcerting. Mainly because the front has quite a bit of body roll, but the back stays flat. Once you get used to that it's not a big deal. But it also means that the truck is very prone to wallowing if you don't keep two hands on the wheel.

I think the LT is miles ahead of the previous setup I had on, but the previous setup cruised better and was maybe a bit of a better road trip trig.

Anyways, I went up to Adventure Ready and picked up my RTT for the trailer:

17861686_10155941582954186_7317901841807368979_n.jpg


This thing is awesome. We're supposed to get our XV3 trailer no later than the 25th. So it's going to be quite a sprint to get it ready to roll south on May 5th.

I also finally expanded my beer cooling capabilities:

17903595_10155942651349186_7549606015367638641_n.jpg
 
Vinyl Wrap Tips and my FUBAR

as you guys know, Lawndart, had his hood partially wrapped and I think the final result came out great!
He and I spoke and brainstormed for a while trying to sort out optimal lengths for the wrap. Cut it too short and it looks goofy and unbalanced. Run in the length of the hood and it just throws off the look. And IMHO, wrapping the entire hood makes it look like you got a hood from the junk yard.

I called around and a local wrap shop wanted $250 to do that center piece of wrapping. I wanted some hands on experience with wrapping so I decided to order some 3M 1080 matte black wrap, some knifeless tape, and a squeegee.

First of all, as Isaac stressed to me over the phone, this isn't a piece of cake wrap job. There's angles that require patience, and the tackiness of the vinyl works every last nerve you have.

I screwed up my first attempt, but I gotta say it was really fun. $35 of wrap went to the trash can, but I almost had it and I'll get it on the next go. Stay tuned. Here are some tips if you want to do the same.

1. If you're working in a garage use an angled light so you can capture the mold lines of the hood. Since the lines aren't terribly distinct and sharp you have to be careful to get your lines right. I did it outside and waited till dusk so the light was coming in from the side and not straight down. It's much easier to see the angles in the hood.

2. Remove your hood liner and carefully pop out the rivets in the hood. You don't have to remove the whole liner. I removed the 6 that were closest to the bumper and it allowed the liner to droop enough to access the scoop to pop it out.

3. Pop out the scoop. Clean the entire hood with alcohol to get rid of any dust particles.

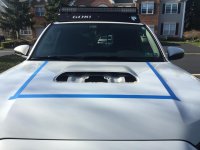
4. I used painters tape to create my boundary lines. I didn't want sharp edges so I used a coaster to create the arcs in the front of the hood.

5. Grab your knifeless tape and follow the lines you created with the painters tape.

6. Now your ready to drop the vinyl down. This is the part where I need more practice. I ALMOST had it, but toward the end I was trying to fix up one side and pulled too hard and ripped the vinyl.

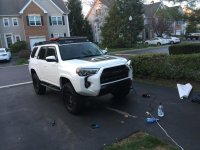
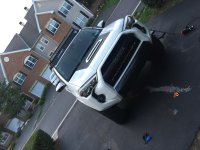
7. Back to the beginning. I will try again when my next roll of vinyl comes in the mail and repost. But for your own edification and to get some laughs at my expense here's my botched job. So close. So far.
 

Attachments

  • IMG_6744.jpg
    IMG_6744.jpg
    126.9 KB · Views: 1,052
  • IMG_6745.jpg
    IMG_6745.jpg
    136.1 KB · Views: 1,109
  • IMG_6747.jpg
    IMG_6747.jpg
    134.4 KB · Views: 1,049
as you guys know, Lawndart, had his hood partially wrapped and I think the final result came out great!
He and I spoke and brainstormed for a while trying to sort out optimal lengths for the wrap. Cut it too short and it looks goofy and unbalanced. Run in the length of the hood and it just throws off the look. And IMHO, wrapping the entire hood makes it look like you got a hood from the junk yard.

I called around and a local wrap shop wanted $250 to do that center piece of wrapping. I wanted some hands on experience with wrapping so I decided to order some 3M 1080 matte black wrap, some knifeless tape, and a squeegee.

First of all, as Isaac stressed to me over the phone, this isn't a piece of cake wrap job. There's angles that require patience, and the tackiness of the vinyl works every last nerve you have.

I screwed up my first attempt, but I gotta say it was really fun. $35 of wrap went to the trash can, but I almost had it and I'll get it on the next go. Stay tuned. Here are some tips if you want to do the same.

1. If you're working in a garage use an angled light so you can capture the mold lines of the hood. Since the lines aren't terribly distinct and sharp you have to be careful to get your lines right. I did it outside and waited till dusk so the light was coming in from the side and not straight down. It's much easier to see the angles in the hood.

2. Remove your hood liner and carefully pop out the rivets in the hood. You don't have to remove the whole liner. I removed the 6 that were closest to the bumper and it allowed the liner to droop enough to access the scoop to pop it out.

3. Pop out the scoop. Clean the entire hood with alcohol to get rid of any dust particles.

4. I used painters tape to create my boundary lines. I didn't want sharp edges so I used a coaster to create the arcs in the front of the hood.

5. Grab your knifeless tape and follow the lines you created with the painters tape.

6. Now your ready to drop the vinyl down. This is the part where I need more practice. I ALMOST had it, but toward the end I was trying to fix up one side and pulled too hard and ripped the vinyl.

7. Back to the beginning. I will try again when my next roll of vinyl comes in the mail and repost. But for your own edification and to get some laughs at my expense here's my botched job. So close. So far.

Your problem, and Isaac will undoubtedly concur, is obvious from your pics. There are all kinds of tools laying on the ground, but no beer. Beer (any type) is essential, no, mandatory... for doing this type of work in the driveway. No beer = your result. Now, there is a fine line on the exact amount of beer that is required for a mod like this. For me it would probably be six. For smaller humans, maybe 2-3 would suffice. The key is to get in the zone, and beer is the key.
 
as you guys know, Lawndart, had his hood partially wrapped and I think the final result came out great!
He and I spoke and brainstormed for a while trying to sort out optimal lengths for the wrap. Cut it too short and it looks goofy and unbalanced. Run in the length of the hood and it just throws off the look. And IMHO, wrapping the entire hood makes it look like you got a hood from the junk yard.

I called around and a local wrap shop wanted $250 to do that center piece of wrapping. I wanted some hands on experience with wrapping so I decided to order some 3M 1080 matte black wrap, some knifeless tape, and a squeegee.

First of all, as Isaac stressed to me over the phone, this isn't a piece of cake wrap job. There's angles that require patience, and the tackiness of the vinyl works every last nerve you have.

I screwed up my first attempt, but I gotta say it was really fun. $35 of wrap went to the trash can, but I almost had it and I'll get it on the next go. Stay tuned. Here are some tips if you want to do the same.

1. If you're working in a garage use an angled light so you can capture the mold lines of the hood. Since the lines aren't terribly distinct and sharp you have to be careful to get your lines right. I did it outside and waited till dusk so the light was coming in from the side and not straight down. It's much easier to see the angles in the hood.

2. Remove your hood liner and carefully pop out the rivets in the hood. You don't have to remove the whole liner. I removed the 6 that were closest to the bumper and it allowed the liner to droop enough to access the scoop to pop it out.

3. Pop out the scoop. Clean the entire hood with alcohol to get rid of any dust particles.

4. I used painters tape to create my boundary lines. I didn't want sharp edges so I used a coaster to create the arcs in the front of the hood.

5. Grab your knifeless tape and follow the lines you created with the painters tape.

6. Now your ready to drop the vinyl down. This is the part where I need more practice. I ALMOST had it, but toward the end I was trying to fix up one side and pulled too hard and ripped the vinyl.

7. Back to the beginning. I will try again when my next roll of vinyl comes in the mail and repost. But for your own edification and to get some laughs at my expense here's my botched job. So close. So far.

FYI: you will be surprised how forgiving that 3M vinyl is.... meaning when you think it's time for the trash, don't toss it!

You mentioned a tear tho, no coming back from that. But wrinkles, creases ect will come out with a little bit of heat. The stuff is really amazing, and the air seems to just bleed out from under it without the use of soapy water. I've had to peal an entire section back, hit it with the heat gun. Restore its shape and start over again several times. And it still sticks and lays flat.

Just take your time, and don't tear it.

-A
 
Your problem, and Isaac will undoubtedly concur, is obvious from your pics. There are all kinds of tools laying on the ground, but no beer. Beer (any type) is essential, no, mandatory... for doing this type of work in the driveway. No beer = your result. Now, there is a fine line on the exact amount of beer that is required for a mod like this. For me it would probably be six. For smaller humans, maybe 2-3 would suffice. The key is to get in the zone, and beer is the key.

This needs to be in my signature.
 
Damn I must've missed you. Adventure Ready is literally next door to my family company.

Thanks! I run Squadron Pros on the back, and inside the rear bumper (there's an S2 on the camp table vertical post. And I use the BD mounts. The rack already has holes, but I added two holes further to the corner so I could get the lights pointing out and down, since they're really more like work lights for me.


I am running an Anti-Rock setup. It's not the one for the FJ Cruiser, it's kind of a custom made and modified one we bodged into place.

The results are great, especially for usable travel, and it keeps the rear end planted firmly in turns. I'll be honest, for those that have never driven a long travel 4runner, driving my truck can be a little disconcerting. Mainly because the front has quite a bit of body roll, but the back stays flat. Once you get used to that it's not a big deal. But it also means that the truck is very prone to wallowing if you don't keep two hands on the wheel.

I think the LT is miles ahead of the previous setup I had on, but the previous setup cruised better and was maybe a bit of a better road trip trig.

Anyways, I went up to Adventure Ready and picked up my RTT for the trailer:

17861686_10155941582954186_7317901841807368979_n.jpg


This thing is awesome. We're supposed to get our XV3 trailer no later than the 25th. So it's going to be quite a sprint to get it ready to roll south on May 5th.

I also finally expanded my beer cooling capabilities:

17903595_10155942651349186_7549606015367638641_n.jpg
 
Anyways, I went up to Adventure Ready and picked up my RTT for the trailer:


This thing is awesome. We're supposed to get our XV3 trailer no later than the 25th. So it's going to be quite a sprint to get it ready to roll south on May 5th.

I also finally expanded my beer cooling capabilities:

--------------------------------------------------------------------------------------

Yeah, Alu-Cab makes some very nice products and the tracks mounted to the top..hmmm..a nice place for rack mounted solar panels...looking forward to checking it out next month
 
Or more like a great place for Maxtrax or my surf board.

Anyways, I went up to Adventure Ready and picked up my RTT for the trailer:


This thing is awesome. We're supposed to get our XV3 trailer no later than the 25th. So it's going to be quite a sprint to get it ready to roll south on May 5th.

I also finally expanded my beer cooling capabilities:

--------------------------------------------------------------------------------------

Yeah, Alu-Cab makes some very nice products and the tracks mounted to the top..hmmm..a nice place for rack mounted solar panels...looking forward to checking it out next month
 

Members online

No members online now.

Forum statistics

Threads
278,309
Messages
3,554,071
Members
248,016
Latest member
Advally Service

Trending content

Back
Top