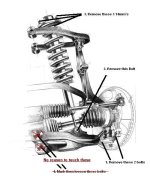
Leveled her this weekend

How does a 1" thick spacer provide 2" of lift?

The strut assembly is attached to the A-arm at approximately it's mid-point... halfway between the pivot point and the end. Move the midpoint 1" and the end, being twice the distance from the pivot point, will move 2". Hope that helps!

~Doozi
 
There is no reason to loosen the bolts on the lower control arm. I'm not sure why anyone would even think that needs to be done.
 
There is no reason to loosen the bolts on the lower control arm. I'm not sure why anyone would even think that needs to be done.
The 2 bolts by the wheel or the eccentric bolts to adjust alignment?

Either way I did my daystar lift this way, the second time around. Its so much easier/faster, that its a no brainer in my opinion. The first time I removed a bunch of extra stuff, used the factory jack to push the A arm down (wedged against the top inner wheel well), etc. It was a lot more trouble and took twice as long.
 
The 2 bolts by the wheel or the eccentric bolts to adjust alignment?

Either way I did my daystar lift this way, the second time around. Its so much easier/faster, that its a no brainer in my opinion. The first time I removed a bunch of extra stuff, used the factory jack to push the A arm down (wedged against the top inner wheel well), etc. It was a lot more trouble and took twice as long.

I was talking about the eccentrics that adjust the alignment--there's no reason at all to loosen them to install spacers. I think it's bad advice to post a write-up when something unnecessary like that is included
 

Attachments

  • toyota-front-suspension.jpg
    toyota-front-suspension.jpg
    47.9 KB · Views: 2,954
I was talking about the eccentrics that adjust the alignment--there's no reason at all to loosen them to install spacers. I think it's bad advice to post a write-up when something unnecessary like that is included
When you can't take a 3ft. Prybar and pry the lower A arm down or even stand on it and have it swing down out of the way, you need to loosen the bolts. If you can get away with not loosening them, do it! You're really lucky! YOU WILL NEED AN ALIGNMENT ANYWAYS! I think it's bad advice to tell people to cut corners and to not touch the bolts and spend over an hour trying to pry the lower A arm out of the way when they can mark a bolt and get the alignment close to where it was instead of taking the minute to make it easy to swing the lower A arm. The truck should not be driven far till you get an anilgment. It'll be about +1.5 degrees camber (yeah, that's huge when it should be -.4).

What I found was when I loosened them, the eccentric didn't even turn out of alignment. Maybe I'm lucky on that. The alignment was still way cambered in by the way. I fixed my illustration.
 
Last edited:
Has anyone installed a kit like this on a T4R with XREAS?

I wonder if this kit can be installed with XREAS since it requires a 60-degree rotation of the top plate. Wouldn't the shock also be rotated the 60 degrees, along with the XREAS plumbing? Is that a problem?

I'm sure I didn't explain that very clearly, but hopefully someone can catch my drift and explain.

Thanks,
Bill
 
When you can't take a 3ft. Prybar and pry the lower A arm down or even stand on it and have it swing down out of the way, you need to loosen the bolts. If you can get away with not loosening them, do it! You're really lucky! YOU WILL NEED AN ALIGNMENT ANYWAYS! I think it's bad advice to tell people to cut corners and to not touch the bolts and spend over an hour trying to pry the lower A arm out of the way when they can mark a bolt and get the alignment close to where it was instead of taking the minute to make it easy to swing the lower A arm. The truck should not be driven far till you get an anilgment. It'll be about +1.5 degrees camber (yeah, that's huge when it should be -.4).

What I found was when I loosened them, the eccentric didn't even turn out of alignment. Maybe I'm lucky on that. The alignment was still way cambered in by the way. I fixed my illustration.


Two points:

1- you don't need to pry anything with a prybar. You can use the bottle jack that came with your 4Runner on the control arm. Try it next time, it works perfectly.

2- I installed a small leveling spacer on my own 4Runner. When I put it on the alignment rack, it was still within factory specs. So I did not need to adjust the alignment at all, but I did put it on the rack to check it.
 
Has anyone installed a kit like this on a T4R with XREAS?

I wonder if this kit can be installed with XREAS since it requires a 60-degree rotation of the top plate. Wouldn't the shock also be rotated the 60 degrees, along with the XREAS plumbing? Is that a problem?

I'm sure I didn't explain that very clearly, but hopefully someone can catch my drift and explain.

Thanks,
Bill

Yes, I have XREAS and it's not a problem. The XREAS systems is connected by rubber hoses at the shocks, so taking the shocks out and rotating them is not an issue at all. I installed my spacers without disconnecting the XREAS system at all.
 
Your alignment must have been jacked before. There's 0 chance that you can lift it that much and have it in spec still.

Let me say it again: My alignment was in specs BEFORE and AFTER installing the spacer. I've performed hundreds of alignments over the years, so I think I know what I'm doing. The point is that my spacer is only 1/2", giving me 1" of lift. Such a small spacer doesn't automatically mean that the alignment will be out of specs. And that's another reason not to mess with those eccentrics when it's not at all necessary. Try the bottle jack next time and you'll see how easy it is.
 
Yes, I have XREAS and it's not a problem. The XREAS systems is connected by rubber hoses at the shocks, so taking the shocks out and rotating them is not an issue at all. I installed my spacers without disconnecting the XREAS system at all.

Thanks Doc!
I've been thinking of a one inch leveling kit (half inch spacers) but it seems like the 2-inch kit (one inch spacers) might be easier to install. This next weekend I'm going to put a jack under the front and see what 2" will look like.
Bill
 
Thanks Doc!
I've been thinking of a one inch leveling kit (half inch spacers) but it seems like the 2-inch kit (one inch spacers) might be easier to install. This next weekend I'm going to put a jack under the front and see what 2" will look like.
Bill

They are both the same as far as being easy to install. The thickness of the spacer doesn't make one easier than the other. You will have to compress the spring either way.

I chose a 1/2" spacer because I only wanted 1" of lift in the front. That still leaves a slight rake to my 4Runner's stance. The back end is still slightly higher than the front. If you go with a 1" spacer (which gives you 2" of lift), the 4Runner will look pretty much level when you compare the gap between the top of the tires and the bottom of the fenders. But when you look at the running boards, they will appear to be higher in the front than the rear. That was the look I was trying to avoid, so for me it made more sense to just lift the front 1" using a 1/2" spacer. I did this three years ago and I'm still completely happy with the look.
 
Two points:

1- you don't need to pry anything with a prybar. You can use the bottle jack that came with your 4Runner on the control arm. Try it next time, it works perfectly.

2- I installed a small leveling spacer on my own 4Runner. When I put it on the alignment rack, it was still within factory specs. So I did not need to adjust the alignment at all, but I did put it on the rack to check it.

A couple of questions if I could trouble you, as I am about to add 1/2" spacers to my T4R:

1) Which is the control arm?

2) Step #1 in the Diagram, are the two pointers referring to the large bolts to the right of each of the two pointers?

Thanks very much!
 
Last edited:
A couple of questions if I could trouble you, as I am about to add 1/2" spacers to my T4R:

1) Which is the control arm?

2) Step #1 in the Diagram, are the two pointers referring to the large bolts to the right of each of the two pointers?

Thanks very much!

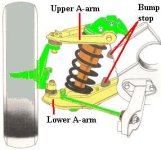
You have two control arms (upper and lower), which are also sometimes called A-arms:
 

Attachments

  • aarms.JPG
    aarms.JPG
    17.6 KB · Views: 1,809
Sorry, forgot to add---- there are some really good step-by-step instructions posted on this forum to install spacers. I'll see if I can find a good one for you and post a link to it.
 
Sorry, forgot to add---- there are some really good step-by-step instructions posted on this forum to install spacers. I'll see if I can find a good one for you and post a link to it.

OK, thanks, that would be great! Actually, I did a lot of searching to find some good step-by-step instructions with pics, but didn't find any. But maybe I just didn't look in the right place or something.
 
A couple of questions if I could trouble you, as I am about to add 1/2" spacers to my T4R:

1) Which is the control arm?

2) Step #1 in the Diagram, are the two pointers referring to the large bolts to the right of each of the two pointers?

Thanks very much!
For step one it'll be obvious when you look. BY the balljoint there's 2 bolts on the bottom of the piece of metal The head is on the bottom and they're vertical bolts. Just pull those two

Doc, if you'd mentioned that was just a 1/2" spacer and not the 2" this thread was about it would have made more sense to me about the alignment.

For those that don't like the thread, PLEASE STOP BASHING IT AND START YOUR OWN, THAT'S f**** RUDE!!! If you have a basic question like the one above I can answer those, just post it.
 
Last edited:

Members online

Forum statistics

Threads
278,306
Messages
3,554,046
Members
248,016
Latest member
Advally Service

Trending content

Back
Top