Lindenwood's 2002 SR5 Build Thread

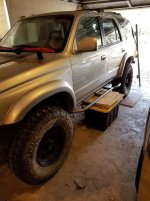
Snapped an updated overview pic.

lindenwood-albums-lindenwood-picture50503-2002-sr5-12-mar-2018.jpg
 
I ran out of MIG wire assembling these, but here are my new 4xInnovations sliders ready to be welded to the frame!
 

Attachments

  • 20180317_161849-600x800.jpg
    20180317_161849-600x800.jpg
    79.1 KB · Views: 624
Getting the feeling nobody gives a rat's ass about this build here...

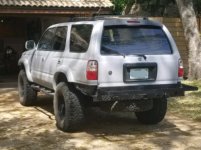
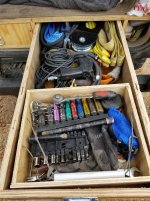
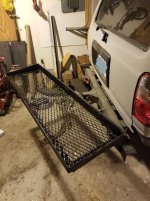
But, I was able to also finish the respray of my rig (Satin gray), re-do the swing-out tray in expanded sheet, and build a crude tool tote for my drawer. Progress has slowed considerably with the birth of my kid a few weeks ago, but that was expected.

I am about halfway done with the gas tank skid. Finishing the rest shouldnt be nearly as tedious.

Next major plans:
-Upgrade the audio system (all new factory-location speakers and an Android Auto bluetooth ead unit)
-Cut a hole in the roof for a big MaxxFan (meant for RVs)
-Install a second battery with my new isolator
-TrueTracs and Gears, hopefully by October. Still can't fully decide between 4.88s and 5.29s, though.
 

Attachments

  • 20180421_111128.jpg
    20180421_111128.jpg
    60.2 KB · Views: 572
  • 20180409_170131-600x800.jpg
    20180409_170131-600x800.jpg
    108.4 KB · Views: 549
  • 20180422_033054.jpg
    20180422_033054.jpg
    90 KB · Views: 554
Last edited:
I ran out of MIG wire assembling these, but here are my new 4xInnovations sliders ready to be welded to the frame!

Those look great! What kind of welder are you using??

Getting the feeling nobody gives a rat's ass about this build here...

But, I was able to also finish the respray of my rig (Satin gray), re-do the swing-out tray in expanded sheet, and build a crude tool tote for my drawer. Progress has slowed considerably with the birth of my kid a few weeks ago, but that was expected.

I am about halfway done with the gas tank skid. Finishing the rest shouldnt be nearly as tedious.

Next major plans:
-Upgrade the audio system (all new factory-location speakers and an Android Auto bluetooth ead unit)
-Cut a hole in the roof for a big MaxxFan (meant for RVs)
-Install a second battery with my new isolator
-TrueTracs and Gears, hopefully by October. Still can't fully decide between 4.88s and 5.29s, though.

Not true!! I see how you can feel that way. My thread doesn't get much action from others either. It's not as popular as the "cool kids" here.lol Probably cause I am 2wd. But..people do watch and maybe they don't reply. I am guilty of not replying too. Even on some of the big builds. Besides your doing these upgrades for yourself not on what others think.
 
Those look great! What kind of welder are you using??


Not true!! I see how you can feel that way. My thread doesn't get much action from others either. It's not as popular as the "cool kids" here.lol Probably cause I am 2wd. But..people do watch and maybe they don't reply. I am guilty of not replying too. Even on some of the big builds. Besides your doing these upgrades for yourself not on what others think.

Lol thanks! I figure if one or two folks get an idea or inspiration, it is helpful.

I bought a 110v welder from Harbor Freight for $80 with a coupon, originally thinking it would be good to supplement my previously-preferred OxyAcetylene setup and to help with assembly by allowing easy tacking. But, after getting used to it, I am able to make perfectly sound welds within its power limits, so I havent even fired up the O/A setup other than for about 3 minutes on one weld :P . Flux welds arent super pretty, but I absolutely can't complain about having completed both bumpers, sliders, and 1.5 skid plates (so far) with an $80 welder that doesnt require me to dig into my breaker panel :P .


Good looking build! What kind of tires you running?

Sent from my Pixel using Tapatalk

They are Milestar Patagonia 285/75r16 on 16x8 American Racing wheels with 4.5" backspacing. The tires are made in Mexico, but they balanced very well, are quieter than the ATs on my wifes 5th Gen, grip great, seem to be wearing well, and were $800 for 5 tires from Amazon. Can't complain!
 
Lol thanks! I figure if one or two folks get an idea or inspiration, it is helpful.

I bought a 110v welder from Harbor Freight for $80 with a coupon, originally thinking it would be good to supplement my previously-preferred OxyAcetylene setup and to help with assembly by allowing easy tacking. But, after getting used to it, I am able to make perfectly sound welds within its power limits, so I havent even fired up the O/A setup other than for about 3 minutes on one weld :P . Flux welds arent super pretty, but I absolutely can't complain about having completed both bumpers, sliders, and 1.5 skid plates (so far) with an $80 welder that doesnt require me to dig into my breaker panel :P .

That's interesting. I have a 110 HF welder and I figured it would be too small to weld sliders on. 1/4" steel might be too thick. I didn't want to buy a more powerful unit. I do have 220v here at home. Figured cheaper to have someone weld them on than pay for a new more powerful unit.
 
I have found that turning the wire speed way down (~3/10) enables sufficient heat concentration to gain full penetration on even those 1/4" mounting plates. Of course, it takes a little more finesse with manipulating the puddle, but with my torch experience it wasn't so alien. In any case, with anything more than 1/8" steel I would not expect to do any structural welds to full penetration in a single, straight-line pass as one can i traditional MIG.

Honestly the most annoying part is, being a flux-core welder, all the sparks and slag flying everywhere makes welding under a vehicle generally unpleasant :P .
 
I have found that turning the wire speed way down (~3/10) enables sufficient heat concentration to gain full penetration on even those 1/4" mounting plates. Of course, it takes a little more finesse with manipulating the puddle, but with my torch experience it wasn't so alien. In any case, with anything more than 1/8" steel I would not expect to do any structural welds to full penetration in a single, straight-line pass as one can i traditional MIG.

Honestly the most annoying part is, being a flux-core welder, all the sparks and slag flying everywhere makes welding under a vehicle generally unpleasant :P .

Ah ok. I better be careful and go slow. Umm...my welding skills are not so great. My Dad was a welder but I can't have him going underneath. He's 80 years old. Decisions.
 
I'll be following along to see what you do for a gas tank skid!

Also, every time I click on this thread and I see that Hi-Lift on the hood I cringe. Get into a bad wreck and that thing is coming straight for your and your passenger's face.
 
I'll be following along to see what you do for a gas tank skid!

Also, every time I click on this thread and I see that Hi-Lift on the hood I cringe. Get into a bad wreck and that thing is coming straight for your and your passenger's face.
Will update the skid progress.

I thought a lot about the hi-lift placement. Since the mounting bolts run through the hood hinges, they would have to rip through roughly an eighth inch of steel to pull out. More than likely, the entire hood would come off by breaking the hinge pins or surrounding metal. Further, the only way the jack would be given the windshield-bound vector would be from a seriously-tremendous rear-ending. I do think it is reasonable to expect it (including the whole hood) might fly off radially in a high-speed rollover, but I would expect the same with most any commercial mounts.
 
I'll be following along to see what you do for a gas tank skid!.

Finished the skid as a Father's Day present to myself!

I built a frame out of 1/8" 2x2 steel angle iron, and the bottom is some old 1/8" diamond plate I had. The plate part probably isn't thick enough to go hammering down on jagged rocks without some potential damage. But, it is meant more to protect against hidden tree stumps or scraping over the occasional large obstacles, which it should handle just fine. It weighs 40lbs.

lindenwood-albums-lindenwood-picture51544-3rd-gen-home-made-gas-tank-skid.jpg
 
Awesome build. Any details on the android radio you are installing and it's speaker compatability? Would like to throw in a double din head unit myself soon...

Sent from my XT1254 using Tapatalk
 
really niece work on the whole truck but I really like that swing out rack in the back.I have a after market rack that has to be attached to the hitch and it's pain if I have to open the rear hatch it's a really clever idea.
 
Awesome build. Any details on the android radio you are installing and it's speaker compatability? Would like to throw in a double din head unit myself soon...

Sent from my XT1254 using Tapatalk
Thanks!

Honestly, I know very little about car audio. But, I did some digging and the Sony XAV-AX100 seems to be about the best bang-per-buck Android Auto head unit. Can get them for $350-400 online. But, I cant speak to any specific compatibility issues.
 
really niece work on the whole truck but I really like that swing out rack in the back.I have a after market rack that has to be attached to the hitch and it's pain if I have to open the rear hatch it's a really clever idea.


Yup! I couldnt find anything like it, so I built one!
Here is my most recent use. I took the dogs and kid out to the woods, and found an old ottoman that I took home to throw out. Fit perfectly on the tray without putting gross woods junk in my rig, heh.

lindenwood-albums-lindenwood-picture51545-cleaning-up-trail.jpg
 
Yup! I couldnt find anything like it, so I built one!
Here is my most recent use. I took the dogs and kid out to the woods, and found an old ottoman that I took home to throw out. Fit perfectly on the tray without putting gross woods junk in my rig, heh.

lindenwood-albums-lindenwood-picture51545-cleaning-up-trail.jpg

that is an awesome picture with a really cute baby and the dog looking at the baby with the rig. keep up the good work. great.
 
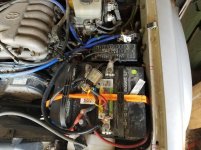
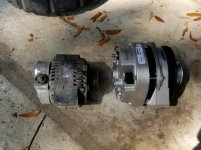
Installed my CS-144 140amp alterbator, knocked out my first hack at a dual battery system, and did most of the "Big 3" wiring yesterday. I need to build negative wire for the block, but otherwise I'm all done.

The CS-144 alternator is meant for a 1995 Cadillac, but fits with little modification. A $16 pigtail adapter from ebay and few washers to space it properly and it fits. The factory alternator puts out about 40 amps at idle and 85 max, where this takes those numbers to ~85 and 140, respectively. Plus, I am all about replacing things on my 16-year-old rig before they can leave me stranded, so this hit two birds with one stone.

I grabbed a Dual Purpose Marine battery as the extra. Cost me $85 out the door, including the core fee (for not bringing in an old one). It is only 55Ah, but everything I want (fan, fridge, and some LEDs) will only use about 8-10 Amps per night. I dont expect to do any long-duration campouts with no driving during the day to recharge, so no worries. In any case, with the alternator putting out 90 amps at idle, Id only have to run the truck for 5-10 mins to full recharge the batteries.

The relay is from Powerstream.com. It is a simple product that closes the relay when it senses above 12.6 volts (i.e. engine running) to charge the 2nd battery. It was $75+chipping, and is rated for 150 amps steady state but they advertise that it can handle a 1500 amp spike. It is simply bolted onto the negative battery terminal, both out of simplicity and to keep the positive leads as short as possible. I might move it eventually, though I do need to get some rubber covers for the positive terminals.

I was worried that since the winch is only hooked to the 2nd battery, if I was winching with the engine running it could exceed 150 amps through the solenoid. For example, if the engine was running (relay closed) but the second battery was low, the winch might try to pull most of its 400amp draw from the main battery through the isolator. But, I called them specifically about this and they said such loads would not harm it at all.

Right now, the main battery has only the factory connections--though I combined all of the positives into one main lead (the thick black wire wrapped in electrical tape), and plan to add a cutoff switch down the road.

The second battery powers the winch and accessories. The red cable going into the fender is the positive line going to the back of the rig from the 2nd battery. It is on a 120amp fuse (which is just out of view) since the wire is rated at 150 amps, but I think I am going to swap in something like a 30 or 40 Amp fuse since 100 Amps could probably still arc enough to start a carpet fire without tripping the breaker. Plus, I will likely add individual fuses to each accessory. Right now only my compressor is powered by this wire, but eventually I will have a fridge, a roof fan, and some mild red LEDs powered off the same circuit.

I had to move the fuse box a good bit--it was actually about 1.5" further back, but I settled on this location after everything was done to minimize strain on the wiring harness. I was surprised I was able to fit the coolant bottle back in place, but it worked. I used a simple flat piece of scrap steel as the battery tray.

I'd like to say the ratchet strap is only temporary, but let's be real...

I really hate those blue hoses... I got em as a cheap set to replace some cracked vac lines, but I wish I'd have spent $10 more to find a black set :P .

*edit*

Here is Doc's writeup that gave me the idea and confidence to do the swap. I highly recommend the pigtail for the alternator plug--mine was $16 on ebay.
http://www.toyota-4runner.org/3rd-gen-t4rs/135318-docs-cs144-alternator-upgrade.html

And, here is CSL's thread where I got the idea and motivation to stuff a 2nd battery up there. My install is definitely not as clean as his, so get your info from the source.
http://www.toyota-4runner.org/3rd-gen-t4rs/63214-dual-battery-set-up.html
 

Attachments

  • 20180701_094801-800x600.jpg
    20180701_094801-800x600.jpg
    86.5 KB · Views: 473
  • 20180630_094701_crop_800x600.jpg
    20180630_094701_crop_800x600.jpg
    70.5 KB · Views: 463
Last edited:
I keep adding that Maxxfan to my cart and chickening out about cutting a hole in my roof...

Though, I really love the idea of having an easy way to keep the vehicle cool during the day. I installed some of those window gap covers that allow me to leave the windows cracked, and that helped tremendously to keep the vehicle cool when it is sitting in the su . Being able to establish a constant breeze in through those cracked windows and out the roof would make it even better. Plus, if we are trying to sleep in it on a hot day, the ability to simply blast ourselves directly with that fan (it would be about above our stomachs) would be really nice.
 
Last edited:
Link to details and discussion on the suspension "downgrade" to OEM+5100 fronts and 890 rears.
http://www.toyota-4runner.org/3124809-post32.html

Link to my 100mi review of the Gibson exhaust.
http://www.toyota-4runner.org/3124993-post51.html

I am getting ready to install a Pulse-Width Modulating rheostat directly from my 2nd battery to the AC / Heater blower. This should allow me use the stock in-dash blower without the ignition on. At low settings it might draw maybe 0.5-1 Amps, but a lot of that will be offset by also reducing the required duty cycle of my fridge. In any case, it seems like it should the perfect way to maintain cabin airflow without cutting holes or leaving windows down.
 
Last edited:

Members online

No members online now.

Forum statistics

Threads
278,310
Messages
3,554,078
Members
248,016
Latest member
Advally Service

Trending content

Back
Top