Lots of overdue service items- catching up, input?

DiskDoctr

New member
My 04 V8 LTD 4Runner has been good to me, but there are a couple of high mileage service items I am just getting around to tackling. At the risk of getting booted (maybe from this site, maybe a good swift kick ;) ) I'm posting about the imminent service items for input and even "how could you's "

I've owned this since new. Now she has about 160k or so miles.

So all you guys who are good about meeting all your service intervals may want to divert your eyes!

Here's a list of things I intend to do over the next month. I'm listing the things I *think* I know, so feel free to correct me or give an opinion. I'll take requests for pics, just let me know what you want to see.

1. Change oil in front and rear differentials and center transfer case.

Mobil 1 Synthetic LSD 75w-90w gear oil, about 7 quarts total. This is the FIRST time this has been changed.

I ordered 2 drain plugs and 2 crush washers for all three from the dealer. I intend to substitute drain plugs for fill plugs for the extra magnet.

I intend to buy a gear oil pump at Walmart for about $6 or so, shows instock locally online.

2. Change all 8 spark plugs.

It came with iridium and specs them. Using the spark plug finder tool on NGK's website, I selected Iridium IX, BKR6EIX-11, #3764 (use this number at Advance Auto)

3. New timing belt and water pump

I got a Toyota OEM timing belt. I have the water pump and gaskets.

Question: Should I change the Timing Belt Tensioner Bearing and Idler Bearing??? I see they are included in the kits on ebay (maybe I should have ordered a kit, but hindsight)

What about the hydraulic tensioner? Saw it online, too, about $60.

4. Coolant

Like an idiot, I almost forgot this! We're changing the WATER PUMP! :jaw:

I saw someone posted something about Toyota SLCC, 3.5 gal. Is this a dealer only item, or is there a good substitute? I use Advance Auto a lot, don't mind a few things from dealer, but cost is obviously an issue.

Should I use a flush? I've done this before on other vehicles, but not sure if on the 4Runner.

5. Replace front clip, fog light and turn signal sockets.

Another member hooked me up with the parts to treat my 4Runner's 'Deer-itis' :D It was a reasonable price and is much appreciated!

6. Replace passenger headlamp

I replaced the driver's side a while back, now matching them up. Got a good special on Autopartswarehouse.com, 20% off over a certain amount and free shipping. I ordered headlamps for 4Runner, and a couple other family vehicles.

7. Replace serpentine belt

Picking up Dayco at Advanced Auto

8. PCV Valve

Not sure of part number yet, have to look this up.

9. Seafoam the intake

Never done this, saw a couple writeups and videos. Any tips are welcomed!

10. Oil filter and oil

Always run Mobil 1 5w-30w since first change when new.

11. Air filter

It's about time. I've changed it a couple of times. Any one better than another?

12. Front AFR/wideband O2 sensors

Never changed, but throwing a code for the front driver's side. I read OEM is the way to go on these? Any tips on getting them out?

I broke one on wife's Chrysler minivan a while back, even though I ran it until hot, used PB Blaster, and was slow but forceful. Sucked!

13. Rear drive shaft thumping

I've been greasing it on and off. Softens it for a bit, but it really seems harsh! Anyone have a fix for this? Can the seals be replaced? Would that help? Outside of buying a new propeller shaft, that is ;)

I have some other maintenance and repair items that I have...er...neglected that I plan to get to shortly as well.

Any tips or input would be welcome! I have a buddy helping out for the timing belt and water pump. He says about 4 hours.

Thanks.
 
Register to hide this ad
Some items done this weekend

Got started this weekend.

1. Changed oil and filter. Nothing exciting there.

2. Changed air filter

3. Greased rear drive shaft. Made a difference in the thumping, but certainly more is necessary. Read in one of the threads about disassembling the shaft and repacking the splines. Will likely try that in the near future for a more permanent fix.

4. Cleaned MAF using electronics cleaner. Had two wire sensors. I was expecting only one from the other writeup pics I saw. Sprayed them both, let it dry, put it back. Looked okay before, but figured it wouldn't hurt.

5. Replaced passenger side headlamp. I have a dent in that fender, awaiting repair. It had broken one of the 4 mounting points off the old headlamp- the one that attaches just inside the side fender.

After removing the old headlamp I attempted to remove the bolt, but it snapped. I didn't see a reason to replace it, especially since I could get to all the others by only removing the plastic rivet fasteners of the plastic cover over the radiator and top of the headlamps.

I did have a small problem with the aftermarket headlamp, though. The clip at the top outside seemed to be molded too close to the top of the light body, not allowing the mounting frame to slide in between them.

I used a heatgun to heat that part to just below toasty. I bent the clip into the right spot, then heated that joint and allowed the frame to spread the joint enough to fit.

It felt that if I didn't, it would have broken.

6. Used Seafoam for the injection cleaning. Pulled the lower end of the hose off from the PCV. I had my daughter start the engine, I pulled it off, felt to make sure it had suction (right hose, yeah!)

I sucked about half a can of Seafoam in quickly. The engine stumbled, but didn't quite stall, I had my daughter turn the engine off.

We waited 10 mins, fired her up (LOTS OF WHITE SMOKE!!!), and then took a half hour drive, spiritedly driving in a lower gear for lots of 4-4.5k rpm revs up and down.


So far, so good. I can see I am going to have some trouble removing the bolts for the coil packs. ANyone know the bolt size for replacements?

Thanks.

Oh- She runs quite a bit better now, but the air filter was pretty bad and we were in a lower gear at higher rpms. All the same, it felt like a race car. Give her gas and she'd throw you into the seat. Let off and the Magnaflow rumbled... :guitar3:

I have a speed sensor wire that was melted, so my TSC is disabled for now. Combined with lots of anti-skid still on the roads from winter, and it was fun to drift a couple of corners!

I'm running 265/70 R17 10 ply, fronts brand new, backs almost new. Lots of tread, but lots of zip, too!
 
Add items

Adding items:

14. Hose from top of gas tank to charcoal emissions box MELTED! From last year's cracked exhaust pipe, no doubt.

15. Hose from charcoal emissions box to the extra little box MELTED! Same as above.

These explain the gas smell when underneath. I cannot believe how close these lines are to the stock exhaust pipe and buried above the spare tire location!

Be careful and check your exhaust for leaks :ohwell:
 
Done!

(I realized I posted this update in a question thread but it belongs here)

The timing belt, thermostat, coolant change and water pump are DONE!

The biggest problem we had were some cheap-a$$ bolts. Broke one in the top square portion of the top water tube, and one on the right cam cover. A nut was bad on the left came cover and one bolt wouldn't come out at all on the left cam cover, prefering to break out of the left cam cover completely.

Easy outs are essential tools!

Fortunately, I have a 5 gallon bucket of misc metric bolts and nuts. Picked them up at a local flea market a few years back, probably out of a garage

I took a few pics I'll share once I get them off my tablet and resized.

It was tricky to get the timing marks lined up on the crank and then on the top cams.

We replaced all the idler, tension pulleys and the tensioner. The idler pulley hadn't failed, but I could feel a little slop and grittiness in it. I was glad we changed it and the others.

Found the water pump gasket had a small leak.

The coolant has NEVER been changed or serviced in any way. Over 160k and 10 years, but the radiator and all the chambers looked BRAND NEW! I'm glad we refilled it with genuine Toyota SLLC (pink). It was expensive, but after this, I am a believer!

So, how was the timing belt you ask?

The belt looked to be in okay shape at first glance. But the square profile of the teeth were a bit trapezoid in shape and shiny. It had not jumped any teeth, but as my buddy showed me, when both cams were lined up with the marks, the crank was between 10 and 20 degrees off to the driver's side (advanced timing)!

Talk about S-T-R-E-T-C-H!

The results? Much crisper throttle response, a very significant decrease in the mid-rpm power dip, and it felt like better performance. I'm guessing with that far out, The ECU (or possibly the ECU?) could have been advancing the timing for the performance power curve, but with the belt stretch, it got too aggressive and had to be retarded.

I don't know if this is so, but it would explain the hesitation and power sag. The power, rpms, and acceleration seem much more continuous. I have a slightly modified exhaust that I remember added power to the mid-rpm, but didn't realize how it has been fading over the years...frog in water thing, I guess

This job took us about 9 hours with the broken bolts and looking for replacements. I also wasted (a ton of) time looking for O-rings that I didn't realize were in the kit already and using easy outs and drilling the upper square coolant bolt hole.

Moral of that wasted time? Open your parts and look at them BEFORE getting too deep into your project! I was excited to get this done and neither of us slept much the past few days (we shared that story as we were dragging butt when we met for breakfast) and didn't think about it.

I also took the opportunity to clean up some of the plastic parts while they were out on the ground. Dollar store imitation Simple Green in a spray bottle, a small round scrub brush with stiff plastic bristles and a long handle, and a hose.

Oh- and I ordered 10 replacement plastic 'rivet' style fasteners/clips for the plastic bits. I need some more, but this was what I could get quickly for about $1 each. I plan to order more for various locations.

In retrospect, I would DEFINITELY RECOMMEND you change your timing belt about 100k miles. Not because of impending FAILURE of the belt, but because of the decrease in performace due to a stretched belt! In my case, the different is quite noticeable, even without the "I should have had a V8" head-smack

Hope this is helpful to others thinking of this job or putting it off like I did.

Edit: We also put a new serpentine belt on. It had the expected wear and cracking, but nothing unusual.
 
Last edited:
Intake carbon- Valve job?

I noticed when doing the timing belt and such that the intake tube on the top of the engine had a bit of very fine, almost ink-like carbon build up near/around the butterfly.

I carefully sprayed it with carb cleaner, using a rag to make sure none of it sprayed into the cam area (can't be good for bearing and seals), and wiped it out. It took about 4 cleanings this way to remove it.

Since the input for this is directly from the airbox, I am wondering if I have a leaking intake valve causing blowback into this area?

I've read about some people getting their valve adjustment checked. Is this a normally scheduled maintenance item?
 
Timing Belt Camshaft Gear Alignment

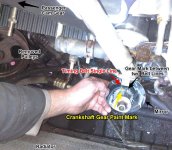
Here is a pic of the proper alignment of the paint marks on the camshaft timing gear and the timing belt in the 4th Gen V8 4.7L 2004 4Runner Limited.

Timing Belt Camshaft Alignment.jpg

The pic is looking down between the radiator and the engine, using a mirror to "see" the camshaft timing gear.

You can see the removed power steering pump on the left side of the pic and the belt going up toward the passenger side top cam gear.

The timing belt has three lines on it. One is by itself, the other two are together. Notice the crankshaft timing gear has marks on it. The one closest to the passenger side is a single yellow paint dot (I enhanced it in the pic). It should align with the single line on the belt.

The other mark on the gear should fall BETWEEN the pair of two lines on the belt.
 

Attachments

  • Timing Belt Camshaft Alignment.jpg
    Timing Belt Camshaft Alignment.jpg
    136.5 KB · Views: 2,513
Last edited:
Timing Belt Top Cam Gear Alignment Pics

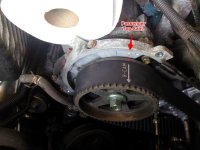
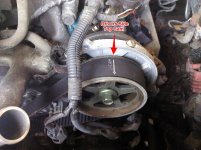
Here are pics of the timing belt alignment on the top Cam Gears. Note that 'Left' 'Right' and forward arrows are labeled from the perspective of the DRIVERS SEAT.

Passenger Top Cam.jpg

Drivers Top Cam.jpg

This left one gave some trouble. It took the two of us to hold the belt off the edge of the gear while the other turned the gear with a wrench on the bolt, then slide the belt on the gear. It's easier if the belt is not on all the tension/idler pulleys yet.

Just be ready as it turns clockwise, it will "spring" after a point, which is just enough to smash one's fingers against the battery housing. Twice. It draws blood the second time ;)
 

Attachments

  • Passenger Top Cam.jpg
    Passenger Top Cam.jpg
    134.5 KB · Views: 943
  • Drivers Top Cam.jpg
    Drivers Top Cam.jpg
    137.2 KB · Views: 1,133
Last edited:
Break this bolt, don't worry!

Pay close attention to what I'm about to tell you. It will save you about an HOUR of time!

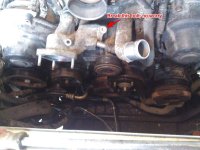
Go ahead and BREAK THIS BOLT if it is stuck! Do not worry about using an easy out, heat, left handed drill bits, precision center drilling to proper diameter for a through bolt and nut, using care to cover the holes and police all your shavings, etc.

Break this bolt.jpg

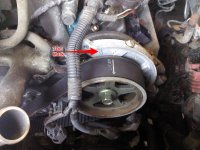
The new water pump REPLACES THIS PART!

Uhm...yeah...I did all the things I'm telling you not to do, then realized the new part replaces that bolt hole :yell: :clock:

As long as you have a replacement bolt (maybe someone can post the size?) don't worry about breaking it off, it's pretty soft.

There you go, now you may save yourself more than twice the time it took you to read this entire thread :D

Hope this helps the next guy.
 

Attachments

  • Break this bolt.jpg
    Break this bolt.jpg
    134.5 KB · Views: 873
TDC Alignment Mark

When you have the parts back on the timing belt areas, including the entire crankshaft assembly, but haven't put the top cam covers on yet, you can turn the crank with a wrench, aligning its timing marks with TDC ('0') and each cam should align with its TDC Alignment Mark. You can see the TDC mark in this pic of the Driver's side top cam gear, although the timing belt arrow is aligned with the installation mark (I reused the pic I had).

The arrow should be aligned with the TDC mark when the crankshaft is in the TDC position (not the way it is in the pic). I didn't have a pic of that, so spelling it out.

TDC Driver Cam Mark.jpg

If BOTH cams are not aligned with the belt and TDC marks after at least one full rotation, then STOP! It MUST be corrected before continuing!

Hope these pics are helpful.
 

Attachments

  • TDC Driver Cam Mark.jpg
    TDC Driver Cam Mark.jpg
    136.3 KB · Views: 1,527
Last edited:
Big Thanks!

Finally, a BIG THANKS to my buddy who helped me with this huge job! As a matter of fact, I ended up being the helper most of the time so not to disrupt his routine.

I treated for breakfast, lunch, Mountain Dew, music, and even picked him up in the am and took him back in the eve.

It's better to have the engine warm when removing bolts and parts, so this worked well.

Besides, being his ride home is great incentive to make sure we get it done correctly, else it's quite the walk for both of us! :laugh:

I know buddies don't keep score, but I owe him big time for this! It was definitely a two-person job!
 
Driveshaft Clunk fix, lube tips

I pulled my driveshaft off today to degrease, clean, regrease and reassemble the propeller shaft as suggested by others to eliminate (hopefully!) the driveshaft clunk problem of the 4th Gen 4Runners.

Here are a few tips for anyone wanting to do this.

1. I removed just the back flange bolts and gently tapped the flange with a hammer to loosen it.

2. Put a dolly or something on the floor under the driveshaft, just in case it drops. You do NOT want to damage the splines.

3. I had marked the front and rear of the driveshaft and wrote numbers on the driveshaft for the bolts. As I removed the bolts, I laid them on the floor and wrote 1, 2, 3,4 on the floor with a grease pen. It'll wipe off.

4. If you put your driveshaft on a pair of jackstands, with the non-splined end lower, it is easier for the brake cleaner to drain and you can easily rotate it to get at all the splines. Be sure to spray up inside the shaft to get all the crap out.

5. I left the front universal and driveshaft section on the vehicle. It requires a key in the ignition and Neutral to rotate, so be sure to mark it and the rear, too. I sprayed it with brake cleaner while on the vehicle and let it drain into a thin greasy mess on the floor that I then had to cover to lay over top and keep working. I wrapped a screwdriver handle with a lint free cloth and stuck it inside the splines to clean it out well.

6. I greased the rear splines with a grease gun, using a small screwdriver to push some back into the splines and used a grease needle (used for greasing CV Boots) to get grease back into the splines.

7. I stuck the grease hose into the front female splines and did my best to get it around, using the same screwdriver handle (without rag) to pack the grease all around into all the splines. I also used some 600 grit emery cloth to take some rust buildup off the outside of the front stubby part of the shaft, where the seal from the rear section will ride- just in case it was sticking there, too

8. Make sure you take the time to throughly grease the universals and work them around a bit and add just a bit more grease. My rear universal had one side of the universal that didn't grease evenly until after working it around a bit. Be sure to wipe off extra grease that squeezes out of the caps. Do the same with the front. It's much easier with the driveshaft off (I set the end of the shaft on the top of the gas tank to get good access to the zerk)

9. When reassembling the driveshaft, it helps to remove the grease zerk on the front (where the driveshaft is greased, NOT the universal). This allows grease to push out of the hole.

10. I found the driveshaft wouldn't compress enough to reinstall on the rear flange, so I put a floor jack under the rear hitch and jacked up the body several inches. If you keep the universal side of the flange angled enough to get the center of the driveshaft side over the center bolt of the differential side of the flange, you can then GENTLY tap it a bit to help it slide into place. If you meet more than minimal resistance, STOP. You don't want to break or gouge anything.

Be sure to reinstall the front zerk, tighted the rear flange bolts and grease the front zerk.

Overall impression of this job? Probably a '3' on a scale of 1-10 because of the specialty tools needed.

1. Impact air gun for the bolts
2. Floor Jack
3. Jack Stands
4. Pliers
5. Pistol grip grease gun (MUCH easier one hand operation for tight spots)
6. Brake Kleen spray
7. 14mm socket, knuckle joint, extension, 14mm box wrench
8. Flat screwdriver with correct handle diameter ;)
9. Paint pen to mark parts
10. Optional grease gun
11. Creeper and/or cardboard for floor
12. Headlamp and/or flashlight
13. Grease

Hope this is helpful.
 

Members online

Forum statistics

Threads
278,316
Messages
3,554,120
Members
248,016
Latest member
Advally Service

Trending content

Back
Top