Modifying the Limited Bumper

Thanks all. What I'm seeing on here is basically the same that others have done so that's confirmation enough. Love the rig pics!


I ended up trimming my bumper to fit a modified SSO/AA bumper. In the limited mod thread. Don't know if that's what you're looking for or not.
 
I guess you could cut it a bit higher if you wanted to lose the parking sensors but I did not

Hey [MENTION=143314]tm965[/MENTION], curious if you can explain what you did with the bottom of the bumper after you trimmed it? Did you just leave it hanging or did you re-secure it? [MENTION=336]03_4x4Runner[/MENTION] mentioned constructing a few brackets. If you did create new brackets, how many did you use? If you didn't create brackets do you have issues with the bumper not being secured/flapping?

Also, did you have to trim the fender liner? How did you re-secure it and was your cut aggressive enough to expose the washer fluid reservoir?

Sorry for all the questions, but I'm struggling to find information on trimming the Limited bumper. Everything out there is about the SR5/TRD Pro bumpers.

Thanks!
 
Hey [MENTION=143314]tm965[/MENTION], curious if you can explain what you did with the bottom of the bumper after you trimmed it? Did you just leave it hanging or did you re-secure it? [MENTION=336]03_4x4Runner[/MENTION] mentioned constructing a few brackets. If you did create new brackets, how many did you use? If you didn't create brackets do you have issues with the bumper not being secured/flapping?

Also, did you have to trim the fender liner? How did you re-secure it and was your cut aggressive enough to expose the washer fluid reservoir?

Sorry for all the questions, but I'm struggling to find information on trimming the Limited bumper. Everything out there is about the SR5/TRD Pro bumpers.

Thanks!

I trimmed the bumper while it was on the vehicle so there was no need to resecure it. It is still very solid and it does not move at all. After trimming I used some cowled edge trim on the cut areas to give it a more finished look. I’ve taken the bumper and trim to the speed my tires are rated for and everything stays put.

You will need to trim your fender liner to an extent. Your washer fluid resevoir will be exposed from the side but not the front—I hit mine with a bit of black paint so it blended in and you don’t even notice it now.

The only downside to trimming the limited bumpers are several metal trim brackets that extend down from the crash bar. Once you’ve unscrewed the trim from then you’ll either need to bend them up or cut them off. You can leave them but the don’t look great when looking at the vehicle from the side. You won’t be able to see them looking at the vehicle head on. Hope this helps
 
Hey [MENTION=143314]tm965[/MENTION], curious if you can explain what you did with the bottom of the bumper after you trimmed it? Did you just leave it hanging or did you re-secure it? [MENTION=336]03_4x4Runner[/MENTION] mentioned constructing a few brackets. If you did create new brackets, how many did you use? If you didn't create brackets do you have issues with the bumper not being secured/flapping?

Also, did you have to trim the fender liner? How did you re-secure it and was your cut aggressive enough to expose the washer fluid reservoir?

Sorry for all the questions, but I'm struggling to find information on trimming the Limited bumper. Everything out there is about the SR5/TRD Pro bumpers.

Thanks!
I did not trim as much as TM965 so my washer fluid reservoir is not exposed.
I did make small brackets to support the bumper and cut off the low hanging brackets tm965 talked about. My advise is to cut off a little at a time and see what it looks like. Once it is cut you are committed to it. I do not know how many brackets I made. I just kind of trimmed and fabricated as I went along to get the results I wanted. It has been long enough ago that I do not remember all the details. If I ever wreck and need a new bumper an auto body shop would go nuts trying to figure out how to repair it since some of the factory mounts are cut off or modified.
 
Finished my chop and also worked on de-chroming over the weekend.

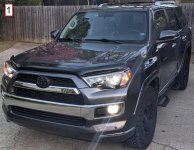
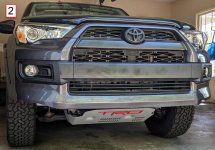
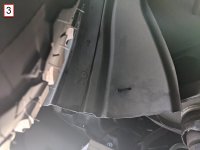
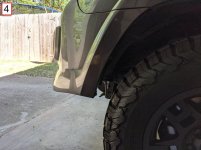
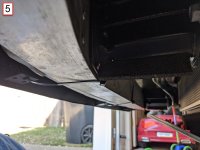
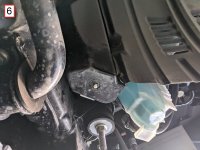
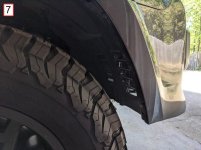
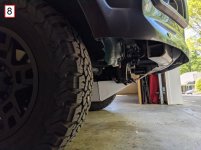
For the chop I chose a line that was not too aggressive. Starting from the fender I drew a line ~1/2 inch below the 2nd lowest fender bolt. I came down at a slight angle to completely remove the lower chrome on the bottom side of the bumper then had to come down at a little sharper angle to not expose too much of the crash bar. Then came straight across the lowest ridge that is also just below the bottom of the crash bar. I think it turned out really well. I used a small rotary tool with a metal cutting disc and although it created more heat the greater control was better than using my angle grinder. I was able to clean up the cut using various rotary tools - sanders, flapper wheel and polishers. The edge is really clean from straight on and even looking underneath it's really clean - no door trim required in my opinion. You can see the crash bar slightly on both sides but only if you are way back or squat down. If it bugs me too much I'll paint black later. You can barely see the washer reservoir from the side so I'll probably leave as is as well. For the fender liners I trimmed straight across and secured with 1 zip tie (1 per each fender liner) closest to the engine since on the outside I retained the 2nd lowest fender bolt and clip. For the lower portion of the front bumper I used 3 corner braces and very large zip ties that go around the crash bar. I spray painted the corner braces black and secured to the bumper using JB Weld. It likely didn't need it but I was worried about the styrofoam coming out in between the front bumper and the crash bar. The look is much more aggressive and really exposes the skid plate, front tow clips and front tires. No flapping or rubbing when driving at high speeds.

For the dechrome I kept everything in place and masked everything off. My last can of plasti-dip was defective (spewing drops out the base of the nozzle) so I ended up having to stop before I was fully complete. The result is some splotchiness in the look. Not sure if the splotchiness is because of lack of coats or maybe I didn't apply correctly or maybe it was too humid outside (I live in Georgia, humid almost all the time). Even with splotchiness I think it looks better! I ordered some more plasti-dip (I used Plasti-dip black glossy and can't find at any local stores) and will fix next time I have a free afternoon and good weather. I also dechromed the chrome piece that stretches across the entire rear bumper. Splotchiness there too but not as evident as the front pieces. Oddly the fog lights aren't splotchy at all.

Images:
1. Front Before
2. Front After
3. Driver Size Fender Zip Tie
4. Driver Side Fender
5. Front Bumper to Crash Bar Corner Braces and Zip Ties
6. Passenger Side Fender Zip Tie
7. Passenger Side Fender
8. Passenger Side Washer Fluid Reservoir
 

Attachments

  • 1. Before.jpg
    1. Before.jpg
    125.2 KB · Views: 7,277
  • 2. Front.jpg
    2. Front.jpg
    108.3 KB · Views: 8,077
  • 3. Driver Side Fender Zip Tie.jpg
    3. Driver Side Fender Zip Tie.jpg
    92.6 KB · Views: 7,267
  • 4. Driver Side Fender.jpg
    4. Driver Side Fender.jpg
    90.2 KB · Views: 7,208
  • 5. Front Bumper to Crash Bar Corner Braces and Zip Ties.jpg
    5. Front Bumper to Crash Bar Corner Braces and Zip Ties.jpg
    109.6 KB · Views: 6,926
  • 6. Passenger Side Fender Zip Tie.jpg
    6. Passenger Side Fender Zip Tie.jpg
    124.8 KB · Views: 6,942
  • 7. Passenger Side Fender.jpg
    7. Passenger Side Fender.jpg
    85.8 KB · Views: 6,929
  • 8. Passenger Side Washer Fluid Resevoir.jpg
    8. Passenger Side Washer Fluid Resevoir.jpg
    86.3 KB · Views: 6,938
Thank you guys for taking the plunge and cutting up your Limited bumpers and taking some pictures.

I didn't realize there were no options for front bumpers for the Limiteds. I am going to be getting the Warn low profile winch bumper, and trimming the front (and possibly rear) plastic bumper... so it doesnt get ripped off during trail use. Because she is certainly going on some trails.

btw, I picked up a 2015 Limited a month ago.

Not new to Toyota, but after owning a Jeep wrangler, I am glad to be back to Toyota.

Cheers!
 
Finished my chop and also worked on de-chroming over the weekend.

For the chop I chose a line that was not too aggressive. Starting from the fender I drew a line ~1/2 inch below the 2nd lowest fender bolt. I came down at a slight angle to completely remove the lower chrome on the bottom side of the bumper then had to come down at a little sharper angle to not expose too much of the crash bar. Then came straight across the lowest ridge that is also just below the bottom of the crash bar. I think it turned out really well. I used a small rotary tool with a metal cutting disc and although it created more heat the greater control was better than using my angle grinder. I was able to clean up the cut using various rotary tools - sanders, flapper wheel and polishers. The edge is really clean from straight on and even looking underneath it's really clean - no door trim required in my opinion. You can see the crash bar slightly on both sides but only if you are way back or squat down. If it bugs me too much I'll paint black later. You can barely see the washer reservoir from the side so I'll probably leave as is as well. For the fender liners I trimmed straight across and secured with 1 zip tie (1 per each fender liner) closest to the engine since on the outside I retained the 2nd lowest fender bolt and clip. For the lower portion of the front bumper I used 3 corner braces and very large zip ties that go around the crash bar. I spray painted the corner braces black and secured to the bumper using JB Weld. It likely didn't need it but I was worried about the styrofoam coming out in between the front bumper and the crash bar. The look is much more aggressive and really exposes the skid plate, front tow clips and front tires. No flapping or rubbing when driving at high speeds.

For the dechrome I kept everything in place and masked everything off. My last can of plasti-dip was defective (spewing drops out the base of the nozzle) so I ended up having to stop before I was fully complete. The result is some splotchiness in the look. Not sure if the splotchiness is because of lack of coats or maybe I didn't apply correctly or maybe it was too humid outside (I live in Georgia, humid almost all the time). Even with splotchiness I think it looks better! I ordered some more plasti-dip (I used Plasti-dip black glossy and can't find at any local stores) and will fix next time I have a free afternoon and good weather. I also dechromed the chrome piece that stretches across the entire rear bumper. Splotchiness there too but not as evident as the front pieces. Oddly the fog lights aren't splotchy at all.

Images:
1. Front Before
2. Front After
3. Driver Size Fender Zip Tie
4. Driver Side Fender
5. Front Bumper to Crash Bar Corner Braces and Zip Ties
6. Passenger Side Fender Zip Tie
7. Passenger Side Fender
8. Passenger Side Washer Fluid Reservoir

That's the best looking trimming of the Limited front bumper I have seen yet. I am in the market for a new 4Runner and want the Limited for various reasons but hate the front end and lack of off road clearance as compared to the standard front bumper. Can you estimate how much clearance you have as compared to the standard bumper ie-did you get as much clearance as the standard bumper porvides? I assume in the center you have just as much clearance since you cut just below the front crash bar.
 
That's the best looking trimming of the Limited front bumper I have seen yet. I am in the market for a new 4Runner and want the Limited for various reasons but hate the front end and lack of off road clearance as compared to the standard front bumper. Can you estimate how much clearance you have as compared to the standard bumper ie-did you get as much clearance as the standard bumper porvides? I assume in the center you have just as much clearance since you cut just below the front crash bar.

Sorry for taking so long to respond. I believe I have the same clearance as the standard SR5 models because as you mentioned the crash bar is in the same place on both vehicles and the way I trimmed it I'm as far down as you can chop without exposing the crash bar. I might actually have a little more clearance, but if it is more it's not much.
 
Just wondering what the purpose of the bumper trimming was for? For ground clearance or wheel clearance?

I was new to 4Runners last year. I originally purchased an SR5 Premium but ended up getting rid of it and purchasing a Limited model. For the SR5 I had already purchased the TRD Pro skid plate, but on a Limited you can't see the skid plate because of how far down the front bumper hangs. So more than anything the look is what I was going for, but certainly clearance has been a benefit. I also mounted all terrain tires on my Limited and those rubbed the fender liners. When chopping the bumper I also chopped the parts of the fender liner that were rubbing; however, I had already fixed the rubbing issue by repositioning the fender liner, which didn't require trimming, only relocating the fender liner attachment points slightly forward.
 
Where did you guys get the TRDP style front end from? I have a buddy with a limited and he's looking to do the swap to a TRDP style front end.
 
I was new to 4Runners last year. I originally purchased an SR5 Premium but ended up getting rid of it and purchasing a Limited model. For the SR5 I had already purchased the TRD Pro skid plate, but on a Limited you can't see the skid plate because of how far down the front bumper hangs. So more than anything the look is what I was going for, but certainly clearance has been a benefit. I also mounted all terrain tires on my Limited and those rubbed the fender liners. When chopping the bumper I also chopped the parts of the fender liner that were rubbing; however, I had already fixed the rubbing issue by repositioning the fender liner, which didn't require trimming, only relocating the fender liner attachment points slightly forward.

I see, what size tires, rims and offset are you running ?
 
I see, what size tires, rims and offset are you running ?

I have the TRD Pro rims running stock tire size 265/70/17s BF Goodrich KO2s. With these I had to push back the fender liners and make a new mounting hole about 1/2 inch back due to rubbing at full lock in reverse. No trimming required.
 
2012 Limited

Any updates on front bumper modifications to the 4runner Limited?
Im trying to figure out how to accommodate a low profile bumper and winch like the C4 that is made for the 2014 plus models
 
Check out Dark Runner Overland

Just seeing this thread now. I cut my Limited 2014 bumper a few years back and have loved the look as it has evolved over time.

I currently sell a DIY kit on Dark Runner Overland - Overlanding, Outfitters if you're brave enough to grab the dremel and go to town. If not, I'm working with a few dealerships to be able to get the price on a color-matched Limited bumper that I will cut to my specs for any customer that wants a simple plug-n-play option. In the meantime, checkout the website and my IG [MENTION=52345]Darkrunner[/MENTION]overland for more pics.

Thanks!

Dan
 
Last edited:
Just seeing this thread now. I cut my Limited 2014 bumper a few years back and have loved the look as it has evolved over time.

I currently sell a DIY kit on Dark Runner Overland - Overlanding, Outfitters if you're brave enough to grab the dremel and go to town. If not, I'm working with a few dealerships to be able to get the price on a color-matched Limited bumper that I will cut to my specs for any customer that wants a simple plug-n-play option. In the meantime, checkout the website and my IG [MENTION=52345]Darkrunner[/MENTION]overland for more pics.

Thanks!

Dan

Any pictures? Didn't see anything on the site
 

Members online

Forum statistics

Threads
278,308
Messages
3,554,057
Members
248,016
Latest member
Advally Service

Trending content

Back
Top