momo.75's '03 Sport 4.7L V8 Build

Did a thing....lol

jglOAuG.jpg
 
7PjUpDX.jpg


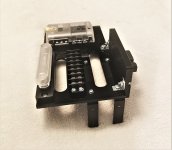
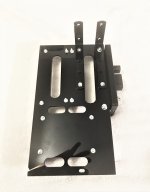
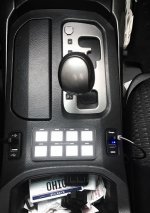
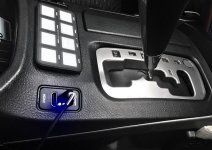
A few weeks ago i worked on mounting the SwitchPros switch panel on my center console. I was really please with the results. Leave it to @TiN to come up with an even better solution. He sent me one of his prototype mounts for the SP unit. I received the mount, backing plate, threaded rods and nuts.

1cW4Y0F.jpg

LvNf1tf.jpg


Mounting couldn’t be any easier. Just pop out the three blanks in the console, put the switch in the mount with the threaded rods installed. Place the mounting plate on the underside of the console piece amd thread the nuts. It fits the contours of the console perfectly. Go check out [MENTION=29196]solid[/MENTION]shiftconcepts for some of his other cool pieces.

WsX27yh.jpg


BRrTbK8.jpg


lMYuRWc.jpg


KPFEqA6.jpg


3DGlGTw.jpg


mootfRg.jpg


2XpzHq5.jpg


Thanks for the amazing work Trevor. Check out his site for some other cool pieces. solidshiftconcepts.com

Momo,

I am also setting up a Switch Pro (SP9100,) and after looking throughout the whole toyota-4Runner.org looking on how people setup their SPs in a 4Runner 4th Generation, I came across your posting. And, I have a few questions regarding your setting.

1) What holes did you use to pass the controller and trigger wires thru the firewall?

2) How many trigger wires did you passed thru? I understand the ignition wire does not have to pass thru the firewall, at difference from the 5th Gen, ours has the ignition fuse in the engine compartment.

I love what you have done to your rig, I've been closely following your blog for inspirations. I just pulled the trigger on the SP9100, and I love the way you set it on the center console!

3) Would you be able to take a few snap shots of that section of the setting?

Looking forward for your response
 
I appreciate that. We ran the wire from the controller through the firewall to the main unit. We just ran it through right above the pedals. I did run the positive wires for the side and rear lights through the cabin and through the firewall in the same location. For those lights we ended up making a grounding bar in the rear so we didn't have to run the negatives all the way forward. What part were you wanting pictures of?
 
I appreciate that. We ran the wire from the controller through the firewall to the main unit. We just ran it through right above the pedals. I did run the positive wires for the side and rear lights through the cabin and through the firewall in the same location. For those lights we ended up making a grounding bar in the rear so we didn't have to run the negatives all the way forward. What part were you wanting pictures of?


It's a great idea to make a ground bar in the back, instead of running ground wires all the way to the front.

I don't need pictures now. Your explanation clarified my concerns

Thanks!
 
If you have one of those Fish Tape things it makes it much easier to push it through the firewall. If you have any other questions feel free to reach out. I am not the best at wiring. I had a buddy help me with it all but I was there helping out so I remember most of what we did.
 
I made my own power tray in AutoCad and a laser cutter and this is what came out:
 

Attachments

  • IMG_4729.JPG
    IMG_4729.JPG
    103.2 KB · Views: 447
  • IMG_4732.JPG
    IMG_4732.JPG
    99.3 KB · Views: 462
  • IMG_4736.JPG
    IMG_4736.JPG
    102.7 KB · Views: 457
  • IMG_4738.JPG
    IMG_4738.JPG
    100.6 KB · Views: 436
I had to modified the design a couple times, since it did not fit well when I closed the hood. Soon, I will install the power tray, and follow your instructions to pass the wires through the firewall into the cabin. I'll post a few pictures once is installed
 
I had ordered some 3" decals through a special a while back but they were just a little too small. I just got some new ones in that are 3.5" tall. If interested shoot me a pm. $5 a piece shipped to lower 48

Z7kPrqY.jpg
 
Last edited:
I finally took the short amount of time to install my diff breather courtesy of [MENTION=109843]montijo505[/MENTION]. I really appreciate it. The easy to install Blais Bros Taco kit has been sitting on my work bench for a while. It has everything you need. Thanks man!

OWEF6yI.jpg
 
Last edited:
GA6IV82.jpg


VHF8vG1.jpg


Q96TWWr.jpg

Santa brought me a pair of STEDI 7” Type-X Sport lights. The craftsmanship of these lights is second to none. Starting with the top notch packaging i knew they had to be good.

9o7KvgB.jpg


The only issue i had was the mounting space on the top of my Demello Offroad bumper. Because the grill on the 4th gen opens with the hood i had to reverse the mounting brackets to push them out a little from the grill.

JH990jb.jpg


n3DZRZv.jpg


a029JPI.jpg


They are complete secured with the STEDI Anti Theft nuts and bolts. I will try to get some output pics but from what I have tried so far it doesn’t do them justice.

jgbifu7.jpg


px07pAz.jpg
 

Members online

No members online now.

Forum statistics

Threads
278,316
Messages
3,554,124
Members
248,016
Latest member
Advally Service

Trending content

Back
Top