Mountain State Overland - 2015 TE 4Runner Overland Build

stock UCAs? :confused:

5xtDarwOa1mDZoWLfIQ.gif
 
What did you guys use for the snorkel? I saw it on the 4runner in the video but it wasn't covered in the build.

I like the build fwiw. Very nice. Hope y'all are planning on a trip to Overland Expo this fall.
 
Definitely looking forward to your take on the BP-51's. Drive the crap out of them so we can all see what they're capable of! :bravo:

We just got back from filming Season 3 content in New England and the BPs were a huge success. We had at least 6 people drive the 4Runner on over two weeks on trails and gravel and everyone concluded that the 4Runner soaked up everything we could through at it.
 
6N1A5616.JPG
092A0372.JPG


Phase 1 – Tires

Those four round things everyone hates to buy, but loves 'em once their mounted.

Since they’re still fairly new to the market, we opted to install BFGoodrich KO2s on the 4Runner. The KM2s on the Tacoma faired very well last year, but we’ll be pounding a bit more pavement this year and feel like the KO2s will be a perfect fit.

We picked 285/70R/17s to mount the factory Trail Edition wheels and added Spidertrax spacers to bump the tires out a bit. I do have some mixed thoughts on spacers; I like the look but – 1) wheel spray > don’t waste your time cleaning your truck EVER; 2) width > I’ve seen where wide vehicles fail on tight trails in WV and prefer the functionality of a narrow track; 3) rubbing > although not that bad, we did have to make some trims and adjustments.
Back to the tires…

So with just under 7K miles on the KO2s a review isn’t warranted; however, I can comment that wet and road handling are very predictable. We are running the tires at the tire pressure recommended for the T4R5 so we can do an honest evaluation of tread wear and regular performance. On the trail and gravel, we’ll likely air down further.

A good all-terrain tire paired with recovery equipment is essentially all you need and like the KO, I’m optimistic that the KO2 may be the ultimate dual sport tire.

Next up, dual batteries and power management…
 
We just got back from filming Season 3 content in New England and the BPs were a huge success. We had at least 6 people drive the 4Runner on over two weeks on trails and gravel and everyone concluded that the 4Runner soaked up everything we could through at it.

I think I need some BP's now.
 
Phase 2 - Dual Batteries and Power Management

We charge equipment continuously and most of our electronics demand power 24 hrs. a day. Heavy loads on a single battery isn't an option thus we opt for two batteries.

So there's a "starting" battery and a "house" battery. The "starting" battery is exactly that - power reserved for starting and running the truck and factory electronics. The "house" battery is essentially an accessory battery; everything aftermarket you'll install. With exception to the winch, our house battery will power the fridge, lifts, 3 full time USB and 12V outlets, communications and an air compressor.

battery2.jpg
battery3.jpg


I custom built my own dual battery install in the Tacoma last year with a Trail Gear Battery Cage. For the 4Runner, we opted for a kit. Its a bit tight under the hood of the 5th Gen and there obvious space for a second battery behind the passenger headlight but I wasn't willing to fab something with our Season 3 shoot closing in. At the time of purchase, the best option we could find was the dual battery kit from ShrockWorks.

ShorckWorks has a well thought out kit that reuses various parts an pieces that come with the truck. Everything is well documented in the instructions and to be honest, the hardest part of the install is separating factory harness plugs, ha! It does take a bit of time but again, it's well thought out and very clean.

Next, we connected the batteries with a DFNA Dual Battery Isolator Kit. There's some super pricey options out there and some very simple DIY solutions but the DFNA is the best of both worlds in my opinion. The DNFA Kit comes with your wires and isolator but you still need a fuse block and fuse panel. I rely on BlueSea for my fuse accessories since they have a solid reputation in the marine industry.

So here's the general setup - starting battery to isolator > isolator to house battery > house battery to fuse block > fuse block to fuse panel. Simple right?

battery4.jpg
battery1.jpg


The DNFA Smart Isolator allows two batteries to be charged at the same time. When the engine is started and the start battery reaches 13.3 volts, the engages, allowing two battery banks (start and house) to be charged simultaneously. When the voltage drops below 12.8 volts (i.e. the engine is stopped), the SBI disengages, separating the batteries. This system eliminates the possibility of draining the start battery and protects sensitive electronic equipment powered from the house battery from harmful engine start up spikes.

So there's no external power monitor with fancy LEDs and such but you can always install that if you feel like you need it. My general rule is, "there's power OR there's no power."

With everything setup in the 4Runner under the hood, we then routed all of the fun stuff through the firewall and even installed a second fuse panel underneath the rear seat for add-ons in the back. There's definitely room for adding more but we need some seat time in the 4Runner before we install a bunch of stuff we don't need.

Next up, the drawers...
 
tires

what size tires did you throw on those? I need a lift and some bigger tires but i still need to decide how big i want to go. that looks sharp!
 
what size tires did you throw on those? I need a lift and some bigger tires but i still need to decide how big i want to go. that looks sharp!

Check the previous page...

Phase 1 – Tires

Those four round things everyone hates to buy, but loves 'em once their mounted.

Since they’re still fairly new to the market, we opted to install BFGoodrich KO2s on the 4Runner. The KM2s on the Tacoma faired very well last year, but we’ll be pounding a bit more pavement this year and feel like the KO2s will be a perfect fit.

We picked 285/70R/17s to mount the factory Trail Edition wheels and added Spidertrax spacers to bump the tires out a bit. I do have some mixed thoughts on spacers; I like the look but – 1) wheel spray > don’t waste your time cleaning your truck EVER; 2) width > I’ve seen where wide vehicles fail on tight trails in WV and prefer the functionality of a narrow track; 3) rubbing > although not that bad, we did have to make some trims and adjustments.
Back to the tires…

So with just under 7K miles on the KO2s a review isn’t warranted; however, I can comment that wet and road handling are very predictable. We are running the tires at the tire pressure recommended for the T4R5 so we can do an honest evaluation of tread wear and regular performance. On the trail and gravel, we’ll likely air down further.

A good all-terrain tire paired with recovery equipment is essentially all you need and like the KO, I’m optimistic that the KO2 may be the ultimate dual sport tire.

Next up, dual batteries and power management…
 
Been waiting anxiously for more season 3 action...! Specifically how those BP-51s perform in a real world setting.
 
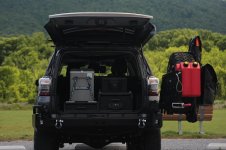
Phase 2 - Drawers

Hey guys. Sorry for the delay with the build posts. We have been busy getting season 3 produced and pushed out and we certainly hope you're enjoying it so far. We're slowly getting back into the groove of things and will be pushing out more updates on the T4R5 so stay tuned. Here is a bit about our drawer system.

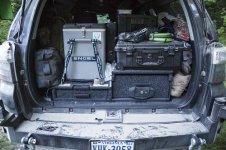
For season 3, we went with the Outback Solutions dual drawer setup from ARB. Originally, we floated around the idea of using three drawers, 2 Roller drawers and 1 Low level roller floor drawer however after physically placing the drawer set up in the T4R5, it turned out that spacing behind the backseat would become an issue. After much thought, we opted to ditch the second roller drawer and went with 1 of each.

The install was pretty straightforward..four holes in through the tailgate sealed from the outside with the supplied rubber padded plates. Lining up the drawers actually was more time consuming than the actual install. The drawers are built with space saving in mind hence the connector in the middle which minimizes wasted space between the drawers. For the connector piece, we actually ended up completely disassembling the drawers according to the supplied instructions and stripping them down to the framework in order to run the connecting bolts through..that was the time consuming piece.

Now onto the drawers themselves. As stated before, the drawers seemed like they were designed and built with space saving in mind. Due to that fact, we quickly found out that space saving also meant sacrificing storage space. The roller drawer proved to be a bit bulky at times with the drawer consuming a little more than an inch on each side on the inside of the drawer housing. With a minimalistic approach, we were definitely able to fit a number of items that we needed into the bigger roller drawer but finding a practical use aside from the roller floor on the smaller drawer proved to be challenging. (Ended up housing a compressor hose, a laptop, and a few other low profile items)

All in all the Outback Solutions storage system definitely served its purpose but did not WOW me by any means. I do wish I had more drawer space, we may have to add storage next year.
 

Attachments

  • 092A1929.jpg
    092A1929.jpg
    75.5 KB · Views: 1,562
  • JPR_160603-8900.jpg
    JPR_160603-8900.jpg
    128.2 KB · Views: 5,459

Members online

Forum statistics

Threads
278,316
Messages
3,554,113
Members
248,016
Latest member
Advally Service

Trending content

Back
Top