I decided to start last weekend on some maintenance that had been put off for a while. This included:
Timing Belt, Spark Plugs, Wires, Valve Cover Gaskets, Spark Plug Seals, Water Pump, Thermostat, PCV Valve.
First of all thanks to all the previous posts on the normal timing belt steps and tips, I won't bring up the same things but just note a few helpful and troubles to try and avoid.
Disasembly went well up through the crankshaft pulley removal. I am not a welder so I attempted to make the special tool out of 2x4 as some others have done.
First Note: I do not advise usng this approach. The first 2x4 I used I split lengh wise due to the extremem force needed and probably some imperfection in the wood. The second 2x4 I made worked great up until the point where I sheared off one of the drill bits in the pulley hole.... :dammit:
Second Note: Do not use drill bits for this job, the are not made to take the force from side to side. During this process I also ended up shearing off 2, 1/4 inch drive extensions while wrestling with the 2x4's.
Third Tip: Do not use 1/4 inch drive tools for this part, go get a good 1/2 inch drive socket and breaker bar.
Fourth Tip: While you are monkeying around with all this stuff you run a good chance of beating the heck out of your radiator. Do yourself a favor and remove it ahead of time to give more room.
With the sheared off drill bit in the hole I didn't know what to do so I attempted to drill it out and use a Grabbit to attempt removal. These methods really didn't work and I instead resorted to using the engine starter with the 1/2 inch driver breaker bar. I thought this was crazy but I set the breaker bar against the drivers side frame rail which is below the battery. It took 2 bumps on the starter but worked like a champ....
With the pulley out, it was easy to punch out the sheared off bit from the backside of the pulley.
The next difficult area was the compression of the tensioner. I didn't have the Snap-On tool so I removed the A/C compressor and attempted to remove the tensioner as well. I don't know how anyone has done it without removing the A/C Compressor bracket and after looking at it I decided to use a C-Clamp to try to compress it.
If you use a 9 inch, traditional style screw C-Clamp you can put the fixed end half way down the A/C Compressor bracket and put the swivel end directly on the pin for the tensioner. This worked great, just be careful to go slow. The only trick was that the pin in the tensioner spins around a bit so you have to rotate it slightly counter clockwise before you start so that the hole ends up where you want it and not past the point where you can access it.
Timing belt install wasn't too bad. The best advice here is to follow the FSM and start from the LH camshaft and work your way clockwise, finishing on the tensioner.
Camshaft re-install was the next challenge. I wasn't about to use the starter to re-install the bolt so I was forced to look for new tool opportunities. I ended up going to Home Depot and buying a length of 1.5 inch square steel channel and a length of 3/8 inch steel dowel. Take it from me, this is the best way to go. Thanks to the guys at 4x4Wire (Toyota Maintenance: 3.4L V6 Timing Belt Replacement) for the dimensions for the holes and the general idea for the tool.
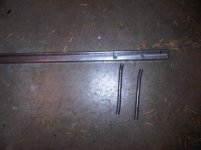
I took the steel channel and a Rigid brand 7/16 inch steel bit, (I used 7/16 to give myself a little wiggle room...) measured the holes to the 3.27 inch outside width and drilled the holes. I cut lengths of the 3/8 inch steel dowel with a hack saw and used the tool to install the camshaft pulley by just putting my socket between the tool and the pulley.
This method worked well, the only issue I had was that the dowels still bent a bit so I switched them around to avoid any more break-offs. (you can see the bent ends in the picture...)
The last problem I had was the spark plug tube seal gasket install...
Those are a pain, pop them out with leverage I used a large flat blade screwdriver and twisted it under them to work them out.
For the re-install I did not bend the underside valve cover gasket tabs away but wedged the seals under the tabs and then used the combination of a hammer and again the C-Clamp to work them in. Biggest PITA ever for something so simple....
Anyway, this was my experience. Not too tough but hopefully you can avoid some of my mistakes!
Timing Belt, Spark Plugs, Wires, Valve Cover Gaskets, Spark Plug Seals, Water Pump, Thermostat, PCV Valve.
First of all thanks to all the previous posts on the normal timing belt steps and tips, I won't bring up the same things but just note a few helpful and troubles to try and avoid.
Disasembly went well up through the crankshaft pulley removal. I am not a welder so I attempted to make the special tool out of 2x4 as some others have done.
First Note: I do not advise usng this approach. The first 2x4 I used I split lengh wise due to the extremem force needed and probably some imperfection in the wood. The second 2x4 I made worked great up until the point where I sheared off one of the drill bits in the pulley hole.... :dammit:
Second Note: Do not use drill bits for this job, the are not made to take the force from side to side. During this process I also ended up shearing off 2, 1/4 inch drive extensions while wrestling with the 2x4's.
Third Tip: Do not use 1/4 inch drive tools for this part, go get a good 1/2 inch drive socket and breaker bar.
Fourth Tip: While you are monkeying around with all this stuff you run a good chance of beating the heck out of your radiator. Do yourself a favor and remove it ahead of time to give more room.
With the sheared off drill bit in the hole I didn't know what to do so I attempted to drill it out and use a Grabbit to attempt removal. These methods really didn't work and I instead resorted to using the engine starter with the 1/2 inch driver breaker bar. I thought this was crazy but I set the breaker bar against the drivers side frame rail which is below the battery. It took 2 bumps on the starter but worked like a champ....
With the pulley out, it was easy to punch out the sheared off bit from the backside of the pulley.
The next difficult area was the compression of the tensioner. I didn't have the Snap-On tool so I removed the A/C compressor and attempted to remove the tensioner as well. I don't know how anyone has done it without removing the A/C Compressor bracket and after looking at it I decided to use a C-Clamp to try to compress it.
If you use a 9 inch, traditional style screw C-Clamp you can put the fixed end half way down the A/C Compressor bracket and put the swivel end directly on the pin for the tensioner. This worked great, just be careful to go slow. The only trick was that the pin in the tensioner spins around a bit so you have to rotate it slightly counter clockwise before you start so that the hole ends up where you want it and not past the point where you can access it.
Timing belt install wasn't too bad. The best advice here is to follow the FSM and start from the LH camshaft and work your way clockwise, finishing on the tensioner.
Camshaft re-install was the next challenge. I wasn't about to use the starter to re-install the bolt so I was forced to look for new tool opportunities. I ended up going to Home Depot and buying a length of 1.5 inch square steel channel and a length of 3/8 inch steel dowel. Take it from me, this is the best way to go. Thanks to the guys at 4x4Wire (Toyota Maintenance: 3.4L V6 Timing Belt Replacement) for the dimensions for the holes and the general idea for the tool.
I took the steel channel and a Rigid brand 7/16 inch steel bit, (I used 7/16 to give myself a little wiggle room...) measured the holes to the 3.27 inch outside width and drilled the holes. I cut lengths of the 3/8 inch steel dowel with a hack saw and used the tool to install the camshaft pulley by just putting my socket between the tool and the pulley.
This method worked well, the only issue I had was that the dowels still bent a bit so I switched them around to avoid any more break-offs. (you can see the bent ends in the picture...)
The last problem I had was the spark plug tube seal gasket install...
Those are a pain, pop them out with leverage I used a large flat blade screwdriver and twisted it under them to work them out.
For the re-install I did not bend the underside valve cover gasket tabs away but wedged the seals under the tabs and then used the combination of a hammer and again the C-Clamp to work them in. Biggest PITA ever for something so simple....
Anyway, this was my experience. Not too tough but hopefully you can avoid some of my mistakes!