Need Advice from Those Who Have Dropped Their Gas Tanks

Bluesky 07

Senior Member
Short version: Two shops each quoted ~$400 to install the fuel sending unit and fuel pump I will provide. I usually do repairs and mods myself but am uncertain about taking this one on. If you've dropped your truck's tank, do you feel it's worth paying a shop $400 to do it based on your experience? My truck does not have rust problems if that factors into your opinion. TIA.

Background & parts info: My fuel gauge has been acting up occasionally and is current reading 1/4 tank off. After watching the various symptoms described this video, I realized the issue is the fuel sending unit and it's been going on for years. I plan to replace the sending unit with an OEM part (p/n 83320 60440, ~$95 shipped from Cobb County Toyota's online parts store) and the fuel pump with a Denso unit (~$110 from Amazon with the strainer). (Debated replacing what appears to be a perfectly good fuel pump but at 15+ years/228K miles, and given the difficulty, decided to change it out.)

Bonus from the "Well, that's one way to go about it" file: These guys didn't want to drop the tank so they just did what Toyota should have to begin with and cut the access hole under the rear seat big enough to get the fuel pump assembly out from inside. Briefly considered this approach but decided to pass on taking a sawzall to the body.
 
Last edited:
Register to hide this ad
I haven't had to drop my tank, at least not on my 4Runner...but I have dropped many of them over the years, it's not too bad if you only have a small amount of fuel in the tank...but if you have a good bit of fuel in the tank and have to do it because the fuel pump has failed it's not a lot of fun only because of the weight and the fuel moving to get the tank off balanced.

That all being said I would do the work myself, but if I had to replace my 4Runner fuel pump/sender, I would go the cut the sheet metal route and not drop the tank, it would be so much easier, but I would use a angle grinder and a cut off wheel to do the cut out, but make sure I use a piece of leather to cover anything that the sparks could harm and avoid starting a fire, I would then use a bigger piece of galvanized sheet metal to replace the cutout piece and use some sealant and sheet metal screws to attach the new cover piece, by going this route you don't have as much to disconnect to replace to pump and sender, just the connections on top of the tank, no filler neck hose, straps, no jack to mess with etc., and not to mention the balancing act while lowering the tank even with a small amount of fuel in the tank.

A Sawall is just too hard to precisely control and could possibly cut other things you're not intending to cut.
 
Last edited:
I've dropped my gas tank in order to replace the tank straps which were rotting away. I also wanted to replace the upper trailing arms which is far easier to replace without the gas tank in the way.
Wasn't too bad. the worst part was figuring out the fuel line disconnects. I'd do it again if it meant saving $400 in labor costs. Having fuel level as low as possible helps a lot. I waited until I was down to an 1/8 tank of gas.
 
Last edited:
the only pain in the ass is getting the fuel lines off, a little wiggle wiggle and some strength and they should be off. i had to do it to my previous runner i had last year and wasnt that bad. but fixed the fuel gauge problem.
 
If you're in a rusty area, be prepared to replace the tank straps.

Also, plan to have an empty, or as empty as possible, fuel tank before beginning the work. It'll save your (or a tech's) back a lot of pain.

I don't know much about the parts you seek to replace, sorry.
 
Depends on what your time and frustration is valued at vs. how much money you have?

At the shop we use either our larger transmission jack (it's like a small table on a swing arm type deal) or our power train lift (big table on a scissor lift basically) for the larger Tundra tanks. It makes the job much easier and relatively pain free.

You could do it at home on jack stands with an empty tank... but I imagine it'd just be a pain in the ass to get at the strap bolts, retaining pins, and connectors that can't be easily reached from the wheel well or back seat access.

But I'd say that a new fuel pump while you're in there to replace the sender isn't a bad idea at that mileage. Get yourself a new fuel pump retainer ring (big plastic ring that locks the whole thing to the tank) and a new O-Ring. Also I would make sure to blow out all the dirt and debris and spray it down with soapy water to break the crud up and hopefully help it come loose a bit easier. We've seen them get rather stuck sometimes that they will break a piece off the fuel pump housing from binding up and then you're SOL and have to buy a ridiculously expensive plastic housing.
 
Short Version: Do it yourself, if you have some patience don’t cut the panel larger, drop the tank.

I dropped my tank to replace a bad fuel sending unit, here are my notes from the experience.

-Because my sender unit was bad, I didn’t know exactly how much gas was left in the tank when I dropped it. I highly recommend getting it as low as possible based on your ODO trip readings. This will make raising it back up so much easier
-Use a jack to first raise the tank up and relieve pressure from the straps, then disconnect hoses and straps.
-Be careful with the plastic ring you have to turn to get the fuel pump off, mine was slightly seized and I cracked it by trying to remove it with a hammer
-Disconnecting the gas vent tube is difficult due to the angle which it is at, be sure to familiarize yourself with how the connection locks/unlocks beforehand
-When re-connecting the gas vent tube on the right side of the tank, lubricate the o-ring before re-inserting it. On mine it was completely dry and I could not get it to go back in for the life of me. Finally added a small amount of oil to the o ring and it slid right in no problem.
-Jacking back up the tank is for sure the hardest part because the leftover gas will slosh around throwing the weight around. I did it by myself with a single jack after some cussing and repositioning.
 
A month ago opened hole with grinder and cutting wheel under the back seat big enough to remove fuel pump. ( Pump failed and I just filled gas the day before. I have an extra large fuel tank, 36.5 Gal. installed several months ago). Couldn't lower the tank by myself.
Changed fuel pump easy. Took me a while to plan the cutting, otherwise easy DIY job. I live in a 3rd world country and travel frequently to remote places. Give's me peace of mind that if needed now I can change that pump by myself in very short time .
 
A month ago opened hole with grinder and cutting wheel under the back seat big enough to remove fuel pump. ( Pump failed and I just filled gas the day before. I have an extra large fuel tank, 36.5 Gal. installed several months ago). Couldn't lower the tank by myself.
Changed fuel pump easy. Took me a while to plan the cutting, otherwise easy DIY job. I live in a 3rd world country and travel frequently to remote places. Give's me peace of mind that if needed now I can change that pump by myself in very short time .


Very interesting, and tempting to avoid dropping the tank. Do you happen to have a pic of the opening after cutting?

Also, for [MENTION=66389]BlackWorksInc[/MENTION] - looks like the fuel filter is a separate part from the fuel pump. Should I change it too? TIA
 
Last edited:
Very interesting, and tempting to avoid dropping the tank. Do you happen to have a pic of the opening after cutting?

Also, for [MENTION=66389]BlackWorksInc[/MENTION] - looks like the fuel filter is a separate part from the fuel pump. Should I change it too? TIA

Wouldn't hurt to snag one if it's not too expensive, you could probably spray some brake cleaner and clean the sock if you needed to; it just depends on how degraded it is. The last high mileage pump (was a fuel pump recall on a 2014 with like 120k on it) the sock was in good condition, so I don't think they degrade very much.
 
Very interesting, and tempting to avoid dropping the tank. Do you happen to have a pic of the opening after cutting?

I didn't take pics during, so this what I did (pics after the fact)

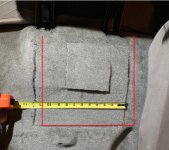
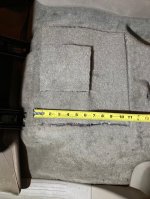
1-After lifting back seat first step was cutting de rug. Aprox 12 x 11 inch
(The inner small rug openning was done months ago to check tank connections using OEM hole.)
Instead of what I did, I suggest move de "U" cut 1 inch towards passenger side (more centric with metal cutting) and extend cut 1 inch toward the front to allow more metal cutting than what I did. (Red lines)
 

Attachments

  • Pic 1.jpg
    Pic 1.jpg
    135.1 KB · Views: 826
  • Pic 2.jpg
    Pic 2.jpg
    113.9 KB · Views: 811
Last edited:
Very interesting, and tempting to avoid dropping the tank. Do you happen to have a pic of the opening after cutting?

2- Disconnected battery neg.
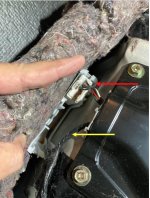
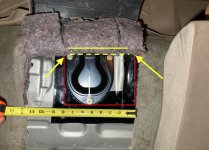
Removed semicircular OEM cover and disconnected 2 connectors. One under the rug towards the drivers seat (red arrow)and the other cable (yellow arrow) at the pump top. Separate yellow arrow cable from rubber piece and place away from cutting area. Pressing the clip under the curve metal remove rubber piece with cables and place on top of tank to avoid damaging when cutting metal. Don’t disconnect fuel hoses from the tank yet to avoid vapors. There is going to be plenty of sparks. Protect yourself. Cover all the upholstery sorrounding the cutting.
 

Attachments

  • Pic 3.jpg
    Pic 3.jpg
    105.4 KB · Views: 818
Very interesting, and tempting to avoid dropping the tank. Do you happen to have a pic of the opening after cutting?

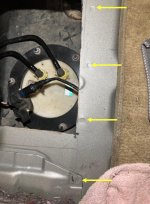
3-There is a limit to how much towards the cargo area you can place the transverse cut. There is a reinforcement under that I would not cut. The soldered points (visible from above, yellow arrows) and putting your hand trough the OEM hole will show you where it is. I made this horizontal cut saving the plastic nut that uses de oem cover (white arrow next pic). Length 8inch.
 

Attachments

  • Pic 4.jpg
    Pic 4.jpg
    108.5 KB · Views: 906
Very interesting, and tempting to avoid dropping the tank. Do you happen to have a pic of the opening after cutting?

4-Longitudinal cuts described with pic. Red lines are where the actual cuts are.
Now you cand bend the metal towards the front. I didn’t cut enough toward the front seat (yellow arrows) and half way pump removal I needed to bent further de metal flap and it bent poorly and now i cannot make a nice curve again of that bent for a better closure. Prolong cuts so it will not bend in an area involving the rubber piece for the cables ( better bend at solid yellow line) not as I did (dotted line). I think it will bend and close better.
 

Attachments

  • Pic 5.jpg
    Pic 5.jpg
    139.7 KB · Views: 338
Last edited:
Very interesting, and tempting to avoid dropping the tank. Do you happen to have a pic of the opening after cutting?

5-Clean metal fillings and top of the tank. Now removed clips of fuel line ( my system had no pressure), ring, 0-ring etc. Careful removing the pump, the sender's float needs gentle rotation of the pump while coming out of the tank.
Closed (temporary) with heavy duty gorilla type tape.
Above rug added old floor mat to increase pressure with the seat.

So far so good. Next step is changing the pump of the failed oem pump and keep it as spare. Hope it helps. BTW mine is a 2003 SR5 V6 2WD.
 
Last edited:
Thanks [MENTION=412480]CarlosV[/MENTION] - greatly appreciate the time you’ve taken to provide such useful information.
 
[MENTION=66389]BlackWorksInc[/MENTION] and whoever else cares to chime in - The fuel pump I bought came with the flat "coffee filter" strainer. I also ordered p/n 23300-50120 thinking it was the fuel filter, expecting something that looks like, well, a fuel filter, like in Toyota's parts page listing (which was filtered for my V6):

Mpis4lJl.jpg


But this is what I got and it's definitely p/n 23300-50120:

LT8h1oNl.jpg


I thought it was an error but there does seem to be filtration material inside this thing.

x4WUs2Hl.jpg


Also, I can't find anything online that fits the 1-GRFE and looks like the black fuel filter circled in the parts listing. So is this the fuel filter?
 
Do you have a better picture of the white thing, maybe out of the bag? Hard to tell but it looks like the fuel pump housing minus pump, regulators, and such.

You won't find a filter like the black one for a 1GR, those are old school online filters. You want the sock style.
 

Members online

Forum statistics

Threads
278,317
Messages
3,554,129
Members
248,016
Latest member
Advally Service

Trending content

Back
Top