
Thanks to this forum I tried some DIY projects and now plan to do much of my own work on my vehicles going forward. This is not a “how to” post – just an account of my DIY noob success.
Since I can’t add a lot of mechanical help to the forum but hope my success will inspire others contemplating DIY. I have minimal mechanical knowledge but I am fairly handy and am not afraid to try stuff.
I am the original owner of a 3rd Gen 1998 4Runner V6 4WD. This truck will surely be the best vehicle I will own in my lifetime. Nothing ever broke or wore out. For example, the original brakes lasted 127,000 miles – I finally had them replaced and the brake fluid flushed in Dec 2014 as a precaution, not because they were worn out.
What needed to be done
The steering had gotten looser over the years but nothing out the ordinary for a 17 year old truck in the desert – bushings dry out fast here. Finally at 127,000 miles in Dec 2015 the steering had a pretty bad clunk when turning at slow speeds. The dealership replaced the right lower control arm and right side ("D") steering rack bushing.
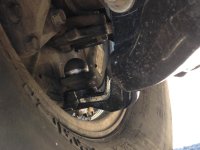
At 128,000 miles in Feb 2015 the right lower ball joint (same side the lower control arm was replaced 1,000 miles ago) failed. Luckily in a parking lot. The dealership replaced the right lower ball joint.
Failed lower ball joint photo.
DIY thoughts start
At this point, the right side had a new lower control arm and lower ball joint but the left side was original. I started doing some research on the forums and discovered the ball joints on these rigs will all fail eventually.
Time to replace the left lower ball joint. As I continued researching I decided to try DIY and to replace more “stuff” while I was at it.
My DIY would include replacing:
DIY begins
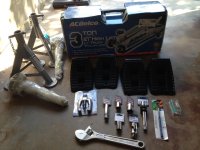
I didn’t own a jack or jack stand so I got to buy some new toys. And based on the posts here I knew I also needed a few new tools. I spent a few hundred dollars but I can use this stuff for many years.
Here are the new toys I got for the project.
I used all OEM parts except the steering rack bushings, which Toyota doesn't sell separately, and the sway bar end links. I purchased the parts from Camelback Toyota online parts store. I live 3 miles from the dealership and picked them up myself so I saved on shipping.
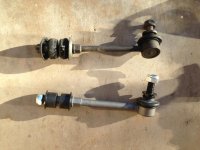
I would buy OEM sway bar end links if I had it to do over - I was not impressed with the Adelco links I bought. The bushings and plates on top an bottom of the bushings were lessor quality (I actually re-used the OEM plates).
OEM vs. Adelco sway bar end links
The parts I took off the truck.
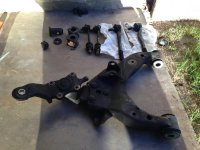
Worn sway bar end links
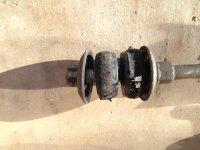
Based on the advice from this forum I used PB Blaster the day before and the bolts came out no problem - the steering rack bushings and outer tie rod ball joints were another story. Hammering the knuckle did not work. I bought two pitman pullers but neither worked - one was too small, the other too big. I finally ended up using a pickle fork which bent - I destroyed the boot but it worked.
I probably spent more than 12 hours on the whole job with an inordinate amount of time spent on the steering rack bushings and tie rods.
Here is a shot of my new front-end.
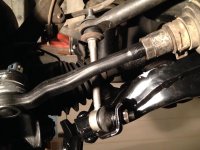
I got an alignment and it was time to see if my hard work paid off.
The result is the truck is much tighter and safer truck. Sadly I will probably be selling the truck soon but couldn't sell it with a good conscious knowing the left lower ball joint was going to fail at some point.
In addition to a huge sense of satisfaction, I saved a lot of money. Since I replaced left side and the dealership (Camelback Toyota – the same place I bought the parts) replaced the right side a month apart I could get an exact cost comparison.
Lower control arm
Dealership – $508 total ($258 parts and $250 labor)
DIY - $174 (parts)
Lower ball joint
Dealership – $486 total ($136 parts and $350 labor)
DIY - $88 (parts)
Steering rack bushings
The dealership only replaced the right side “D” bushing which is far and away the easiest of the 3 bushings to replace - at a cost of $231 ($43 parts and $188 labor). I paid $20 for all three bushings.
I hope my DIY success inspires others to give DIY a try.
A disclaimer – the truck has been in AZ its whole life so no rust and I have never done intense off-roading or rock crawling so the underside is in great shape making my work much easier. Your experience may differ.
Free lower control arm
I still have the left lower control arm that is looking for a good home. Just needs new bushings. Pay for shipping at its yours. I will try to take some pictures of it and post it in the marketplace.
Since I can’t add a lot of mechanical help to the forum but hope my success will inspire others contemplating DIY. I have minimal mechanical knowledge but I am fairly handy and am not afraid to try stuff.
I am the original owner of a 3rd Gen 1998 4Runner V6 4WD. This truck will surely be the best vehicle I will own in my lifetime. Nothing ever broke or wore out. For example, the original brakes lasted 127,000 miles – I finally had them replaced and the brake fluid flushed in Dec 2014 as a precaution, not because they were worn out.
What needed to be done
The steering had gotten looser over the years but nothing out the ordinary for a 17 year old truck in the desert – bushings dry out fast here. Finally at 127,000 miles in Dec 2015 the steering had a pretty bad clunk when turning at slow speeds. The dealership replaced the right lower control arm and right side ("D") steering rack bushing.
At 128,000 miles in Feb 2015 the right lower ball joint (same side the lower control arm was replaced 1,000 miles ago) failed. Luckily in a parking lot. The dealership replaced the right lower ball joint.
Failed lower ball joint photo.
DIY thoughts start
At this point, the right side had a new lower control arm and lower ball joint but the left side was original. I started doing some research on the forums and discovered the ball joints on these rigs will all fail eventually.
Time to replace the left lower ball joint. As I continued researching I decided to try DIY and to replace more “stuff” while I was at it.
My DIY would include replacing:
- left lower control arm
- left lower ball joint
- left and right outer tie rods
- left and right sway bar end links
- sway bar bushings
- steering rack bushings (driver side and center)
DIY begins
I didn’t own a jack or jack stand so I got to buy some new toys. And based on the posts here I knew I also needed a few new tools. I spent a few hundred dollars but I can use this stuff for many years.
Here are the new toys I got for the project.
I used all OEM parts except the steering rack bushings, which Toyota doesn't sell separately, and the sway bar end links. I purchased the parts from Camelback Toyota online parts store. I live 3 miles from the dealership and picked them up myself so I saved on shipping.
I would buy OEM sway bar end links if I had it to do over - I was not impressed with the Adelco links I bought. The bushings and plates on top an bottom of the bushings were lessor quality (I actually re-used the OEM plates).
OEM vs. Adelco sway bar end links
The parts I took off the truck.
Worn sway bar end links
Based on the advice from this forum I used PB Blaster the day before and the bolts came out no problem - the steering rack bushings and outer tie rod ball joints were another story. Hammering the knuckle did not work. I bought two pitman pullers but neither worked - one was too small, the other too big. I finally ended up using a pickle fork which bent - I destroyed the boot but it worked.
I probably spent more than 12 hours on the whole job with an inordinate amount of time spent on the steering rack bushings and tie rods.
Here is a shot of my new front-end.
I got an alignment and it was time to see if my hard work paid off.
The result is the truck is much tighter and safer truck. Sadly I will probably be selling the truck soon but couldn't sell it with a good conscious knowing the left lower ball joint was going to fail at some point.
In addition to a huge sense of satisfaction, I saved a lot of money. Since I replaced left side and the dealership (Camelback Toyota – the same place I bought the parts) replaced the right side a month apart I could get an exact cost comparison.
Lower control arm
Dealership – $508 total ($258 parts and $250 labor)
DIY - $174 (parts)
Lower ball joint
Dealership – $486 total ($136 parts and $350 labor)
DIY - $88 (parts)
Steering rack bushings
The dealership only replaced the right side “D” bushing which is far and away the easiest of the 3 bushings to replace - at a cost of $231 ($43 parts and $188 labor). I paid $20 for all three bushings.
I hope my DIY success inspires others to give DIY a try.
A disclaimer – the truck has been in AZ its whole life so no rust and I have never done intense off-roading or rock crawling so the underside is in great shape making my work much easier. Your experience may differ.
Free lower control arm
I still have the left lower control arm that is looking for a good home. Just needs new bushings. Pay for shipping at its yours. I will try to take some pictures of it and post it in the marketplace.








