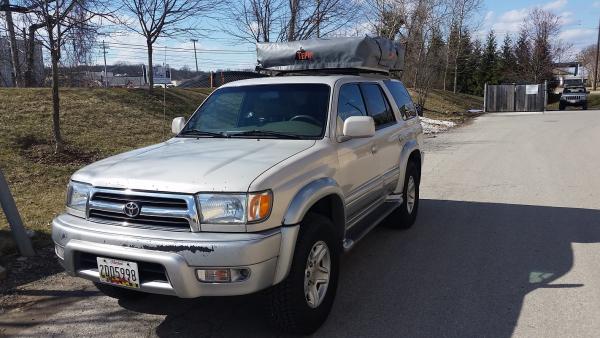
new-to-me '99 4Runner Limited

I found something that was worth investigating, and once I did some carfax research and used the help of a friend that's a service writer at a local Toyota dealership to pull service records for the vehicle. I felt comfortable enough that this vehicle was pretty well maintained although oddly enough there's no record of a T-belt service.

A call last night to the titled owner was the final piece that I needed to make a deal on it. I was told that the runner had failed an emissions test in October ( CF records shows this ) and that the PO took it to the dealership where they found a bad O2 sensor, bad MAF sensor and a cracked air box. These items were placed and then the owner traded in the Runner.

I ended up with a '99 Limited, Desert Dune/ Millennium Silver 2 tone. 200,300 miles on it. E-locker. Auto climate control is possessed, sunroof no works. Everything else functions as intended. Initial inspections shows that 1 outer torn CV boot ( long term, almost no grease left in the joint) the other joint is severely cracked. One rusted/broken sway bar link in the front. No visible signs of leaky axle seals. There's a 10 year old record of Toyota replacing the bearings/seals under an extended warranty.

Interior leather in decent shape. The drivers seat has cracking but is generally still in 1 piece. ABS light is on, no other CEL/indicators are lit up. It starts right up and idles fine. Trans seems to shift ok. I tested the t-case and E locker during the test drive, everything is ok.

The sleaze ball wholesaler wanted $4500. I wasn't about to give that much for it. I ended up at $3200, which I think is a decent price based on how rust free the runner is. I would have loved to have known the PO when she was trading it in and offered her more than the $900 that carmax gave her.

To give you an idea of the sleaze level of the wholesaler, he did the sale as an open title transaction and wouldn't provide a bill of sale. 2 big NO-NO's as a licensed dealer in MD.

Pics.

2ndhandyotaman-albums-1999+4runner-picture49291-20171220-095044.jpg

2ndhandyotaman-albums-1999+4runner-picture49292-20171219-120942.jpg

2ndhandyotaman-albums-1999+4runner-picture49294-20171219-121013.jpg


I put about 100 miles on it today, just to get an idea of what I need to do as far as maintenance goes. I'll run it through a state inspection on Friday to get that list of repairs.

Initial work to be done:

New rear shocks. It has fairly new KYB monomax struts up front, so I'll use the same shock in the rear.

New CV axles. I'll go with NAPA ones and reboot the one original axle w/ the cracked boots, the joints haven't been contaminated yet so it will be good enough for a spare.

OEM LBJ and hardware. I already ordered them.

Front sway links. One is toasted, the other can't be much better.

Fog Light lenses are busted, need to source new ones.

I'll order a T-belt kit and VC gasket service kit from fleabay. The guy in the parts dept at the local dealer where my friend works told me that even at employee pricing, the ebay kits from Camelback are still a better deal. This job can wait until the spring when it's warm again. I'll be working in an open parking lot space at a buddies body shop, no need to freeze doing a job that can wait a bit.
 
Register to hide this ad
Glad you had success in your search bud! Looks to be solid 'Runner - once you've done all the maintenance bits will be a great car
 
[MENTION=205481]4ranna[/MENTION]- how's your search going? I looked at a '00 SR5 that was super clean, the CL ad was the usual dealer posing as the owner BS. He got it through inspection and wants $5500 for it. I was tempted until I looked at the one that I got. It might be worth a look if that's within your budget.

so weird, I looked at this on my not-so-smart phone and couldn't see the pics. I move to the work station and everything is fine.
 
Last edited:
Nice find and at a great price too. Was looking for a T4R with 200k or less miles, with e-locker, and they were going fast in CA.

Ended-up with Desert Dune/ Millennium Silver too. Enjoy.
 
A few updates- replaced the rear shocks with KYB Monomax, the 'Runner already has them in the front. Night and day difference already in ride quality. I'm guessing that the rears were basic Monroe cheapie shocks, no markings on the body and black in color. They were beyond toasted, one would only compress about 1/3 of the way. On the passenger side I wiped out the upper shock mount pocket to keep dirt/mud from helping it rot away and found 2 other top mounts of shocks just laying in there. I got a good laugh from that discovery.

When I was at a pick and pull yesterday I snagged a near perfect passenger side seat along with a CCU and a few other small goodies. I went to the local Maker space to be able to work in doors and have decent lighting, a good deal for $5 ! I took apart the new seat first just to get an idea on how it comes apart. I've read a few different versions on how the lower seat comes out. What I discovered was after removing the plastic trim pieces, there is 4 bolts that attach the base to the seat frame.
2ndhandyotaman-albums-1999+4runner-picture49616-20180111-175142.jpg


The cushion assembly just lifts straight out. I then wanted to remove the seat back leather cover and foam. What I found is that there are 2 bolts per side, right where the seat pivots back and forth against the base. After removing these 4 bolts, then unsnapping the plastic interlocking flaps at the bottom of the leather cover, the entire seat back will pull away from the seat base frame.
2ndhandyotaman-albums-1999+4runner-picture49621-20180111-201248.jpg


From that point, I removed the leather cover from the seat back, then removed the foam pad and set everything aside. I went outside and removed the seat from the 'Runner , put it on the work table and broke it down the same way. I compared the foams and discovered that they are exactly the same, Toyota designed them to be symmetrical for a number of reasons that only make sense if you work in manufacturing.
2ndhandyotaman-albums-1999+4runner-picture49620-20180111-193423.jpg


Now, the lower foam from the passenger side has a weight sensor to turn on the air bag, so that didn't get used when reinstalling it on the drivers side. I just tucked up the wire harness and zip tied it to the underside of the seat frame.

Re-assembly was straight forward, I started by swapping over the seat back foam and leather onto the drivers side upper frame. The power lumbar switch mount isn't present on the passenger upper frame otherwise this step wouldn't have been necessary. The foam already has the opening for the switch on both sides of the foam. I slipped that over the steel frame, then started to slip the leather cover over the foam. It was a nice snug fit. Once I got the leather fully over the foam, I then rolled it back up half way to expose the steel bar in the fabric that needed to be attached to the spring in the metal frame. Normally, new hog rings would be used for this. I didn't have any as I didn't think that I'd get that far with the project in one night.

I improvised and used some TIG filler wire to make some hog rings. It worked well enough that I felt confident it wasn't coming apart any time soon. The leather was again pulled all the way down, the upper seat cushion was held in place on the steel frame and the 2 bolts per side at the pivot point were re-installed. I then fished up the wiring harness for the lumbar switch, pushing through the backside of the leather through the hole in the metal frame to mark the spot where I had to take a utility knife and make a hole for the switch.

Once that was done the switch was connected and pushed into the mounting bracket. The plastic interlocking flap was fished around the steel tube at the pivot point and locked together. I now had a complete seat, made from passenger side seat parts.
2ndhandyotaman-albums-1999+4runner-picture49623-20180111-204748.jpg


I installed the seat back into the 'Runner and tried the power switches, everything worked perfectly. I cleaned up my mess inside of the shop and jumped into the truck to go home. I simply could not believe the immediate improvement in how much better the seat now feels. It was well worth the minimal money outlay and my time. Anyone that says you can't use a passenger seat to fix a drivers side is full of their own BS, I just did it and hopefully have provided enough pics to prove it.
 
A few attempts at removing the old broken fog lights and installing function used ones that I got from a forum member didn't turn out too well for me. I was too caught up with trying to remove the entire assembly, I got as far as removing the housing itself but not the mounting bracket. Today I got PO'd at trying to work around the old brackets so I grabbed them like a small ape and rocked them back and forth until they work hardened and snapped off right at the mounting screws on the bumper.

This gave me enough room to hammer on a socket over the crusty bolt head and then unbolt them from the speed nuts that wrap around the plastic lower air dam. Once they were out of the way it was a simply procedure to install the mounting brackets that came with the used fogs, then mount up the lights themselves.

I now have function yellow fog lights. I tested each lamp before mounting in case I had to buy new bulbs. I wasn't crazy about yellow bulbs, but they work and I didn't want to spend any $$ if I didn't have to, so they will stay yellow until one blows out. :)

2ndhandyotaman-albums-1999+4runner-picture49787-20180122-130321.jpg


They seem to function properly, they only come on when the low beams are turned on and they go off when high beams are on. I imagine that there's a
mod to turn them on at will, not when Toyota thinks they should be on. LOL

One thing I didn't notice was a dash cluster light indicating that they are on- should there be an indicator light? Every other vehicle that I've ever owned with factory fogs has an indicator lamp.
 
More maintenance updates..

I was getting a bad vibe somewhere in the drive train that seemed to be more focused on speed instead of rpm. I had re-greased the rear driveshaft u joints last month and the vibes lessened. I was casting a suspicious eye on the CV joint, so I dropped the drive shaft today and was going to drop it off at a drive shaft shop to have them take it a-part and call me with the expensive news...

I get the shaft dropped and immediately noticed that the rear joint was frozen in one axis, so I knew that the joint was toast. I went to the shop, the owner checked the CV and gave it a quick once over and said that it was good, so I got a new u-joint from him and got busy.

2ndhandyotaman-albums-1999+4runner-picture50711-u-joint.jpg

Pretty much the classic " there's your problem !"

I got it changed over and put the shaft back in. it's 1000% better, I'll need a longer trip at 70 MPH to check for vibes but it seems like this was the main issue for now.
 
Just bought my own “new to me” ‘99 Limited in Desert Dune/Silver. Sadly, no e-locker for me, though. But it does need a bit of maintenance. Glad to see someone with such a nice ride is putting in the work to keep it going! Gives me motivation to start buying parts and diving in.
 
Just bought my own “new to me” ‘99 Limited in Desert Dune/Silver. Sadly, no e-locker for me, though. But it does need a bit of maintenance. Glad to see someone with such a nice ride is putting in the work to keep it going! Gives me motivation to start buying parts and diving in.

Congrats on your new rig !

I've been enjoying this old truck, I just have to walk the fine line of giving it some decent maintenance without getting buried financially in it. I still need to take and post a few pics of the new Cats, they were the most expensive item that I wasn't sure about spending money on, but it ended up fixing the P0420 issue. Being able to fix most things myself is what makes owning an old vehicle possible, there's no way I'd be able or willing to let a garage do the work.

Start a thread and post pics of your rig as you go along with fixing it and enjoying it.
 
A bit more of maintenance today. I got a CEL yesterday, got it scanned and the code for the TPS showed up. Kind of makes sense as the idle has been a bit weird and the trans didn't always downshift like I thought it should. I got a new part from the dealership and installed it today.

No pics, I was trying to beat the rain. I was able to reach around the backside of the TB and use a #2 phillips screwdriver bit and a 1/4" drive racket w/ a 1/4" shallow socket to hold the bit to get the 2 screws out. They came out without much issue, except that I managed to drop one of the screws while transferring it to magnetic holder so that I wouldn't lose one....

I looked at the remaining screw to attempt to identify the thread pitch. A M4 x.7 nut seemed to thread onto the original screw easily ( there's also an odd-ball M4 x .5 thread pitch, just FYI ) so I went with that. A quick trip to the local Ace Hardware got me 2 M4 x .7 cap head screws in stainless steel and 2 washers, total of about $1.50 for everything. I threaded in the new hardware ( with a bit of anti-seize on the threads) and got them finger tight, then I snugged them up with a hex key wrench.

So, the lesson here is: if you need to replace the TPS screws for any reason, M4 x .7 x 12 is what I used and it worked perfectly. The bonus is that the next time the TPS has to be removed, a simple hex wrench will do the trick.
 
It's been almost a month since the truck forced me to spend money on it...:faint2:

Today's job- I was tired of saggy butt syndrome ( SBS) and as much as I want to go to OME 906's, it's just not in my immediate future so I decided that $40 spent at Rock Auto for the Moog 81041 springs couldn't make things any worse so I ordered them and they showed up yesterday. ( FWIW, local parts stores wanted between $65-$90 for the exact same part and no one stocked them )

I also got some Beck Arnley rear sway bar links, the ones on there were toast. 5 years ago.

I also got some new rear brake shoes because I thought I saw a crack in one of the shoes a few days ago, I was wrong when I looked really close to day so at least I can return the parts and get a few bucks back.

Lastly, I got a new(er) tire from the pick and pull yesterday and a 16" Taco steelie a few weeks ago. My spare tire was original, no way I was going to take a chance on a 18 year old tire to use as a spare. The original spare wheel was so corroded I would have been concerned trying to use it as a base for a bottle jack, much less using it as a spare wheel.

This update it mostly werds, I'm not great at stopping in the middle of a job to clean up, grab the phone and take pics.

Here's a few that I took after the werk was finished.

New shiny coil spring. I used a small bottle jack between the axle tube and the bump stop ( against a piece of wood) to get the axle to drop down enough to change the spring. Kind of a PIA to get the upper seat to fit properly while you wrestle with releasing the bottle jack. I think I got them right, it isn't making any weird sounds when I hit bumps.

2ndhandyotaman-albums-1999+4runner-picture51283-20180523-153049.jpg


Beck Arnley rear sway links. Not too impressed with the quality. The cup washers for the isolators and the isolators themselves are just a basic universal type, no way to keep the shaft or isolators centered in the large hole that they mount through. I ended up using the stock middle washer to help keep things centered.

Really bad pic, I was too lazy to try to squeeze myself close to the tire to get a better view.
2ndhandyotaman-albums-1999+4runner-picture51284-20180523-153057.jpg


I didn't take any before/after measurements, it was sagging badly and now it's not. LOL There's probably a slight bit of rake now, it doesn't look like the cargo area is full of dead hookers any more.

2ndhandyotaman-albums-1999+4runner-picture51286-20180523-153227.jpg


Same type of bad pic for the "new" spare. I was too busy with the tire machine, my buddy owns a body shop and was letting me make my mess in the parking lot and use his tire equipment. There was actually a job about to start that needed to the equipment, so I hustled and just got it done.
2ndhandyotaman-albums-1999+4runner-picture51285-20180523-153118.jpg

Not too bad for $35 all-in for a good spare.

Ironically, the original 245-75-16 was just about as tall as the 265-75-16 that I'm running now. The spare is 265-70-16 and is a tiny bit shorter. it will work good enough in a pinch.

Overall thoughts of the job- the 'runner rides a LOT better now. The Moog springs seem to work well with the KYB Monomax shocks. It's firm, but not what I'd consider brutal. I wouldn't want to drive across 50 miles of cobblestone roads w/ this setup but for the 45 miles I drove on the way home on the highway and secondary streets, it feels good. New sway links can't be hurting either, the old ones were so sloppy they couldn't have been doing much good back there.
 
Last edited:
Another bit of time has passed and I was forced to fix a broken seat height adjuster motor. I was moving the seat forward when I heard a bad "crunch" sound- apparently the Garmin GPS that I keep under the seat must have moved around a bit and when I adjusted the seat, it got wedged against the motor and broke off at the mounting boss.

I pulled the seat and had a look. I could have gone to a pick and pull and gotten another motor but I honestly didn't feel like it doing that yesterday, so I hacked together a "fix" that should outlive the rest of the truck.

After the pic was taken, I used a hose clamp to secure the motor to the new support arm. The arm will keep the motor from moving sideways when it gets used, this will be plenty good enough to keep things in the location that they need to be in.

2ndhandyotaman-albums-1999+4runner-picture53552-20181202-153137.jpg
 
I hit the local REI garage sale this morning and saw the same Tepui RTT that I was drooling over at the November garage sale. It was marked down a bit more so I decided to get it. I know that I'll need a Yakima roof rack for more strength if I decide to keep this. The amount of flex in the stock cross bars and roof sheet metal has me honestly concerned that the roof could get seriously damaged if I climbed up in there.

2ndhandyotaman-albums-1999-4runner-picture54733-rtt.jpg
 
Over the past few weeks I've been hearing a faint " squeak squeak squeak" noise that keeps time with increased tire speed. I can really notice it when driving next to a brick wall, that's when it sounds pretty bad.

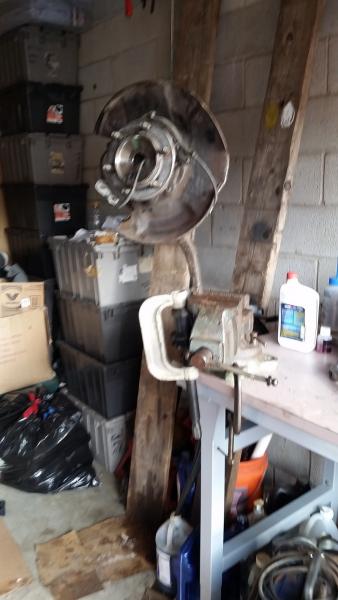
When a local shop was replacing the Right inner tie rod in December after someone lightly hit the truck after running a stop sign, they found that the caliper was sticking. I replaced it with a NAPA re-manned one. When I started noticing the squeaking noise recnetly, I thought that maybe the caliper was going bad, so I pulled the RF wheel and rotated the brake rotor. I was hitting a binding spot, so I pried back the pads to see if they were dragging. The noise and binding spot were still there. With my ear very close to the outer CV joint, I could hear that the wheel bearing seemed to be on it's last leg. The Outback that I recently purchased was back at the dealership getting some warranty repairs done, so I couldn't afford to have any down time with the 4runner right now.

I made a trip to a local-ish pick and pull and found a 4runner just waiting to donate its steering knuckle/drive hub to me, if nothing else to just buy a bit of time until I can get all the Toyota bearing and seals to repair it with the good parts.

I got the cheapest ball joint that Napa sells, ($14 on sale this weekend) and rented the ball joint installation kit from them. ( full refund when the kit is returned)

I now understand why everyone complains about the generic ball joint tool kits, it left a bit to be desired although I would not have been able to install the new joint without it. It just took some "creative" stacking of spacers and a big socket to push on the back side of the BJ. I got the new BJ installed, repaired the broken/seized M6 bolt that holds the ABS cable guide and called it a day. The storage unit where I do my work was getting the asphalt resealed today, so I couldn't install it. I'll go back tomorrow and get it installed and click a few pics along the way.

2ndhandyotaman-albums-tools-tom-foolery-picture55387-20190524-173618-a.jpg
 
Last edited:
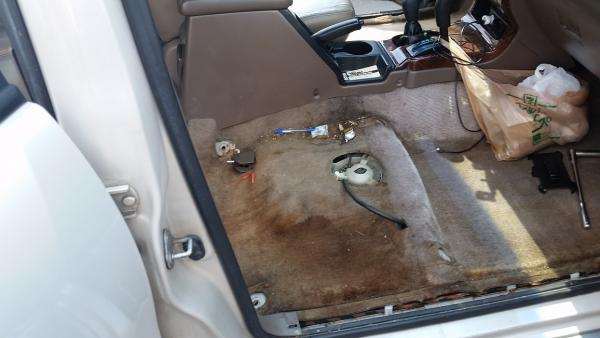
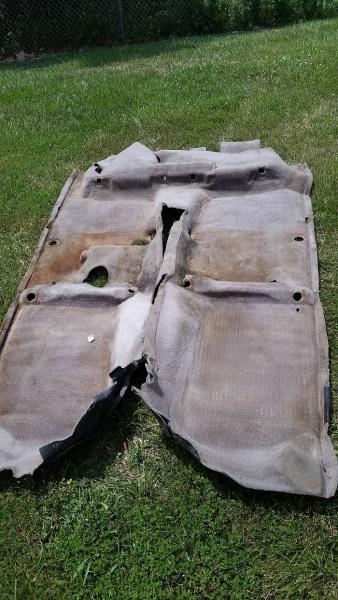
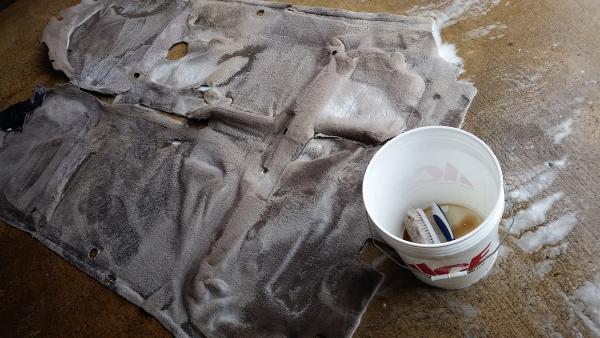
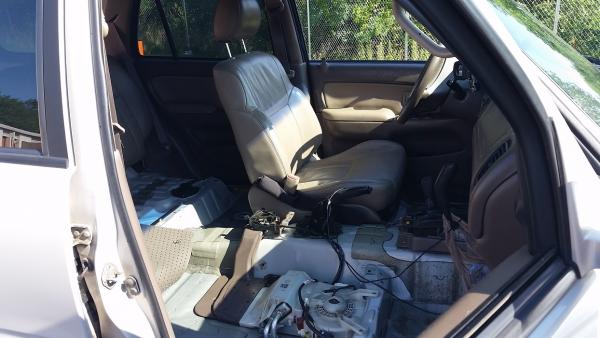
4 day holiday weekend, so what better way to spend time in the sun then to pull and clean some 20 year old carpet? LOL

I was surprised at how quickly the interior comes out, I was at about 1 hr. to get everything out to the point where I could pull the nasty old carpet.

I got some generic Mequires carpet cleaner form the local commercial auto parts ( Auto plus, formally known as Kunkles automotive)

After dumping about $15 in quarters at the coin operated car wash, I got to the point of where it wasn't getting any cleaner. It's permanently stained and some discoloring, but at least it's clean and shouldn't stink like cigars and 20 years worth of daily grime. I'm not spending the money on new carpet, so this is gonna have to be good enough. I'll reinstall it tomorrow and click a few more pics.

2ndhandyotaman-albums-1999-4runner-picture55793-20190705-120121-a.jpg


2ndhandyotaman-albums-1999-4runner-picture55794-20190705-122724-a.jpg


2ndhandyotaman-albums-1999-4runner-picture55795-20190705-133830-a.jpg


It's kind weird driving around with no interior and only 1 seat in the whole rig!

2ndhandyotaman-albums-1999-4runner-picture55796-20190705-170021-a.jpg
 
Last edited:

Members online

No members online now.

Forum statistics

Threads
278,315
Messages
3,554,102
Members
248,016
Latest member
Advally Service

Trending content

Back
Top