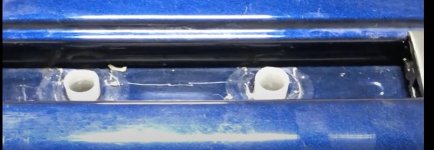
Non Drill roof rack (no silicone)

Naw. Threw out the prinsu spacers. Just referenced them to confirm the heigh needed was 1.0 inch. The pics I posted are all that I used. So the delrin spacer has the 35/64 thru hole that the OD of the o ring seals against. The ID of the o ring is on the bolt shank.
 
Lock washers no longer needed on Prinsu no drill roof rack
So I just received my Prinsu No Drill Roof Rack. All the lock washers were not in the bag. I’ve emailed the dealer and I am being told that those are no longer needed. Anyone else heard of this?

Thanks
Steve


Sent from my iPhone using Tapatalk
 
Lock washers no longer needed on Prinsu no drill roof rack
So I just received my Prinsu No Drill Roof Rack. All the lock washers were not in the bag. I’ve emailed the dealer and I am being told that those are no longer needed. Anyone else heard of this?

Thanks
Steve


Sent from my iPhone using Tapatalk


Problem solved


Sent from my iPhone using Tapatalk
 
Prinsu no drill No silicone option. Use a gasket under a custom spacer, and two o rings on the bolt shank to stop water intrusion down the threads. All McMaster Carr stuff.

1/16 thick x 0.75 EPDM gasket
0.75 wide x 1.00 high Delrin spacer. Cut to 4.25 long
Drilled thru holes 35/64 inch diameter
1/8 buna o rings -203 size

That is great. I’m completely going this route.

I’m still waiting for my 4Runner and am just wondering if you can recall how far apart the mounting holes are center to center? I’d like to pre make these so it’s all ready to go when I get my 4Runner in a month.
 
That is great. I’m completely going this route.

I’m still waiting for my 4Runner and am just wondering if you can recall how far apart the mounting holes are center to center? I’d like to pre make these so it’s all ready to go when I get my 4Runner in a month.

Sorry. I didn’t save my measurements. I didn’t take the rails off first though. You can pop off the plastic covers easily and measure the bolt head spacing. It’s easy if you grab a couple sockets of similar diameter and put them on the heads. Easier to measure the edge of two cylinders than guess at the hex center or deal with two hex heads edges that are not aligned.

I did the same spacing for all but measured all 4 locations first to note consistency.

If I were to do this again I’d make my spacers 4.125. Otherwise no complaints so far. Also, the delrin is easy to drill but you must have a good clamp and drill press or equivalent. Drills in plastic want to grab, so prepare for that.
 
Sorry. I didn’t save my measurements. I didn’t take the rails off first though. You can pop off the plastic covers easily and measure the bolt head spacing. It’s easy if you grab a couple sockets of similar diameter and put them on the heads. Easier to measure the edge of two cylinders than guess at the hex center or deal with two hex heads edges that are not aligned.

I did the same spacing for all but measured all 4 locations first to note consistency.

If I were to do this again I’d make my spacers 4.125. Otherwise no complaints so far. Also, the delrin is easy to drill but you must have a good clamp and drill press or equivalent. Drills in plastic want to grab, so prepare for that.

No problems. I’ll wait until I get the runner to measure.

Thanks for the advice.
 
Not as cheap as DIY but for $45 you can get the SSO delrin spacers with butyl rubber tape. I have had the SSO rack installed with these spacers for 6+ months with zero leaks throughout the many many crazy rain storms we've had this year. Very happy they started offering these:
Roof Rack Spacers and Butyl Tape | Southern Style OffRoad

Sent from my Pixel 5 using Tapatalk

I already got all the supplies from McMaster-Carr, but this is good to know. I would’ve gone this route if I knew of this earlier. Thank you.
 
Well, I tried to fab up something similar to what Crob42 fabbed up, and well, it didn't go so well. Most likely it's the drill bit I have (it's a HQ Norseman) because it bites too hard, but the derlin blew apart on me.

So, plan B. I did also buy the silicone washers for this very case, and this is what I did, from bottom to top.

Butyl around the white plastic
Silicone washer
Prinsu spacer

On the bolt, I slipped on the supplied fender washer, then a 1/8 buna o-ring (-203), this should seal up the void between the bolt head and the spacer so water doesn't enter and pool in the spacer.

Edit: I applied red loc-tite to the bolt.

Cranked it down, finished my beer, now hope for the best.

I may get spacers fabbed in the spring.
 
Last edited:
Well, I tried to fab up something similar to what Crob42 fabbed up, and well, it didn't go so well. Most likely it's the drill bit I have (it's a HQ Norseman) because it bites too hard, but the derlin blew apart on me.


Bummer, but not surprising. I had to use 4 bits of increasing size, good clamps, and a very slow drill press feed to get it to work. Kinda was a science project. Worked, but your plan B prob is just as good.
 
what do you mean "not use silicone"?

All racks you will need to seal the factory mounting locations.

Victory 4x4 is a full-length rack and no-drill option for the front where the footpads sit in the rain channel. seen it in person, very nice fitment

I can say the Victory 4X4 Full rack is top quality. I am very happy with my purchase. Got a first responder discount. Bought the optional black nuts and bolts.
 
I'm planning to install the Eezi-Awn / Equipt K9 rack that I have on order.

I'm trying to adapt what I know works on the roof of a travel trailer or motorhome. Anyone see any problems?


  • Small amount of black Dicor self-leveling lap seal to fill the gaps outside of the white OEM spacers that surround the bolt hole.
  • Butyl tape with holes cut to go over the OEM spacers
  • Rack mfg (K9) spacers around the OEM spacers but on top of the butyl tape
  • Thin layer of Dicor around the top threads of the bolts
  • Dicor on top of the bolt heads and around any seams
  • Strip of black Eternabond tape covering the top of the entire mounting bracket on top of the bolt heads

One of the K9-specific issues is the need for washers to level out the K9 spacers in some cases. I think I might be able to wrap the outside of the K9 spacer and washers with butyl tape. Or maybe put the washers at the bottom and use Dicor lap seal. I don't have any great pictures of what this looks like after it is installed so it's tough to plan ahead.
 

Attachments

  • Screen Shot 2022-04-12 at 6.30.32 PM.jpg
    Screen Shot 2022-04-12 at 6.30.32 PM.jpg
    83.9 KB · Views: 700
Received the spacers from RA 2 weals ago and I finally was able to swap the barrel spacers on my Prinsu...I added butyl tape on the mounting points too.
a1dfed475240fd636f26dbb66004c09c.jpg
e5d593ee8cc08df14fdd9a0fb8bc610c.jpg
65c2e83ce066509106fbcd8fc09ea0e3.jpg
e8d0124fbc2f6767d3a34b510aecb943.jpg
d143a90b3ebb5bf69437a8704059eecc.jpg
683f9009f13be9aa301073c96d6d755b.plist


Can you share the hardware order you used?

I have the RA mounts, but looking at the instal = bolt + Metal washer + Prinsu mount point + RA Mount + Vehicle top…. Makes me think I need something more between the metal washer and the Prinsu mounting point.

Or…. Is the RA mount just enough?

Thank you!


Sent from my iPhone using Tapatalk
 

Members online

Forum statistics

Threads
278,316
Messages
3,554,120
Members
248,016
Latest member
Advally Service

Trending content

Back
Top