Official home improvement/ remodel thread.

I had a helper today, but he had no thumbs and was a nightmare with a hammer so I kicked him out.
ff972a6ce5872b737df235443100e306.jpg

I mean cool dog and all. . .but I'm digging the staircase in the background, do you have more pictures of that set up?
 
I mean cool dog and all. . .but I'm digging the staircase in the background, do you have more pictures of that set up?


Hey thanks man. I don't have any other pics of it on my phone right now, I'll take some tonight. The beam in the center and the steps are oak and the hand rail is Birdseye maple. All hand made. Pretty cool.
 
Hey thanks man. I don't have any other pics of it on my phone right now, I'll take some tonight. The beam in the center and the steps are oak and the hand rail is Birdseye maple. All hand made. Pretty cool.


Birdseye handrail sounds glorious.
 
I mean cool dog and all. . .but I'm digging the staircase in the background, do you have more pictures of that set up?


Here ya go man.
9a7409b1fa04d1f797b06d827cf961ec.jpg

1ecf104731ed44abae17eafe10f800ec.jpg

841eb0e1259be6a83cb70c544b6d6b11.jpg

7db4a4715d35a913d17859ab46e1c0b6.jpg

ed3b3302b5581ab4a4e5d3219b784fd8.jpg

96e9ae638e726ebb1cd4018da3642032.jpg

Last one showing the Birdseye rail and got photobombed by my four legged morons.
 
Last edited:
oh boy am i glad this thread exists. i need a little tip on a bathroom remodel.

my downstairs half bath had a pedistal sink which i dislike so i took it out today and going to put in a vanity, one issue i came across is the base molding. whats a good way to remove the base molding without doing a ton of damage? its your standard base with the caulk on top. i will need to remove 24 inches cleanly so the vanity sits in flush to the wall and the molding sits flush to the vanity.
saws i own. jig, recipricating (and miter but thats useless here) my skill level is above average and i can tackle the job. just looking for some good tips on how to do it
 
^ I'd just go at it gently with a prybar and a hammer. Protect the wall from the prybar with a rag. Hammer the pry bar down and pry it out a bit, move over a foot or so and repeat until it all comes off smoothly and cleanly. Patience is a virtue.
I'd remove all of the moulding on the wall the new vanity is going onto. Install the vanity, then cut the moulding and install it so fits right to the vanity and then caulk it.
 
Last edited:
oh boy am i glad this thread exists. i need a little tip on a bathroom remodel.

my downstairs half bath had a pedistal sink which i dislike so i took it out today and going to put in a vanity, one issue i came across is the base molding. whats a good way to remove the base molding without doing a ton of damage? its your standard base with the caulk on top. i will need to remove 24 inches cleanly so the vanity sits in flush to the wall and the molding sits flush to the vanity.
saws i own. jig, recipricating (and miter but thats useless here) my skill level is above average and i can tackle the job. just looking for some good tips on how to do it

Use a knife to cut through the caulk on top of the trim. If you try to pull it off without cutting it you'll be fixing drywall. The caulk will pull the paper layer off the drywall, and then you'll have to mud over it to cover it up. You can use a back saw or crosscut saw to cut the trim without removing it as well.
 
Found a before and after picture of my kids room
0c103e80c91fe89815d1b70f434cf76e.jpg

38060f2ed1a50ab911e99ce99c5432e0.jpg


Took me about 4 months to just get the house liveable after I bought it but hoping to flip it in another year or so and build somewhere
 
Fireplace

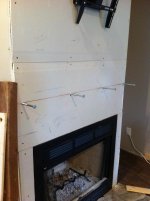
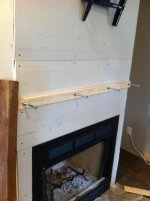
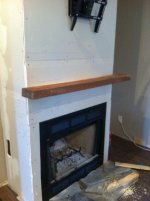
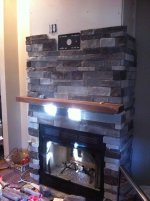
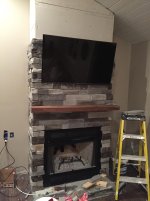
I started installing the stone on my fireplace. Takes a while, but is starting to look nice. I thought of a cool way to mount the mantel so it just floats there.

IMG_1663.jpg

Used 9 inch lag bolts and drilled 6 inch deep holes in the back side of the mantel.

IMG_1664.jpg

3/4 inch spacer

IMG_1665.jpg

Filled the holes with liquid nail, and slide it on.

IMG_1680.jpg

IMG_1684.jpg
 

Attachments

  • IMG_1663.jpg
    IMG_1663.jpg
    144.9 KB · Views: 436
  • IMG_1664.jpg
    IMG_1664.jpg
    147.6 KB · Views: 437
  • IMG_1665.jpg
    IMG_1665.jpg
    149.1 KB · Views: 435
  • IMG_1680.jpg
    IMG_1680.jpg
    136 KB · Views: 436
  • IMG_1684.jpg
    IMG_1684.jpg
    126.4 KB · Views: 487
Forgot to mention that mantel was an old floor joist in a barn. It is the perfect size, I didn't even have to cut it so the edges don't have fresh cuts on them. Nice rough cut maple, and you can't beat the price of free!
 
Forgot to mention that mantel was an old floor joist in a barn. It is the perfect size, I didn't even have to cut it so the edges don't have fresh cuts on them. Nice rough cut maple, and you can't beat the price of free!


That is awesome man! Looks fantastic. Really digging the stone facade.
I did something very similar for my mantle. I mounted the wall plate the same way, but then built a five sided box for a mantle, with internal supports that I then affixed to that wall plate. In the end it kind of came out looking like a piece of cut and painted drift wood, which is what I was going for, but your old maple looks way cooler.
7263ee9d9e58e2599c12bf550a8765c2.jpg
 
Last edited:
Great minds! :bravo: And there I was thinking I came up with an original idea for the first time in my life... lol. I always try and find ways to use the big tools taking up room in my garage every time I can, so at least I was able to use my drill press. With the stone around it, it really firmed it up.
 
[MENTION=113878]NewguyNY[/MENTION] & MStudt thank you both
i used a utility knife to cut the top edge and a small saw with 13 teeth per inch to slowly cut in on each side. little pry bar and wa-la.removed with zero damage. new vanity fits nicely, ill go and caulk the sides to clean it up a bit.
successful remodel.
 
[MENTION=113878]NewguyNY[/MENTION] & MStudt thank you both

i used a utility knife to cut the top edge and a small saw with 13 teeth per inch to slowly cut in on each side. little pry bar and wa-la.removed with zero damage. new vanity fits nicely, ill go and caulk the sides to clean it up a bit.

successful remodel.


Nice! Pics or it didn't happen.
 
Nice! Pics or it didn't happen.

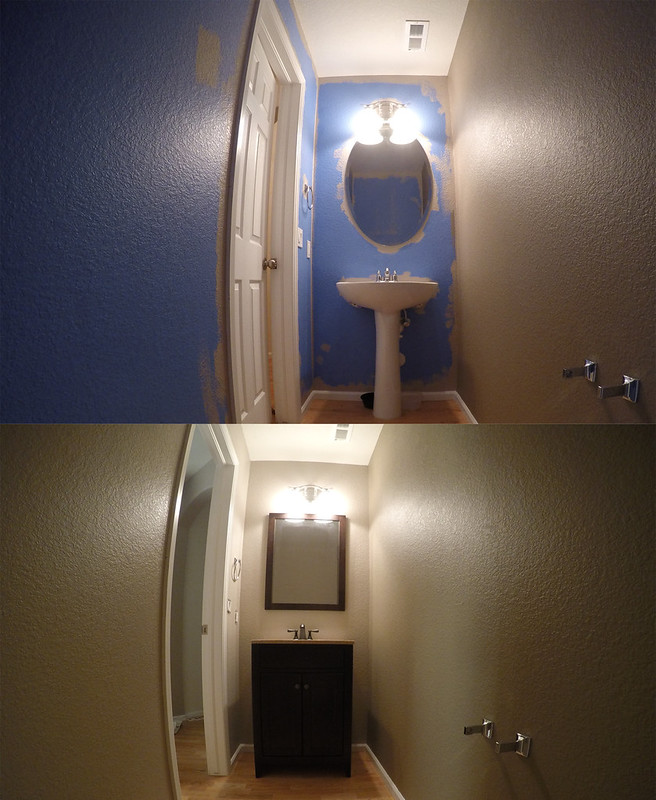
using a gopro here is a before and after. the old paint color was denver nuggets blue. no more bachelor pad, time to be an adult. i already painted the right wall and did the edges before taking the before picture.

23039937085_9603951bbc_c.jpg


im going to replace the TP holder, towel bar and light fixtures next.
 
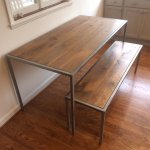
Completed a little table and bench this week. 1" square, panel top reclaimed 3/4" mixed species.
 

Attachments

  • image.jpg
    image.jpg
    120.7 KB · Views: 327
Completed a little table and bench this week. 1" square, panel top reclaimed 3/4" mixed species.


Wow man. That looks awesome! I wish I had some metal skills. I need to break down and buy a welder and just start messing with it.
Wanna build me a roof rack? ;-)
Seriously though. Looks great!
 

Members online

No members online now.

Forum statistics

Threads
278,312
Messages
3,554,089
Members
248,016
Latest member
Advally Service

Trending content

Back
Top