Okki's Build Thread

Hey Okki! Thanks, i just wanted to double check because i measured from ground to the fender and got 39" and when i saw you only had 24.5". I was wondering why such a difference but now i know.

You don't want to measure from the ground because that includes both a tire size and tire pressure variable. If you measure from the center of the wheel, you get a more accurate and stable measurement.

Okki
 
Question from your rear breather mod

I eventually plan on combining all breathers into this single filter, but this takes care of the main trouble point on the 5th gen 4Runner.
This may be a dumb question, and I'm still looking through the rest of the thread, but how do you plan on combining all of the hoses into 1 filter? Fancy splitter of sorts? Is there a need to do the front, and does it use the same union? Also, why is this not factory? It costs us next to nothing, all things considered.
 
Last edited:
This may be a dumb question, and I'm still looking through the rest of the thread, but how do you plan on combining all of the hoses into 1 filter? Fancy splitter of sorts?

Nothing fancy, but yes... A splitter. Just using a T where the line meets the line that comes from the rear.

Okki
 
Nop.. still looking for new job. actively looking in Indianapolis (current location) and Colorado; Tucson, AZ; DFW, TX; Northern FL; GA and VA. The market just sucks :(

Anyone have a contact at:
Raytheon,
Triple Canopy,
Honeywell,
General Dynamics (or 4GS)

Looking for a Program Manager, Proj. Manager, Business Analysis Manager type of position.

Okki

Went reading back through your build for the first time in a long time. I know this was 2 years ago and is probably not an issue anymore, but if you ever need help in this department again, I still have a few contacts at Triple Canopy and my moms at Raytheon.
Wonderful build, as I'm sure you've heard many times. I am currently looking to take your lead on interior accessory switches.
 
Went reading back through your build for the first time in a long time. I know this was 2 years ago and is probably not an issue anymore.

Yeah.. been working as a Sr Project Manager and recently Program Manager at Eli Lilly. Still trying to find funding for my own company (AWIS, LLC - Home) to take my 2 patented products to market. Or sell the patents and technology to an established defense industry manufacturer.

Thanks for the reminder though! and let me know if you have any questions on the switches or other mods on my truck.

Okki
 
Yeah.. been working as a Sr Project Manager and recently Program Manager at Eli Lilly. Still trying to find funding for my own company (AWIS, LLC - Home) to take my 2 patented products to market. Or sell the patents and technology to an established defense industry manufacturer.

Thanks for the reminder though! and let me know if you have any questions on the switches or other mods on my truck.

Okki

My main issue at this point is that I am a huge fan of the contura (ottrawa or however it's spelled) but don't want to have to go hacking up my interior panels to make them fit
 
My main issue at this point is that I am a huge fan of the contura (ottrawa or however it's spelled) but don't want to have to go hacking up my interior panels to make them fit

You can use the cubby hole at the bottom of the center stack. obviously would still need a hole to run the wires into it, but you're not cutting large new holes in the dash. Also means you dont bump into the switches with your knee, but they are a bit more hidden behind the shifter.

The two links below show you how that would work. I'm planning on using that as my next switch location as well if i need anymore.

http://www.toyota-4runner.org/5th-gen-t4rs/116234-jangoforhires-build-pictures-6.html

http://www.toyota-4runner.org/5th-gen-t4rs/106545-new-light-setup-thoughts-please-5.html#post1258613

Okki
 
Maintenance Links and Vendors

Since my truck is out of the free service offered by Toyota, I've started looking more into alternate sources for getting my maintenance done. This post will provide some input on vendors I've used and resources that are helpful from a maintenance standpoint.

Manuals:
Toyota Manuals in PDF form: Toyota Online Owners Manuals and Warranty
Maintenance Items per Interval: Toyota Parts and Service

Vendors:
High Tech Truck and Auto, Chantilly, VA :first::first::first::first::first:
Had my Icon Stage 6 installed here and Body Mount Chop performed. The guys did a great job on the installation and alignment. Also brought an oil seeping issue to my attention. Great service, quality of work and attention to detail. Would be my regular shop if they weren't 800+ miles away.

Bob's Garage, Westfield, IN :first::first::first::first:
Local shop where "Bob" still actually works there. Mechanics know what they are talking about (at least as far as I could tell). The shop floor was CLEAN... as in comb your hair in the reflection clean! They have both a machine shop on site and work with a local fabricator as needed. While their history is more with normal cars and classic muscle cars, they took the time to learn and understand my vehicle and what is important based on how I use it. Impressed and very happy so far. Great service at a great price. (More stars may come....)

Butler Toyota, Indianapolis, IN :second::second:
Had all the "free" Toyota maintenance performed here. Not the worst place on the planet, but not the greatest. Not used to dealing with aftermarket outfitted vehicles and fairly pricey (dealer prices). One good thing is their opening hours, which includes Saturday.

Firestone Complete Auto Care, Carmel, IN :third:
Was initially impressed with the sales spiel of one of the shop managers, but less than impressed with the actual appointment. First it took them over an hour after the start of my appointment (9AM; they open at 8AM) to even get to my truck. the "ASE Certified" applied to only 2 mechanics and neither of them was there. The oversold me on a engine and cabin filter and all the other inspection points that are part of a 35K mile maintenance do not appear to have been addressed. I did get a brakepad measurement and a battery check. all in all it cost me $93,- and 2.5 hours of my day. I was also amazed by the interaction with other clients and statements about how bad TPMS is and that it always leaks. EVERYONE's tires were apparently low and needed nitrogen. Glad I tried them out on a minor maintenance, bu I will NOT be going back to Firestone... Ever.
 
Last edited:
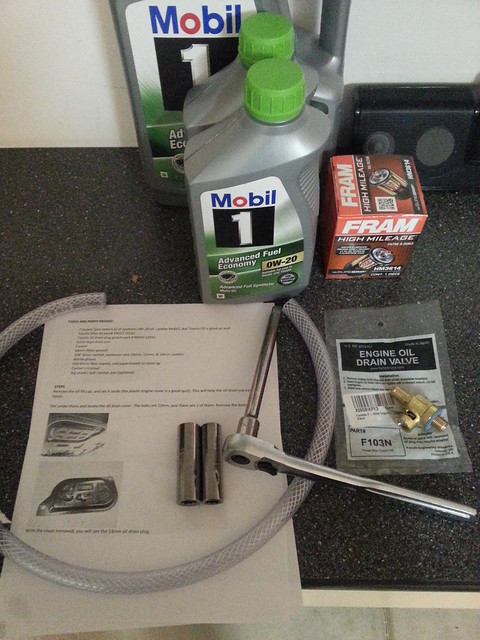
Fumuto Oil Drain Valve

Fumoto Oil Drain Valve
Fumoto F-103N Engine Oil Drain Valve $ 26.50 Amazon
Mobil 1 0W20 – 1 Quart (2 jugs) $ 15.48 Walmart
Mobil 1 0W20 – 5 Quart (1 jugs) $ 24.97 Walmart
Oil Filter $ 6.47 optional Walmart
Total $ 73.42

WHY:
With the full set of skids on the bottom of my truck now, I thought it would be easier to drain the oil by using a Fumoto valve. Being able to turn the valve lever versus having to undo and reinstall a drain plug seemed easier when working in small confines.

WHAT:
I printed out the oil change instructions from [MENTION=65614]Antman[/MENTION] here. It provides great instructions on how to remove the OEM skid access panel and all the things you need to know for a regular oil change.

11050716925_d72da487af_z.jpg


I picked up the valve, oil, filter and some hose. In the final installation I left the hose off since there is enough, but not a lot of clearance between the valve and the access hole in the Shrockworks skids.

INSTALLATION:
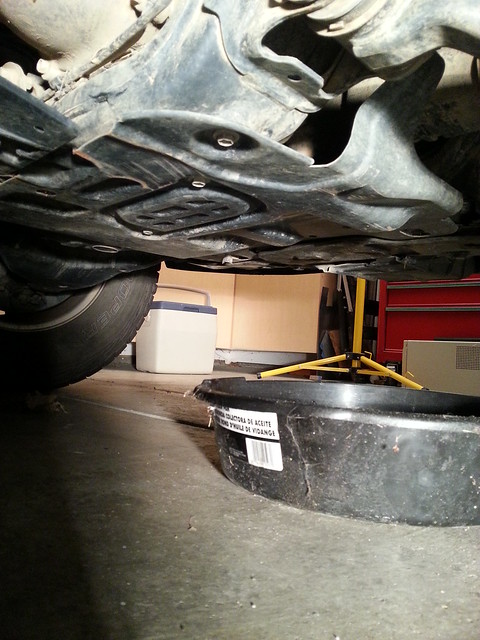
Start by removing the access panel and place your oil drain pan under the opening. Make sure you have a pan that holds at least 7 gallons of fluid and preferably has a drain spout.

11050805416_b6fcd5be11_z.jpg


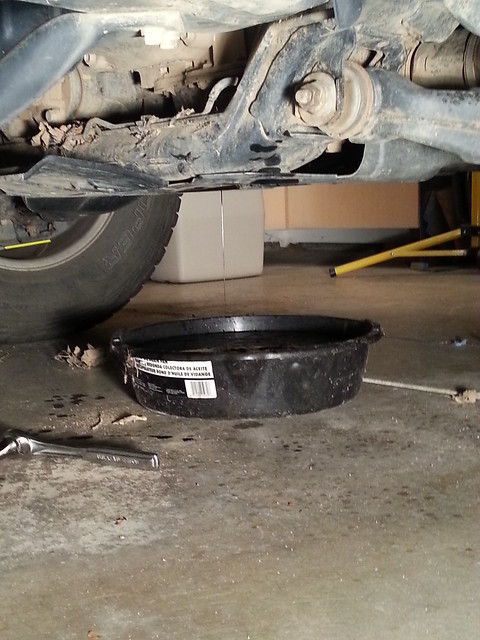
Following [MENTION=65614]Antman[/MENTION] instructions, drain the oil. Make sure you have driven the truck so the oil drains more easily.
11050801406_999c98a917_z.jpg


When you remove the drain plug, it will drain immediately, so wear surgical gloves and be ready for it. If you wish to complete a full oil change, replace the filter now per the instructions linked at the start of this post.

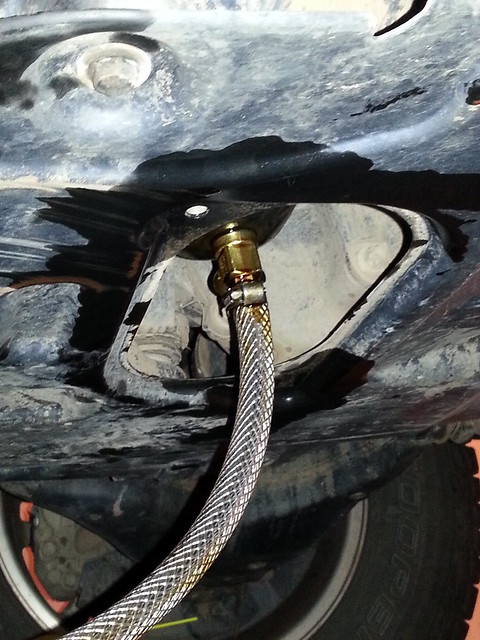
Once drained, you can install the Fumoto valve. It simply screws in place of the drain plug.

11050881523_7b3ce158d6_z.jpg


I initially installed a piece of hose, then trimmed it back, and eventually removed it once I noticed the small clearance with the Shrockworks skids.

11050825224_13d7bf75aa_z.jpg


[A picture of the valve with the Shrockworks skids installed will be added later.]

Refill your oil at this point, run the engine briefly and check to make sure you didn’t overfill the reservoir. You should expect to use at least your 5 gallon jug.

Okki

 
Last edited:

Members online

Forum statistics

Threads
278,309
Messages
3,554,066
Members
248,016
Latest member
Advally Service

Trending content

Back
Top