fourfive
Senior Member
Was wondering for those that have installed the OME 861s, did you put the factory bump stops/cones back into the coil? I realize the cones won't be very effective at this point but was just curious who decided to keep them in the coil.
Any tips on trying to install the taller 861s? I have the OME 890s right now and they definitely required some work trying to get those in place by myself so I can only imagine that the 861s, being a taller coil, will be a bit more challenging. Hopefully I'll have some help from a friend, but in the event I'm doing the install solo, any tips would be greatly appreciated..
==================================================
Edit: Finally got some time to post pictures. Install of superflex happened May 2015.
Couldn't decide between the superflex & 861s but knew I wanted a little more lift then the 890s. Initially got the 861s but not too long after I bought the superflex also b/c I couldn't make up my mind. My plan was to install both to compare & sell the one I didn't use. Installed the superflex first but ended up liking the ride height so never installed the 861s to compare....still deciding if i want to put the 861s on just to see how it looks but time is not letting that happen right now.
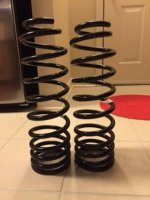
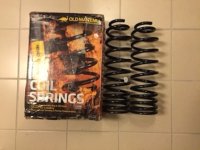
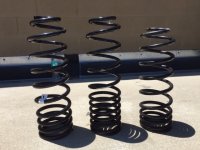
Here's a comparison of the driver side coils: 861 (left), Superflex (middle), 890 (right)
The recommendations of how to install taller coils made this process much easier. Here's the steps I took with the driver side:
1. Chalked front wheels, unbolted parking brake/brake lines off rear diff, lifted rear on jack stands & removed rear driver side wheel.
2. Lifted rear axle high enough to take pressure off rear sway bar end links to unbolt both driver & passenger side links to allow the rear axle to droop further.
3. Lowered the rear axle just enough to unbolt the lower shock bolt.
4. Lowered the rear axle the rest of the way
5. Moved my floor jack to the passenger side axle & jacked up passenger side axle until I had enough space to remove my 890s (which was what I had on at the time).
6. Removed my 890s but needed another ~1-1.5" to get my superflex in.
7. Continued jacking up my passenger side axle until I had enough room to easily slide my superflex into place
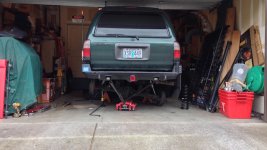
Hear's a pic:
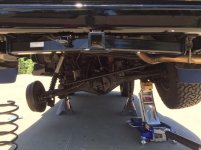
This is probably a known method to many but I didn't go this route when I installed my 890s. The first time I installed my 890s (which was the first time I ever installed a suspension...actually, I was assisting a friend that offered to do the install), I didn't unbolt my panhard & only unbolted the sway bar end link on the side I was working on. This created enough room to push the 890 into place with some force with 2 people. The second time I removed my rear coils (by myself this time), I unbolted the panhard bar, along with the sway bar link on the side I was working on, which easily made enough room to uninstall/install the 890s. HOWEVER, if you've ever unbolted the panhard with the back end lifted on jack stands, you may have run into the same issue I did which was not being able to get the panhard bolt holes to line back up. Getting the panhard bolted back on took me about 3hours when I installed my 890s. My goal when switching to the superflex was to avoid unbolting the rear panhard if at all possible. Never had issues unbolting/rebolting my panhard when it was on level ground but was a different story when the back end was lifted on jack stands.
Any tips on trying to install the taller 861s? I have the OME 890s right now and they definitely required some work trying to get those in place by myself so I can only imagine that the 861s, being a taller coil, will be a bit more challenging. Hopefully I'll have some help from a friend, but in the event I'm doing the install solo, any tips would be greatly appreciated..
==================================================
Edit: Finally got some time to post pictures. Install of superflex happened May 2015.
Couldn't decide between the superflex & 861s but knew I wanted a little more lift then the 890s. Initially got the 861s but not too long after I bought the superflex also b/c I couldn't make up my mind. My plan was to install both to compare & sell the one I didn't use. Installed the superflex first but ended up liking the ride height so never installed the 861s to compare....still deciding if i want to put the 861s on just to see how it looks but time is not letting that happen right now.
Here's a comparison of the driver side coils: 861 (left), Superflex (middle), 890 (right)
The recommendations of how to install taller coils made this process much easier. Here's the steps I took with the driver side:
1. Chalked front wheels, unbolted parking brake/brake lines off rear diff, lifted rear on jack stands & removed rear driver side wheel.
2. Lifted rear axle high enough to take pressure off rear sway bar end links to unbolt both driver & passenger side links to allow the rear axle to droop further.
3. Lowered the rear axle just enough to unbolt the lower shock bolt.
4. Lowered the rear axle the rest of the way
5. Moved my floor jack to the passenger side axle & jacked up passenger side axle until I had enough space to remove my 890s (which was what I had on at the time).
6. Removed my 890s but needed another ~1-1.5" to get my superflex in.
7. Continued jacking up my passenger side axle until I had enough room to easily slide my superflex into place
Hear's a pic:
This is probably a known method to many but I didn't go this route when I installed my 890s. The first time I installed my 890s (which was the first time I ever installed a suspension...actually, I was assisting a friend that offered to do the install), I didn't unbolt my panhard & only unbolted the sway bar end link on the side I was working on. This created enough room to push the 890 into place with some force with 2 people. The second time I removed my rear coils (by myself this time), I unbolted the panhard bar, along with the sway bar link on the side I was working on, which easily made enough room to uninstall/install the 890s. HOWEVER, if you've ever unbolted the panhard with the back end lifted on jack stands, you may have run into the same issue I did which was not being able to get the panhard bolt holes to line back up. Getting the panhard bolted back on took me about 3hours when I installed my 890s. My goal when switching to the superflex was to avoid unbolting the rear panhard if at all possible. Never had issues unbolting/rebolting my panhard when it was on level ground but was a different story when the back end was lifted on jack stands.
Attachments


Last edited: