Painting aftermarket dash kit for head unit install in Trail, TRD OR, TRD Pro

GearJunkie88

New member
When installing an aftermarket head unit you'll need to purchase a dash kit, such as the Scosche like this one: https://www.amazon.com/Scosche-Toyo...93412331&sr=8-8&keywords=Scosche+4runner+dash

This kit only comes in silver. That's great if you have an SR5. If you have a Trail, TRD Off Road, or TRD Pro, you have a black interior instead of silver. At least one forum member has taken the Scosche kit to a body shop to have it color-matched and painted. I took mine to a body shop and they wanted $100 to paint it. I thought that was outrageous so I took a gamble on finding some rattle-can spray paint. And the winner is: Dupli-Color BTY1600 Graphite Gray Pearl. https://www.amazon.com/gp/product/B00407TUIC/ref=oh_aui_detailpage_o01_s00?ie=UTF8&psc=1

I sprayed 3 coats of color and a couple of coats of gloss clear. It is a perfect match.
 
Register to hide this ad
I played around with graphite gray pearl and black sand pearl.

For some odd reason i felt black sand pearl closer. Can't get the OEM gloss though, atleast not easily.

Maybe i need to get serious and repaint better. Graphite grey seemed a bit too light in color when i sprayed it.
 
First of all, you're looking at a GREAT kit. Do NOT bother with metra.

this said, back in the day, I sanded it down, and just sprayed with the autozone paint, and clear coat.
 
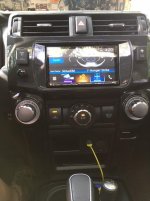
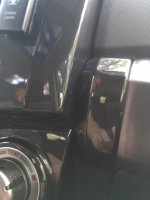
Here are a couple of photos

The first one is the full dash. The 2nd one is a close-up of the Scosche kit + the AC controller trim piece + the little piece next to the glove box.

To get the high gloss, I sprayed 2 light coats and 1 medium coat of Dupli-Color clear. I waited 20 minutes between coats. After 7 days I sprayed 1 medium coat and 1 heavy coat (waiting 20 minutes between coats). After 2 hours, I used a very fine microfiber cloth and some 3M Perfect-It buffing compound.

In the picture you'll notice I made a couple of mods to the Scosche kit. I used a Dremel tool to cut-out 2 places for AOB switches. The Flux Capacitor switch turns on/off some blue LED strips that are under the driver's and passenger's side dash. The knob below the Flux Capacitor switch is a potentiometer that controls the brightness of those LEDs. The Zombie Light switch turns on/off the LED spot lights mounted on the front of the 4R.
 

Attachments

  • dash full.jpg
    dash full.jpg
    47.1 KB · Views: 12,686
  • dash close.JPG
    dash close.JPG
    119.3 KB · Views: 4,953
Here are a couple of photos

The first one is the full dash. The 2nd one is a close-up of the Scosche kit + the AC controller trim piece + the little piece next to the glove box.

To get the high gloss, I sprayed 2 light coats and 1 medium coat of Dupli-Color clear. I waited 20 minutes between coats. After 7 days I sprayed 1 medium coat and 1 heavy coat (waiting 20 minutes between coats). After 2 hours, I used a very fine microfiber cloth and some 3M Perfect-It buffing compound.

In the picture you'll notice I made a couple of mods to the Scosche kit. I used a Dremel tool to cut-out 2 places for AOB switches. The Flux Capacitor switch turns on/off some blue LED strips that are under the driver's and passenger's side dash. The knob below the Flux Capacitor switch is a potentiometer that controls the brightness of those LEDs. The Zombie Light switch turns on/off the LED spot lights mounted on the front of the 4R.

How did you remove the dash piece? Was it difficult?
 
Awesome! Finally a solution that looks like it works....and because of that I want to do it now.....I hate you:redbrick:
 
I played around with graphite gray pearl and black sand pearl.

For some odd reason i felt black sand pearl closer. Can't get the OEM gloss though, atleast not easily.

Maybe i need to get serious and repaint better. Graphite grey seemed a bit too light in color when i sprayed it.


Sorry for bringing this thread back to life. But I'm going to attempt to paint my Scosch dash kit. Would you happen to have pics of the black sand pearl color as opposed to the graphite gray pearl for your dash? I'm just trying to get the best match as possible. Also is anyone doing any other prepwork such as sanding and or using Dupli-color primer before painting?
 
Sorry for bringing this thread back to life. But I'm going to attempt to paint my Scosch dash kit. Would you happen to have pics of the black sand pearl color as opposed to the graphite gray pearl for your dash? I'm just trying to get the best match as possible. Also is anyone doing any other prepwork such as sanding and or using Dupli-color primer before painting?

I just finished installing a radio with a Scosche kit using the duplicolor paints. I bought 2 kits by accident so I decided to paint one with black sand pearl and the other in the graphite grey pearl. The black sand pearl is definitely closest to the factory color. I ended up getting poor results from the duplicolor clear and bought another clearcoat on amazon (USC Spray Max 2K High Gloss clearcoat) that is compatible with the duplicolor paint and the end result was much better.

Not having any prior experience with paint work/prep, it was some trial and error. I'm not exactly pleased with the end result although my wife thinks it looks great. I think that there's a little too much "orange peel" and that I should have wet sanded a little more prior to putting the clear on.

Things I did learn:

1. Be patient, allow 20 minutes or so between coats for drying.

2. Do it in an closed area like your garage but wet the floor to keep the dust down and keep the paint and clear from sticking to the floor.

3. WEAR A RESPIRATOR! An N95 mask doesn't cut it, you don't want to breathe in that stuff, especially the clearcoat.


I'll probably order another can of the black sand pearl and clearcoat in the spring and try it again when its a bit warmer.

Good luck!
 
Last edited:
I will second using SprayMax 2K. YOU MUST GIVE IT TIME TO OFF GAS IN BETWEEN COATS OR YOU WILL GET TRAPPED BUBBLES!


I used this clear on an Inerior project of my old car, I’ll see if I have photos still. I also used it for a 99% perfect match exterior rust repair job.

For my interior project I wanted a pure flat(no orange peel) gloss piano black finish, wet sanding and buffing is required.

The exterior project turned out a near perfect match to the rest of the clear coat. I didn’t even wet sand it.

Awesome results for a garage project.

tIGGOXF.jpg
 
Last edited:
I got it and it looks nice.

Had to rig stock brackets to mount the radio though.

On the website, the pictures they have kind of looks like it's a flat black? Is it actually color matched for the Trail/TRD's?

Also, can you tell me what exactly you had to rig? Does the included hardware not truly support a double-din HU? I also don't see any hardware in the pics that would allow to bolt it back down.
 
On the website, the pictures they have kind of looks like it's a flat black? Is it actually color matched for the Trail/TRD's?

Also, can you tell me what exactly you had to rig? Does the included hardware not truly support a double-din HU? I also don't see any hardware in the pics that would allow to bolt it back down.

It matches almost perfectly to ORP. I like the clean look. I also got the other kit included by Crutchfield, I don’t like shape, and I don’t like to bother with painting.

Included hardware would not support anything. I took stock side brackets, they did fit a couple bolt holes on Kenwood 9905 and it aligned perfectly. I have not a faintest idea how to mount to the trim panel itself.
 
I will second using SprayMax 2K. YOU MUST GIVE IT TIME TO OFF GAS IN BETWEEN COATS OR YOU WILL GET TRAPPED BUBBLES!


I used this clear on an Inerior project of my old car, I’ll see if I have photos still. I also used it for a 99% perfect match exterior rust repair job.

For my interior project I wanted a pure flat(no orange peel) gloss piano black finish, wet sanding and buffing is required.

The exterior project turned out a near perfect match to the rest of the clear coat. I didn’t even wet sand it.

Awesome results for a garage project.

tIGGOXF.jpg
What was the exact order you took in painting it? When did you set sand?

Sent from my SM-G977U using Tapatalk
 
What was the exact order you took in painting it? When did you set sand?

Sent from my SM-G977U using Tapatalk

I followed a typical painting scheme.

-Primer or promoter
15 min flash second coat if necessary, or let dry to handle and wet sand.
- Base coats
15 min flash between.
- clear coat
15-25 min flash between. Light coat then heavier as you build the coats.

I waited about two-three days before I cut/ polished the minimal orange peel.
 

Members online

No members online now.

Forum statistics

Threads
278,317
Messages
3,554,129
Members
248,016
Latest member
Advally Service

Trending content

Back
Top