Pearl's mod/build LT rear/DK +3.5 LT/Custom Baja Bumper/Thorley Headers/Manual T-case

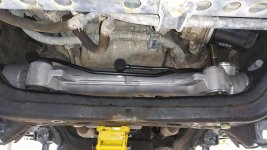
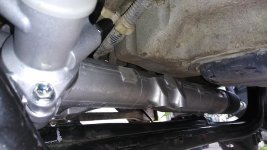
Tried a test fit of the Rack this morning, not enough room to really get an idea of how it's going to sit in there.
Gonna wait on the new motor mounts and fab up a 1/4" spacer.

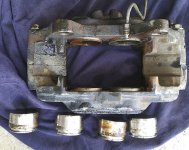
So I shifted over to my front calipers. Did the bigger 5th gen upgrade when I installed the TC suspension (4 years ago). Let me just say not entirely impressed w the new Centrics I installed back then.

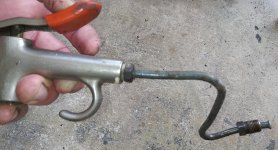
I rigged up a steel brake line to my compressor to push the pistons out. One caliper had 3 seized pistons, but the rubber was in decent shape and still in tact.
Rubber on other side was cracked and brittle, but the pistons were at least still working and popped out w minimal work. Go figure. SMDH. One piston on the other caliper is still seized, so I'm letting some PB Blaster work over night.

Now the clay and lime content in the Ocala National Forest might be part of the reason for this early corrosion, but I doubt these things would last 2 season in the rust belt.

Considering inflation and supply chain issues, I have to rebuild and can't buy a set of quality new ones, because Im already way over extended on this build right now lol.
 

Attachments
  • 20220313_175053~2.jpg
    20220313_175053~2.jpg
    146.4 KB · Views: 310
  • 20220313_175026~2.jpg
    20220313_175026~2.jpg
    138.6 KB · Views: 316
Last edited:
Raised the engine and did a test fit, seems like it'll work. Looks centered on the frame within a 1/16" to 1/8 " Will notch the frame and drill and weld a sleeve for the passenger side mounting hole tomorrow. Then fab some 1/4" spacers for the motor mounts.
 

Attachments

  • 20220314_183128.jpg
    20220314_183128.jpg
    137.7 KB · Views: 289
  • 20220314_183205.jpg
    20220314_183205.jpg
    137.5 KB · Views: 290
  • 20220314_183251.jpg
    20220314_183251.jpg
    136.9 KB · Views: 315
so much inspiration in just a few build pages.. awesome work man.

Really curious to see the rest of the LC200 rack swap. I just ordered a set of the offset bushings from him last night and it will be on my to-do list for later this year.

Really interesting on the FJ tank.. I can definitely see 2 big benefits, first being the clearance up front, which is absolutely terrible from the factory tank.. and the rear clearance at full droop.

I'm also after quite a bit of travel gains myself, but I think I will more than likely go a less popular route... ie: either a 3-link long arm.. or a reverse triangulated 4-link on a larger axle.. I don't need it, but I want it..
 
so much inspiration in just a few build pages.. awesome work man.

Really curious to see the rest of the LC200 rack swap. I just ordered a set of the offset bushings from him last night and it will be on my to-do list for later this year.

Really interesting on the FJ tank.. I can definitely see 2 big benefits, first being the clearance up front, which is absolutely terrible from the factory tank.. and the rear clearance at full droop.

I'm also after quite a bit of travel gains myself, but I think I will more than likely go a less popular route... ie: either a 3-link long arm.. or a reverse triangulated 4-link on a larger axle.. I don't need it, but I want it..

Thank you! I'm kind of a butcher lol. But I've always been more about function than form. My welding sucks, so your not gonna see any fancy dimes.
I rolled the mig out today and realized the power cable I put on it 2 years ago is short. So spent some time redoing that today. That pissed me off. Freaking 40' now.

Participating Toyota dealers have a parts sales going right now w free shipping on orders over $75.
Code is: FREESHIP
I hit one like it last fall when I picked up the rack. You might want to look into that sooner than later.

The seized piston had me wasting time during the Centric caliper debacle yesterday. It won't budge. So I went ahead and bought 2 new OEM's. $115 for a new caliper from Toyota is not bad. The dealer is 17 miles away, so the free shipping saves me gas money.

I bailed on putting the 14" triple bypasses on the back for now. That may take some longer links and cutting into the cab to make the geometry work properly. Way over budget now, so that will take some planning.

FJ tank will definitely accommodate a good bit more travel though.
 
damn it... and there goes another project on the way... Just ordered the LC200 rack from the Greenville, SC toyota dealer.. came out to $420, not terrible. The offset bushings should be on the way soon as well so we'll see.. may need to tackle this at some point in the next few months. Definitely following to see how your swap wraps up!
 
damn it... and there goes another project on the way... Just ordered the LC200 rack from the Greenville, SC toyota dealer.. came out to $420, not terrible. The offset bushings should be on the way soon as well so we'll see.. may need to tackle this at some point in the next few months. Definitely following to see how your swap wraps up!

Lol sorry. If I run into any problems I'll let you know. My fitment should go easier w my diff removed.

I bought a larger aftermarket resevoir and Im gonna replace some old crappy rubber lines too. Probably take the belt loose and hand crank some fluid through to flush out the pump before hooking it all up.

Raining today, so its fab day w some motor mount spacers.
 
LC 200 Rack Motor Mount Spacer fab

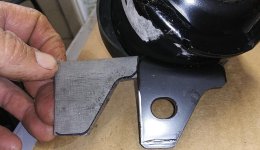
I opted to put the 1/4" spacers between the mm wings and the frame. I really didnt want to put any stress on the mounting points in the engine block either.

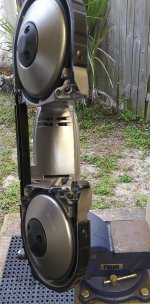
Locked my portable Band Saw in the vise, and voila, vertical band saw.
Got the basic shape cut out, now I'll smooth the corners and edges w a flappy, then drill em out and paint.

I may put some thin L shaped tabs under the hardware to keep the spacers from sliding around. We'll see how secure they sit in there first.
 

Attachments

  • 20220316_172424~2.jpg
    20220316_172424~2.jpg
    153 KB · Views: 360
  • 20220316_172636~2.jpg
    20220316_172636~2.jpg
    140.3 KB · Views: 354
Last edited:
I opted to put the 1/4" spacers between the mm wings and the frame. I really didnt want to put any stress on the mounting points in the engine block either.

Locked my portable Band Saw in the vise, and voila, vertical band saw.
Got the basic shape cut out, now I'll smooth the corners and edges w a flappy, then drill em out and paint.

I may put some thin L shaped tabs under the hardware to keep the spacers from sliding around. We'll see how secure they sit in there first.

recently bought one of those porta-bands and I love it. way nicer and less barbaric than a grinder.

Looks like you're making some good progress on the rack! Definitely a long term goal for me as well
 
recently bought one of those porta-bands and I love it. way nicer and less barbaric than a grinder.

Looks like you're making some good progress on the rack! Definitely a long term goal for me as well

The saw is a cheap harbor freight brand, but it's working. It is variable speed, which I found slower is better when cutting/drilling thicker steel. You have to change the blade in it first thing. Milwaukee blade works pretty good.

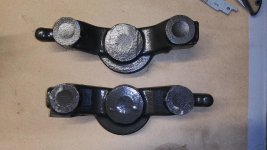
New Motor Mounts were delivered yesterday, but it was raining, so I worked on the spacers and cleaning up the spindle adapters that Dirt King requires for their LT LCAs.

The OEM LCAs were laying on the side of the house for a few years after I installed the TC lowers. Almost threw them out, but had seen your LCA bushing replacement tutorial, and decided to hang on to them and maybe do a redurb one day. Glad I did, because now I would have been trying to source those adapters. Thank You! Lol.
 

Attachments

  • 20220317_075452.jpg
    20220317_075452.jpg
    137.9 KB · Views: 359
New Motor Mounts and spacers are installed, but I didn't take any pics.

I have the Marlin Crawler cam tab gussets I'm going to weld in, so I will probably wait to finalize the rack so as not to damage it. Measured 4" between the cross member and the pan with the new mounts and spacers, so I should have around a 1/2" clearance...Clarence.

My diff guy didn't get to it this week and he goes to the 12hrs of Sebring every year, so that will have to wait until next week. No big deal, plenty to do on this thing. Although I do need to learn how to crack those things open and work on em.

Took a cut off wheel to the TC hoop and the bump stop horn, to make room for the DK kit. 36 grit Flap disc is knocking down the rough stuff pretty well.

Headers look dead sexy in there, bit of a shame to cover em up lol.
 

Attachments

  • DK prep.jpg
    DK prep.jpg
    140.6 KB · Views: 370
  • Old TC Hoop.jpg
    Old TC Hoop.jpg
    144.5 KB · Views: 367
Sebring... man... I have to make it out to that track at some point in my life.. Been lucky enough to visit Road Atlanta a quite a few times for different events, and even got to go on-track not on one, but on 2 occasions...

First time was when my brothers Supra placed top 5 in the Gridlife car show and they took us out behind a pace car for like 3 laps of on-track awesomeness, and the second time was 2 years later when I got to go on a ride along in a drift car, i'll never forget that haha.

Now back to the remaining awesomeness in this thread.. I have a set of total chaos cam tabs to go on as well, and I also opted to get the cam bolt delete kit so I don't have to worry about the cam shifting on me. I'll loose some fine tuning in alignment in favor of not having anything move unless i really screw up lol.
 
Sebring... man... I have to make it out to that track at some point in my life.. Been lucky enough to visit Road Atlanta a quite a few times for different events, and even got to go on-track not on one, but on 2 occasions...

First time was when my brothers Supra placed top 5 in the Gridlife car show and they took us out behind a pace car for like 3 laps of on-track awesomeness, and the second time was 2 years later when I got to go on a ride along in a drift car, i'll never forget that haha.

Now back to the remaining awesomeness in this thread.. I have a set of total chaos cam tabs to go on as well, and I also opted to get the cam bolt delete kit so I don't have to worry about the cam shifting on me. I'll loose some fine tuning in alignment in favor of not having anything move unless i really screw up lol.

I went to the 24 hrs of Daytona one time back in the early 90s. Unbelievable technology even back then. Nissan Prototypes were the dominant cars. Watching those things hitting 220+ mph on the high banks is pretty damn impressive. Never been to Sebring, would like to go there and go to Road Atlanta, LimeRock, Elkhart, The Glen, Laguna, etc...

Would LOVE to see a Baja race and one of Robby's Stadium Truck races too. The bucket list is too long for my budget lol.

Already have the TC gussets, and the MC gussets can go over them and add another layer of protection. I've got the Poly Performance cam lock kit I will put on, as I have the DK heim uppers that can dial in the alignment from there. This will be a major learning curve for sure.
 
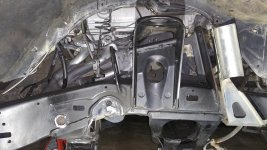
OK, here is some pics of the new MM w one of my homemade spacers and the clearance gained between the pan and the rack. It's not quite a 1/2", but it's close and it will be plenty of room.

Initial measurements are pretty good. It's centered side to side pretty well judging by the boots lining up with the outside of the frame, and each mounting boss is within a 1/16" measuring the yaw position off the core support.
[MENTION=130999]Inv4drZm[/MENTION] Mason tell Devon his 2 piece bushing design seems like it would be more adjustable for positioning than MC's bushing.

Gonna do some more cutting and grinding so I'm pulling the rack out again. I have a new steering sector shaft coming in tomorrow, the old U-joint on the rack end is pretty sloppy. So I will put the rack back in and check my clearance between the steering shaft and the frame, and make adjustments.
 

Attachments

  • New MM w Spacers.jpg
    New MM w Spacers.jpg
    96.4 KB · Views: 341
  • 200 Rack Clearance.jpg
    200 Rack Clearance.jpg
    86.2 KB · Views: 345
Dirt King Long Travel +3.5"

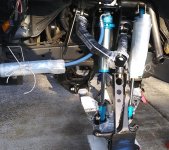
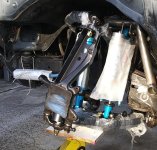
Mocked up the driver side to cycle it through and get my hydros and limit strap spacing sorted out.

Full compression will put the UCA almost into the inner fender well, so I'll most likely bump 1 to 1.5" short of that.

Looks like about 12.5" of travel might be possible.

Still a lot of welding and painting to do.
 

Attachments

  • 20220328_182815~2.jpg
    20220328_182815~2.jpg
    139.6 KB · Views: 315
  • 20220328_182942~2.jpg
    20220328_182942~2.jpg
    136.3 KB · Views: 312
looking awesome man! Definitely great to see the progress. Can't wait to see this wrapped up and on the road again. :trophy:

ps: do recall what length 1/2" bolts were to get the LC200 mounted? Too lazy to pull my shield off to pull measurements and don't recall if I still have the longer bolts that came with my diff drop kit I had on for a while and then removed.. Surely that LC200 rack needs longer bolts vs the stock one?
 
Last edited:
looking awesome man! Definitely great to see the progress. Can't wait to see this wrapped up and on the road again. :trophy:

ps: do recall what length 1/2" bolts were to get the LC200 mounted? Too lazy to pull my shield off to pull measurements and don't recall if I still have the longer bolts that came with my diff drop kit I had on for a while and then removed.. Surely that LC200 rack needs longer bolts vs the stock one?
Thanks! I still feel like I'm WAY over my head, but thats pretty much how I've approached most endeavors in my life lol.

I was in GA, WPB, and Austin working for the last few weeks, so this project has been in a holding pattern. I covered it up from the weather pretty good, but the surface rust is setting in now. So that will cost me a days prep work for welding and painting now lol.

Masons Bump Steer numbers from his CAD experiments kind of have me spooked about this 200 rack. But I'm gonna have to make the decision soon to either bail on it or do the full send and install it.

The problem I have is I already reemed the spindle out to accept the Tundra OTEs. I guess if I wanted to put the OEM rack back in, I could have my CNC guy make me some bushings that would work for the stock OTEs.

**Anyway, my truck already had a diff drop installed also, so I measured that bolt to be 8" and the passenger side bolt at 6". I bought all new Grade 8 bolts, washers, and nylock nuts**.

Still have to fab up a bracket for the larger fluid res, and get some new PS lines in place as well. Probably put a single pass cooler in also.

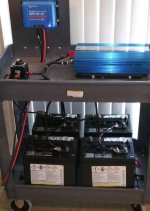
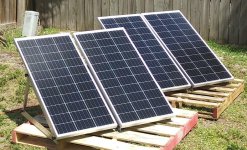
My Son and I got our Solar system operational today, so we will hopefully have a fridge during Hurricane power grid outages.
 

Attachments

  • 20220425_115855~2.jpg
    20220425_115855~2.jpg
    127.1 KB · Views: 290
  • 20220425_115938~2.jpg
    20220425_115938~2.jpg
    157.6 KB · Views: 304
That solar panel setup is awesome man! Especially where you are I'm sure you can take pretty awesome advantage of it if ever needed!.

As far as the projects are concerned, don't worry, I feel the same way with anything i undertake lol. It works itself out in the end, it's not your first rodeo, you'll get through it :)

Thanks for the hardware size, thats about what I was thinking it should be. I'm not longer running diff drop kit but am fairly certain that I still have the longer bolts so i'll need to get under there and verify so I'm not spending extra money on unneeded bolts, washers and nuts.

With regards to bumpsteer.. I decided I'm going to give it a shot and see what its like. I don't feel like going through the hassle of selling my rack and going to the cut down tundra rack.. because at that point I would be running a clevis setup for sure and we're talking probably close to a $1900 cost swing to switch over.. I have no hard core ties to IFS so I figured in the future it will still probably be just as expensive to do a SAS if I want to run larger tires.. I would probably be looking at something in the 37-40" tire range at that point. For the time being I'll just swap in the

it seemed to have worked out pretty decent on the FJ and that was with LT. I'm still stock arms so my numbers obviously looks significantly closer to stock but with the much less likely to fail rack/tie rod setup for 35's and rock crawling.
 
[MENTION=294895]awhitney1[/MENTION] definitely interested the tune you mentioned to aemravan. Between the headers and exhaust, newer intake plenum, larger throttle body and larger injectors, there is most likely some power to gain.
 
Definitely look into, I was just glad there was finally a company that has tunes for the 4th gen v8 4runners!

Get the tune kit here: VFTuner Tuning Kit
– VF Tuner


I contacted Yotawerk tuning on facebook who work with the VF Tuner to get a tune file for the V8 using the 'premium Active Duty' tune. Noticed a good increase in torque and possibly better mpgs. I'll do more driving to get more of a feel from the initial test.

[MENTION=294895]awhitney1[/MENTION] definitely interested the tune you mentioned to aemravan. Between the headers and exhaust, newer intake plenum, larger throttle body and larger injectors, there is most likely some power to gain.
 

Members online

Forum statistics

Threads
278,315
Messages
3,554,130
Members
248,016
Latest member
Advally Service

Trending content

Back
Top