Project pinemind - 1985 4Runner DLX Restoration

pinemind

New member
Hi everyone,

So I've finally gotten my 15 post count and I can start my build thread. Caveat here is that I've already got about 2 months work of weekend progress in my backlog, so I'll be able to post a lot of this up front as time permits. And I only get to work on this on weekends, outdoors. So if you live in the Northeast, that means you also know that means over 2 months I've been able to work on it 8 days, since it rains 50% of every weekend ...

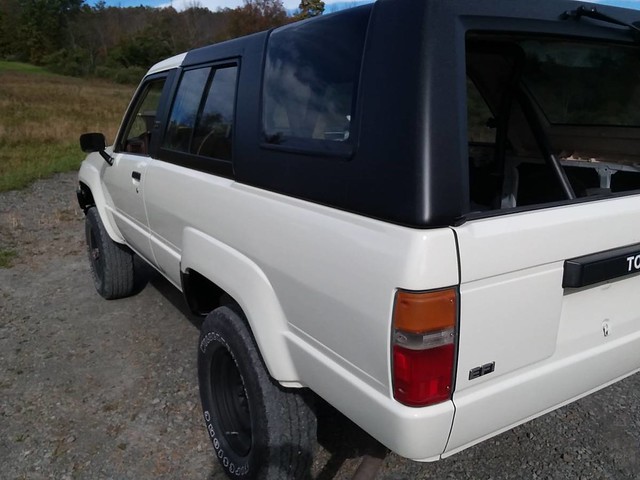
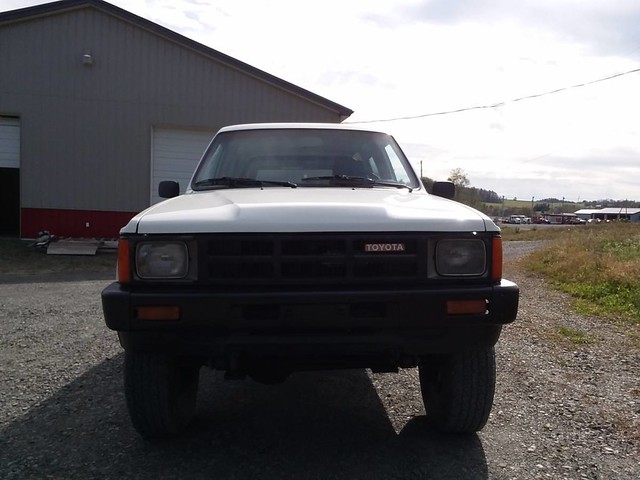
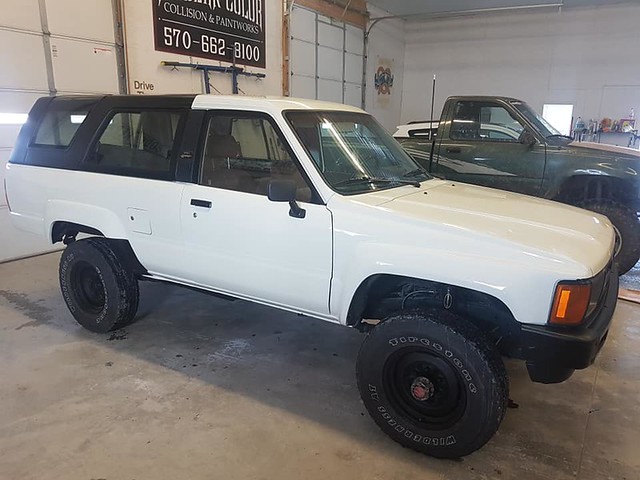
My 4Runner is a 1985 DLX with a manual transmission, 150k, originally painted Red 391, but 85% repainted in White 033 (engine bay, upper firewall, upper b-pillars interior, interior tailgate not-withstanding). I had another 1985 DLX 10 years ago that was Red 391 from the factory, so I took it as a sign but I think I'm going to keep it white as I like the DLX's black trims with the white combination. It's a Utility 4Runner, so it has this rear bench with 2 rudimentary welded bolt things to keep it up. My previous 1985 was not a Utility 4Runner, so it had this pull latch below the bench seat. Never thought I'd say this, but I miss that. So if anyone has that assembly, I'll pay :).

I've always been drawn to the DLX for weird OCD reasons (black door handles, black TINY mirrors, not the ones that bolt into the door, black bumpers, black windshield trim ... basically no chrome, no power windows, cruise, extra things to break).

I was looking for a solid foundation that ran and drove, meaning as perfect of a body I could find. After about 6 months, I found this one owned by a body shop owner who had taken his time to completely restore the body of the 4Runner. All new panels, no Bondo, and a nice fresh 033 paint job. The top was also repainted. No rust, dents, dings or scratches on the body. No rust on any interior panels or floors. The frame had been (mostly) de-rusted and POR-15'd. It did run and drive, but I was told it had an oil leak preventing me from driving it back home 5 hours. Upon arriving, it was clear that whomever removed the A/C (I hate that) forgot to put in the 3 bolts in the timing chain cover and attempted to fix it with RTV everywhere. Easy enough fix.

I originally bought this to swap in a 3.4 and make it an updated version of the 1985, but given the costs there and the uniqueness of the 1985, I decided to go a different route and work to restore it as OEM as possible within my mechanical means. 2 months later, I'm down a rabbit hole where I'm replacing every rusted bolt I can find (toyotapartsdeal.com loves me at this point). I'm also keeping records of every part I've ordered down to the washer. I'll make that spreadsheet public as maybe it can help someone else looking to have a list of all the nitty gritty parts it took me hours scouring partsouq.com to identify and order. Probably not ... :)

What I Knew Was Broken Upon Purchase:
  • Oil Leak in Timing Cover
  • Clutch Master Cylinder Leaked (got new Aisin one to replace it)
  • Brakes were weak (bled LSPV when got home, was 1 pump now instead of 3)
  • Rear window console switch didn't work (p/o wasn't aware of topper switch, zip-tie fixed that problem)
  • Tailgate lock was from another tailgate (found answer on Yotatech and swapped in correct cylinder)
  • Rear differential and surrounding parts very rusty (on the list to fix)
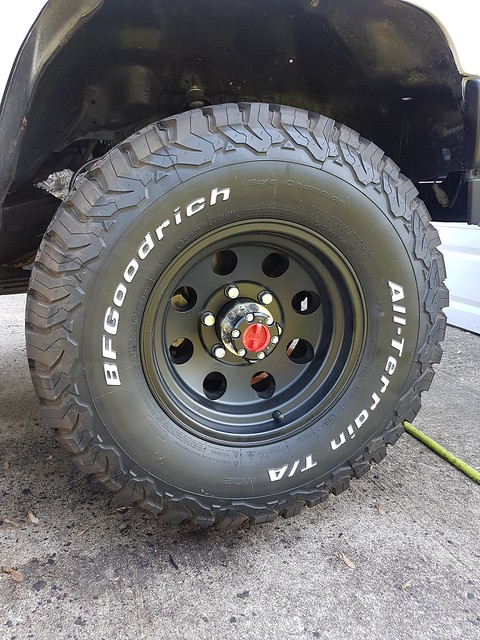
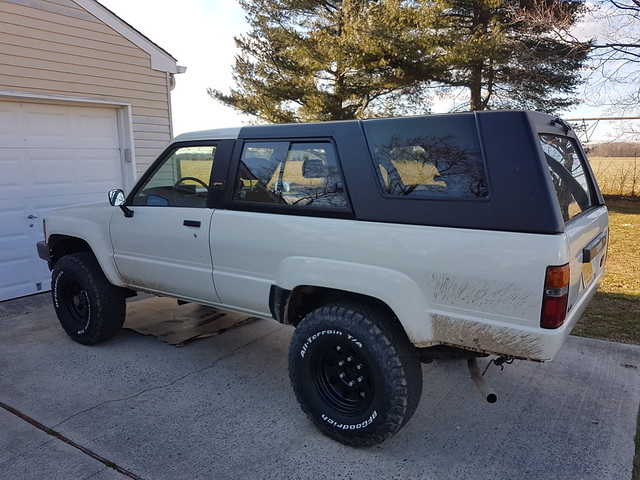
  • Tires were older and dry rotted (replaced with 31.5x10.5 BFG AT's and black steel wheels until I find the holy grail of OEM 1985 wheels)
  • No carpet (easy fix)
  • Drivers side seat destroyed (planning on reupholstering all seats, hate vinyl)
  • Few topper cover pieces broken or missing, which sucks because they are impossible to find in brown
  • Center console shift surround broken, also impossible to find (I broke this as soon as I got home by putting my hand on it)
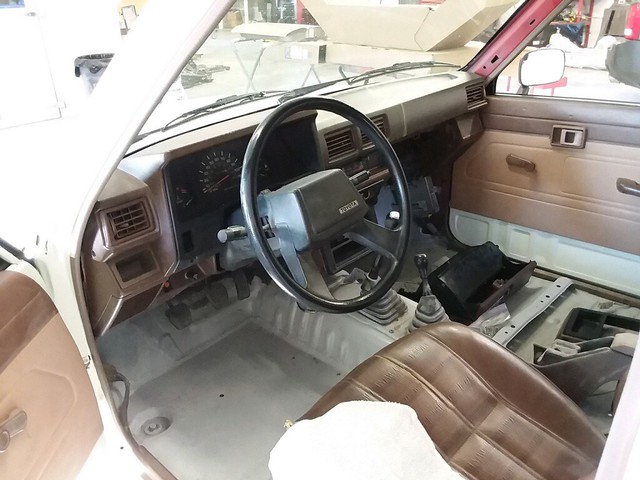
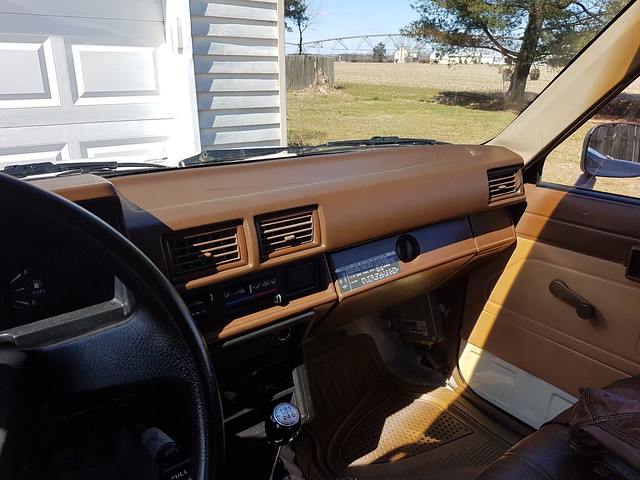
  • Dash pad cracked ... shocker (found a non-cracked one by a miracle)
  • Interior filthy (spent days cleaning, restoring, protecting it, looks great now)
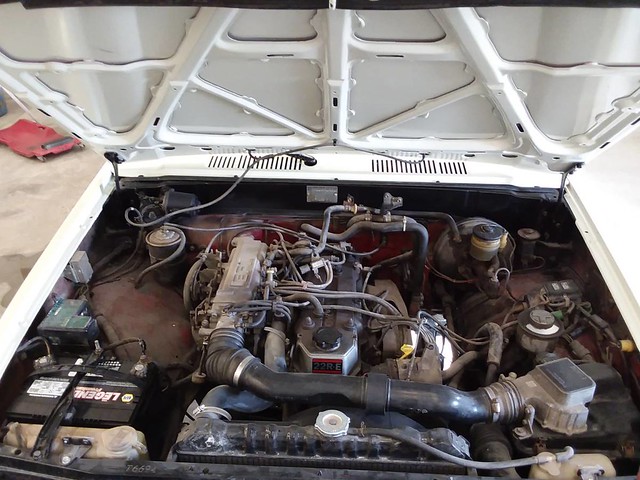
  • Engine compartment filthy (current project as I remove everything that's not the engine and replace or clean it, wiring, bolts, plastic clips included)
  • Rusty brackets in engine bay (wire wheeled and painting all parts)
  • Rear OEM taillights hazy, discolored (installed new OEM ones)

What I Didn't Know Was Broken Upon Purchase:
  • Front brakes were completely shot, pads frozen to rusted rotor, caliper toast (my fault for not checking, ordered all new calipers, rotors, pads, brake lines, and AISIN hubs)
  • Exhaust leak at catalytic converter to rear pipe (planned on replacing exhaust anyway so not a huge deal)
  • Slight random miss at warm idle, still tracking this down (did OEM plugs, wires, cap, rotor, TPS adjusted, waiting on engine reassemble to test)
  • Water leak on driver's side interior (angle grinder + seam sealer fixed this after multiple tries)
  • Topper leaks, sometimes, right where it meets the vertical cab (no idea, have to take it off, weatherstripping looks dead but OEM part discontinued)
  • Another oil leak, front main seal (currently fixing while disassembling engine bay for engine bay paint, wait till I post the picture of how someone attempted to fix it ... think RTV but in the completely wrong place)
  • A/C pressure hose from firewall sawzalled off, rendering it useless, part is discontinued
  • Power Steering Idler Bearing Frozen causing high pitched start up noise (have new one to put in)
  • Radiator leaks, small but still there (ordered all new gazillion hoses (steel heater ones too), radiator, 2 stage thermostat for overshoot which sucks in the winter)

What Are My Non-OEM Plans?
  • Front and rear seat heaters
  • LCE Header (normal quiet rest of exhaust)
  • Soundproofing and deadening entire vehicle (not for stereo, so that I can bear to drive it at highway speeds)
  • ... that's it

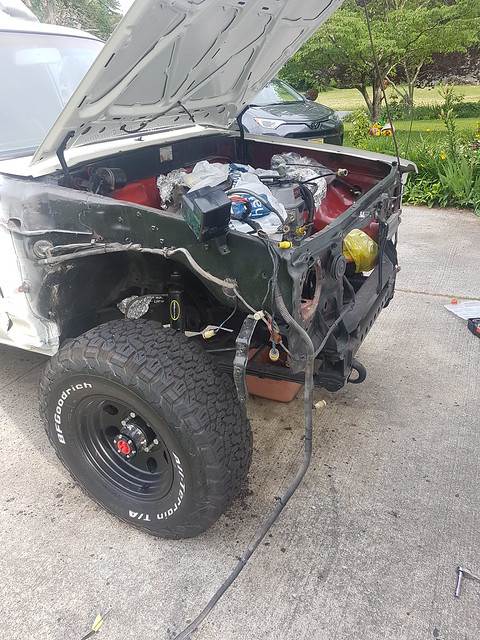
I'm currently in the middle of restoring the engine bay/front brakes and hubs. I wasn't going to paint it, as I'm planning on swapping in a new 22REPerformance engine next Spring and doing it then. But not only was it still red, but it had these impermeable black splotches of, I think, undercoating, all over the paint randomly, coupled with an oil sludge from the oil leaks that got everywhere (think Family Guy quote here) and is impossible to remove. Unfortunately, this is turning into a very tedious process and I've probably spent 3 weekends on this already. Simply put, with the rest of the paint and body immaculate, I can't stand to look at it when I open the hood (you'll see below).

I'll try and post some backlog pictures aligning with what I've done so far and then once I'm current, you should see a post once per week to keep with my work cadence.

As I picked it up:
40006101473_eb4040ae2d_z.jpg


47373874662_88d74e22dd_z.jpg


47373874672_0873061603_z.jpg


46703557404_c18bff8ea4_z.jpg


46703596894_8b1bcb8247_z.jpg


46511606555_9be0fd42df_z.jpg


Added New Tires and Wheels (and obligatory woods run):
40460994043_db034543b4_z.jpg


New Crack-Free Dash Pad and Cleaned up Interior:
46703558924_2b52506307_z.jpg


I'll work on some other posts throughout this week as I still need to get some photos up from my phone.

If you want to follow me on Instagram, that's where I document most of my progress as it's a bit easier when I'm covered in grease:
[MENTION=284564]pinemind[/MENTION]17 (only place I don't have an online handle with pinemind ...)
 
Register to hide this ad
looks pretty clean..
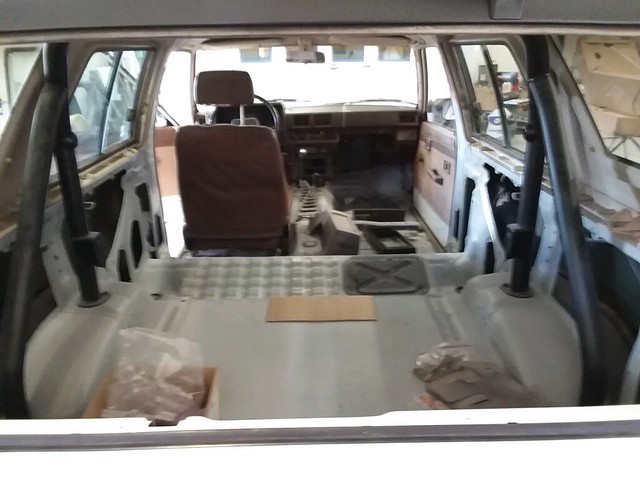
has the truck had some extensive floor repairs in the driver's footwell and in the back?
 
looks pretty clean..
has the truck had some extensive floor repairs in the driver's footwell and in the back?

Nailed it. The previous owner replaced the driver's side footwell and rear deck area with new sheetmetal. Other floorboards are original and have no signs of rust or rot at this point.
 
Going through my pictures, I realize I didn't take as many as I thought I did over the past 8 weekends of work. I tend to get lost in flow from 8 am until 5 pm, most of the time not even eating. Therefore, pictures are usually an afterthought. When you have 1 day a week outdoors to work on something, time seems to disappear.

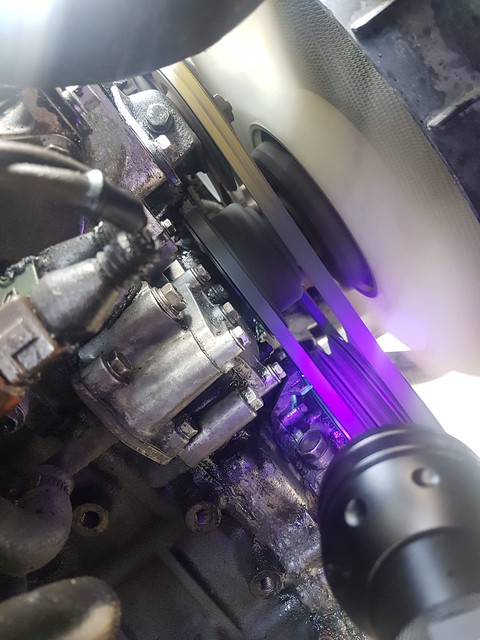
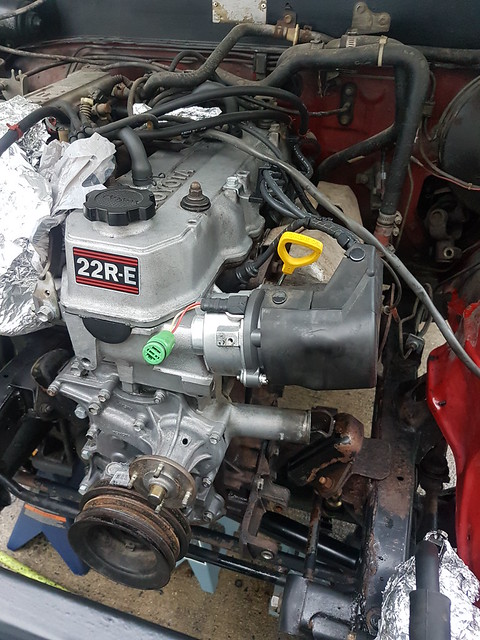
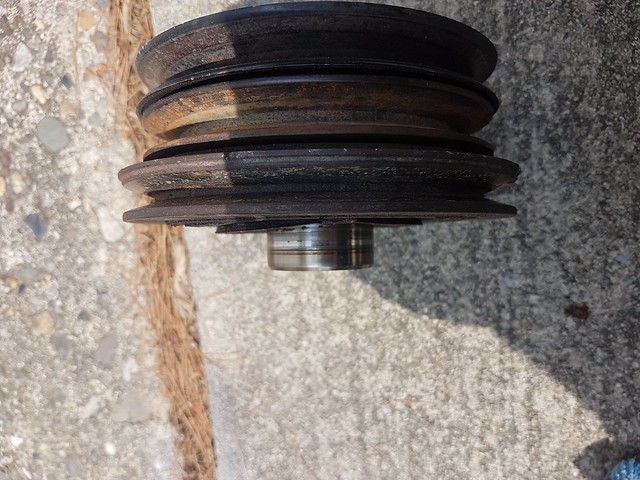
After getting 3 new timing cover bolts to fix the obvious oil leak where the A/C bracket previously was, I discovered after driving around, that there was still another oil leak. Oil was thrown all over the inner fenders, P/S hoses, alternator, frame rails, etc. I purchased of the the UV dye kits with the fashionable yellow grandpa shades and went to work. I was anticipating for the worst (head gasket, timing cover leak elsewhere) since there was oil all over the front of the timing cover. However, turns out it was the front main seal. The picture below is the oil creeping up over the timing indicator before dropping onto the crankshaft and spewing everywhere. I also noticed, that the rear pulley on the harmonic balancer was wobbling while it ran. I don't have a picture, but I'll grab one this weekend and edit this to show how it was actually dented on the inside.


32904363957_f8d2894df1_z.jpg


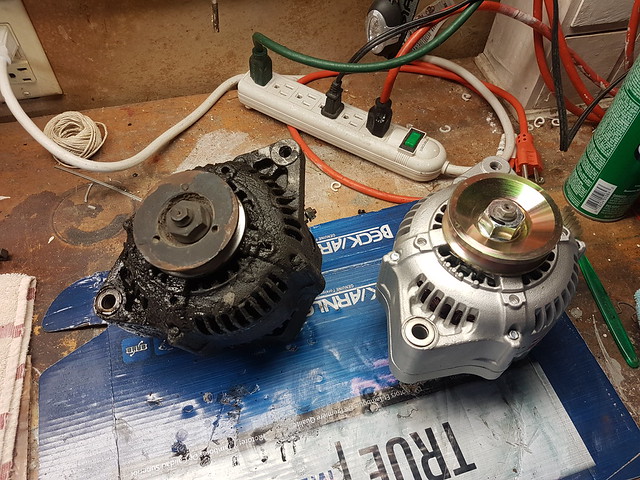
At this point, due to the extensive oil infestation, I decided I was going to take off all the accessories on the engine to better clean things and also replace the alternator. Here's a picture of a two functional alternators, no idea how the oil soaked one was still properly charging the system:


46962593744_e82b16b96a_z.jpg


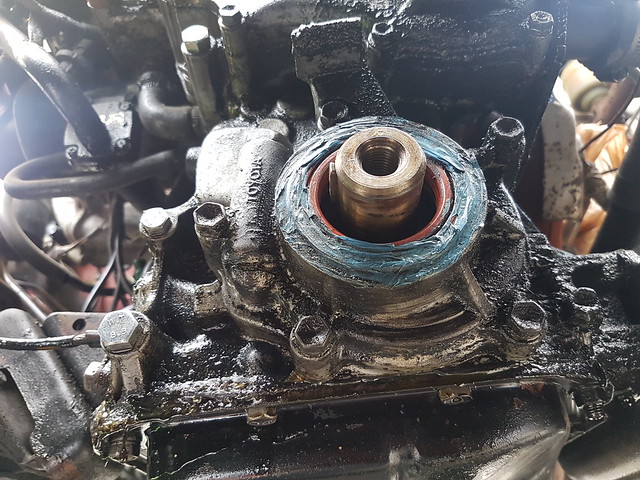
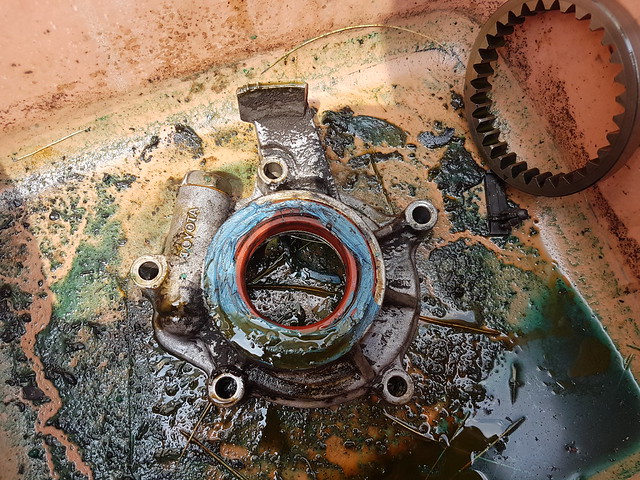
I was all set to do the starter bump method to remove the crank bolt, but I had purchased one of those stubby Milwaukee impact wrenches, and it was able to crack the bolt easily. When I pulled off the harmonic balancer, I couldnt' believe what I saw. It looks like instead of replaceing the front seal, someone put blue RTV on the FRONT of the front main seal, which makes zero sense:


46835333145_44613c7d82_z.jpg


The radiator was leaking and who knows how old the hoses were, so out they came as well. Steel #7 lower-to-mid as well. Also spend an entire day getting the sludge off the engine and surrouding frame rails, etc. Gunk HD Gel, SuperClean, power drill brushes, bronze brushes, brass brushes, nylon brushes of all shapes and sizes.


47058761474_e09bbd6c9d_z.jpg


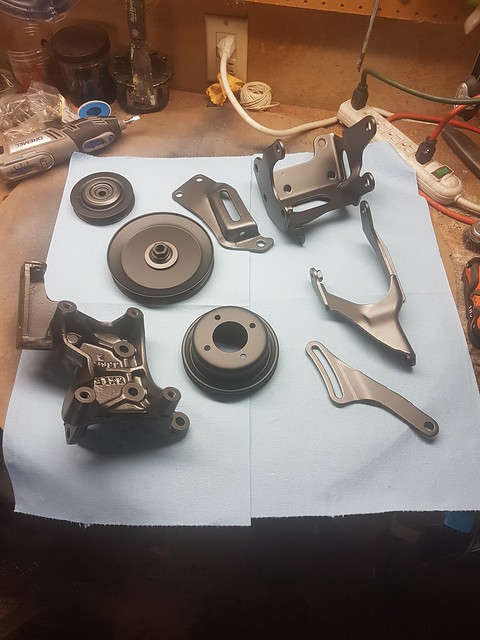
I also decided to wire wheel/paint or sandblast/powdercoat any rusty brackets, pulleys, etc. So over the course of the last month, I've been taking certain parts to the powdercoaters like engine pulleys and engine brackets and also having the bolts ceramic coated. Below you can see the pulleys are all in a satin black, where the P/S, alternator, and A/C brackets are all powdercoated in a dark grey.


47848437041_1a97b69993_z.jpg


I took out all the power steering hoses and reservoir, super messy since I wasn't planning on doing that so I didn't purge it while it was all still running. Those I wire wheeled or cleaned/restored and used some engine spray paint, knowing full well it's probably just going to disintegrate when ATF fluid hits it. I'll get some pictures this weekend of this as well.

The whole air intake, MAF box, throttle body components were removed and cleaned in various ways. Air box was wire wheeled, primed and painted. Plastic hoses cleaned and protected. Awaiting new MAF gasket and some bolts. Picture needed here.

I checked the TPS while it was out and it seemed to read ok via 4crawler's great writeup. Still not 100% sure on the certainty there as the IDL-E2 was giving me infinite at 0.57 mm. Largest feeler I could get a <2.3k reading was 0.45 mm to 0.47 mm. But everything else checked out and I wasn't going to mess with it until the engine was all back together. I don't think it's the cause of the random miss warm idle. I have a full vacuum line kit to replace, not to mention the throttle body was horribly gunked up. EGR is also rusted and probably original, so replacing that as well. Too many other variables I haven't checked or fixed yet.

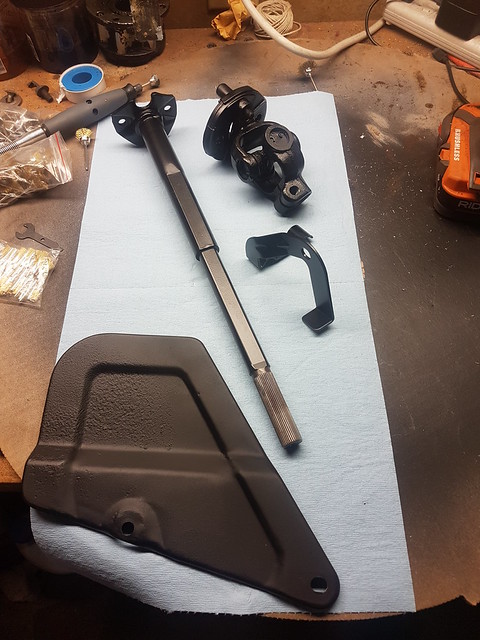
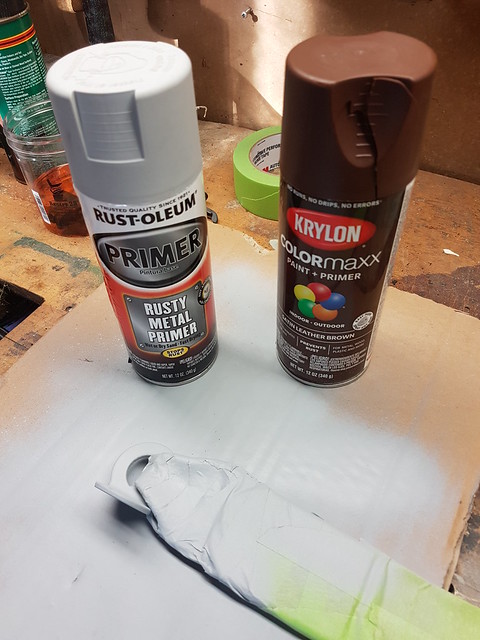
I painted some other random parts as well using some Krylon Rusty Metal Semi-Gloss: intermediate drive shaft, coupler, high-pressure p/s hose frame rail bracket, exhaust shield:


47796225442_57d73ac57f_z.jpg


Ok, that's enough for this one. I'll put some more up tomorrow.
 
Last edited:
Some small side projects I took on when I was waiting for some parts to come in, so I moved to the interior. The ends of the front seatbelts that bolt to the floor were severely rusted. I took my time with a Dremel and removed all the rust. The I painstakingly masked, primed and painted them the closest brown I could find. This took a long time since I had to rotate and hold the metal piece around the sewn loop of the seatbelt, paint, wait to dry, repeat. I found some plastic cup washers so I'm hoping to use those to prevent damage from the bolt as those metal pieces are free to move and could easily chip the paint. We'll see how it ends up working in the long run:


46652755455_35be8c66d4_z.jpg


40602241633_2c3a9f07e2_z.jpg


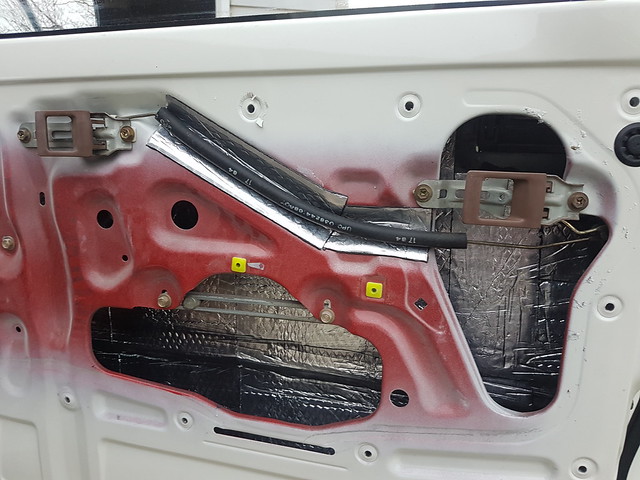
Part of my non-OEM work will be soundproofing. I've never done this before, so I figured I would start with the doors since those results are easily noticed and it's a small area to work with. I'm going to go with sound deadener (chose Noico 80 mil as it was cost effective compared to Dynamat). I may be following this up with some closed-cell foam to do the actual sound suppression in the doors, but haven't done that yet. Elsewhere (quarters, firewall, floor) I will be laying the same sound deadener plus a mass-loaded-vinyl product to really cut down the noise. In the passenger door, I also noticed the bar connecting the handle(s) to the latch always had a rattle. So I found some old vacuum tubing, and put some of the sound deadener behind it as well. The doors shut like a Lexus now and no rattling at all at any speed. Even locking the door has an audible difference. Pretty cool and well worth the 4 hours or so of cleaning, measuring, cutting and contorting my arms :).


46652755495_cb275517f7_z.jpg


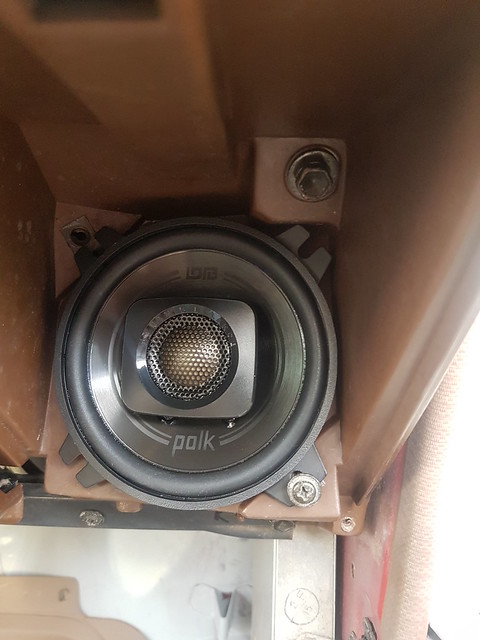
Lastly, I installed some Polk 4" speakers. Because of the asinine "4T" sizing that only Toyota used in the 80's and 90's, normal 4" speakers don't drop right in. Opposite metal clips need to be broken off, and the remainder need to be bent. It's still a bit of a stretch as I barely have the screws grabbing metal, but it's in there. I have a stock 80's Toyota OEM cassette player I got as well, so they currently sound not much better than stock given the poor amperage from that head unit. I am looking into a small amplifier with speaker level inputs so I can get cleaner power to those speakers yet retain the OEM cassette player. I just can't put the volume up too high right now unfortunately. Below is how the 4" aftermarket speaker fits (or doesn't fit) before modification. Don't have an after picture but will get one and update.


47058765924_60518ed3d7_z.jpg


That's my update through my backlog for the day. I tried to group a few interior mods together to keep some sort of cohesiveness to these posts.
 
whoa - awesome job so far. Would love it if you could post links or part #s for the interior bits. I just picked up an '85 as well, and the interior is pretty much completely roached.
 
whoa - awesome job so far. Would love it if you could post links or part #s for the interior bits. I just picked up an '85 as well, and the interior is pretty much completely roached.

Thanks man. Just going to be completely honest, I stopped trying to find interior parts new after going only 3 or 4 deep, because they are all long-since discontinued. If you look on ebay for new OEM interior parts, there's really only two left with multiple listings: Dome Light Lens Cover and HVAC Plastic Decal Cover 86+ only with the updated graphics. This sucks for us '85 guys that have the old school HVAC decal that has the Heat with the wavy lines graphic, mine is all marked up and I've already ordered 2 from ebay that were misrepresented on condition. Funny, whenever I look at the '85 HVAC icons, I think of the opening scene of Ghostbusters with Bill Murray and Rick Moranis. "A couple of wavy lines ... I'm sorry, this just isn't your day (shock)." That's how I feel when trying to source interior parts from anywhere, especially in brown :).

I actually plan on starting a thread to go over my method for finding OEM parts and what my process is, experience with different vendors. I've got it down to a repeatable method, and I think it would help people looking for those hard to find random bolts and such. I'll also be cleaning up and sharing my Google Sheet that shows all the parts I've ordered with details like: from which vendor, if they are OEM or not, laymen's term description of what they are (not the cryptic Toyota part names), categories and sub categories to where that part was located, or what system of the truck it was in. Expect that in the coming weeks as I still have to comb through orders from Amazon, ebay, 22reperformance, yota1, etc. I've got my toyotapartsdeal.com ordered parts all compiled as they are the best source for getting OEM parts as they get them from dealers everywhere and I leaned on them heavily for all the rusted bolts and washers.
 
Looking good!

Where did you find the dash pad?

And funny, that old gooey alternator looks just like mine before I replaced it(and the o-ring on the ps return line).
 
Really great seeing a guy take the time to keep one of these exceptional rigs as stock as possible. It IS way more work than ANY restomod, been there with 40’s! Keep up the excellent work, I am following.
 
Sub'd and anxiously awaiting the parts listing/process you used! :cheers:

Thanks man. Just going to be completely honest, I stopped trying to find interior parts new after going only 3 or 4 deep, because they are all long-since discontinued. If you look on ebay for new OEM interior parts, there's really only two left with multiple listings: Dome Light Lens Cover and HVAC Plastic Decal Cover 86+ only with the updated graphics. This sucks for us '85 guys that have the old school HVAC decal that has the Heat with the wavy lines graphic, mine is all marked up and I've already ordered 2 from ebay that were misrepresented on condition. Funny, whenever I look at the '85 HVAC icons, I think of the opening scene of Ghostbusters with Bill Murray and Rick Moranis. "A couple of wavy lines ... I'm sorry, this just isn't your day (shock)." That's how I feel when trying to source interior parts from anywhere, especially in brown :).

I actually plan on starting a thread to go over my method for finding OEM parts and what my process is, experience with different vendors. I've got it down to a repeatable method, and I think it would help people looking for those hard to find random bolts and such. I'll also be cleaning up and sharing my Google Sheet that shows all the parts I've ordered with details like: from which vendor, if they are OEM or not, laymen's term description of what they are (not the cryptic Toyota part names), categories and sub categories to where that part was located, or what system of the truck it was in. Expect that in the coming weeks as I still have to comb through orders from Amazon, ebay, 22reperformance, yota1, etc. I've got my toyotapartsdeal.com ordered parts all compiled as they are the best source for getting OEM parts as they get them from dealers everywhere and I leaned on them heavily for all the rusted bolts and washers.
 
Okay, another backlog of updates. I moved last weekend so I wasn't able to get too much done that weekend. But the weekend prior to moving, for the first time in about 6 weeks, I actually put something back on the 4Runner instead of in constant dismantle mode. It felt good.

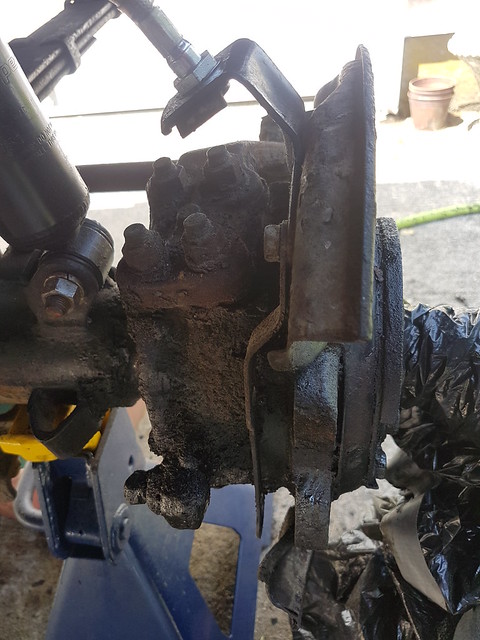
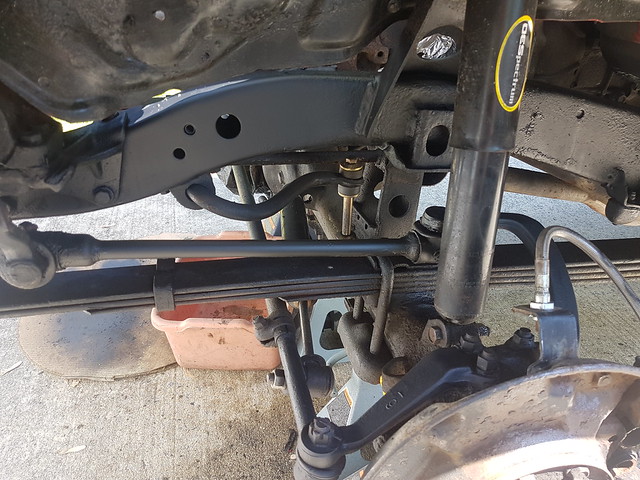
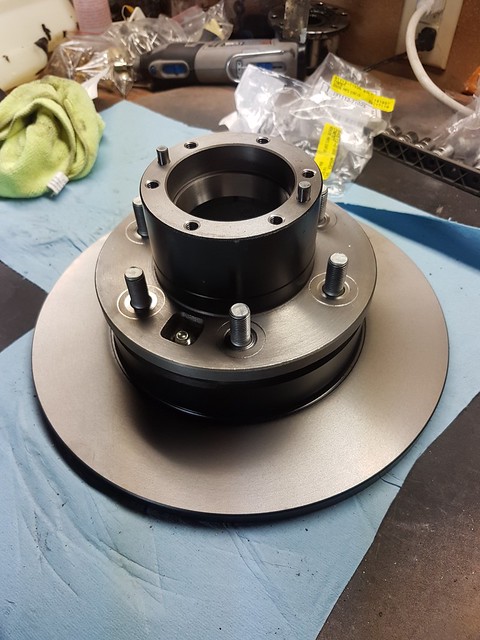
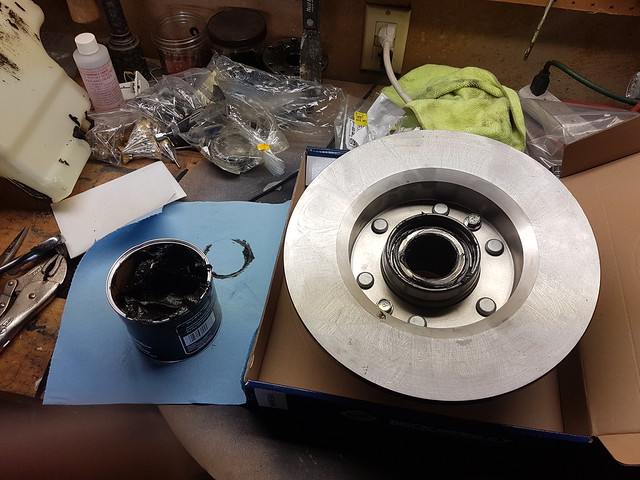
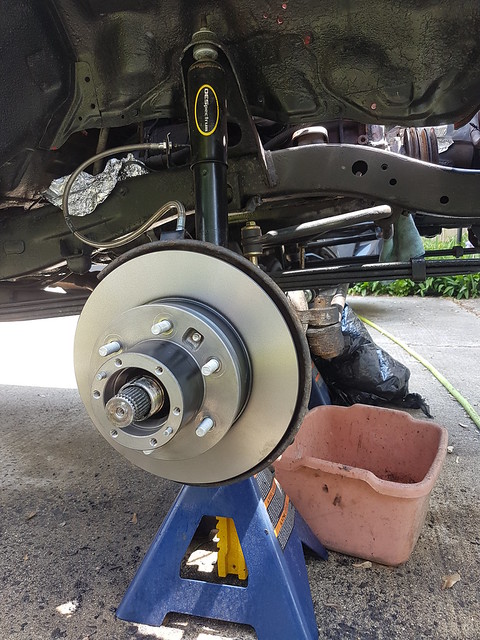
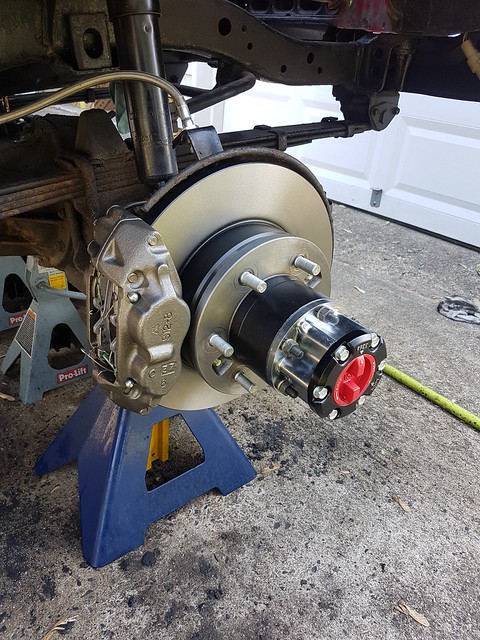
So I went to work on the front brakes and hubs. One of the things I didn't check when I bought it (as listed in my opening post) was that the front brakes were completely shot, all components. No brake upgrades here, just new stock calipers, rotors, pads and last mile hard brake lines. I also decided to rebuild the front hubs up to the backing plate. This meant all new hardware for the spindle (nuts, washers, lock washers), bearings, races, and I even ponied up for brand new OEM Toyota hub bodies (not the Aisin locking hubs, the actual steel hub bodies). Expensive, but they were rust pitted bad even after sandblasting. I also bought brand new Aisin hubs for each side. I thought about restoring the originals, but the plastics were all chewed up, metal corroded and since I was going this far, might as well just do it all. I also spent time chipping off what I believe is 35 years of dried grease and dirt off the backside of the backing plate and knuckle, awful.

47957882657_f483fdb6c4_z.jpg

Before the cleaning


47957896168_922a61eed3_z.jpg

Sprayed some Rustoleum Rust Convertor while I was there just because.


47957894753_2c4210067a_z.jpg

New hub, new Toyota wheel studs (NAPA's were impossible to get in), new rotor


47957882432_69e650bf97_z.jpg

My first time ever packing bearings and setting races. Used a bearing/race driver kit from Harbor Freight, worked really well.


47957923276_af6c62be54_z.jpg

After the torque-down procedure for the spindle nuts. Followed Roger Brown's method on 4crawler.com


47957893843_53dabb4bb5_z.jpg

All assembled with new hub studs, cone washers, nuts and Aisin hubs.


47922418838_48a63ff36d_z.jpg

Aftermarket wheels on, lookin' good until I can find OEM wheels.
 
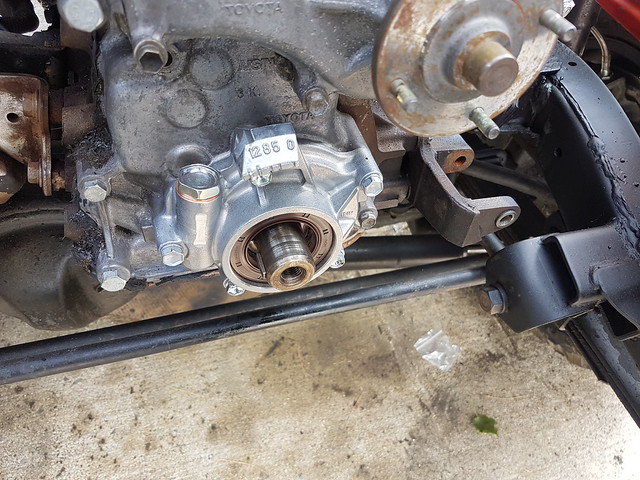
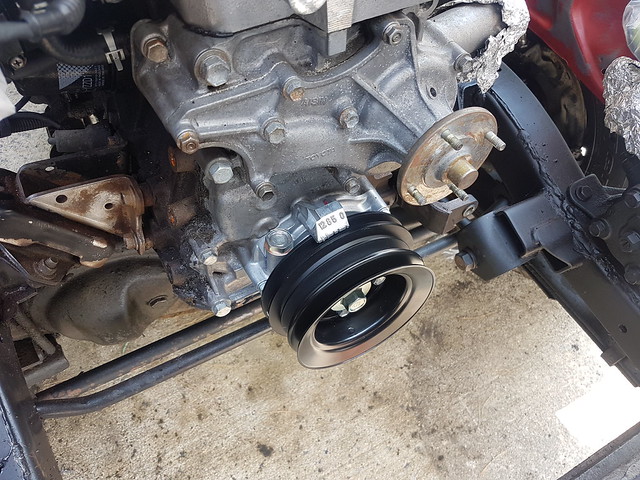
Another lagging update but better late than never. Two weekends ago I finally got to the fixing the crux of the oil leak in the front main seal. Ordered a new OEM Aisin oil pump, front main seal, oil pump hardware/bolts, harmonic balancer (didn't want to deal with the grooving issue going forward), new A/C pulley, pulley bolts, and crank bolt. While I was ready to do the starter bump with the breaker bar to get the crank bolt off, I put my new shorty Milwaukee impact wrench to work and it made short work of removing the bolt. I did have the radiator out but I think it still may have fit in there, given how compact this thing is. Side note, this impact wrench, while expensive, has been the single greatest tool purchase I've made thus far, given how old and rusty some of these various bolts and nuts are.

I posted this before, but you can see that someone tried to fix the leak on the seal, by putting blue RTV on the front side of the seal. Not sure why this was thought to be a good solution as it obviously didn't work.


47987169791_9aa5f5a21e_z.jpg


I also mentioned before in a previous post when finding the oil leak, that I could see a wobble on the harmonic balancer part of the pulley. Strangely enough, the A/C pulley bolted to the front didn't show much of a wobble. But you can see below, after removing the harmonic balancer, the inner ring was dented in multiple locations possibly contributing to this wobble. The scoring on the shaft is also pretty evident, making my decision to spend for a brand new one an even easier one.


47987119132_d00fed6804_z.jpg


In putting on the o-ring so it would stick on the timing chain cover, I just used a small amount of white lithium grease and ran it through my hands. It stuck without issue and I was able to easily get the oil pump with new seal to line up properly without any retries. It's interesting how low those torque numbers are on the oil pump bolts, given it's a pressure seal on the o-ring against a flat surface on the oil pump side, but I followed them from the FSM nonetheless.


47987120942_ec41981b20_z.jpg


I pre-assembled the new A/C pulley to the new harmonic balancer outside the truck and slid the whole assembly on without a problem. My torque wrench only goes up to 100 lb/ft so I will need to borrow one to get it up to the 116 lb/ft (truck was in 5th gear, e-brake on, no issues torqueing it this high).


47987116038_de46315f62_z.jpg


Now I don't know if everything is leak-free and working yet, as I was still in the process of prepping the engine bay for paint. After that, I still need to reassemble the engine bay, install all the new parts for the cooling system (radiator hoses, heater hoses, radiator, etc), install the new parts for the hydraulic systems (brake and clutch), and reassemble the power steering system. So I'm still a few weekends out from seeing if I did it right but it looks great and I'm crossing my fingers for no leaks ...
 
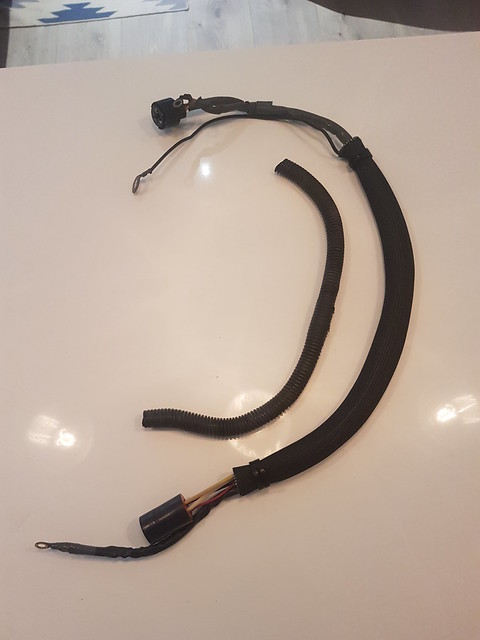
Ok, so the big weekend finally came this past weekend: paint the engine bay day! I've spent at least 3 or 4 weekends getting all the components off, organizing new vs. old parts for reassembly, cleaning the awful oil mess and undercoating off the paint and engine, etc. During that time, I was also cleaning and painting almost all the removed metal parts (brackets, etc) so that when it came time to reassemble, everything was clean and ready. I also had to rewrap a few of the wire bundles as they had become embedded with engine oil. So I used a combination of Tessa tape and some new plastic wire loom. I also tried this fiberglass heat shielded woven sleeve thing. However, it only worked for one set of wires (alternator power bundle) as you have to slide the whole thing into it, no slit like in the wire looms.


48044458498_326de2b5b2_z.jpg


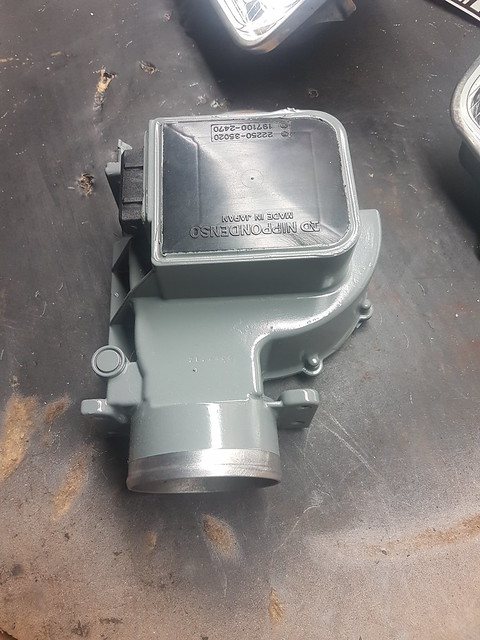
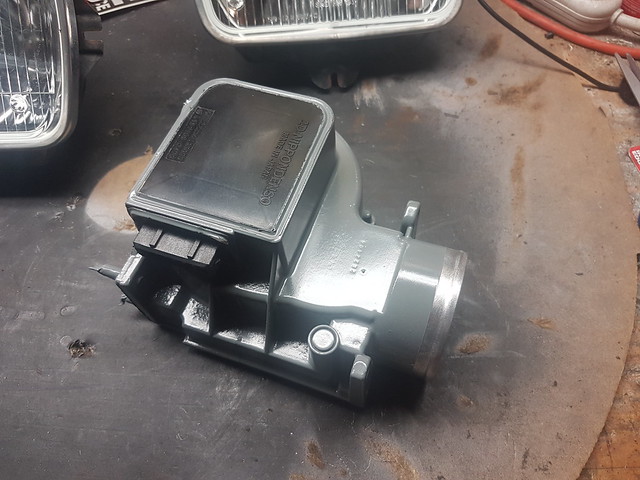
Here's an example of one of the parts I painted, more of an experiment. The MAF aluminum housing was pretty oxidized, and after wire wheeling it, it was super shiny. So I have this darker gray I've been using as an accent color for some of the brackets and brake lines. I decided to paint it and I think it came out great, definitely better than the oxidized and shiny cleaned up version. I realize it's not original, but frankly, it looked like ass no matter how I cleaned it.


48033726667_a4effe82dc_z.jpg


48033726802_930d32b6c1_z.jpg


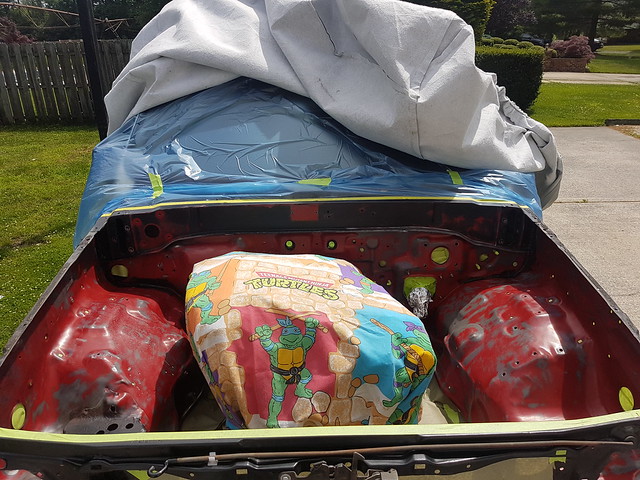
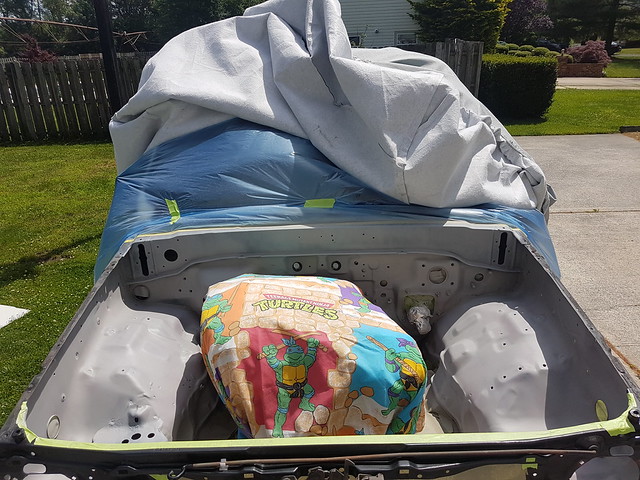
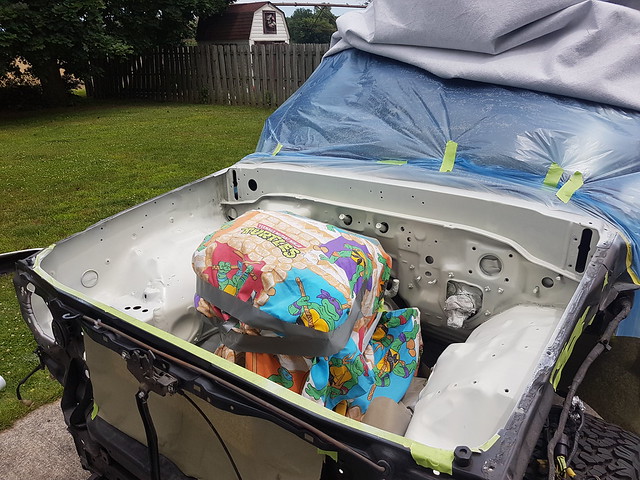
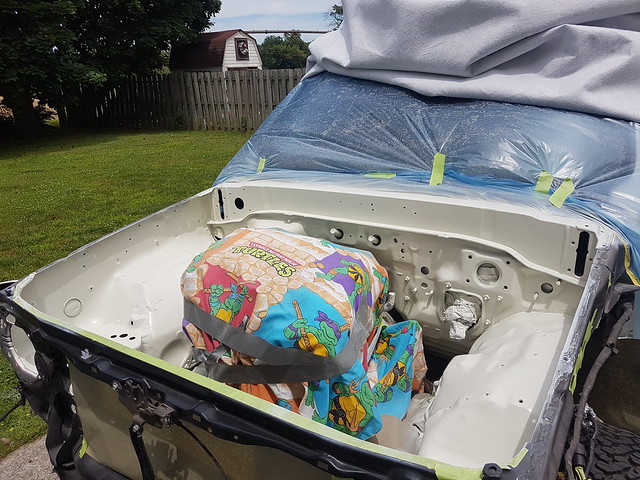
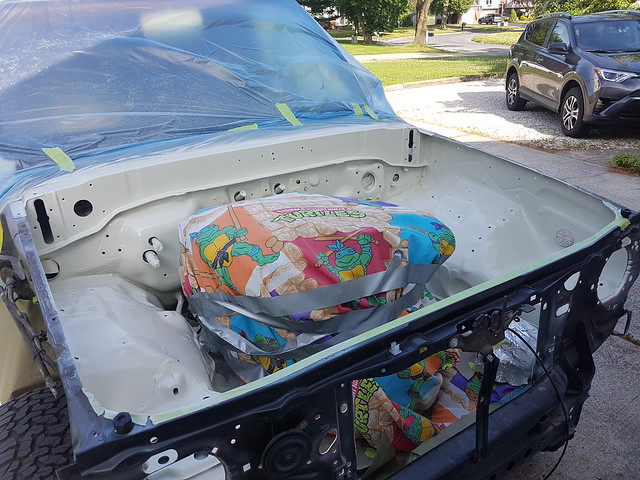
On to the finale, engine bay painting. So I had used a wire wheel as much as I could to get the gunk off, then some 320 grit sandpaper on the harder to reach areas. Given the engine was still in, I realized that it would be a crapshoot on how things turned out behind the engine. But the areas I couldn't get to were not visible, and frankly, anything is better than a giant red engine bay when the rest of the 4Runner is factory 033 white. Then I used some wax/grease prep wipes, wrapped the engine in a sheet and duct tape, laid a towel over the transmission housing, and did some masking paper work for the frame areas. All the paint supplies I got from automotivetouchup.com, as they can mix aerosol cans of factory Toyota colors from ways back. I was able to get 3 cans of 033 white, 3 cans of primer and 3 cans of clear coat. They recommend 3 to 4 coats of primer, 3 to 4 coats of base, then 4 to 5 coats of clear. Between each coat of each layer, wait 10 to 15 minutes. After each all coats of a layer, 30 minute wait. I did this outside and it was a bit windy, so I definitely ended up with some issues in corners where it looks like dust particles and overspray got together and made a 3d sort of pattern. They say to sand it after the primer coat, but there was no way I had the time to sand, re-wash, wait for it to dry, re-mask the paper, etc. It wasn't in the visible areas, and I did try wet sanding one area/wiping it up with a wet rag. It did look better on subsequent coats, but it wasn't worth the effort at this point given the time suck this has been. Weather has been a problem but this past weekend gave me upper 70's with low humidity on Saturday and overcast to do the actual painting. Plus, rain wasn't in the forecast until late Sunday night, giving me 24 hours of time for it to dry properly with the hood off. Mind you, I've never painted anything of this magnitude before, so I was pretty nervous.

Here we go, all the wiring removed through the fender wells.


48033658378_42772caed3_z.jpg


So here it sits right before I was about to put on the primer.


48033724457_bdcc5f7794_z.jpg


And this is after all the coats of primer had been applied.


48033723317_a319756551_z.jpg


Here is after all 4 base coats.


48033610716_03010460b0_z.jpg


And finally, after 5 clear coats (did an extra as it will see abuse from fluids and such)


48033654378_5628493e4f_z.jpg


48033720852_27021a5f57_z.jpg


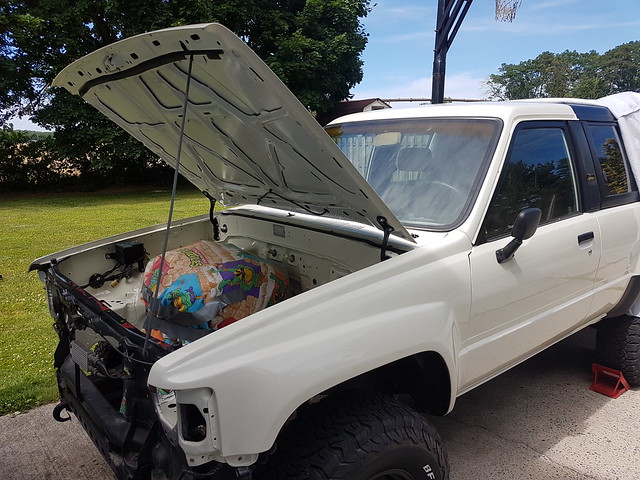
Now with the hood and fenders back on, finally some color continuity! I also painted the hood prop that same dark grey, and repainted the hood hinges/wire wheeled the bolts to remove caked on red paint and rust.


48033720007_e7fbc3cf92_z.jpg


It may be a bit early for this comparison photo, as it will look better once the components are all back in. But nonetheless, this is from the day I picked it up back in late March. I'm ecstatic.


46703557404_c18bff8ea4_z.jpg


I still have to do some wet sanding with a 1500 or 2000 grit next weekend, but I'm not going to go crazy, just on the visible areas. Obviously there is some detritus in the clear from being outside on a windy day (and it's white which doesn't help conceal anything). But I'm super happy on how it turned out, and looking forward to finally getting this thing back together over the next few weekends.
 
This my new favorite 4Runner build. Your attention to detail is commendable. Nothing worse than people cobbling a bunch of crap together and then covering a decent body in Craptor liner and calling it done.

Nicely done pinemind!
 

Members online

Forum statistics

Threads
278,316
Messages
3,554,120
Members
248,016
Latest member
Advally Service

Trending content

Back
Top