Project pinemind - 1985 4Runner DLX Restoration

My apologies for the lack of updates. 2 weekends ago after the crescendo of being done with painting and disassembly, I realized I neglected cleaning up all the hard brake and clutch lines. As with most of the items in the engine bay, they were covered in the impermeable oil/dirt/grease sludge. Given the size and shape of these, this proved a mutli-hour effort in order to prepare it for painting. Plus, I only had about 6 hours on Saturday given some other obligations, so that was all I accomplished aside from organizing a few last minute parts to start re-assembly the next weekend.

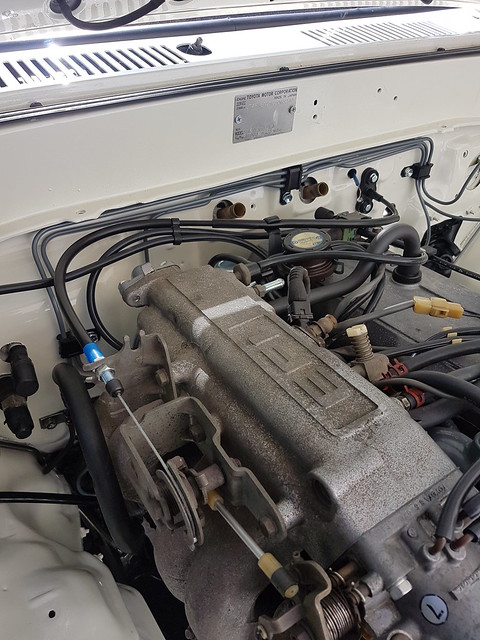
Fast forward to this past weekend, I started with hard to reach items along the firewall, and the passenger side, which was the reverse order of disassembly. While everything was still out, I installed a new OEM EGR Valve and associated hardware, gaskets. What's strange is, there was no gasket on the old EGR Valve when I took it off. I know it's attached to the intake-to-head gasket, but now I'm wondering if this could have been the source of my random mis-fire at warm idle. I also painted the top portion of the part that goes into the intake manifold. I've been using this dark gray for engine bracketry, and keep a semi-gloss for all other brackets that attach places other than the engine. Nice shiny new bolts and nuts too!


48111456181_ed474d0b1b_z.jpg


Not sure what the part is called, but it's part of the EGR system (little brown plastic disk) was next. Same deal with the bracket here, painted it dark gray with engine ceramic DupliColor paint. As I went along, I was also installing brand new black silicone vacuum lines I got from LCE.


48111496628_0f42fb1fc3_z.jpg
[


Then I reattached the rear VSV, cleaned up with a wire wheel on the bracket, more new silicon vacuum lines.


48111560552_ba7d930b3c_z.jpg


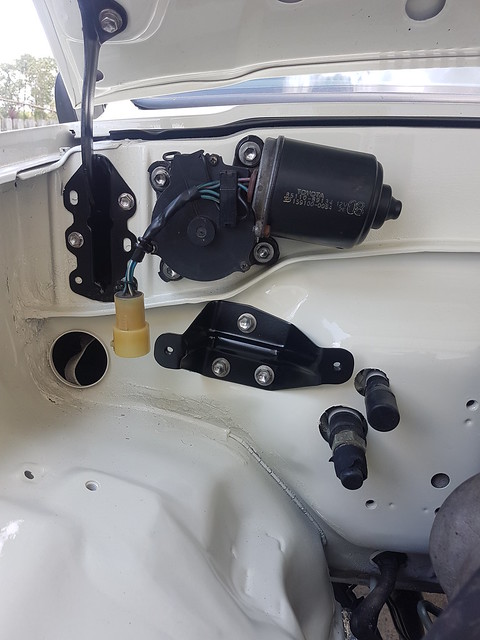
Next up was the windshield wiper motor, and the rear portion of the charcoal canister bracket.

48111496328_8dd955e6da_z.jpg


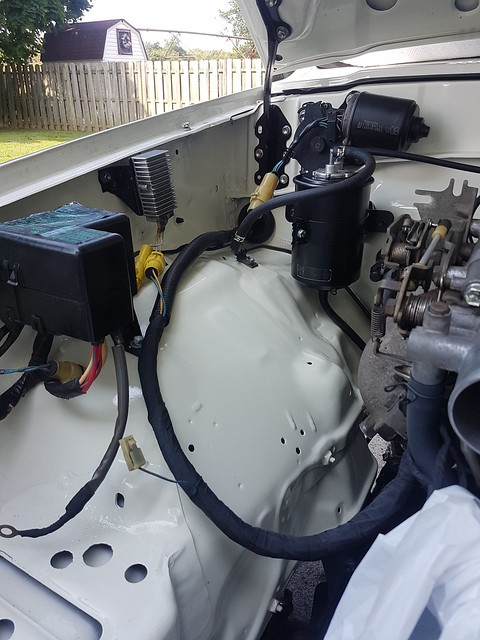
Fuel lines reattached for the charcoal canister on fender and soft tube to firewall. Attached front part of charcoal canister bracket.


48111559527_305ac05f3f_z.jpg


Repainted charcoal canister, new soft fuel hose and clamps installed.


48111495953_9c8d44d8e1_z.jpg


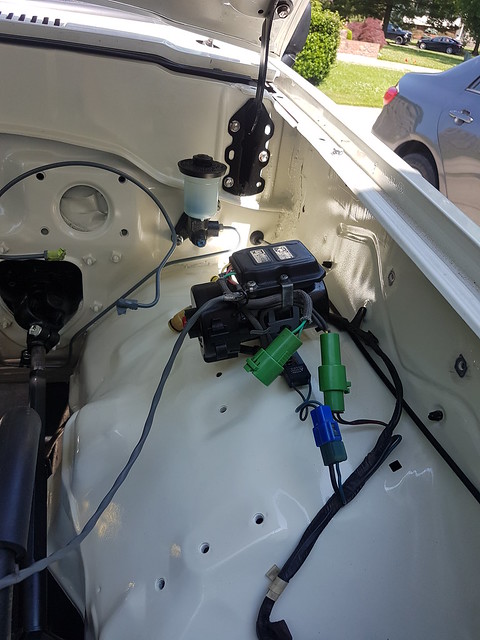
Rerouted the ECU harness back through the firewall and properly installed the grommted. It was covered in grey RTV so got rid of that nonsense. Also, you can see here the original grey tape and wire loom was removed. This part of the harness was in firing range of the oil leak from the front main seal, and was thus oozing oil whenever I tried to clean it. So I removed all the old grey tape/loom, cleaned the wires, and rewrapped with Tessa tape. Also attached the starter resistor thingy and painted bracket.

48111539812_e28ec1172e_z.jpg


Painted brake/clutch lines were next and preassembled with the restored/painted brackets. Also a new OEM clutch hose preinstalled (turned out to be a mistake and should have done this afterwards, found out that on Sunday -> stupid hose clip was impossible to get aligned with the clutch line attached).


48111471043_986b7c3c78_z.jpg


Installed the lines, being very careful especially with the curly-Q ends to not nail the engine bay paint.


48111466953_90942321e8_z.jpg


48111529962_3f5abb13dd_z.jpg


48111455188_6bfa99f249_z.jpg


And that was the end of Saturday. I'll gather my Sunday install pictures and post the rest up tomorrow or Wednesday. Mostly working my way along the firewall, and doing some random installs on the driver side (PS hp hose, steering shaft, speedometer/throttle/parking brake cables, clutch slave cylinder, clutch master cylinder, ignition coil and igniter).
 
Last Sunday started with getting the clutch hose clipped into the firewall. With it already connected to the hard line, I couldn't get it to line up perfectly, even with bending the line a bit due to the tight tolerances for that c-clip to get in there. So I took it off and clipped it in first, then was able to reattach the hard line. Moved down to the slave cylinder install, no issues here. New tiny hard line there, connected up to the soft line, left the slave cylinder bolts loose which helped.


48123717208_be6d3f4180_z.jpg


Next was the throttle cable. First non-OEM part I've installed outside of calipers/rotors as it was discontinued from Toyota. Picked one of the two from RockAuto and felt like I lost that coin flip. The front part is made of rubber and is 3 to 4 times as thick as the OEM one. So the bolts that go into the firewall were way too short. Luckily, I had picked up a metric bolt set and an M6 x 30mm fit the threads. Still strange the front part is rubber which means it just compresses and compresses until you feel it's tight enough. Also the metal piece that slips into the throttle linkage on the intake manifold is a lot smaller. Hoping it holds up to the pulls over time.


48123779642_2e3b136dd2_z.jpg


48123685421_0943db1788_z.jpg


Next, the "whale" piece for the parking brake cable and clip were installed.


48123716013_300884e4e1_z.jpg


48123685041_9c59f5aee6_z.jpg


Speedometer cable plumbed back and installed into gauge cluster.


48123715698_08b7f0619c_z.jpg


Skipped back over to the clutch system to finish that up with the new Aisin clutch master cylinder/gasket/nuts.


48123777257_fc9e202cc5_z.jpg


Sun was at a weird angle, but I first installed the painted power steering high pressure hose with the frame rail bracket. Since it was painted and low in the bay, I wanted to get this out of the way. Then I moved onto the intermediate steering shaft and coupler/shield.


48123713803_e758880d45_z.jpg


48123714088_2640f371f2_z.jpg


New heater valve installed on the firewall. It was at this point I finally encountered my first set of missing parts I knew I bought (but way back in late April per my records): the white plastic brake booster valve and new metal firewall bracket. Wasted an hour going through bins upon bins but no go. So the firewall was 90% complete. Hopefully I can find those parts, otherwise I kept the originals that can serve for the time being. If it only happened for something as trivial as those parts, and this was the only time, I consider myself lucky.


48123775557_2da5e53878_z.jpg


Moved on to sanding a few spots on the fender well for the ferrite bracket to sit on. Then went and installed the coil and ignitor, reconnected some plugs.


48123712958_001b28f46b_z.jpg


Don't forget the rear block/engine hoist to firewall ground! And I can't remember, is that rear hoist bracket supposed to be crooked/angled towards the firewall? Definitely didn't fit straight up and down, but it was so long ago I have no idea.


48123775302_c2175495e9_z.jpg


Squeezed in one last item for the day, the low-pressure hose from steering box to cooler with new clamps. This gives a good view of this area I focused on for the latter portion of the day.


48123680981_8dc3a1be6b_z.jpg


And here's how I left it on Sunday mid-afternoon. This was probably the most fun I've had on this project in the last 2 months, since it was just like putting adult Lego's together.


48123774192_257ce14e38_z.jpg


I'm still up in the air as to what to do next, but I think I'm going in this order for ease of install: steel lower radiator hose, power steering and alternator brackets, alternator, LCE header, fan clutch pulley, fan clutch, fan, radiator, power steering pump/reservoir/other hoses, power steering pump/pulley, belts, coolant/heater hoses, brake booster/MC, air box/intake, battery, headlights. Shit, that's a long list still ...
 
Looks really beautiful!
On that rear engine lift hook, it needs to be turned around so the hook part faces drivers side. I like the black hood hinges on white.
 
Another weekend with 1 day of work, and unfortunately, it was on the hottest day of the year. Faced with 95+ temperatures and humidity severely limited the length of my work. But I've also got an extended 5 day holiday over the 4th of July where I'm 95% sure I'll at least be able to start it back up before I send it to the exhaust shop to complete the cat-back piece (and another issue I discovered, read below).

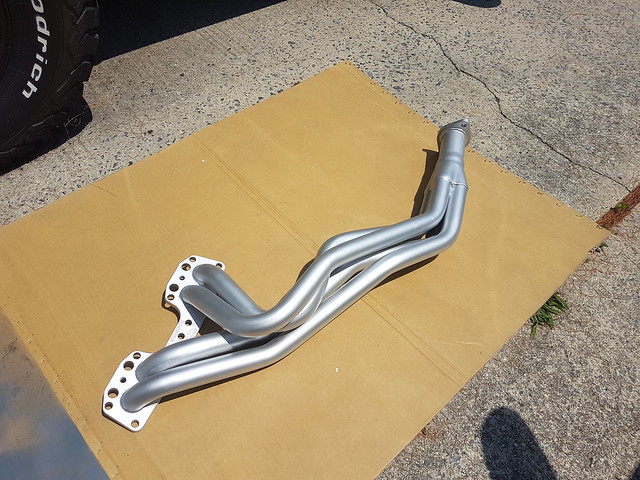
I started with the exhaust header, well, because I was super excited to get this thing in there. When I had my 1985 4Runner after college over 10 years ago, I always wanted to get one but never got around to it before I sold it. And also, it was logically a good idea given the amount of components still not installed on the driver's side of the engine bay. It's an LCE header and I also got new exhaust studs, plus the 4-wire heated O2 sensor, high flow cat, assorted flanges.


[
48169554416_401cc31e3e_z.jpg


Header studs installed, to what I thought would be a good torque. LCE says 10 lb/ft but it did not seem like enough so I pushed a little past those clicks. Don't really understand how if the flange nuts have to be done at 32 lb/ft, a stud at 10 lb/ft is going to hold once you start cranking those nuts down. But Toyota doesn't actually give torque specs for those studs, so apparently it's a crapshoot. Forums didn't seem to have a consensus either.


48169629002_9cc713b022_z.jpg


After installing it, my worst fears were confirmed on 2 of the studs. The lower front-most and rear-most studs both wouldn't torque to 32 and kept spinning, pulling the stud slowly out of the block. I tried removing the header, and re-cranking those 2 studs, but after putting it back on, the nuts still wouldn't torque. So I need to helicoil it, chase it, or something. I may just leave it up to the exhaust shop once I'm finished starting it back up, as I need them to do the catback work anyway for new pipes. It's not like they pull right out, so for testing it, 6 out of 8 holding tight should get me by until then.


48169626622_d66d77a578_z.jpg


48169551761_f095b02143_z.jpg


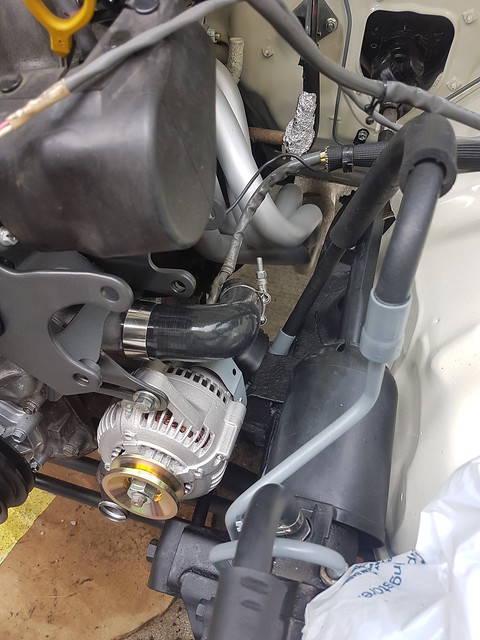
Next was the lower #5 (or #7 depending on who you ask) steel radiator pipe. No individual pictures as I was on the verge of passing out and just needed to get shit done. Then I started on the power steering/alternator bracketry. One thing I was concerned about was grounding for the alternator, seeing as I powder coated the front adjuster bracket. Lower one was still bare steel where the long bolt goes through. Also, where the eyelet ground from the alternator wire harness connects from the factory, to the upper power steering pump bracket, was also coated. So I decided to just skip all that, and screw that eyelet into the dipstick tube holder that goes right to the block. No idea why it doesn't go there from factory as I'm sure it's better right on the block. If anyone sees issues with that adjuster bracket being powder coated for grounding purposes, let me know. But I think the grounding is mainly handled by the small wire that bolts right to the alternator on top with the nut, then the ground extension from the harness completes the ground (the one I moved to the oil dipstick/block screw).


[
48169551876_b3ae797dfa_z.jpg


48169623567_c238c09d8e_z.jpg


Upper power steering idler pulley bracket installed, completing the jigsaw puzzle.


48169623297_91f4f2aea6_z.jpg


Nice front view. Had all the bolts ceramic coated (except the alternator hold down bolt for fear of grounding issues).


48169546341_976a26fe65_z.jpg


Ferrite bracket installed.


48169622292_2a91b150ea_z.jpg


Sky started to rumble, so I jammed in one of the silicone radiator hoses to connect the water pump and the lower steel radiator hose. The clamps that came with them are pure garbage, I miss the spring ones (never thought I'd say that).


48169618412_84b916e00d_z.jpg


And here's where I stood right before the skies opened up and I was burnt to a crisp. Also reinstalled the firewall grommets (A/C lines, heater lines) that I cleaned up and protected with some Car Guys plastic/vinyl/rubber restorer (great product, use it everywhere).


48169544156_d859678d47_z.jpg


Next steps are getting the power steering pump, hoses, reservoir, idler pulley, main pulley, fan clutch pulley, belts all in. Then I'll move to finish up the hydraulic systems (brake and clutch) just to get that all out of the way. Then it's radiator and remaining few hoses. Air intake components and battery will round it out before I start it up again.
 
It's ALIVE!!

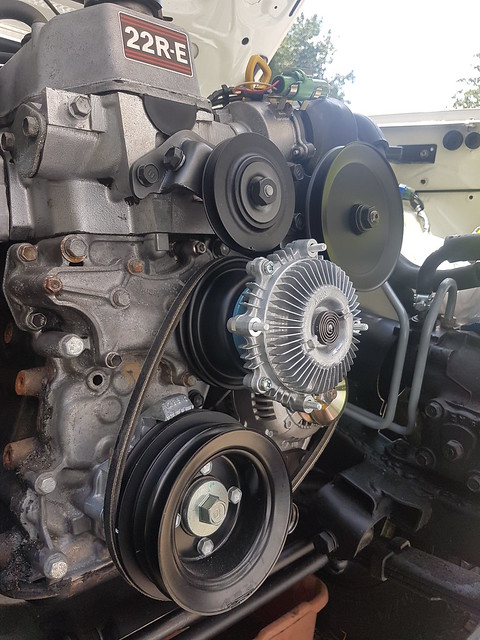
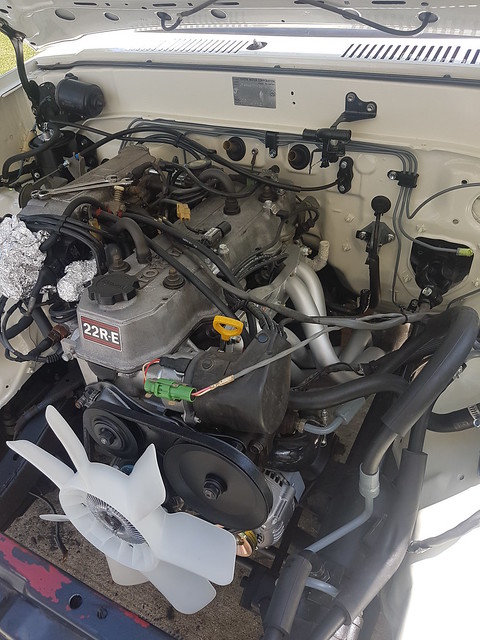
Made a lot of progress over the extended holiday weekend, although the weather was unbearable and stormy, so I lost about a day's worth of work over the 3 days I worked on it. First I started with getting the power steering pump installed and hoses connected. Then all of the pulleys and fan clutch attached so I could get the belts torqued up.


48225840921_533b964331_z.jpg


48225836381_241a941d33_z.jpg


48225835251_3ff8d94c1d_z.jpg


48225892427_774a64c082_z.jpg


New non-yellow fan installed:


48225889832_f7c9240a35_z.jpg


New radiator and cap:


48225888527_63d35d09f1_z.jpg


Brake booster and Aisin master cylinder


48225887542_21fa08173b_z.jpg


Shroud (and new lower shroud) installed:


48225885497_4092d89ca8_z.jpg


New silicone radiator and heater hoses all around:


48225821071_746e44dd7f_z.jpg


Brake booster vacuum hoses and valve:


48225819386_4e23c34d2e_z.jpg


Next was the air box and AFM, intake hoses, clamps (one new intake elbow, other was discontinued but checked for cracks and holes):


48225875402_e951009723_z.jpg


48225873787_4ddceb0c82_z.jpg


Soldered, plumbed, fuse tapped and grounded all the wiring for the 4-wire heated Denso O2 sensor. Hacked back the connector pipe a bit. I didn't install the cat yet as I'm just going to have the shop that fabs up the rear of the exhaust to finish it off. Note, I tapped off the cigarette lighter 15 amp fuse in the driver's side kick panel, using a 5 amp fuse for the heated sensor. It was the only non-critical ignition switched fuse. I ran the wires back through the hood release grommet (heater wire and ground).


48225870292_f87e8a1fa3_z.jpg


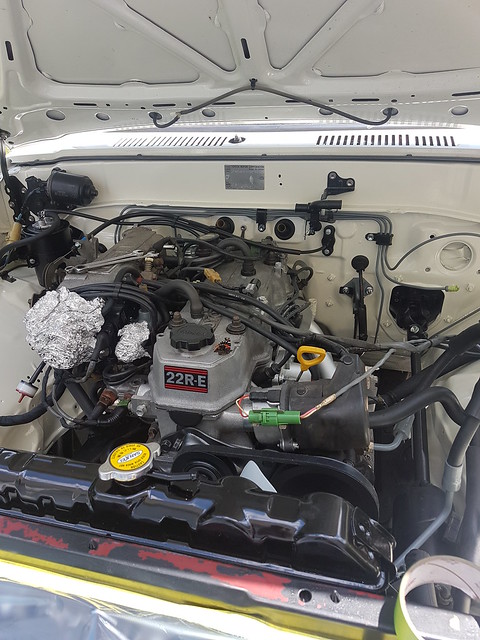
And here it with all the main components installed for starting up. I went ahead and bled the brakes and clutch systems using a Motive power bleeder. Triple checked all my electrical connections and grounds.


48225868822_3283e8a163_z.jpg


I had to wait until the next day to attempt to start it, since it was crazy stormy and I wanted to be able to watch the coolant, temp gauge, check the new oil pump for leaks, etc. Of course, drumroll, it didn't start. It was cranking over but wouldn't go, almost like I had removed the EFI fuse (which I do as a poor-man's kill switch anyway). I went to the FSM and started following the troubleshooting steps. Using a timing light, I was able to see that there was no spark at the spark plugs. Further testing by removing a plug wire, holding it to a ground and looking for an arc. Nothing.

Baffled as I was very thorough in most of this work, main reason it took 2 months. However, I also remembered the holy grail of early Toyota issues: grounds. Realizing I didn't touch anything with the fuel delivery system, I started looking at the coil/ignitor. I had painted almost every bracket that used to be bare/zinc coated metal in the bay. And for 99% of them, I used a Dremel to grind off the paint so the screws to the fender wells would have clean metal. But I forgot the most important one: the coil/ignitor bracket. I used a multimeter and did the FSM voltage test from positive and negative coil to the screw on the ignitor, and I was getting < 1 volt. Moving the lead to a body screw, I was getting 12 volts.

So I took off the coil bracket, ground off all the paint on the underside, and also on the top two places where the ignitor screws into the bracket. Cranked it all back down, and voila! She starts!!!

I used a no-spill funnel to burp the radiator/cooling system as it came up to temperature. The heat was on full blast to move everything through. No crazy sounds from the belts, so I luckily got the alternator jacked back enough to get proper tension. Watched the oil pump where the main oil leak was from and no leaks. Pulled the throttle a bit to speed up operating temperature, then went to work on purging/filling the power steering system. This took a while, and a lot of wheel turning with some horrific groans, I thought I broke the damn thing. But eventually, I had it filled and quiet. No warning lights on the dash, temperature never got above 1/3 and NO OVERSHOOTS!! I replaced the thermostat with the dual stage as the original was always giving me anxiety with it reaching the red and shooting back down every 5 minutes unless the heat was on ... no fun in the summer.

However, I'm still very puzzled and a bit upset that my random warm idle misfire/stumble is still present. I'm going to start a separate thread on this because even though I've read every thread on the Toyota forums on this subject, I still have no idea where to go next. I replaced all the vacuum lines, replaced the EGR valve with a new OEM one/gaskets on both ends, new throttle body gasket, plugs/wires/cap/rotor OEM before teardown, grounds are perfect, and TPS looks good but I'll probably check that again. Timing is good at 5/12. I think that just leaves with me with fuel related issues. I highly doubt the OEM EGR valve is defective, but I was thinking of blocking it off at the intake side for a test. Could be a good time for a new set of injectors regardless. But I really want to avoid doing a fuel pump, filter etc if I don't have to. Any suggestions here would be very welcome as after 2 months, all I want to do is drive this thing!

So this week I'll be calling a few shops to get my exhaust finished up. It's basically an open LCE header that dumps after the connector pipe right at the driver's door. My test drive was very short and extremely loud, poor neighbors. But clutch and brake systems are good.

Again, any thoughts on the warm idle stumble/miss after all I've checked and replaced would be welcome!
 
Hi everyone, sorry for the long gap in between posts. But it's been mostly because I've been having so much fun actually driving this thing around now that it's out of it's 3 month cocoon. I took it to an exhaust shop the Monday after it started up and I checked for leaks and did a short test drive. I got a Magnaflow muffler and mandrel bent 2.25" piping installed for a reasonable price. It's still a bit buzzy for my tastes as the exhaust guy recommended Magnaflow for the quietest 4-cylinder with a header. I still thinkg the Flowmaster Delta 50 or 60 would have been better, perhaps I need to revisit a resonator in the near future. I will reevaluate once I have the soundproofing and carpet in (still bare metal floors and panels), but with the windows down at near-WOT, it's pretty buzzy. No pictures of it yet, I'll have to grab some this weekend.

So the weekend I got it back, it started a blazing hot 2 weeks of 90+ heat and humidity in the Northeast. But I think I spent 4+ hours each day that first weekend just driving. Was able to get it washed which was nice. And the only issue after all that disassembly/reassembly, was a slight leak on the lower radiator hose. I think it was because it was my first experience with silicone hoses and I didn't realize how much you needed to actually crank down those clamps. So I stopped in a Pep Boys parking lot, took out my ratchet set and crawled under. Fixed. Still no leaks.

The next weekend I had a music festival way up in the Catskills, a 250 mile drive each way on the NJ Turnpike, Thruway, etc. Again, it was going to be very hot, 95+ and I was a bit nervous about hitting those roads in that heat for that distance. But I decided to drive and aside from it being unbearably hot as I haven't gone about getting the parts to re-install the AC, it drove like a champ. I was surprised that I was able to cruise at 70 MPG in 5th no issue, and even 75-80 without much struggle either.

So, I'm going to be taking a bit of a break from doing work to actually enjoy the truck. Next steps are to start the rest of the soundproofing, in preparation for installing the carpet. I also am waiting for the upholstery to come in so I can get the seats redone.

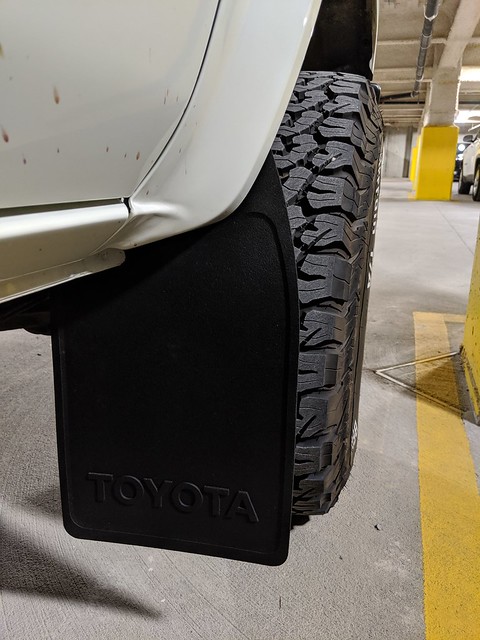
One little project, I got some OEM mudflaps off eBay in pretty good shape, save for the white lettering. So I repainted those, matte clear coated as well. I was very careful, using 3m green automotive tape and an eXacto knife, but they came out great:


48375230257_81aea06041_z.jpg
 
This is so inspiring!! My wife and I just picked up an 85 DLX that has largely been unmolested. We are planning a full set of restorations and mods. This is the level of detail I hope to go to with the engine, as the previous owner did a great job keeping it in top condition..

I'm stoked to see more pics!

Dan
 
I love this. I just got an 88 dlx that is in similar shape as to when you got yours. I'm hoping to do a full restore on mine as well. Good work!

Sent from my SM-N960U using Tapatalk
 
Hi everyone,

Lack of updates, I know. Too much fun with the top off and I've been traveling a lot for work and weddings.


48648214033_3d69ab5954_z.jpg


But here are a few items of what I've been working on. Most of my activities now are focused on getting the interior sorted. I had grand plans of soundproofing the floor which consists of sound deadening (butyl based), then a sound proofing with mass-load-vinyl (MLV) on the floors, and closed cell foam on the vertical panels. The cargo area wasn't too hard, and I was able to lay down the sound material and line the quarters, before putting on the new molded vinyl floor covering in light brown. I ordered this from ACC, and to be honest, the wheel well covers were not molded very well. There was a lot of extra material to cut, plus cutting the holes for the roll bar. I think I cut too much off and they don't want to lay flat, even with a relief cut. I'm going to see if I can just order replacement wheel well pieces to give it another go as it's bothering me. I used Noico for the sound deadener and closed cell foam sheets. Then I used SecondSkin Luxury Liner Pro for the mass loaded vinyl. They are the only US based company that offers a mass-loaded vinyl product, which is unfortunate because it comes in precut sheets. I would have liked to order a custom length to have one unbroken sheet, mainly for when I do the passenger area to cut down on gaps where sound can escape.

Sound deadener in place on cargo floor:

48648714532_3ff1c5deb5_z.jpg


Mass-loaded vinyl on floor and closed cell foam on top of deadener in passenger side quarter panels:

48648579341_a62e6df90f_z.jpg


ACC Brown factory vinyl cargo area in place:

48648212478_b36dd8e3f3_z.jpg


I gave up on trying to find a body shop or paint supply store that could do custom mixing/matching of SEM ColorCoat interior paint to paint the faded quarter panels. It's a shame since I know the capability exists, but everyone they list as being able to do this, had no clue what I was talking about. And I called about 30 shops in a 250 mile radius. However, I found this Duplicolor ColorMaxx paint that matches almost exact to a stock, non-faded dark brown dash piece (Satin Leather Brown). However, due to fading, it doesn't match so well to the top part of the brown side panel pieces. I'll keep my search going but this suffices for now. I used Duplicolor's Adhesion promoter after wiping it down with wax/grease paint prep removal. No sanding and it adhered great! I was not looking forward to sanding those brittle panels. I also had to paint the Christmas tree clips, because Toyota only makes them in black as replacements, and I didn't have any in the parts bin from the previous owner.


48648212928_9837735ef6_z.jpg


48649388087_df4a260fbc_z.jpg


Oh and I also found some OEM front mudflaps in great condition and mounted those. The BFG A/T's are kicking up too many rocks so it comes at a great time. You can also see the restored rears mounted as well


48649388162_c54fee2dcf_z.jpg


48648884653_d06b0ca18b_z.jpg


I just got word my bench seat and passenger seat are done at the auto-upholstery place, so I'll be picking those up tomorrow and giving them the driver's seat to do. I still have some work to do before I install the bench seat, like painting the exposed paint areas from primer grey to the factory 033 white, and figure out what I'm doing for sound proofing in the cabin area. I also have to do the remainder of the inner quarter panels with sound deadening and closed cell foam. Then I switch gears to replacing the water pump, and the rabbit hole of my random warm idle misfire (started another thread) that is driving me nuts.

Oh, another little find here as I went through my idle troubleshooting. It was expensive, but I found a new stock OEM igniter module on ebay. I'm going to use it as a tester as testing the igniter is not the easiest thing to do. If it doesn't solve my idle problems, I'm just going to save it for a rainy day in the future when it does eventually crap out. This part has been discontinued since god knows where, so it's always interesting to find new old stock of OEM parts to stash away.


48648721782_f8f4da8048_z.jpg
 
A lot has happened in the past few weeks, namely getting all my seats back from the upholsterer. So I've been waiting until they were all in to make an update. I was able to find the OEM SR5 tweed fabric from 1985 so I used that to replicate SR5 seats. Since the SR5's didn't have bench seats, I came up with the split design, putting the brown vinyl in the middle and the tweed on the outside to carry the lines. Finally, I came up with the idea to take the leftover fabric and make a custom rear panel to match the interior. I also painted the screw/washers with the same brown I've been using on the faded plastic panels. Carpet is also in, but I messed it up as I didn't realize there was actually a molded area for the front seat rails (didn't let it sit long enough to re-mold. I'm ordering another front piece because I'm anal). Enjoy!


48719605847_67845cd391_z.jpg


48719432471_1ea4e7e745_z.jpg


48719609927_21f0994691_z.jpg


48719100518_5973421789_z.jpg


48719601072_ea7b84deac_z.jpg


48761492488_afd3f17481_z.jpg


Also, installed a new Aisin water pump as I have been getting leaks out of the weep hole for months now. I went factory specs and didn't use RTV. In the end, I think I should have. Because even with new hardware and the proper torque specs (which are pretty low), I chased a leak around one of the lower passenger side bolts. I gradually tightened it, tested it, and did one final tightening and the leak stopped. So I'm definitely over on the torque amount but it's not leaking. I think it's because I have the original timing cover and I didn't do the greatest job of cleaning it off.


[
48719599447_249fdc18a4_z.jpg


Finally, I installed a marine amplifier (2 x 40 RMS) from Kicker to power the front 4" speakers. I was able to keep the factory radio by using special hi-level speaker-to-RCA inputs. Still a bit strange, since the gain is all the way down and I can't get close to 3/4 volume, but the distortion is gone and I can actually hear music through the 4" Polks with the top off at highway speed. Still need some tweaking here, as I'm thinking the speakers rated at 45 RMS may be a little light so I'm on the hunt for some 60 RMS speakers. I also went through and used sound deadening on the back of the dash panels on the driver's side, since they rattled like crazy. It really worked and they weigh a ton now :) I also used some foam tape to stop the switches and vents from rattling as well. Now when I push the deck light or rear defrost, it's a solid "click" ... very satisfying :)


48719429076_ac4d8f8fb1_z.jpg


48719598822_7df9fd0232_z.jpg


48719091248_db6b79b7c1_z.jpg


Lastly, I finally found an unbroken, manual 4Runner shift console bezel on eBay after looking for the last 9 months. It's the last interior piece I didn't have. It was blue, but I used that same brown paint with the adhesion promoter, and it looks brand new. Giving this one a long time to dry before I install it ...


48761998937_6fe1700df2_z.jpg


On a sadder note, it seems I won't be able to avoid a head gasket replacement. As I've been driving more, I've noticed a small coolant leak but couldn't trace it. After my last longer drive on a weekend, I can now see dyed coolant coming down the driver's side of the block from the head gasket area. It's never overheated since I bought it in March, but I think with a brand new coolant system and no where for it to escape elsewhere, plus the limited time it was driven before I started driving it a lot, contributed to the failure. So, I'm going to try and do it myself, along with the timing chain. Just hoping the weather stays a bit on the warmer side for the month of October. Bummer, but at least I got to enjoy a few weeks with the top off before I shut it down for awhile. But I think I have an oil leak somewhere on the rear side anyway (valve cover gasket possibly, hoping not rear main seal) so I'll be able to tackle that plus a valve adjustment.
 
Auxiliary Fuse Block

Daymn! That's lovely work! I wish mine looked that good. I like the vinyl flooring, too! Low-maintenance; No need to vacuum- Just have a little counter brush (that even works on my carpet) and wipe if needed.

Quick thought on auxiliary fuse box.
Auxiliary fuse boxes are typically not switched. A switched one would require a very thick wire to run to the cabin, to a high-current capacity switch (expensive, and maybe hard to find), then back to engine compartment, OR relay with its thinner control wires running to the cabin, to a lighter-duty switch, then back to the relay in the engine compartment. Too much trouble.

I would simply:
1) Determine what circuits and what current load they would have to put on the auxiliary fuse block,
2) Mount it as close as possible to the battery (I have a 4-circuit Blue Sea fuse block but had been too busy to install it).
3) Figure out main wire to carry that total current from battery to the fuse block,
4) Put a fuse or fusible link, inline or mounted as close as possible to the battery on that main wire. (Similar to the fusible link on our 22R-E's).
lDTSnIKNhzM21MtvKjMneKRhhf-kt2df31eYr-kJnmIEOEa2s4X0X0zeJNzBxBTcoVom4HCklob4rSSiR8RIHiNy1_I2tZSxVL1_ePmuE39DgGFXxkEIY5oW2DkEUkJsqzOycmlh0Uh4NScLhpAAt5aRCSiFp2j6PyzXxrs9UNRowDnfW-x-jxTMaF2dYc0ZSEIiE5K9oAsJIpQ3G12T0OaaqWKCbmgfr4n7kCzUWVYT0PsEKkdO0JNOjYA5kQ2BEz3twjNe2rInYtslgauPTST6sBpZh5dOO5omlDM0XLYqEh4sIJPqeG76ZKoHexAqNeyGMSblRFBfqnGNnXbSHQsq_LKZ2bVMw-qYnZPRgrHmb7U-oTjwKAf8efldZePVcr7bDeiRxXV48HETHkBtSCuAPoUoTQEEmpaI95DJPg6NAh3a-ks3GQGfwW2wQBR-abfzQQz0Rq1Z7oU3MbunHthVG0bDrJoEjaleHokyIWYQWiYF1asabPFpDnWBUfQK5Cb-5fWy90_AicYRug56Loz3XfTmX-eKoLJUumDPbEO3Ka49aw9kS10g_8faINEJ8sdmgg9EnEjdRESfMvUMWdykfOwwpC-eXZTTW2_lwoMbQqxKQqcIdx0xoHypqmdnhyaRupnndt4iQKzos5BG0-HQLJ7ojMAhcAWHl9NlSwJbmgzeB0ddetEtJZrblnwmfMLctqHtPk2hIoI1qZ13q9wYIAYxQ2Qy6H74gFqWiZo2ll5yXQ=w800-h600-no
 
Last edited:
Awesome build! The attention to detail is amazing, makes me wish I could redo some of the things on my build. I learned the hard way that skipping corners and not going the extra mile with painting components and hardware will bite you in the butt later on, especially living in the rust belt.

I think i may have the same random slight miss fire as you. Does it happen if you hold the throttle at an elevated rpm (1,500-2,000) too. Runs smooth with a small random "miss" or hesitation every couple seconds? I also have an issue where my idle doesn't always settle at the same rpm. I'd say 85% of the time it settles where i want it to, other times it settles a 100-200 rpm high, other times 100-200 rpm low, to the point of nearly dying. did you have this problem as well?
 
The seats look beautiful!
Can I ask how you found the fabric?
I have 1985 Sr5Sr5Sr5 vertigo seats in need of repair and I don't know if I will ever find the fabric on Earth.
 
The seats look beautiful!
Can I ask how you found the fabric?
I have 1985 Sr5Sr5Sr5 vertigo seats in need of repair and I don't know if I will ever find the fabric on Earth.
I reached out to SMS Auto Fabrics and sent them a picture via email. It's worth a shot to try.
 
Awesome build! The attention to detail is amazing, makes me wish I could redo some of the things on my build. I learned the hard way that skipping corners and not going the extra mile with painting components and hardware will bite you in the butt later on, especially living in the rust belt.

I think i may have the same random slight miss fire as you. Does it happen if you hold the throttle at an elevated rpm (1,500-2,000) too. Runs smooth with a small random "miss" or hesitation every couple seconds? I also have an issue where my idle doesn't always settle at the same rpm. I'd say 85% of the time it settles where i want it to, other times it settles a 100-200 rpm high, other times 100-200 rpm low, to the point of nearly dying. did you have this problem as well?
The miss/erratic idle is only when warm (750 RPMs). The igniter fixed the misses, but I still have a slight idle fluctuation, maybe plus or minus 50 - 100 RPMS) that occurs. I think once I get my TPS perfected, and clean out the IACV, it may clear that up.
 
Hi all,

Now that the weather has turned cold, I haven't been able to make much progress. The repair looming over my head is to address a coolant leak, which is either an external driver side head gasket leak, or one/both of the steel heater hoses that wrap around the block, or the EGR cooling plate on the rear. Also, I'm pretty sure my oil consumption is due to a rear half moon/valve cover leak. Lastly, I have some new fuel components (injectors, fuel rail, cold start hard line) to hopefully finally address my random misfire issue. I was going to do them all at the same time, but I really wanted to isolate the misfire issue so I could drive it until the weather is nice enough for consecutive weekends to do the head gasket/timing chain/heater hose/valve cover work.

Last weekend, we had 60 degree temperatures so I decided to tackle the fuel injectors, rail and cold start line. I've never done any fuel work before and I knew it would be a bit messy, but I pushed forward regardless.

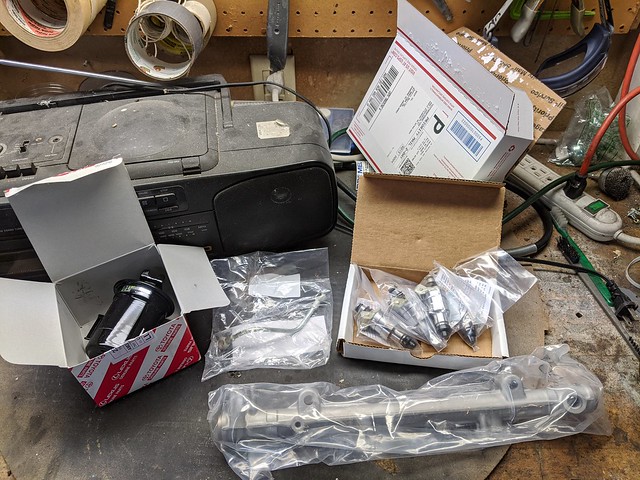
For parts, I got an OEM fuel rail, cold start hard line, and rebuilt injectors from LCE. I ordered the second set of rebuilt injectors so I didn't have to wait around to get them rebuilt, but also so I could send out my old injectors to see their before/after specs (and have a backup set on hand). Ignore the fuel filter, I'll be doing that when I do the head gasket when the lower manifold is off for easier access:


49409069723_d185fdf446_z.jpg


After labeling all the vacuum lines, removing/plugging the TB coolant hoses, I broke free the cold start injector line at the plenum and had a rag handy to catch the residual fuel. Then I simply removed all the upper plenum bolts (no issues surprisingly) and pulled off the plenum. Note: I have a spare plenum and manifold currently at 22REPerformance getting refurbished and powder coated, so as disgusting as the current ones are, I didn't bother cleaning them. It looks like this plenum was never removed, because the gasket was fused to the manifold. I decided against removing the gasket and putting on a new one as it would have taken hours, and the gasket was completely intact:


49409544346_6713436360_z.jpg


49409746327_01edab42d3_z.jpg


I managed to only slightly damage one of the fuel injector connectors (the one closest to the firewall). I also inspected the wiring and all the boots were still intact, no alarm bells there. Removed the fuel rail and promptly tipped it in the wrong direction, getting fuel everywhere. Definitely have a bigger towel here as there's a lot more fuel in this rail than the cold start injector line. Getting the fuel hard line nut on the fuel return/dampener thing off the rail proved to be a huge pain, so I threw it in a vice and used all my might to remove it. The third injector hole near the cold start line had a bunch of gunk behind it. I'm pretty sure this may have been a culprit for my random misfires/shaky warm idle. All the seals on the old injectors that go into the engine were completely deteriorated. I wouldn't be surprised if these were the original injectors from 1985:


49409745827_afbf21b7a8_z.jpg


49409064028_4f328a9840_z.jpg


I coated both the o-rings and the engine side seals of the injectors with some motor oil and inserted the injectors into the fuel rail first by rocking them in (see 22REPerformance's YouTube video for a fail safe way to do this). Then I put the assembled rail back into the engine and reconnected the connectors:


49409540726_3e7d960d7f_z.jpg


49409540651_aeec84426f_z.jpg


After this, it was simply a matter of reconnecting harnesses, coolant hoses to the TB (biggest pain getting those spring clamps back on tight), putting the plenum on and getting the vacuum hoses on correctly. It took a few cranks to start up to build fuel pressure, and I looked for fuel leaks first as I let it run for awhile. Luckily, I used all new crush washers so I had no fuel leaks. I did a test drive and did notice a coolant leak near one of the bypass hoses (the one under the thermostat). I finally purchases some offset pliers as the spring clamp was impossible to get to with any other tool. After moving it up close to the TB, the coolant leak stopped.

Results? After about 200 miles of driving, stopping and listening to the exhaust rhythm and engine, I can safely say the random misfire at warm idle is finally gone. I no longer have those random "put-puts" every 5 to 20 seconds. It runs completely smooth at warm idle, and there is no longer any hesitation on pulling the throttle.

Lessons learned? If you're struggling with a warm idle issue/rich exhaust, and don't know the age or health of your injectors, just go ahead and replace them. It took me about 3 hours and I took my time. If I didn't replace the fuel rail, it would have taken 2 hours given my struggles with the nuts on either end. With the core charge, the injectors were $250.00 for the set for 1984 to 1987 22RE's (22RE Type-C Equalized Fuel Injector Set (1983-1987)).

I'll be sending my old injectors to Witchunter for cleaning and testing. I'll very curious to see how bad these were performing.
 

Members online

Forum statistics

Threads
278,316
Messages
3,554,120
Members
248,016
Latest member
Advally Service

Trending content

Back
Top