Projector Retrofit - Aiming Down

TejasRunner01

New member
Hey Everyone,

I installed the amazon projector's off Amazon found here:

https://www.amazon.com/Nilight-Mini-Bixenon-Projector-Lens/dp/B00B21R0TA/ref=sr_1_3?ie=UTF8&qid=1540932773&sr=8-3&keywords=headlight+projector

I realize these are cheap and not Morimotos' but they fit the budget at the time.

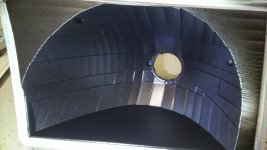
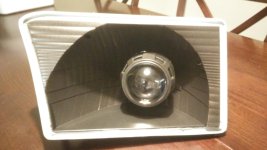
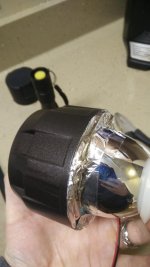
I have these installed, they look great but they are nearly useless to me as they point too far down and not allowing me to get enough light in the distance. When I am driving, I can see about 10 feet in front of me. I have tried reinstalling these twice (re-baking the lens and everything) and still have not been able to get these to aim higher. I realize that there is an adjustment for the horizontal and vertical adjustment, but they honestly don't provide enough height even when maxed out vertically ( which makes the bottom of the headlight stick out and look terrible)

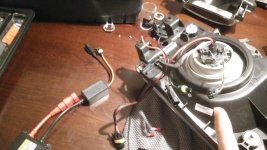
I believe it must be due to the "conversion" h4 adapter plate and silicone ring. Between the projector, and the actual housing I used the silicone ring as the barrier to keep out moisture ( I believe that is how it is supposed to go ) with the adapter plate and nut on the outside of the housing. I then put the hid bulb in between the adapter plate and clip the spring down. It is as if I need a shim to help angle the projector light up vertically so that I can get further project the light. It doesn't seem like others have had this issue so it may be user error as I am not a professional.

Has anyone else had these issues?

Try not to flame me too bad :behindsofa:

Thanks for everyone's help!
 

Attachments
  • IMG_20180123_202111.jpg
    IMG_20180123_202111.jpg
    129.4 KB · Views: 1,823
  • IMG_20180123_202705.jpg
    IMG_20180123_202705.jpg
    134 KB · Views: 1,715
  • IMG_20180123_203018.jpg
    IMG_20180123_203018.jpg
    127.2 KB · Views: 1,747
  • IMG_20180124_181918.jpg
    IMG_20180124_181918.jpg
    135.5 KB · Views: 1,693
Last edited:
Register to hide this ad
When I did mine they were aimed down a bit further than I liked. I cut a piece of foam and wedged it under the shroud to prop them up a bit. My shrouds are bigger than yours and you would never notice it unless I pointed it out and you really looked for it.

You can aim the entire headlight assembly as well so you can tilt the top back and push the bottom out. I tried this initially and wasn't happy with the alignment of the headlight bucket relative to the grill etc. hence the foam.
 
Check that your threaded projector shafts are 100% perpendicular with the clamping surface on the back of the factory headlight reflector bowl. If the threaded shaft is smaller than the opening in the reflector housing it can go in crooked and you will fight the silicone ring to correct it. I did a trial install without the silicone ring to get mine aligned right.

FWIW I purchased and returned that kit from Amazon and opted to go with a pair of 3" D2S projectors and Panamera shrouds from DDM. My install post is here

I had to trim the shrouds at the bottom, too large for the housing, but the projectors went in straight with the silicone ring in the same position as you installed yours but I did have to test fit it like said above. With the projectors properly aligned in the housing you should have no issue with alignment or aiming with the factory adjusters unless there is something amiss with the p[projectors themselves.
 
Last edited:
i purchased those same projectors. i got them as a place holder as a sort of proof of concept and I had intended to upgrade if I liked how things came together and wired up. Turns out, I think the projectors and lights work great, I'm going to stick with them. I'm not sure why the expensive projectors would be better for me, unless the solenoid broke or projector housing, but will see how that goes. Sounds like purists get all excited about a sharp 'cut off line'. Mine seems just fine, and I don't know why that's important. I'm not entering any lighting contests.

When I assembled, I made sure that the projector threads came through perfectly centered in back of housing. I pushed pretty hard on projector to mash the silicone washer while tightening rear nut as much as possible so the projector would not sag. Maybe that's what's happening? I also snaked a ring of butylene around rear of projector along with silicone washer to act as a sort of glue and sealant.

Worked great, only needed a small adjustment. I think your equipment is prob fine, maybe try plenty of pressure on silicone washer when tightening.

I like the paint on your shrouds btw.

290xzkk.jpg
 
Even the TRS drop in projectors are by default "down quite a bit" so without knowing more it would be a bit difficult how yours compare.
 
you WILL run out of vertical adjustment to correct this. these drop in ones need a support from the underside to hold them in place.
The small rubber ring compresses over time and the unit droops inside the enclosure.
 
Thank you all for your insight. I definitely learned a lot and got some great tips. I think I'll give it a go one more time, making sure to test it again with the glass off as a sort of bench test and making sure to tighten up the nut really good.

Since things get pretty hot from the HID bulbs, I want to use a material under the projector to "prop up" the projector that won't potentially get too hot and catch fire. I figure foam has the potential to melt, what would be the best material to use between the silicone ring and the projector? Just another piece of silicone?

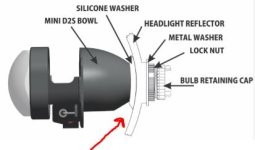
I realize this is a picture of the d2s projectors, but it at least shows a visual of where we are talking about putting a wedge under the projector.
 

Attachments

  • Capture.JPG
    Capture.JPG
    20.3 KB · Views: 1,663
I'm planning on modifying mines soon, Since i don't want to re-open the headlights, my approach will be to drill a small hole from under neath and Add a small threaded insert or a nut JB welded in place. (A nut-sert) could be an option. Then thread in a long thin bolt ( with an extra nut to lock) and adjust in place. there is a metal bracket that holds the solenoid for the cut off so that would be a good spot to make contact for the vertical adjustment.
 
I'm planning on modifying mines soon, Since i don't want to re-open the headlights, my approach will be to drill a small hole from under neath and Add a small threaded insert or a nut JB welded in place. (A nut-sert) could be an option. Then thread in a long thin bolt ( with an extra nut to lock) and adjust in place. there is a metal bracket that holds the solenoid for the cut off so that would be a good spot to make contact for the vertical adjustment.

Interesting idea.. I wonder how visible this would be since my shrouds are rather small compared to a lot of people. I'll give this a thought. If anyone else has other suggestions let me know!
 
II just wanted to let everyone know that I figured this out! It ended up being the H4 conversion plate that needed adjustment.

Basically I adjusted the top tab of the conversion plate towards the projector lens. This allowed the projector lens to be tilted ever so slightly up. Before I adjusted the tab, I measured from the top of the headlight housing to top of the projector lens and it was 2 and 1/6th inches. After adjusting the tab, the measurement was exactly 2 inches. This was enough to bring my projector cutoff line quiet a bit. I do hope that this helps someone else.

Feel free to ask me any questions if you are interested.
 
Last edited:
II just wanted to let everyone know that I figured this out! It ended up being the H4 conversion plate that needed adjustment.

Basically I adjusted the top tab of the conversion plate towards the projector lens. This allowed the projector lens to be tilted ever so slightly up. Before I adjusted the tab, I measured from the top of the headlight housing to top of the projector lens and it was 2 and 1/6th inches. After adjusting the tab, the measurement was exactly 2 inches. This was enough to bring my projector cutoff line quiet a bit. I do hope that this helps someone else.

Feel free to ask me any questions if you are interested.

Great tip, really appreciate the update. I'm having the same issue and it's frustrating to have amazing light right in the foreground, but just not throwing very far.
 
Last edited:
Great tip, really appreciate the update. I'm having the same issue and it's frustrating to have amazing light right in the foreground, but just not throwing very far.


I'm pleased this was able to help someone. Mine were originally only projecting light about 15 to 20 feet in front of me. Now they look like this:

https://imgur.com/a/cCZPIHP

If you end up getting it fixed, feel free to contribute again to this thread with a response. Hoping this will show people that you can do a nice reliable retrofit for under $100 using Amazon parts.
 
So when you say "adjust", how do you mean?


Are you bending it towards the housing?
Yes, just a very slight bend in whichever direction will allow it to seat flush but with a slight projection angle difference.

Also I would like to say as an update, I couldn't be happier with this retrofit.. still looks awesome and works flawlessly. Totally recommended over he expensive kits IF you have the desire to fiddle with it.

Sent from my Mi MIX 2S using Tapatalk
 

Members online

Forum statistics

Threads
278,310
Messages
3,554,079
Members
248,016
Latest member
Advally Service

Trending content

Back
Top