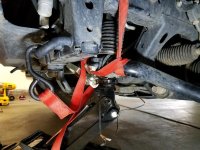
ratchet strap KDSS

CSM4runner

New member
Wednesday I'm planning on installing a Darbinsons lift on my 2016 Trail edition with KDSS. I've done TONS of research and I think i'm going the route of not disconnecting the KDSS and using ratchet straps on the pistons. I'm a visual person so does anyone have pics of how to do it? A lot of pics on the forum can't be seen anymore.

1. Rachet strap the front KDSS
2. Undo the UCA (I'm replacing UCA)
3. Drop out the assembly
4. Reinstall reverse..

I've done a lift on 2001 4runner, 2015 Tundra, and replaced shocks on corvette so i have some experience. This KDSS makes me nervous! :peace:
 
Register to hide this ad
Wednesday I'm planning on installing a Darbinsons lift on my 2016 Trail edition with KDSS. I've done TONS of research and I think i'm going the route of not disconnecting the KDSS and using ratchet straps on the pistons. I'm a visual person so does anyone have pics of how to do it? A lot of pics on the forum can't be seen anymore.

1. Rachet strap the front KDSS
2. Undo the UCA (I'm replacing UCA)
3. Drop out the assembly
4. Reinstall reverse..

I've done a lift on 2001 4runner, 2015 Tundra, and replaced shocks on corvette so i have some experience. This KDSS makes me nervous! :peace:

I did mine two years ago. If your are somewhat mechanically inclined you'll be good. A couple of tips from when I did it: place a jack under the KDSS piston up front and SLOWLY jack it up to the upper limit. The pressure will cause it to extend back out so while the jack is in place use some cordage (I used 550) to tie off the sway bar and then lower the jack. After the lift is installed you'll need to slowly unwrap the sway bar and use the friction of the wrapping to slowly lower it until the outer ends are lined up with the LCAs. You'll need to tie it off again and use a ratchet strap to pull the ends into alignment with the LCAs to get the brackets to fit. It was honestly fairly easy, the UCAs gave me the hardest time. Sorry, no pictures but I hope that helps!
 
You don't need to use rachet straps. If you turn the two kdss bleeder valve three turns counter clockwise then the kdss won't be pressurized.

Sent from my Pixel XL using Tapatalk
 
The driver side is easy. Use a pry bar and it will go down far enough to slide the coil in. The passenger side, I remove the kdss bracket that attaches to the lower control arm

Sent from my Pixel XL using Tapatalk
 
You need to disconnect the tie rods on both side. I replace my UCA with SPC so that also help.

Sent from my Pixel XL using Tapatalk
 
After you have install the coil over on the passenger side, jack the driver side. This will move the kdss bar up close to the lower control arm on the passenger side. I use a chain to wrap around the kdss bar lower control arm. I use a clamp to keep them close. Use a round to guide the kdss bracket as you install the bolts. Take your time so you don't strip it.

Sent from my Pixel XL using Tapatalk
 
Make sure that your runner is on level ground and that it's on all four jacks. Installing the back is almost the same. No straps needed. It's basically using the kdss to your advantage. Once your done installing the suspension, lower the runner to the ground and let it sit there for 15 minutes then tighten the kdss bleeder valve. If you don't do this, you will be paying for a new system.

Sent from my Pixel XL using Tapatalk
 
This method is what Metal Tech told me. It works. I have not seen anyone post it. The strap method works but you are doing under pressure of the kdss which isn't great

Sent from my Pixel XL using Tapatalk
 
Did this a few weeks ago...didn't have any problems reattaching the KDSS mount bolts per the KDSS how to guide.

I decided to attach the ratchet strap before I unbolted the mounts while on the ground.

IMG_0466.jpg
 

Attachments

  • IMG_0466.jpg
    IMG_0466.jpg
    134.5 KB · Views: 2,078
I did mine two years ago. If your are somewhat mechanically inclined you'll be good. A couple of tips from when I did it: place a jack under the KDSS piston up front and SLOWLY jack it up to the upper limit. The pressure will cause it to extend back out so while the jack is in place use some cordage (I used 550) to tie off the sway bar and then lower the jack. After the lift is installed you'll need to slowly unwrap the sway bar and use the friction of the wrapping to slowly lower it until the outer ends are lined up with the LCAs. You'll need to tie it off again and use a ratchet strap to pull the ends into alignment with the LCAs to get the brackets to fit. It was honestly fairly easy, the UCAs gave me the hardest time. Sorry, no pictures but I hope that helps!

MountainClimber78- I think I'm tracking and I have tons of 550 cord. So you never released the two kdss bleeder valves? You just used the jack to release the pressure? I was hoping if i used coil compressors i wouldn't have to undo the 2 KDSS bolts.
 
The method shown in this video is the one that I plan on using when I lift mine. No messing with the Katy SS bleeder screws and it didn't appear that he used ratchet straps or anything like that. Maybe a jack on the passenger side.
https://m.youtube.com/watch?v=bLOa-Pi4W1I

I'm sure many of you guys of seen this video already. What are your thoughts on this procedure?
 
The method shown in this video is the one that I plan on using when I lift mine. No messing with the Katy SS bleeder screws and it didn't appear that he used ratchet straps or anything like that. Maybe a jack on the passenger side.
https://m.youtube.com/watch?v=bLOa-Pi4W1I

I'm sure many of you guys of seen this video already. What are your thoughts on this procedure?

SATSTRAIL- I've watched that video 100 times. The reason i was looking at using ratchet straps and a spring compressor is so i don't have to undo the 4 passenger and driver side KDSS (2 each side) bolts.
 
SATSTRAIL- I've watched that video 100 times. The reason i was looking at using ratchet straps and a spring compressor is so i don't have to undo the 4 passenger and driver side KDSS (2 each side) bolts.

He undoes the 4 sway bar bolts to the arms and 2 on the sway bar bracket for the kdss. I'd prolly just use a jack to support the kdss and remove the brackets. I haven't done this yet but have done suspension on a few dozen cars.
 
There is no reason to strap the KDSS bar.. As it is quite easy to push the cylinder back in place with a floor jack... The system is in open mode at rest.

I've never tired using the balancing/bleeder screws, but that might make things even easier.

Overall, there are many methods that work. I'm not sure what the best one is. but it is important to know what can go wrong and often does... and that is the bolts stripping that hold the front KDSS bar to the front LCA. The trucks that I have worked on all had those bolts stripped before I even touched it (which made things frustrating to say the least). So key is to make sure there is as little tension as possible (even when removing them). A vice grip clamped on before removal is a good move IMHO. Going back on is always a bit of a struggle, so make sure you have extra hands and straps to help get things back into position. Just don't get in a rush. As long as you don't strip out those bolts, you won't screw it up (the threads are fine and weak).
 
There is no reason to strap the KDSS bar.. As it is quite easy to push the cylinder back in place with a floor jack... The system is in open mode at rest.

I've never tired using the balancing/bleeder screws, but that might make things even easier.

Overall, there are many methods that work. I'm not sure what the best one is. but it is important to know what can go wrong and often does... and that is the bolts stripping that hold the front KDSS bar to the front LCA. The trucks that I have worked on all had those bolts stripped before I even touched it (which made things frustrating to say the least). So key is to make sure there is as little tension as possible (even when removing them). A vice grip clamped on before removal is a good move IMHO. Going back on is always a bit of a struggle, so make sure you have extra hands and straps to help get things back into position. Just don't get in a rush. As long as you don't strip out those bolts, you won't screw it up (the threads are fine and weak).

For the UCA.. it's just very obvious and simple. Just make sure you remove the speed sensor wire and all the brackets before getting started. It also helps to have someone helping when guiding the long bolt back in. It can be done solo.. but is much more difficult.
 
an extra long 19mm gear wrench makes installing (and later loosening of the thru bolt for greasing / maintenance) the UCAs a piece of cake.

you can also install front coilovers without detaching the KDSS swaybar as per the instructions that come with king coilovers

http://www.toyota-4runner.org/5th-g...wanting-lift-their-kdss-equipped-runners.html
If your spring is no higher than two inches then you should not need spring compressor. I have the icon overland 3 inch spring. We used the spring compressor on the driver side. We didn't use it on the passenger side cause I disconnected the kdss bracket that attaches to the face. That side went in easy. You just need to push the axle down. I did remove both of my rear upper link cause I was replacing them with MT

Sent from my Pixel XL using Tapatalk
 

Members online

No members online now.

Forum statistics

Threads
278,306
Messages
3,554,045
Members
248,016
Latest member
Advally Service

Trending content

Back
Top