Rear Liftgate rubber button replacement?

dmccarthy

New member
I own a 2008 V8 4runner-limited and the rubber that covers the rear liftgate automatic button appears "melted" and has been for quite some while. It looks like when I combed the internet it seems like quite a few people have had similar issues. When I brought it up at the dealer they told me it was $350 to replace the button assembly. I can't find just the replacement rubber piece anywhere on the internet. Does anyone have any suggestions. It is getting very difficult to open the liftgate due to the issue and would like to replace if possible.

Thanks,

Darin McCarthy
 
Register to hide this ad
I own a 2008 V8 4runner-limited and the rubber that covers the rear liftgate automatic button appears "melted" and has been for quite some while. It looks like when I combed the internet it seems like quite a few people have had similar issues. When I brought it up at the dealer they told me it was $350 to replace the button assembly. I can't find just the replacement rubber piece anywhere on the internet. Does anyone have any suggestions. It is getting very difficult to open the liftgate due to the issue and would like to replace if possible.

Thanks,

Darin McCarthy

I'm having the same issue with my Toyota Seinna which uses the same part. This is what I found on Amazon for about $35.
http://www.amazon.com/gp/product/B00KC8OLYQ?colid=26CCIWAINCY50&coliid=I2S2N5L1KO2ZHD&ref_=wl_it_dp_o_pd_S_ttl
I also saw someone nicely wrap the button in duct tape. Sounds bad, but you can't really see it.
 
I'm having the same issue with my Toyota Seinna which uses the same part. This is what I found on Amazon for about $35.
Amazon.com: 2003-2013 Toyota 4Runner - Genuine Liftgate Release Switch - 84840-35010: Automotive
I also saw someone nicely wrap the button in duct tape. Sounds bad, but you can't really see it.


Thanks...that is way better than buying the $350 Assembly....and yes I had a blue paper shop towl stuck to mine..gets a little sticky down here


http://www.toyota120.com/forum/showthread.php?t=18231


Here is the writeup from toyota120
 
You can not purchase just the rubber part, you have to get the whole switch and they are easy to find online. I replaced mine recently for the same reason. Took me less than an hour to do, including eating pizza at the same time.
 
Ditto, It's pretty easy but I bought a set of trim removal tools from Harbor freight so I wouldn't trash the mounting studs.
 
Same thing happened to my '07 SR5. Tried the duct tape trick for a while until it became almost impossible to open, especially in cold weather. So, I ordered the switch assembly (part #84840-35010) from Toyotapartsdeal.com. Easy fix.
 
Had the saem problem with our 07 4Runner about a year ago. Rubber turned all gummy, eventually peeled off!

I separated the button assembly from the hatch. Two Phillips screws if I remember correctly. Now it is just hanging out still connected by the wire. Can't disconnect it if I remember correctly as it disappears into the hatch.

I scraped all the gummy rubber off. Cleaned it up with a bit of acetone. Gave it a light sand and cleaned again.

The I got a bicycle inner tube. Measured and cut a perfect sized piece to cover where the old rubber was. I glued it in place with super glue. It was a bit of pain, I had some scraps of wood and some clamps holding the whole mess together. After the glue set I removed the wood and clamps. Checked it over. Seemed fine but just to be sure I wiped a light bead of marine silicon around the edges.

Installed back in you'd never know it was "mickey mouse" fixed. The inner tube looks just like the OEM rubber that was there. It's been there for over a year and shows no signs of breaking down.

I originally was going to buy the part at the dealer but the price was insane. Like $400 seems to ring a bell.
 
The part I linked to earlier is only $35. I have no idea why the dealers would charge $400. Half hour tops
 
$350 is way too much...

I would guess at least .5hrs labor and $40~50 for the part at mark-up, so about $115~125-ish (IIRC my dealership's hourly rate is $150, so 150/2=$17 +30~40)

Honestly though you get a small screwdriver and remove the pad, I don't remember if the connector is clipped to the body or not; if it is... you just pop the plastic interior panel off and unplug it and feed the new one in.
 
Had the saem problem with our 07 4Runner about a year ago. Rubber turned all gummy, eventually peeled off!

I separated the button assembly from the hatch. Two Phillips screws if I remember correctly. Now it is just hanging out still connected by the wire. Can't disconnect it if I remember correctly as it disappears into the hatch.

I scraped all the gummy rubber off. Cleaned it up with a bit of acetone. Gave it a light sand and cleaned again.

The I got a bicycle inner tube. Measured and cut a perfect sized piece to cover where the old rubber was. I glued it in place with super glue. It was a bit of pain, I had some scraps of wood and some clamps holding the whole mess together. After the glue set I removed the wood and clamps. Checked it over. Seemed fine but just to be sure I wiped a light bead of marine silicon around the edges.

Installed back in you'd never know it was "mickey mouse" fixed. The inner tube looks just like the OEM rubber that was there. It's been there for over a year and shows no signs of breaking down.

I originally was going to buy the part at the dealer but the price was insane. Like $400 seems to ring a bell.

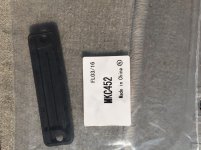
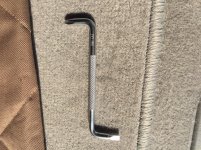
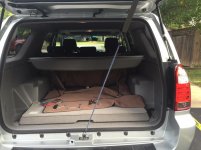
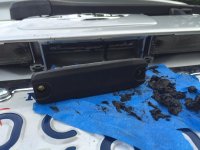
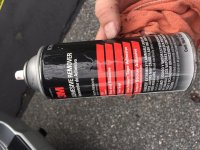
Sorry for bumping an old post, but wanted to add that as an alternative to the bicycle inner tube 'fix', I just followed the same steps posted above, but used a new rubber cover that I bought on eBay for $19. It fit perfect and total DIY time was about 30 minutes, with most of that being clean-up of the old rubber cover remnants from around the switch mechanism (nearly liquified in my case). I used 3M Adhesive Remover instead of acetone, but it's probably the same thing. A few pictures I took during the process are below. I recommend putting some blue painters tape around the "button" area, and using latex gloves if your switch cover is really melted...mine went from being just slightly tacky to full-on melt-on-your-hand in just a few weeks, so catching this early definitely makes for a less messy procedure. A small "s" shaped philips head screwdriver and a bungee cord to hold the rear hatch down at a good working angle helped a lot as well.

-Graham
 

Attachments

  • IMG_7587.jpg
    IMG_7587.jpg
    136.2 KB · Views: 9,169
  • IMG_7588.jpg
    IMG_7588.jpg
    134 KB · Views: 9,114
  • IMG_7589.jpg
    IMG_7589.jpg
    126.5 KB · Views: 9,165
  • IMG_7590.jpg
    IMG_7590.jpg
    126 KB · Views: 11,139
  • IMG_7593.jpg
    IMG_7593.jpg
    119.3 KB · Views: 10,047
  • IMG_7594.jpg
    IMG_7594.jpg
    129 KB · Views: 9,752
  • IMG_7596.jpg
    IMG_7596.jpg
    134.1 KB · Views: 9,018
  • IMG_7595.jpg
    IMG_7595.jpg
    122.4 KB · Views: 9,057
Last edited:
Awesome. Just purchased the same kit in Amazon. Glad to see it works out well and hopefully won't have to do it again.
 
Coincidentally, I ordered the same part this past week for my wife's Sienna - they have the same problem. I took a quick look at this afternoon and noticed the tight angle of the screws. The 90 deg screwdriver is great idea. I'll have to dig around in the tool chest to see what I can use. I sure hope the cover holds up better.
 
Yup, I got the $19 part in the mail today, putting it on tomorrow.

edit- well, that was a mess. My advice is do it sooner rather than later. I could tell mine was getting sticky a few months ago, but I kept putting it off until I was getting goop on my finger when I opened the door. Now I wish I fixed it sooner.

It took me about 5 minutes to change the cover, but about 1/2 an hour to clean the mess in between.
 
Last edited:
Agreed that sooner is better then later. Did my wife's last week. It was a pain but not as bad as taking the gate apart. It was "sticky" for a while before I got to it. Best advice is as soon as you note it becoming an issue replace it.
 
I was really surprised how quickly mine deteriorated too! I'm hoping the new rubber boot/cover turns out to be durable...but if it starts to get sticky I'm definitely not going to wait on replacing it this time! Lol
 
I just did this, man it was sticky, i scrap all the mess the best I can, even the slit on the button too, got it all working, now thinking to myself that saving the money wasn't really worth all that trouble. Should of just paid double and got a new switch, less headache, but still need to unclip the plug some how, unless I cut and splice.
 

Members online

Forum statistics

Threads
278,309
Messages
3,554,068
Members
248,016
Latest member
Advally Service

Trending content

Back
Top