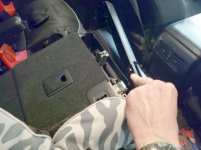
Rear-Middle Seat Latch trim broke

wesrick

New member
Can someone explain to me how to replace this trim piece? The screws go in from the backside, and I can't figure out how to reach them.

Alternatively, if you have a solution for something other than replacement, I'm open to hearing about it. Not sure if JB weld or some type of clip would work - but I am definitely open to ideas!

I'm also not sure where I can get the part number for this trim piece. Any help on that is appreciated, too.
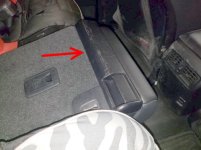
 

Attachments

  • attached.jpg
    attached.jpg
    60.3 KB · Views: 5,403
  • popped.jpg
    popped.jpg
    53.2 KB · Views: 5,028
Register to hide this ad
That looks pretty close to me, too. Not sure how I can confirm, though... any ideas?

Also, I don't see how to install it. Any ideas on how I might go about installing it? I'm just not sure where to start.
 
That looks pretty close to me, too. Not sure how I can confirm, though... any ideas?

Also, I don't see how to install it. Any ideas on how I might go about installing it? I'm just not sure where to start.

If it were me I'd probably order it from my local dealer so that I could return it easily if it ends up being the wrong part.

As for installation, looks like maybe there's a couple screws that hold the padded assembly to the "frame", maybe accessable under the seatback board sub-assembly? I'd have to go poke around at mine to see.

Does the image below work for you? This is all I've found to go on...

166591906
 
If it were me I'd probably order it from my local dealer so that I could return it easily if it ends up being the wrong part.

As for installation, looks like maybe there's a couple screws that hold the padded assembly to the "frame", maybe accessable under the seatback board sub-assembly? I'd have to go poke around at mine to see.

Does the image below work for you? This is all I've found to go on...

166591906

At a glace looking at the diagram it looks like your going to have to remove the seat section (to make it easier), deglove the cover, and take that backing plate off like [MENTION=287820]kjbenner[/MENTION] said.

Post up pics of the process. I'm sure it will be useful to someone else DTR.
 
I fixed mine several years ago and I don't remember exactly how I did it, but it was really simple. Pulling off the back board seems familiar.

I did not buy a new part. I bedded up fiberglass and epoxy and drilled a new screw hole in it, that much I do remember.
 
Late to the party here, but the part number for that plastic piece is correct, 72067-60030-C0 for reference.

Broke mine when sliding a box into the back with the rear seats down, didn't even push on it very hard either. Sad that Toyota decided to use philips screws that were literally 3/8's inch long to secure this part to the frame of the middle seat. They could easily have used ¾ inch screws, as the plastic part has way more than enough room in the hole for a screw that long to fasten it down.

Taking it apart is relatively easy, although I did not take photos, was a little too pissed off about the whole issue and just wanted to get the part back on the vehicle.

Remove the center headrest, pop the carpeted panel off the rear of the seat, you'll need to remove the headrest's two guides (the things that hold the headrest in). These are a bit of a pain to remove, as you have to pinch the sides then slide it out, I used a channel lock pliers to squeeze it and tap it out of its slot.

There's a few more clips and screws iirc (going by memory here), they are relatively easy to see where you need to remove them at this point. You should be able to install the new part with a stubby philips screwdriver by pulling the front plastic panel down once its loose, no need to disassemble any further at this point. The wire rod needs to be inserted at an angle then snapped into the second slot on the part, you'll understand this once you see the part.

I would highly recommend using longer screws for reinstalling it, there's no reason they used what they did. I found three longer screws with the same thread pitch in my box-o'-screws and had no problems driving them into the slots in the new plastic panel.

Took me about 30 minutes to do this job, but still annoyed that I had to do this in the first place.
 
Resurrecting this thread to say thank you for the writeup! This is exactly the info I needed, as I have brought shame on my family by breaking this part while chasing a rattle. The classic "you'll just make it worse trying to fix it!" came true.

Thanks again!
 
Resurrecting this thread again as I just broke mine over the weekend and now have to replace both the back panel and front panel. If you check out the linked parts diagram it's number 71413 for the latch on the back of the seat and 72067 for the large front plastic piece. I broke the tabs on the front piece so i have to take the whole seat apart.
Parts Diagram

I'm going to try and follow the above guidance but i'll also update with photos if I remember. Anybody else do this and break anything else I should order ahead of time?
 

Members online

Forum statistics

Threads
278,316
Messages
3,554,120
Members
248,016
Latest member
Advally Service

Trending content

Back
Top