Replacing rear license plate bezel

I can't remember what I did and didn't do, all I remember was it being a pain in the ass. Maybe if you have really small hands/arms but I'm 6'4" 285lbs and my arms/hands got all cut up and scratched trying to get it out.

Plus once I did fix it and put it all back together, the door latch wouldn't work after i closed it. I had to pull the back plastic panel off while the door was closed which was a nightmare. Finally got it back apart and opened up to realize the handle wasn't working because......it was locked. Son of a B....!!!

It took me like 6+ hours to replace two flipping license plate bulbs.....

:ybrick::ybrick::ybrick::ybrick::ybrick::ybrick:

Stuff like that drives me nuts! I learned the hard way that you can actually install the handle bracket on upside down! It doesn't work right if you do that!
 
I just put my trim back on after drilling out and retapping broken plate bolts. Then I seen the rusty rear plate lamp screws. I got all 4 out to replace with new if I can find them.

It would have sucked to have to remove it to deal with rusted Phillips heads.


Sent from my iPhone using Tapatalk
 
some part numbers and a bunch of random info

I just finished posting this up over on Yota Tech to answer over there so much of this is verbatim from that posting, wanted to get it over here as a thanks for the many of you that have helped me out. I've been more a taker from this forum than a giver.

Time to balance the scales-the reference vehicle is my 99 SR5 but not sure the part numbers will correspond to all 96-02 3rd gens:

Old thread I realize. And sorry to be wordy, but this is a bit of an exhaustive endeavor.

I was brought up to be thorough. I lost my father recently, and I think of him frequently as I take on projects where more than one set of hands are helpful. Back in the day I was the small set of hands when his big mitts just couldn't get into a tight area. I'm still thankful for all he taught me on how to use tools and to step back and think of an alternative when something was not working.

Several folks are finally getting around to working on their license plate surround-garnish.

I have part number for the rubber gasket that surrounds the garnish-that is called a "Protector, Back" 76825-35020. $11 or so at dealership

The 4 plastic (push in) clips that hold the garnish piece to the hatch will likely be destroyed when you push outwards from the inside of the hatch. Those are "Clip-Back Door" 76817-89101 --- 4 x $1.42 at Mtn States Toyota

Small hands are most helpful when you work inside the cargo area reaching into the back hatch 'cavity' to remove a 10mm nut below the lock cylinder. The main culprit is 2 plastic splash shields that keep water away from the window's motor assembly. Got a nephew or other small child around? They might really come in handy here. And you can pass on some knowledge that may help them some day.

2 rods must be removed-a large one that attaches to the latch release, a smaller one that attaches to the lock cylinder. Each has plastic retaining clip that slide over the rod to hold it in place. Needle nose pliers work here to help loosen up the clip, but only a small bit of force is needed.

The hatch latch assembly is held to the hatch body, also by two 10 mm nuts, there are tight to get at with a socket, and a 10 mm small handled wrench may be more effective. A side note is that the latch handle also attaches to the rear side of the garnish with 3 extremely short Phillips screws. These may already be stripped or the plastic receptacles they screw into have broken off-do not despair, they do not serve any real purpose. But if the screws are missing you may wish to run a magnet inside the hatch cavity bottom to be sure they have not fallen in there and drive you crazy later rolling around as you make turns.

At times it will be helpful to release four other 10 mm bolts that hold the window regulator arms/motor assembly in place inside the cavity. At other times you may want to but back into place at least 2 of the 4 bolts to hold the mechanism in its normal position for easier access to other connections.

Other threads I have read suggested to never start this job without the rear window already down about 1-2 inches, and I agree with that.

Electrical connections to remove are the one for the license plate lights and another one for the lock cylinder. This is again where small hands are most helpful. A small tip flat screwdriver or pick type of tool helps to push in tabs to release such connections.

Miscellaneous tools I found helpful to have in the cargo area with me were long and normal size needle nose pliers, and one of those small mirrors like a dentist uses inside your mouth.

A helper on the outside of the vehicle is most helpful, in my mind almost a must.

A/ To run for tools so you do not have to crawl in and out through the passenger door repeatedly
and
B/ Exerting pulling pressure on the garnish piece as you pinch in the clips.

then later

C/ Holding the window glass in place or even exerting slight upward pulling when you are ready to reinstall all 4 bolts of the window regulator This will take some pressure off of the spring so it will be easier to line up the bolt holes. This is of course when you are ready to put everything all back together.

Once you have removed the mechanical connections and the electrical connections you can work on the garnish more at your leisure without being cloistered in the cargo area.

An excellent time to replace the paint color to match your body color if that is the route you want to go, or go with extreme contrasting color if that is more to your liking. Some 3rd gen owners favor the garnish/surround piece with "4RUNNER" lettering, some like to remove the chrome, whatever suits your needs.

A good time to go ahead and clean up your light lenses, and replace the bulbs with long life LEDs. A good time to check out the lens gaskets and revitalize them. A good time to lube up the lock cylinder. A good time to lube up the hatch release lever. A good time to tighten up the Phillips screws holding the lock cylinder to the back side of the garnish.

A good time to reinforce all plastic attachment points on the back of the garnish piece with Super Glue or Loctite Power Grab (gluelike in a caulking tube), like for 2 of the clips, and the 3 screw receptacles for the latch if you are still lucky enough to have them not be broken.

A good time to be sure your hatch striker is properly indicating 'open door' (AT THE DASH) when the hatch is open, and properly triggering your cargo area dome light when set to the "Door" position. (That is a another job completely unto itself, but just saying since you have the hatch cavity all opened up for the garnish work anyways....)

I've read where others have used gasket type material or even caulk to replace the rubber gasket piece, not a bad idea necessarily until you have to remove the garnish at some point if the latch breaks. Or you strip out the light screws, just saying...

When you are ready to put the garnish back in place, leave the 4 push in clips off and check your fitment, check the latch to be sure that it releases. Keep in mind that the latch DOES NOT have to be attached to the garnish piece to function properly.

It won't release if you do not have the electrical connection in place for the lock cylinder. It won't release if the door unlock button has not been pressed on the driver or passenger door, or on the key fob. It won't release if you do not have the rods reattached for both the lock cylinder AND the latch. Check it out now, you do not want to button everything back up to find out you re-assembled incorrectly.

I realize I have jumped around a bit, but hope this is a bit more helpful than some posts saying it is all intuitive once you open up the cavity.

If you have any experience inside a driver's door panel you will notice similarities in the rod mechanisms of course. But from there it's unlike any other project taken on, but very rewarding once completed.

I now have Natural White (056 color code) for my spoiler and my license plate surround. Much better in my view than a black spoiler and gray garnish piece. And the rubber gasket piece is intact and tight to the body as it should be, the main reason I started the whole thing.:bravo::bravo:

 
I've swapped my bezel out. It's really not that hard at all, it just takes a bit of time. The trick to getting the window motor unbolted from the window itself is to roll down the window a few inches until you have clear access to each bolt. Besides that it's straightforward
 
if you had to remove the bezel to replace the lock cylinder, and you also wanted to take the glass out to replace it.
would you remove the glass first? then move the regulator then remove the bezel?


I am going to replace my rear hatch, so will need to replace the lock and I also want to swap the glass as the replacement hatch glass has a lot of stickers I don't want to deal with.
 
I've swapped my bezel out. It's really not that hard at all, it just takes a bit of time. The trick to getting the window motor unbolted from the window itself is to roll down the window a few inches until you have clear access to each bolt. Besides that it's straightforward

Who wants to help me do it and is close to PA????
 
I can't remember what I did and didn't do, all I remember was it being a pain in the ass. Maybe if you have really small hands/arms but I'm 6'4" 285lbs and my arms/hands got all cut up and scratched trying to get it out.

Plus once I did fix it and put it all back together, the door latch wouldn't work after i closed it. I had to pull the back plastic panel off while the door was closed which was a nightmare. Finally got it back apart and opened up to realize the handle wasn't working because......it was locked. Son of a B....!!!

It took me like 6+ hours to replace two flipping license plate bulbs.....

:ybrick::ybrick::ybrick::ybrick::ybrick::ybrick:

this happened to me. when you take off the two bolts that hold the latch mechanism on the inside you typically let it drop and ignore it. Be careful putting the latch mechanism back on because you have a 50% chance of putting it on upside down and if you do the handle on the outside will not work. There is a little plastic piece on handle that pushes down on the inside mechanism. test this before you put it back together and slam it closed. it's a PITA to solve if this happens
 
...you have a 50% chance of putting it on upside down and if you do the handle on the outside will not work....


Ha! I did exactly that. Had to pull the cover from inside with the tailgate shut, pop the latch release by pulling the cable and take it apart again.


Sent from my iPhone using Tapatalk
 
Rear handle has more or less stopped working

So, the rear handle started getting sticky a while back. Its now at a point where its become a PITA to open the hatch. I bit the bullet and ordered a new latch assembly and handle. Luckily, everything inside the hatch is rust free except where the latch assembly bolts in. I'll treat(Corroseal) that before I put it back together. So, at this point I just want to replace the handle. Do I need to remove the outside license plate bezel to do this? I appears that maybe I do, as there are little tabs on the handle frame----maybe for the plate light lenses?? After reading this thread, maybe I should have ordered a bezel (garish) foam gasket....?? Any input from someone who has done this would be appreciated!

Thanks in advance
 
So, the rear handle started getting sticky a while back. Its now at a point where its become a PITA to open the hatch. I bit the bullet and ordered a new latch assembly and handle. Luckily, everything inside the hatch is rust free except where the latch assembly bolts in. I'll treat(Corroseal) that before I put it back together. So, at this point I just want to replace the handle. Do I need to remove the outside license plate bezel to do this? I appears that maybe I do, as there are little tabs on the handle frame----maybe for the plate light lenses?? After reading this thread, maybe I should have ordered a bezel (garish) foam gasket....?? Any input from someone who has done this would be appreciated!

Thanks in advance

just did this work myself see posts in build

https://www.toyota-4runner.org/3641622-post297.html
https://www.toyota-4runner.org/3641931-post298.html

yes get the weather strip, it will keep the water and junk out. you will probably want to take the bezel all the way off, IMO it's easier but others may have tricks I could not figure out. since I was repainting mine I took it all off.

I would also get the clips(7681789101) and pads for the garnish because you are probably going to rekt the old ones getting them off. just be super careful because the plastic is discontinued and the only source for them now is junk yards.
 
Thanks for the answer!

just did this work myself see posts in build

https://www.toyota-4runner.org/3641622-post297.html
https://www.toyota-4runner.org/3641931-post298.html

yes get the weather strip, it will keep the water and junk out. you will probably want to take the bezel all the way off, IMO it's easier but others may have tricks I could not figure out. since I was repainting mine I took it all off.

I would also get the clips(7681789101) and pads for the garnish because you are probably going to rekt the old ones getting them off. just be super careful because the plastic is discontinued and the only source for them now is junk yards.

I appreciate your advice on this. I will order the pads (is there more than one??) AND thanks for including the part number for the clips! I will follow your advice!!
 
just did this work myself see posts in build

https://www.toyota-4runner.org/3641622-post297.html
https://www.toyota-4runner.org/3641931-post298.html

yes get the weather strip, it will keep the water and junk out. you will probably want to take the bezel all the way off, IMO it's easier but others may have tricks I could not figure out. since I was repainting mine I took it all off.

I would also get the clips(7681789101) and pads for the garnish because you are probably going to rekt the old ones getting them off. just be super careful because the plastic is discontinued and the only source for them now is junk yards.
Bezel is still available. Part #76801-35260. This is I think for 99-01. Then 02 has some other ones.
 
Bezel is still available. Part #76801-35260. This is I think for 99-01. Then 02 has some other ones.

your correct I think there is a different part for each year.

each place I tried let me order it then reply back and say it's unavailable.

for 98
76801-35160 - Finish Panel - 1996-1998 Toyota 4Runner | World Toyota Scion Parts

for 99+
76801-35260 - Finish Panel - 1999-2001 Toyota 4Runner | World Toyota Scion Parts

I have a 1998 and 2000

I measured the 2000 and the later years are a bit bigger in size... so.... I guess I would have to see them side by side to figure out if they could interchange based on the mounting points. I can't imagine they moved stuff?

looks like the new ones for 99-2000 don't come with the badge and that is fine by me :) hmmm darn there goes my money again.
89fa9cc42f00e77ebd9a3714394d7d36.jpg
 
I appreciate your advice on this. I will order the pads (is there more than one??) AND thanks for including the part number for the clips! I will follow your advice!!

link for 2000 parts diag

4 @ plastic clips 7681789101 CLIP, BACK DOOR OUTSIDE GARNISH

4 @ 9054005028 CUSHION

I would say you don't really need the cushions they are just like neoprene washers to combat rattles. optional but I don't do rattle, they drive me crazy.

BACK DOOR PANEL & GLASS | 4RUNNER VZN185L-GKPZKA RZN18#,VZN18# | JT3HN87RXY0283787 | Toyota | Genuine Parts Catalogs | PartSouq Auto Parts Around the World
 
Many thanks to everyone who contributed to this thread.
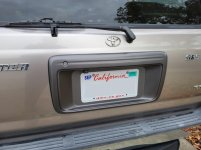
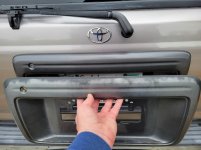
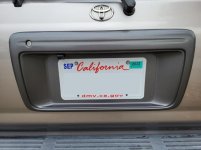
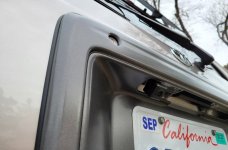
I just finished painting and refurbishing a bezel I pulled from a junkyard.
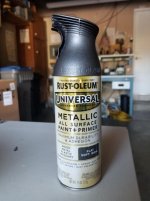
I used Rust-oleum Flat Soft Iron, followed by Satin Clear Enamel.
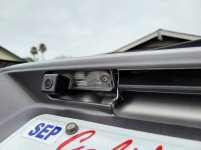
We also installed a rear backup backup camera while we were at it.
It took several hours to complete, but I'm happy with the results.
 

Attachments

  • 20211228_095536_resized.jpg
    20211228_095536_resized.jpg
    58.7 KB · Views: 1,399
  • 20211228_101024_resized.jpg
    20211228_101024_resized.jpg
    56.4 KB · Views: 1,936
  • PlateUpgrade2_resized.jpg
    PlateUpgrade2_resized.jpg
    48.1 KB · Views: 1,326
  • PlateUpgrade3_resized.jpg
    PlateUpgrade3_resized.jpg
    49.9 KB · Views: 1,323
  • 20211228_095833_resized.jpg
    20211228_095833_resized.jpg
    135 KB · Views: 1,304
  • 20210609_082422_resized.jpg
    20210609_082422_resized.jpg
    53.5 KB · Views: 1,306
Installed my original 96-98 back on the other day. The chrome 02 bezel didn't cut it for me any more.
Did it with hatch open. Propped the black metal plate. Kept rear window closed. Used a 12" long skinny 1/4" drive- which is perfect for removing all 10mm nuts and plastic clips (press an rotate) Took about an hour. Don't mess with window mechanism or hatch handle- let in rest insitu.
Debadged the rear hatch leaving 4Runner one on bezel only. So much cleaner looking.
One thing, as I went from the larger later bezel to original smaller one I have a faint tide mark.
 

Members online

Forum statistics

Threads
278,312
Messages
3,554,089
Members
248,016
Latest member
Advally Service

Trending content

Back
Top