Replacing Valve Cover Gaskets - A True Write Up - **PICTURES**

Good write up. Thank you. Will use this very soon.

Just one thing: the picture you used to show valve cover bolt torque is the same one as the intake manifold torque. This may lead some people to try and torque the valve covers to 13 ft-lbf.

I think it's supposed to be much, much less.

Or maybe I'm just seeing it wrong since I'm using tapatalk?
 
Anybody know what service manual OP is using? What

Any 3rd Gen FSM will work for this repair. There's some small differences between the years like the throttle body cable connections but the bulk of the information is exactly the same.
 
nice write-up. you've now convinced me to do it myself. i too take longer then most to do repairs. where did you buy your parts? some of the part numbers i can't find on camelbacktoyota.com
 
Good write up. Thank you. Will use this very soon.

Just one thing: the picture you used to show valve cover bolt torque is the same one as the intake manifold torque. This may lead some people to try and torque the valve covers to 13 ft-lbf.

I think it's supposed to be much, much less.

Or maybe I'm just seeing it wrong since I'm using tapatalk?

yes i noticed this too...can someone clarify what the valve cover bolts should be torqued to and the correct tightening patter if possible??

also what year truck was this?
 
yes i noticed this too...can someone clarify what the valve cover bolts should be torqued to and the correct tightening patter if possible??

also what year truck was this?

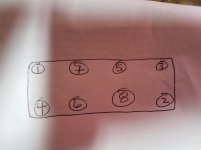
Just like anything with multiple fasteners holding a component on, a crossing pattern is a good technique to tighten it down. Screw in all the bolts by hand using an extension and socket until they make contact with the rubberized washers. Now start your crossing pattern tightening them a little bit at a time. You could go far corners to far corners, then the center four in a crossing pattern. Look at the pic below. Just keep going through the crossing pattern slowly tightening the bolts evenly. What you want to avoid is tightening down one side too much, and then when you start tightening down the other side, you're causing the valve cover to try to bend. The valve cover won't bend, it will break like we've seen on this forum and I've seen personally on a coworkers 3rd Gen. It usually cracks on one of the corners and people think it's because somebody overtightened the bolt but I think it's because of uneven tightening, and when you try to bring the loose side down tight, the cast valve cover can't handle it and it cracks.

20170410_151740.jpg
 

Attachments

  • 20170410_151740.jpg
    20170410_151740.jpg
    51.8 KB · Views: 4,682
My 2 cents: old mechanic, possibly as old as the Model T told me to always tighten valve covers in the sequence like that of the heads. If I don't know such, which I rarely do, or if there are more head bolts than valve cover bolts or vice versa, then I start with the inner most bolts to form a square, crossing them to make an X, and then work my way out to end up with the outer most bolts tighten last. In retrospect, considering the small amount of torque applied to tighten the covers down, it probably doesn't matter.

I believe I used a 32mm socket to tap the new plugs in.
 
My 2 cents: old mechanic, possibly as old as the Model T told me to always tighten valve covers in the sequence like that of the heads. If I don't know such, which I rarely do, or if there are more head bolts than valve cover bolts or vice versa, then I start with the inner most bolts to form a square, crossing them to make an X, and then work my way out to end up with the outer most bolts tighten last. In retrospect, considering the small amount of torque applied to tighten the covers down, it probably doesn't matter.

I believe I used a 32mm socket to tap the new plugs in.

I did notice the tightening sequence for the heads, inside out, rather than outside in. I think the fact that the FSM doesn't even suggest a tightening sequence for the valve covers leads me to believe the sequence isn't all that important, but from experience, slowly tightening them down evenly with whatever pattern you choose is a good idea so you don't end up cracking your valve cover. The FSM says. "Tighten down the bolts evenly in several passes."

But, with that said, I think I will adopt the inside out tightening pattern next time around. The reckon the Ol' Codger probably knows what he's talking about.
 
too many years, too many problems on too many rigs, learned early....
start at the middle, criss cross, take em down slowly and then torque them down correctly with an inch pound wrench ( for our fragile valve covers)
however..... warning
might add a whole entire 5 minutes on a v-6 to our yota 7 hour valve cover replacement so be ready for the crazy amount of extra time spent :)
sarcasm spoken here
 
Last edited:
too many years, too many problems on too many rigs, learned early....
start at the middle, criss cross, take em down slowly and then torque them down correctly with an inch pound wrench
however..... warning
might add a whole entire 5 minutes on a v-6 to our yota 7 hour valve cover replacement so be ready for the extra time :)

You know, I suspect a lot of shop mechanics don't do this. My coworker's driver side valve cover was cracked in the front corner after paying a shop to do the valve cover gaskets. I suspect the mechanic was just zipping the bolts down with an air ratchet to save time and tightened down the back side too much. When he got to the front, the valve cover was forced to try to bend, and like I said above, our cast valve covers are not going to bend, they are going to break.

Just more reinforcement to do as much of your own repairs as possible because more than likely you're going to do the job better than the paid mechanic because you're taking your time and not in a rush to get to the next job. Don't get me wrong, there's lots of good conscientious mechanics out there but why pay high labor bills when you have the tools and know-how to get the job done yourself.
 
well to switch gears a little....has anyone found after scraping off a quarter inch of grease and grime off the valve covers and re-installed the clean as a whistle ones found the engine quite a bit louder???im still struggling with a clickedy clack (although running perfect) motor.
 
This may be a stoopid question but while you have this thing off would it be a good idea to just keep ripping stuff out and replace the head gaskets while you're at it as preventative maintenance, kind of like the timing belt?

PS have you ever considered a career as a hand model?
 
Just like anything with multiple fasteners holding a component on, a crossing pattern is a good technique to tighten it down. Screw in all the bolts by hand using an extension and socket until they make contact with the rubberized washers. Now start your crossing pattern tightening them a little bit at a time. You could go far corners to far corners, then the center four in a crossing pattern. Look at the pic below. Just keep going through the crossing pattern slowly tightening the bolts evenly. What you want to avoid is tightening down one side too much, and then when you start tightening down the other side, you're causing the valve cover to try to bend. The valve cover won't bend, it will break like we've seen on this forum and I've seen personally on a coworkers 3rd Gen. It usually cracks on one of the corners and people think it's because somebody overtightened the bolt but I think it's because of uneven tightening, and when you try to bring the loose side down tight, the cast valve cover can't handle it and it cracks.

View attachment 247404

Are you sure that's the right tightening procedure? Usually tightening inside-out (your sketch is outside-in) results in the least stress in the covers. Outside-in tightening, you force the material to "bunch up" in the middle causing stress points.

IMO, part of the tightening is to do it gradually from 0 to torque spec of the bolt over multiple passes (3-4).
 
Last edited:
This may be a stoopid question but while you have this thing off would it be a good idea to just keep ripping stuff out and replace the head gaskets while you're at it as preventative maintenance, kind of like the timing belt?


PS have you ever considered a career as a hand model?


Head gaskets is a significantly more intrusive job including timing belt component removal (book time for that is around 4-5 hrs alone for a pro mechanic, so extrapolate for a novice) plus cam removal and then heads. So while it would be ideal to do that major of a job, if it ain't broke don't fix it. Plus heads take like 200,000 miles plus to go out whereas valve covers seem to leak significantly more frequently.

Opinions my vary however. I'm one of those evil professionals so what do I know?(Sarcasm intended)
 
Tackling this job in the next week or so. Installing a TRD supercharger and figured I'd do this while I had it apart. They needed to be done anyway.

I have the valve cover grommets, valve cover gaskets with spark plug tubes, and the cam plugs.

Judging from this OP, there's only 2 cam plugs? One on each head, in the rear? And then just remove and reseal the half moons?
 
Great write up OP one of the best I've seen.

I'm tackling this job soon. I downloaded the factory service manual but it's like 2000 pages and I can't seem to find section on replacing valve cover gaskets. Can anybody point me in right direction? I'm also considering getting some kind of paint pen to mark tubes and connectors ect so I know where things go instead of using tape.
 
Are you sure that's the right tightening procedure? Usually tightening inside-out (your sketch is outside-in) results in the least stress in the covers. Outside-in tightening, you force the material to "bunch up" in the middle causing stress points.

IMO, part of the tightening is to do it gradually from 0 to torque spec of the bolt over multiple passes (3-4).

No, I'm not sure because there is no suggested tightening sequence in the FSM. The FSM manual only suggests that you tighten the bolts down evenly over several passes. The FSM doesn't have a sequence because it's not that important like torquing down the head. You just want to avoid tightening it down unevenly and potentially causing the valve cover to crack.

I was trying to demonstrate one way to use a crossing pattern to evenly tighten down a component with multiple fasteners. Just like wheel lug nuts, there's no written rule how you should tighten them down but a crossing pattern is a good technique.

When I tightened mine down, I did way more than 3-4 passes to slowly bring them down evenly. I didn't have any set tightening sequence but I did use a crossing pattern. I didn't use a torque wrench either. I just choked up on my 3/8" ratchet. It wasn't until this last year that I bought my first torque wrench. Now I own 3.
 
Last edited:

Members online

Forum statistics

Threads
278,316
Messages
3,554,111
Members
248,016
Latest member
Advally Service

Trending content

Back
Top