Dylanseagraves
New member
*FIRST WRITE UP EVER*
Sorry it is almost entirely word based, I'm very bad about documenting projects as I just tend to do them and not want to stop. I will post some pictures I have before and after and if I can dig up any that a friend may have.
but please fell free to comment, make suggestions and ask questions!
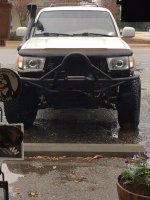
After owning my 4runner for 5 years I decided to finally pull the trigger on some new headlights, but I wasn't skimping out by any means.
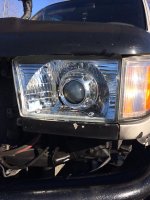
I decided to check out @retrofitsource to see what all the hype was about. I was able to piece together my ACME HID kit with the ACME 6k bulbs, ACME relay, speedy start ballasts, the ACME super projectors with the panamera switchback shrouds. with a 5% coupon code and the free shipping, $190 to my door and 3 days early at that.
https://www.theretrofitsource.com/c...versal-kits/bi-xenon-acme-h1-stage-3-kit.html
Couldn't stop at that though, had recently come across the thread about the 96-98 to 99-02 headlight upgrade
Upgrade ?96 ? ?98 Toyota 4Runner Headlights « Josh?s World
after seeing how much more clean the housings look I had to go with them for the upgrade, the open lens allows for much better light amplification rather than a cloudy old plastic lens.
4 RUNNER 99-02 HEADLIGHT SET | eBay
found these on eBay, $76 for the pair with composite lens, free shipping and a 1 year warranty couldn't beat it. All in all, $266 in. not so bad right?
Before beginning the project take a trip to autozone or lowes, etc. make sure to get some silicone adhesive (clear for stock color housings, color to match, etc.) have a rather sharp and thin blade on hand, as well as a flat head with good leverage.
I baked the housings starting at 250, then dropping the oven to 150 (170 for the oven I used) for roughly 6-10 minutes depending on how it goes. start the blade along the top side of the housing and attempt to create a gap big enough to wedge the flathead and start to pry it back and forth. Careful not to separate it entirely from the top from the bottom without splitting it as you can damage the plastic back of the housing this way.
*ensure to take your blade and cut the adhesive to ease the separation and not to strain the lens or the back of the housing.
upon beginning separation ensure the lens and housing don't touch or they can reseal in a matter of seconds with the silicone rapidly dropping in temperature.
Once separated you now begin the fun and satisfying part, assembling the headlights.
Very simple and straightforward process.
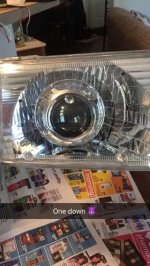
Start with the projector lens and attach the appropriate silicone grommet (h4) on the back and feed it in front side, then add the appropriate locking plate (h4) to make the housing converted to the appropriate bulb housings. Next add the hex lock nut in order to secure the projector in the housings, ensure that the projector is installed the right way, (wires bottom side) then add the adapter to hold the bulb in place with a few screws and the projector is in. Not so bad.
(Next part is only if shrouds were ordered)
if you opted out of the shrouds and just wanted projectors skip this part.
next you will find a ring to fit around the projector lens in order to accommodate the shroud. It'll snug up around the lens well. If you also have switchbacks you will have a little piggyback wire to run through the back of the housing, in order to ensure proper space for the connector take your flat head and break the tiny plastic piece that holds the old bulb clip in place as you will have a new bulb clip on the adapter plate.
*resealing*
in this case I went the less effective way, being concerned for the shroud and wires and connectors I opted out of baking the first lens to reheat the silicone and help reseal it rather than just caking the housing with good, clear adhesive silicone and squeeze the life out of it to seal and so far so far.
the second one I decided to bake just for 5 minutes and didn't notice any damage, but no ease of sealing either, so far have held up well.
REVIEW
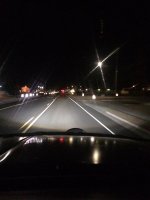
the different is amazing, easily 5-10 times the light output of outdated halogen bulbs in old pitted housings. Low beams easily shine down 250-300 feet the road, high beams I would bet a hard 1000 if perfect visibility. and the halos add such a nice flare to it for the few bucks extra they cost.
Sorry it is almost entirely word based, I'm very bad about documenting projects as I just tend to do them and not want to stop. I will post some pictures I have before and after and if I can dig up any that a friend may have.
but please fell free to comment, make suggestions and ask questions!
After owning my 4runner for 5 years I decided to finally pull the trigger on some new headlights, but I wasn't skimping out by any means.
I decided to check out @retrofitsource to see what all the hype was about. I was able to piece together my ACME HID kit with the ACME 6k bulbs, ACME relay, speedy start ballasts, the ACME super projectors with the panamera switchback shrouds. with a 5% coupon code and the free shipping, $190 to my door and 3 days early at that.
https://www.theretrofitsource.com/c...versal-kits/bi-xenon-acme-h1-stage-3-kit.html
Couldn't stop at that though, had recently come across the thread about the 96-98 to 99-02 headlight upgrade
Upgrade ?96 ? ?98 Toyota 4Runner Headlights « Josh?s World
after seeing how much more clean the housings look I had to go with them for the upgrade, the open lens allows for much better light amplification rather than a cloudy old plastic lens.
4 RUNNER 99-02 HEADLIGHT SET | eBay
found these on eBay, $76 for the pair with composite lens, free shipping and a 1 year warranty couldn't beat it. All in all, $266 in. not so bad right?
Before beginning the project take a trip to autozone or lowes, etc. make sure to get some silicone adhesive (clear for stock color housings, color to match, etc.) have a rather sharp and thin blade on hand, as well as a flat head with good leverage.
I baked the housings starting at 250, then dropping the oven to 150 (170 for the oven I used) for roughly 6-10 minutes depending on how it goes. start the blade along the top side of the housing and attempt to create a gap big enough to wedge the flathead and start to pry it back and forth. Careful not to separate it entirely from the top from the bottom without splitting it as you can damage the plastic back of the housing this way.
*ensure to take your blade and cut the adhesive to ease the separation and not to strain the lens or the back of the housing.
upon beginning separation ensure the lens and housing don't touch or they can reseal in a matter of seconds with the silicone rapidly dropping in temperature.
Once separated you now begin the fun and satisfying part, assembling the headlights.
Very simple and straightforward process.
Start with the projector lens and attach the appropriate silicone grommet (h4) on the back and feed it in front side, then add the appropriate locking plate (h4) to make the housing converted to the appropriate bulb housings. Next add the hex lock nut in order to secure the projector in the housings, ensure that the projector is installed the right way, (wires bottom side) then add the adapter to hold the bulb in place with a few screws and the projector is in. Not so bad.
(Next part is only if shrouds were ordered)
if you opted out of the shrouds and just wanted projectors skip this part.
next you will find a ring to fit around the projector lens in order to accommodate the shroud. It'll snug up around the lens well. If you also have switchbacks you will have a little piggyback wire to run through the back of the housing, in order to ensure proper space for the connector take your flat head and break the tiny plastic piece that holds the old bulb clip in place as you will have a new bulb clip on the adapter plate.
*resealing*
in this case I went the less effective way, being concerned for the shroud and wires and connectors I opted out of baking the first lens to reheat the silicone and help reseal it rather than just caking the housing with good, clear adhesive silicone and squeeze the life out of it to seal and so far so far.
the second one I decided to bake just for 5 minutes and didn't notice any damage, but no ease of sealing either, so far have held up well.
REVIEW
the different is amazing, easily 5-10 times the light output of outdated halogen bulbs in old pitted housings. Low beams easily shine down 250-300 feet the road, high beams I would bet a hard 1000 if perfect visibility. and the halos add such a nice flare to it for the few bucks extra they cost.