Roof Rack and RTT install Completed

Jpilot

New member
So, finally got everything buttoned up and the rooftop tent installed. Here is the series of photos as I went along.
The Rack is by NiseRack, [MENTION=176262]Eitek1[/MENTION] was kind enough (and smart enough) to design and make these available to us here.
His website is:
Shop | NiseRack.com

A good write-up of the rack is here:
5th Gen Aluminum Roof Rack Using OEM Siderails: NiseRack

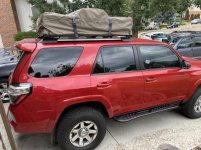
And here is my build
 

Attachments

  • 6F95A4C7-2BFF-491A-8F72-F9AEDABA833D_p.jpg
    6F95A4C7-2BFF-491A-8F72-F9AEDABA833D_p.jpg
    60.6 KB · Views: 1,080
Register to hide this ad
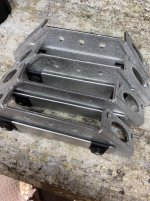
Started with the rack legs, they come with all the hardware. Only took about 4 days to arrive from NiseRack. Great job there.
 

Attachments

  • 3DDFD160-500C-42A7-87C1-1D7030A10361_1_201_a.jpg
    3DDFD160-500C-42A7-87C1-1D7030A10361_1_201_a.jpg
    97.3 KB · Views: 896
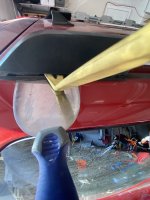
Pry the end cap off of the roof rails. I used a wide scraper to distribute my wedging load, so as to not dent the top of the truck. Worked well.
 

Attachments

  • B53E81F3-AF09-4BCA-9491-7BE9E11FE446_1_201_a.jpeg
    B53E81F3-AF09-4BCA-9491-7BE9E11FE446_1_201_a.jpeg
    133.3 KB · Views: 881
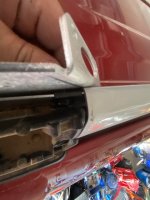
Then the brackets just slide into place. I ordered 4 "sets" of brackets, which will give you left and right brackets for 4 rails. I found if you loosen the bolt a little at a time, while you insert into the rail, it goes in well, and then you can tighten a bit by hand as soon as it is slid in.
 

Attachments

  • IMG_3209.jpeg
    IMG_3209.jpeg
    76.3 KB · Views: 892
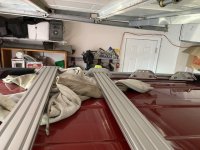
After all brackets are on (I had 8 for 4 crossbeams) , slap the covers back onto the rails and then attach the crossbeams. I used an old sweatshirt to hold the far side while the first went on.
 

Attachments

  • IMG_3217.jpeg
    IMG_3217.jpeg
    101.9 KB · Views: 885
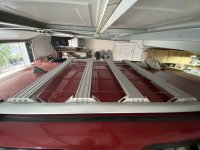
Once everything was on, I tightened everything up and was good to go. Great rack. Entire rack system was less than $300, so a big saving over a custom full or 3/4 rack.
 

Attachments

  • IMG_3220.jpeg
    IMG_3220.jpeg
    77.7 KB · Views: 893
Rtt

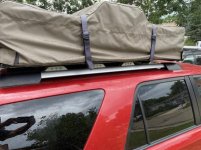
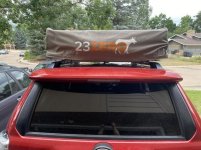
Final piece to the job was the Roof-Top tent. I have a 23zero tent, soft shell, and absolutely LOVE it. Has been a great way to camp, get yourself off the ground and get some great sleep. Brackets fit really well over the 3' wide crossbeams and are solid. Tent pretty much goes from end to end of the factory side rails, so does not look out of place.
 

Attachments

  • IMG_3238.jpg
    IMG_3238.jpg
    54.9 KB · Views: 896
So, finally got everything buttoned up and the rooftop tent installed. Here is the series of photos as I went along.
The Rack is by NiseRack, [MENTION=176262]Eitek1[/MENTION] was kind enough (and smart enough) to design and make these available to us here.
His website is:
Shop | NiseRack.com

A good write-up of the rack is here:
5th Gen Aluminum Roof Rack Using OEM Siderails: NiseRack

And here is my build
Looks great! A couple questions. 1. How hard was it to bolt the tent onto the rack? I'm thinking clearance under the tent to attach the hardware. and 2. How high is the top of the tent from the roof of the runner? I'm wondering if it will fit in my garage.

Thanks!
 
Looks great! A couple questions. 1. How hard was it to bolt the tent onto the rack? I'm thinking clearance under the tent to attach the hardware. and 2. How high is the top of the tent from the roof of the runner? I'm wondering if it will fit in my garage.

Thanks!

Tent bolts were about a 1 hammer difficulty on the “outside” bolts and about a 3 hammer difficulty on the “inside” bolts. Helps to have a family member with small hands and limber wrists to get the nuts started.
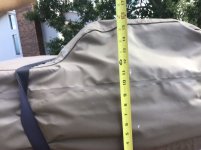
Tent sits about 16” above the rack. No way mine goes in the garage, but my 4R is also lifted with 285s.
 

Attachments

  • 67B716B2-4F15-456A-9646-E85E5319FDFA.jpeg
    67B716B2-4F15-456A-9646-E85E5319FDFA.jpeg
    90.3 KB · Views: 705
It’s quicker if you pre-set the inside bolts, that way all you do is slide the bracket around and tighten the outside bolts only. If you ever take it off keep that in mind! Just undo the outside bolts! Hope that helps.
 
It’s quicker if you pre-set the inside bolts, that way all you do is slide the bracket around and tighten the outside bolts only. If you ever take it off keep that in mind! Just undo the outside bolts! Hope that helps.

Absolutely correct. We needed to set and capture on this install because it was going on a new size rack for the first time. From now on out, ‘outside’ nuts only and slide off.
Thanks
 

Members online

Forum statistics

Threads
278,316
Messages
3,554,113
Members
248,016
Latest member
Advally Service

Trending content

Back
Top