Review and Install
Relations Race Wheels 2011+ 4Runner Replacement Seat Covers
Pros: Price
Cons: Installation
Review:
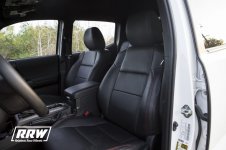
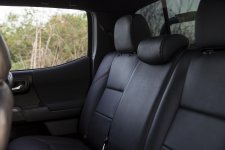
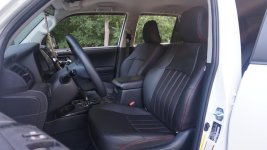
Overall happy. Material is slightly lighter shade of black (grey) than stock door panels etc. Red stitching looks nice and matches center console cover well. Looks good, but a bit squeaky which prevents sliding in the seats.
One headrest was mismarked (mirrored), and some markings were off relative to my seats, but overall a good guide as to where to look to trim. Some rod sleeve ends were sowed shut, so they had to be cut open. A ~3-4” section of J-hooks on the fwd passenger lower seat wasn’t stitched in fully, so I’ll have to go back and rubber-cement it or something to keep the fabric tucked in properly.
There’s a reason people pay others to install new covers. This took about two weekends (~four days at six hours a day, including placement of seat heater pads) to do the front buckets, and rear seats (including rear center armrest). I haven’t done the front center console cover, but I don’t expect this to be difficult, I just need an upholstery staple gun. Was able to install seat heaters at the same time. Buy a good pair of diagonal cutters, as this will save you from excessive hand strain. I started off with the headrests, worked my way through the rear seats, and then to the front buckets. This was overall a good move as it allowed reasonable time to learn and step through the various unique assembly methods involved.
Tools Required:
Screw Driver(s), various (plastic cover and bumper removal)
Wrench/Sockets, various (seat removal)
Utility knife blades
Hog ring pliers
Diagonal cutters
Needle nose pliers (removing remnants of hog rings)
Plastic trim removal tools
Torx (T40 and T45 sizes)
Some ‘how to’ videos that were useful although not specific to the vehicle/RRW covers:
Discussion here about how to work on the headrest covers, as I couldn’t find a video:
Removal of rear headrest lever
Youtube video showing non-RRW install of similar covers on a 5th gen 4runner, rear seats:
https://www.youtube.com/watch?v=whfpae2fm-Q&feature=youtu.be
Youtube video showing details on a 3rd gen seat cover replacement with good how-to for hog rings. I found that NOT prebending hog rings was best, and just holding the pliers with a firm grip allowed the best ability to control placement.
https://www.youtube.com/watch?v=aW5FmIQCk5A&feature=youtu.be
Youtube video showing how to remove covers off a Tacoma including seat back recline handle.
https://www.youtube.com/watch?v=bo52GJSsBL0&feature=youtu.be
General order of operations:
Headrests:
1) Remove all headrests (qty 5)
2) Front headrests and center rear headrest are slipover
3) Rear passenger and driver side headrests unfold ‘j-clips’, remove, and slide new covers over. Attach / fold using ‘j-clips’
Rear Driver Side Seat Cushion:
1) Remove rear seat cushion driver side (two covers and two screws)
2) Remove Two bumpers (two screws) and release cord plastic cover (two screws) from seat
3) Remove ‘felt’ bottom
4) Unclip ‘j-clips’ of cloth cover from frame
5) Remove cloth cover from cushion using wire cutter (use needle nose pliers to clean up leftover remnants of hog nose rings)
6) Slide metal rods out of factory cloth cover and place in appropriate sleeves on new cover
7) Attach middle metal rod to seat cushion rod using hog rings
8) Attach side metal rods (qty 2) to seat cushion rod using hog rings
9) Fold new cover over seat cushion
10) Fish ‘extra’ cover attachment under main metal frame, and attach hog ring as marked
11) Fish pull loop through cover
12) Fold all ‘j-clips’ into place (hint, push well past ‘vertical’)
13) Place seat bottom back on
14) Attach rubber feet with two original screws
15) Cut, as marked, cushion to accept cord release plastic cover
16) Attach plastic cover using built in clips and two original screws
Rear Passenger Side Seat Cushion:
1) Same as “Rear Driver Side Seat Cushion”
NOTE: “J-clip” on the front is very long and is a pain due to the metal frame with bracket. This took a lot of work, bending (molding) the clip to finally get engagement. Take a look at the removed cover and note that it is curved in two places to make it easier to engage. I bent this area as best as I could with pliers and finally got it to engage once I released the nearby clips, pulled it as taught as possible, and gave it a go. Was not fun, but it is doable.
Rear Seat Backs (driver and passenger sides):
1) Remove trim piece behind seats by opening plastic covers of forward most tie downs in rear cargo area and remove the tie down bolts and trim piece (2 bolts)
2) Remove Rear Seats (two bolts driver side 40% split, three bolts passenger side 60% split) from vehicle in two parts
3) Remove rear panel of driver side rear seat back
4) Take photo of seat back attachment
5) Remove plastic latch cover from the side (two screws)
6) Disconnect top ‘j-clip’
7) Cut all rings and remove cover
8) Remove metal rods and transfer over to new cover
9) Cut plastic rod from old seat and transfer to new cover
10) Use hog ring pliers to connect front of seat cover to cushion
11) Attach J-clip
12) Use hog ring pliers to connect back of seat cover to frame
13) Attach plastic latch cover with two screws
14) Attach rear panel
15) Repeat steps 4 through 14 for passenger side main seat back
Rear middle seat back:
1) Remove rear felt lower cover from the bottom using pry tools and then slide ‘up’ to release plastic clip
2) Flip up rear lower felt on passenger side and expose two T-40 Torx head fasteners securing center seat back to passenger seat back.
3) Remove T-40 Torx head fasteners, and pull release lever to remove center seat back from passenger seat back.
4) Remove plastic trim covers using standard methods
5) Utilize T-45 Torx to remove various pin bolts and remove center armrest from seat back.
6) Remove cup holder (two screws and pull out on three tabs near forward edge)
7) Unfold arm rest cover
8) Reverse operations to install new cover.
Front Bucket Seatbacks:
1) Remove Seats (4 bolts each and 4 plastic covers)
2) Unclip elastic band of lower back seat from under seat cage
3) Remove various outer plastic trim around lower seat pad / hinges as needed
4) Clip lower row of hog rings
5) Unzip two rear zippers
6) Take photos of inside of seat, around airbag (three metal brackets, four stitched fabric pieces, one domed hex nut (10mm))
7) Take photos of lower hinge area on each side (two fabric pieces, one under around hinge and one to the back on each side)
8) Remove domed hex nut and unclip three brackets
9) Unclip/tug free fabric pieces around lower hinges
10) Remove backseat cover by removing hog rings etc
11) Reverse order of operations (up to and including 4) to install new covers
12) Cinch Front Seat Backrest Covers using a bowline on one end and a trucker’s hitch on the other.
Front Bucket Lower Seat:
1) Unclip cushion from frame
2) Remove cushion from seat
3) Remove hog rings and separate cover from seat
4) Reverse order of operations (including steps 3 and 2 from Front Bucket Backseat) to install new covers