Saleen's Build Thread

saleen12

New member
This will be a thread to track the progression of my 4runner and get tips from the helpful members of this forum.

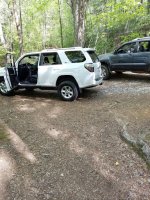
I picked up this beauty about 4 months ago for a killer deal, had 48k miles and has just over 50k now. 2015 SR5 Super White 4x4.

Short mod list below, but I just ordered my lift and hope to have it done by end of June!

Current Mods:
1) Salex Organizers from Amazon (best $20 ever spent)
2) Interior LEDs from Ebay (second best $20)
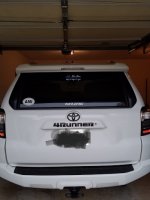
3) Plasti dipped all badges black (Another great way to spend less than $20)
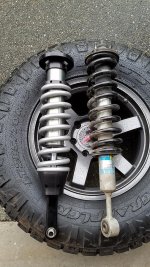
4) Bilstein 5100s all 4 corners
5) Rear Superflex Toytec coils & OME driver side spacer
6) Front 2884 OME Coils
7) SPC Upper Control Arms
8) Spidertrax for all 4 wheels
9) Weathertechs
10) K&N drop in filter


Tires: I will probably be going with 285/70/17 Telstar Mudclaws. They are so incredibly cheap and 10 ply. My buddy has them on the 4th gen in one of the pictures on this post and we love them so far. $175 a tire is hard to beat for a mud tire, if they pop its cheap to replace and if they wear out too fast its an easy upgrade down the road.
 

Attachments
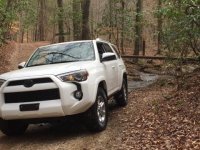
  • Pic1.jpg
    Pic1.jpg
    54 KB · Views: 983
  • Pic 2.jpg
    Pic 2.jpg
    106.5 KB · Views: 922
  • Plastidip.jpg
    Plastidip.jpg
    32.7 KB · Views: 933
Last edited:
Register to hide this ad
I have a couple questions for the pros regarding my lift.

Do I need to order anything else? Extended brake lines, bump stops, sway bar relocate, or diff drop?

Anyone have any tips for install? Hoping to knock it out in June with a buddy who was a mechanic (never really did much suspension work tho), my father-in-law (can do anything with tools), and one other friend (him and I only know what we have read on the forum and watched on youtube).

I will be taking it straight to a 4x4 shop to have them install tires and do the alignment after the lift, so I will ask them to check our work and re-torque everything. I might have them do the wheel spacers also since I want them installed right the first time.

Really wish there was a full list of tools needed and a list of torque specs for this job with solid instructions. :noidea:
 
Do I need to order anything else? Extended brake lines, bump stops, sway bar relocate, or diff drop?

Anyone have any tips for install? Hoping to knock it out in June with a buddy who was a mechanic (never really did much suspension work tho), my father-in-law (can do anything with tools), and one other friend (him and I only know what we have read on the forum and watched on youtube).

Not necessary for extended brakes, bump stops, diff drop or sway bar relocation. You will be wasting money.

Suspension install is easy. Just make sure to unbolt the ABS sensor lines before you do anything. Those lines break easily and will cost $60/each to replace. The job doesn't require any special tools maybe except for spring compressors that you can rent from any auto parts store. Just basic sockets/wrenches, a dead blow hammer, flat head screw driver. Of course torque things down when the rig sits level. If you have an impact wrench it makes things a lot quicker. It'll be easy with an extra person helping.
 
Not necessary for extended brakes, bump stops, diff drop or sway bar relocation. You will be wasting money.

Suspension install is easy. Just make sure to unbolt the ABS sensor lines before you do anything. Those lines break easily and will cost $60/each to replace. The job doesn't require any special tools maybe except for spring compressors that you can rent from any auto parts store. Just basic sockets/wrenches, a dead blow hammer, flat head screw driver. Of course torque things down when the rig sits level. If you have an impact wrench it makes things a lot quicker. It'll be easy with an extra person helping.

Awesome, really appreciate the feedback. I was kind of hoping that was the case with those 4 extra parts which is why I did not order them yet. Hell I really did not want to order the UCAs but I figured I should do it while everything is apart.
 
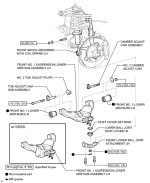
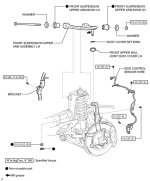
Torque specs via quick Google search for the 2010+ 4WD 5th gen models. Off the Toyota manual.
 

Attachments

  • lca.jpg
    lca.jpg
    133.3 KB · Views: 1,186
  • uca.jpg
    uca.jpg
    110.6 KB · Views: 1,909
Anyone have advise on what lube to use with the new zirked spc ucas? Also do I need a ball joint seperator? I've seen installs where they just wack it with a dead blow.

Sent from my SM-G935V using Tapatalk
 
Anyone have advise on what lube to use with the new zirked spc ucas? Also do I need a ball joint seperator? I've seen installs where they just wack it with a dead blow.

Sent from my SM-G935V using Tapatalk

I have Total Chaos UCA's and used their recommended Super Lube with PTFE. You'd have to google to see what SPC recommends, but I'd imagine they are similar.

Also, We were unable to get the radiator supports back on without spacers on them as the sway bar was in the way. Even with the 1/4" spacers I needed to add 3 thin washers as well to clear the sway bar from those brackets.

Be careful of the thing ABS wire that is connected to the UCA's. I had to pull a bracket off the wire as my new UCA's didn't have a place for them to screw in, and I was supposed to just zip tie them. While prying the bracket off, the wire broke like it was nothing. It was still driveable until my replacement came in (just no ABS or off road features) however it was still about a $65 mistake and about an hour and some hassle to put the new one in.

You'll also want an extra set of hands for the UCA install. One to hold the UCA and another to feed the bolt through. The drivers side is a breeze, but the passenger side has a ton of crap in the way making it a challenge to snake that bolt through.

On the rear, I disconnected both sway bar links, and removed both shocks. Jacked up one axle and pulled the spring out of the other side and put the new spring in, repeat on opposite side, reinstall shocks, links, bump stop spacers, done. A spring compressor is a huge help for the rear.

While this video is for a 4th gen and some of the items won't apply/are overkill. I found this video to be hands down the best suspension install video. Their rear they installed is pretty complex so I didn't use it for that.

https://www.youtube.com/watch?v=-tDYnzKtE2c
 
Last edited:
I have Total Chaos UCA's and used their recommended Super Lube with PTFE. You'd have to google to see what SPC recommends, but I'd imagine they are similar.

Also, We were unable to get the radiator supports back on without spacers on them as the sway bar was in the way. Even with the 1/4" spacers I needed to add 3 thin washers as well to clear the sway bar from those brackets.

Be careful of the thing ABS wire that is connected to the UCA's. I had to pull a bracket off the wire as my new UCA's didn't have a place for them to screw in, and I was supposed to just zip tie them. While prying the bracket off, the wire broke like it was nothing. It was still driveable until my replacement came in (just no ABS or off road features) however it was still about a $65 mistake and about an hour and some hassle to put the new one in.

You'll also want an extra set of hands for the UCA install. One to hold the UCA and another to feed the bolt through. The drivers side is a breeze, but the passenger side has a ton of crap in the way making it a challenge to snake that bolt through.

On the rear, I disconnected both sway bar links, and removed both shocks. Jacked up one axle and pulled the spring out of the other side and put the new spring in, repeat on opposite side, reinstall shocks, links, bump stop spacers, done. A spring compressor is a huge help for the rear.

While this video is for a 4th gen and some of the items won't apply/are overkill. I found this video to be hands down the best suspension install video. Their rear they installed is pretty complex so I didn't use it for that.

https://www.youtube.com/watch?v=-tDYnzKtE2c
Interesting. In all the research I never realized the radiator bracket might get in the way. Do you have a link to the spacers for that? What causes it to be in the way and is this a common problem?

Thanks for all the great info also!

Sent from my SM-G935V using Tapatalk
 
Interesting. In all the research I never realized the radiator bracket might get in the way. Do you have a link to the spacers for that? What causes it to be in the way and is this a common problem?

Thanks for all the great info also!

Sent from my SM-G935V using Tapatalk

Toytec sells a bracket on their site. I'm not sure if it's from adjusting the sway bar as most complete kits also include sway bar relocation brackets. Once I realized mine was rubbing, some research showed this was a fairly common problem.
 
Toytec sells a bracket on their site. I'm not sure if it's from adjusting the sway bar as most complete kits also include sway bar relocation brackets. Once I realized mine was rubbing, some research showed this was a fairly common problem.

Oh are you talking about the sway bar relocate? I thought you were saying you had to get a radiator mount spacer...
 
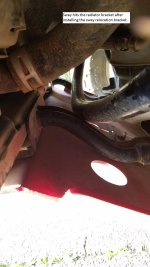
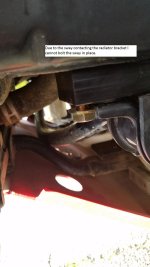
Brackets are definitely needed if you are running 3.0" diameter coils on a 2.5" diameter shock body. Like those coilovers offered by King, Fox, Icon, Radflow, BP-51. The sway bar won't clear those coils so you will need brackets to move the sway bar forward or run without a sway bar. When you move the sway bar forward the driver side of the sway bar will contact the driver side radiator support bracket, this will prevent you from bolting the sway bar back onto the sway relocation brackets.

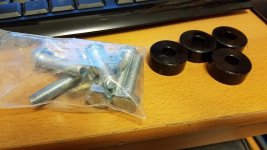
To remedy this you will need to use four 1/2" washers and 6 extended bolts. Normally comes with the 2.5 coilover kits. With these spacers you will lower your radiator brackets so the sway bar will clear. Downside to this is that the front skid plate mounts directly into the radiator brackets. Means if your brackets are lowered so will your skid plate clearance by 1/2". All but the KDSS models will need this done if the owner chooses to run the factory sway bar.

For the 5100+2885 you won't need the sway relocation brackets since these OME coils are a bit smaller in diameter. I ran 5100+2887 before and never had any issues. You can install the relocation bracket if you want as it won't hurt anything, will just lose a little clearance in the front.
 

Attachments

  • 20170407_192900 (1).jpg
    20170407_192900 (1).jpg
    136.9 KB · Views: 683
Last edited:
Brackets are definitely needed if you are running 3.0" diameter coils on a 2.5" diameter shock body. Like those coilovers offered by King, Fox, Icon, Radflow, BP-51. The sway bar won't clear those coils so you will need brackets to move the sway bar forward or run without a sway bar. When you move the sway bar forward the driver side of the sway bar will contact the drive side radiator support bracket, this will prevent you from bolting the sway bar back onto the sway relocation brackets.

To remedy this you will need to use four 1/2" washers and 6 extended bolts. Normally comes with the 2.5 coilover kits. With these spacers you will lower your radiator brackets so the sway bar will clear. Downside to this is that the front skid plate mounts directly into the radiator brackets. Means if your brackets are lowered so will your skid plate clearance by 1/2". All but the KDSS models will need this done if the owner chooses to run the factory sway bar.

For the 5100+2885 you won't need the sway relocation brackets since these OME coils are a bit smaller in diameter. I ran 5100+2887 before and never had any issues. You can install the relocation bracket if you want as it won't hurt anything, will just lose a little clearance in the front.

Very glad to hear this. Thanks for the detailed write up also, I am really hoping not to have to order anything else other than the tires and upper control arms!
 
Found these pictures I posted awhile back. Gives you a visual of what I am referring to when the sway hits the radiator support brackets. Last picture is the spacers and bolts to lower those two radiator brackets. You're only going to need to space out the brackets if you move the sway bar forward aka sway bar relocation.
 

Attachments

  • 20170406_181942.jpg
    20170406_181942.jpg
    135.9 KB · Views: 287
  • 20170406_181958.jpg
    20170406_181958.jpg
    123.4 KB · Views: 266
  • 20170406_184905.jpg
    20170406_184905.jpg
    136.4 KB · Views: 271
Found these pictures I posted awhile back. Gives you a visual of what I am referring to when the sway hits the radiator support brackets. Last picture is the spacers and bolts to lower those two radiator brackets. You're only going to need to space out the brackets if you move the sway bar forward aka sway bar relocation.

Sounds like he may not need the sway bar relocation bracket though, so hopefully not an issue?
 
Sounds like he may not need the sway bar relocation bracket though, so hopefully not an issue?
That is what I'm hoping for but I will update after the lift. We are shooting for next weekend.

We are going to try the no spring compressor method as it looks way easier and safer and will save time and money vs having a shop assemble them. Does anyone know If I need to remove the tie rod ends with a ball joint seperator or fork or can I just support the hub and drop the lower control arm?

Sent from my SM-G935V using Tapatalk
 
That is what I'm hoping for but I will update after the lift. We are shooting for next weekend.

We are going to try the no spring compressor method as it looks way easier and safer and will save time and money vs having a shop assemble them. Does anyone know If I need to remove the tie rod ends with a ball joint seperator or fork or can I just support the hub and drop the lower control arm?

Sent from my SM-G935V using Tapatalk

I only used a compressor in the rear and it was a big help.

You shouldn't need a ball joint separator. 5-10 good hits with a hammer after loosening it up and it separates easily.
 
I only used a compressor in the rear and it was a big help.

You shouldn't need a ball joint separator. 5-10 good hits with a hammer after loosening it up and it separates easily.
Do I even need to take it off though? I've seen lots of videos where they just support the hub and disconnect the lca to swing it down and remove coilover

Sent from my SM-G935V using Tapatalk
 

Members online

Forum statistics

Threads
278,307
Messages
3,554,054
Members
248,016
Latest member
Advally Service

Trending content

Back
Top