Sherpa Equipment Company - 5th Gen

I placed my order during their stimulus sale but I suspect they’re a bit backed up because they were shut down for awhile...
 
Sorry, this was me trying to get their attention on how to mount a the shower mentioned above on one of their racks.

The rack will come when it comes.

How long have you been waiting? They were probably back logged quite a bit due to the quarantine and shut down. I don't think they were allowed to resume production until 3-4 weeks ago.
 
Hey Sherpa guys ... any thoughts on how this would mount on your rack? Just strap underneath the cross bars?

RoadShower

I too would like to know the solution to mounting this.

This looks as if it will mount easily to crossbars going perpendicular to the vehicle or you could great creative to make brackets that allow it to mount parallel to the vehicle unless the supplied mounts rotate. Looks as if they might be able to. I have no personal experience with this product though.


Any plans for 5th gen drawer system?

We do have plans for a drawer system for the 5th gen, we are in the production process of them now.

As far as orders taking longer, we have been working hard to keep up with the lead times since our 3 weeks stuck at home. As expected it put a huge strain on our production. We are getting racks out as quickly as we are able though. Our phones and emails are always open during our business hours so feel free to reach out.
 
OK, rack installed. Mostly. I'm still fighting with the front of it trying to get it secure enough. Harder when you are single handed. Gave up for the day after spending 5 hours getting the rack set up because it was getting dark. Will give it another shot this week some night.

xXEMzqO.jpg
 
OK, rack installed. Mostly. I'm still fighting with the front of it trying to get it secure enough. Harder when you are single handed. Gave up for the day after spending 5 hours getting the rack set up because it was getting dark. Will give it another shot this week some night.

xXEMzqO.jpg

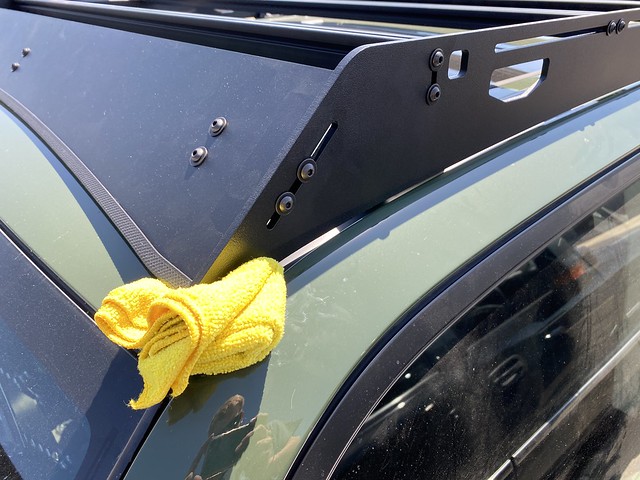
The best way to set them up solo is by using a rag or something soft to push the front of the rack up a bit. Then you have gravity on your side while tightening the front feet. We use this method during installs at the shop. Definitely not the easiest to set up but once they are on you won't have to adjust them for a long time.
 
The best way to set them up solo is by using a rag or something soft to push the front of the rack up a bit. Then you have gravity on your side while tightening the front feet. We use this method during installs at the shop. Definitely not the easiest to set up but once they are on you won't have to adjust them for a long time.

Yup, exactly what i did. Still took longer than expected...and i sorta got confused with the front and rear side mounts.
 
The best way to set them up solo is by using a rag or something soft to push the front of the rack up a bit. Then you have gravity on your side while tightening the front feet. We use this method during installs at the shop. Definitely not the easiest to set up but once they are on you won't have to adjust them for a long time.

Seriously considering one of your racks. Given that this particular issue has come up a few times in the comments, is there any way you could post a video or even pics to illustrate this method you describe for tightening the front feet?
 
Seriously considering one of your racks. Given that this particular issue has come up a few times in the comments, is there any way you could post a video or even pics to illustrate this method you describe for tightening the front feet?

Untitled by alex fleming, on Flickr

This is how we do it here at the shop. Leave the middle mount of the rack loose, get the fronts tights, pull the rag, tighten the middle mounts and you're good to go. A buddy gently pushing up on the corner of the rack also works.
 
OK, that picture and description helped a lot. Now installed with everything nice and tight.

rCxubpQ.jpg


VFuqRGu.jpg


I experimented with the "smiley" too - those things are brilliant!

1KS022P.jpg


To people reading this because they are considering a Sherpa rack.

1) the quality of design and manufacture is outstanding.

2) the thoughtful design of the accessories is superb.

3) their customer service is amazing. emails answered quickly, advice freely offered, support when needed. I've bought stuff from about 10 of the vendors that get talked about on this site, and these guys are first in the class.

Great product, great people.

Untitled by alex fleming, on Flickr

This is how we do it here at the shop. Leave the middle mount of the rack loose, get the fronts tights, pull the rag, tighten the middle mounts and you're good to go. A buddy gently pushing up on the corner of the rack also works.
 
Thanks, I’ll be ordering a Sherpa crestone in the near future so the picture and details will be helpful for the install.


Sent from my iPhone using Tapatalk
 
Untitled by alex fleming, on Flickr

This is how we do it here at the shop. Leave the middle mount of the rack loose, get the fronts tights, pull the rag, tighten the middle mounts and you're good to go. A buddy gently pushing up on the corner of the rack also works.

I appreciate you posting this, I just talked to Will this morning about my adjustable feet and this helped me when adjusting it, feels much more secure now. Firstly, this is a very well made rack and it exceeds my expectations once mounted. The whole Sherpa team has been patient and responsive during my ordering and install, hats off to a small group of guys making a great product, can't wait to put this through its paces.

A few points of feedback for the Sherpa team after my install this weekend:

1) You have 7/8" bolts (the hex heads) listed in the online instructions but 1" listed on your packing list.

2) I was a bit confused during the install about which way the rubber feet are supposed to fit over the channels...one side is somewhat concave, and the other side is flush. I went concave side down on all 4 and they seemed to fit ok, but confirmation in the instructions would have made me feel better since this is the piece of the install that guarantees weather sealing, and the hardest part to reverse/fix one the rack is on.

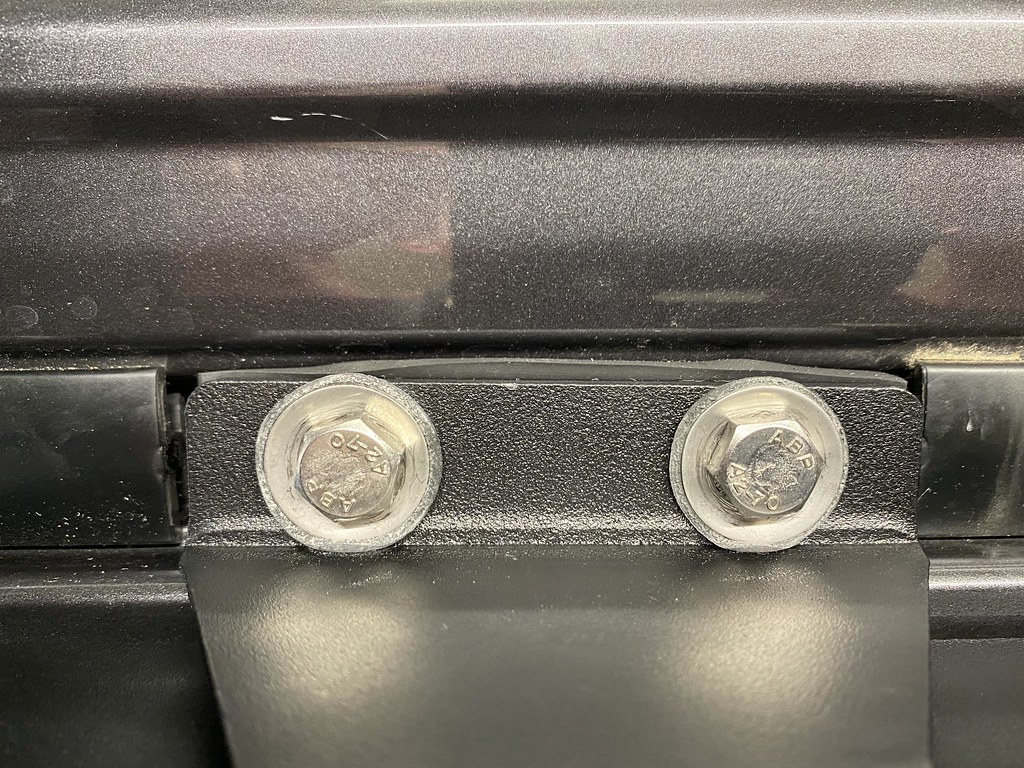
3) Another point about the feet, there are no instructions on how tight the foot bolts should be. It feels like you can turn forever without increased torque because the rubber feet and the rubber on the washers continues to compress. Will mentioned that you should stop before the washers become concave...well, lesson learned too late on that one, all my washers are concave.

A bit more detail in the instruction book would be helpful for these crucial steps.

Here's a pic of how much my rubber is compressed right now, and the bolts still turn with ease.

50109203451_ac0397ea80_b.jpg
 
I appreciate you posting this, I just talked to Will this morning about my adjustable feet and this helped me when adjusting it, feels much more secure now. Firstly, this is a very well made rack and it exceeds my expectations once mounted. The whole Sherpa team has been patient and responsive during my ordering and install, hats off to a small group of guys making a great product, can't wait to put this through its paces.

A few points of feedback for the Sherpa team after my install this weekend:

1) You have 7/8" bolts (the hex heads) listed in the online instructions but 1" listed on your packing list.

2) I was a bit confused during the install about which way the rubber feet are supposed to fit over the channels...one side is somewhat concave, and the other side is flush. I went concave side down on all 4 and they seemed to fit ok, but confirmation in the instructions would have made me feel better since this is the piece of the install that guarantees weather sealing, and the hardest part to reverse/fix one the rack is on.

3) Another point about the feet, there are no instructions on how tight the foot bolts should be. It feels like you can turn forever without increased torque because the rubber feet and the rubber on the washers continues to compress. Will mentioned that you should stop before the washers become concave...well, lesson learned too late on that one, all my washers are concave.

A bit more detail in the instruction book would be helpful for these crucial steps.

Here's a pic of how much my rubber is compressed right now, and the bolts still turn with ease.

50109203451_ac0397ea80_b.jpg

Did the same with my washers....
 
Yeah Will should put the washers up on the Components page for sale so we can all buy new ones now that we know how they are supposed to work!

I did exactly the same thing.

On your point 2) for whoever reads this. One way to tell when you have the rubber feet aligned correctly, the steel tubes in the rubber feet and the white tubes coming out of the car are perfectly lined up. If you reverse it, the steel tubes point at a bit of an angle, and it is really hard to get them to line up (or get the bolt to thread easily). Once you notice that, getting them sorted out is easy.

I agree in general, there are a few of these nuances that should be in the instructions.

Another one is putting on the rearmost cross bar early and getting it aligned away from the shark fin before you tighten the sides onto the feet. It shows that as one of the last steps, and I had the sides a bit too far forward, so the bar contacted the fin and I had to loosen everything up and adjust it again.

I appreciate you posting this, I just talked to Will this morning about my adjustable feet and this helped me when adjusting it, feels much more secure now. Firstly, this is a very well made rack and it exceeds my expectations once mounted. The whole Sherpa team has been patient and responsive during my ordering and install, hats off to a small group of guys making a great product, can't wait to put this through its paces.

A few points of feedback for the Sherpa team after my install this weekend:

1) You have 7/8" bolts (the hex heads) listed in the online instructions but 1" listed on your packing list.

2) I was a bit confused during the install about which way the rubber feet are supposed to fit over the channels...one side is somewhat concave, and the other side is flush. I went concave side down on all 4 and they seemed to fit ok, but confirmation in the instructions would have made me feel better since this is the piece of the install that guarantees weather sealing, and the hardest part to reverse/fix one the rack is on.

3) Another point about the feet, there are no instructions on how tight the foot bolts should be. It feels like you can turn forever without increased torque because the rubber feet and the rubber on the washers continues to compress. Will mentioned that you should stop before the washers become concave...well, lesson learned too late on that one, all my washers are concave.

A bit more detail in the instruction book would be helpful for these crucial steps.

Here's a pic of how much my rubber is compressed right now, and the bolts still turn with ease.

50109203451_ac0397ea80_b.jpg
 
Last edited:
I had the foresight to order extra rubber feet with my rack because I live in Texas and nothing kills rubber faster than our summers...I would definitely order more washers knowing what i know now.

So for those of you who also now have concave washers, would you agree that your bolts still turn fairly easily? By no means would I consider mine "tight" and I'm a little concerned about throwing a 150lb XL tent up there in the current state of install. The torque is really hard to gauge because of the way all the rubber compresses during tightening.
 
Mine definitely got harder to turn but they aren't at the "really hard to tighten" stage that most bolts need to get to.

That said, on the ones where I did it properly (washer's aren't crushed) the feet felt quite firm side/side and back/front. I think the way they designed it (metal tube inside the rubber) you don't need a ton of top-down force to create a stable structure.

But I'm going to get some washers and re-do the ones I crushed, because I suspect the seal on the crushed ones is compromised.

So yeah nice if we could just order that off the website.

I had the foresight to order extra rubber feet with my rack because I live in Texas and nothing kills rubber faster than our summers...I would definitely order more washers knowing what i know now.

So for those of you who also now have concave washers, would you agree that your bolts still turn fairly easily? By no means would I consider mine "tight" and I'm a little concerned about throwing a 150lb XL tent up there in the current state of install. The torque is really hard to gauge because of the way all the rubber compresses during tightening.
 
Thank you all for the feedback. We will get the bonded washers up on the site this week. We've seen people run crushed washers and not have any water issues. Take that as you will. The bolts really do not need to be cranked down much at all. Once your washer deforms to flat on all 4 feet, everything is plenty tight. The bolts when over tightened turn the spacer into a punch and we have seen customers that do not pay attention and use impacts start damaging their roof. If we put a torque spec on them it would be in inch-pounds and not a lot of people have an inch-pound torque wrenches. It is around 22-inch pounds.

If you feel the need, some blue Loctite is great peace of mind.

We do plan to run through our instructions on the Crestone again here in the next couple of months to update little nuances as stated above. We can add in the torque specs as well. It is great to get feedback from you all and pass it on to others and future customers so thank you!
 
Last edited:
Thank you all for the feedback. We will get the bonded washers up on the site this week. We've seen people run crushed washers and not have any water issues. Take that as you will. The bolts really do not need to be cranked down much at all. Once your washer deforms to flat on all 4 feet, everything is plenty tight. The bolts when over tightened turn the spacer into a punch and we have seen customers that do not pay attention and use impacts start damaging their roof. If we put a torque spec on them it would be in inch-pounds and not a lot of people have an inch-pound torque wrenches. It is around 14-inch pounds.

If you feel the need, some blue Loctite is great peace of mind.

We do plan to run through our instructions on the Crestone again here in the next couple of months to update little nuances as stated above. We can add in the torque specs as well. It is great to get feedback from you all and pass it on to others and future customers so thank you!

Appreciate you taking that feedback, i'll be getting some washers just for peace up mind when they're up. I think watching the washers as they tighten will be a good metric of how tight the bolts need to be. Discovered today that my back left foot is rubbing the body, which I think is a product of being over-tightened/close to the body. Heard a rattle going over bumps coming from the back which was a first.

I'm curious...since I have extra rubber feet, would it be possible to completely remove the rack now that it's fully assembled, put the fresh feet/rubber washers on, and re-tighten all feet? I think I probably permanently deformed the first batch of feet by over-tightening.
 

Members online

Forum statistics

Threads
278,316
Messages
3,554,122
Members
248,016
Latest member
Advally Service

Trending content

Back
Top