Should I Man Up?

Brian757

New member
I really do not like paying mechanics in my area to do work on my truck, especially when I cannot see it done myself.

I am possibly attempting to do my own timing belt/water pump.

Here is what I will use to aid me in the procedure:
http://www.nwtoys.com/forum/tech-article-submissions/1261-5vz-fe-timing-belt.html

I was lucky enough to get a link from [MENTION=82276]Dutch-Runner '99[/MENTION] for an eBay sale.
Here it is: http://www.ebay.com/itm/Toyota-TIMING-BELT-WATER-PUMP-KIT-Genuine-OEM-Parts-4-Runner-Truck-3-4L-V6-/180729034728?pt=Motors_Car_Truck_Parts_Accessories&vxp=mtr&hash=item2a144a37e8
Labor at a local shop: $590.00

It is wayy too much of a hassle or should I do it?
 
Last edited:
Register to hide this ad
That's a lot more parts than you need... but it certainly doesn't hurt to do them. (honestly though, I don't see the point to the cam and crank seals unless yours leak already)

It's also more parts than you would get for that quote from your mechanic. Toyota v6's are easy. They did the smart thing and put a gear on the middle of the cams. Try aligning four cam gears instead of two like you do on the Toyota.

Just double and triple check your gear alignment and make sure any gasket mating surface is CLEAN.
 
Its not that bad to do it yourself, just take your time and allow 2-3 days so you can take brakes and such. I did mine in 2 days, one full 8 hour shift, and then the next day maybe 5 hours. This was really taking my time, cleaning stuff as i went along. If i did it again, i think i could get it down to probably 8 hours.
 
You can do it man. From what I have been reading, getting off the crank pulley and making sure the cams stay lined up are the 2 biggest issues. I will be glad to help you do it.

If you were able to tackle all that front end work there is no reason you can't do the timing belt. A lot of the labor is in pulling the radiator. After changing my belts twice, I could have the belts and radiator off in under 30 minutes.
 
Last edited:
I always encourage my friends to take on their own auto-maintenance, so if you have any ability whatsoever, take on all the projects that you can! You'll save about $1k on timing belt jobs, so even if takes you 16 hours, is your time worth $62.5/hr? Mine certainly is...

That being said, the timing belt is a fairly big project. Not that it's overly complicated, it's just a lot of work. I have not done one on my runner yet, but I have done them on a Honda Accord and a couple other vehicles though. So, make sure to give yourself plenty of time, resources (tools, beer, and someone to hold your calls), have a manual of some sort at the ready (in paper form), and double check your work. It's a non-interference engine so you can't muck up anything too bad, but backtracking on your work is daunting. Oh, lastly, be patient with yourself and the project - don't let the frustrations you may or may not encounter deter you from taking on projects in the future.
 
The 4Runner was my first timing belt. I've since done a few more. It took a long time, basically three afternoons of a 3-day weekend, with a couple of pool breaks (including making the pulley holder.)

As others said, don't try it if you have to rush. But there is nothing that is beyond any basic mechanic's skill set. Go for it.
 
It gets a lot easier once you have done the first job. I had to pull mine down again as I was 180 out. It's fun to time yourself though. Last one was a sohc honda, running to running with a new belt in 20min :).

It's also not much more work (unless you have transmission cooler lines) to pop out the radiator and it gives you lot more time.

I don't know what that guide shows, but I have few tips for you:

-Grab a bottle of white out. mark a line on each gear, across the belt and onto the back timing cover. also mark the crank gear in the same fashion. This will save you a lot of time, and you know the timing will be right on without having to line up TDC etc.

-Also grab yourself some of those heavy duty paper clips (the square kind you can squeeze open). Once you have your cams set into place with the belt, clip the belt to each gear. you can now let go of the cams as they are still set to the belt. Of course, this isn't necessary if you have four hands.

-make sure you have no slack on the side of the belt opposite the tensioner as well as. I think these belts fit snugly anyway.
 
Honestly this was my first tb/wp and it took me 5 hours the first time. Just remove the radiator. It will add a little time but if you slip and put a wrench through it, its expensive!! 2 must have tools to make it quick is a chain wrench and a snap on tool to compress your tensioner without having to remove it. My big mistake was going too fast with the compress tool and cracking my tensioner pulley bracket not realizing and finishing the repair. But the next day when I took it all apart and put it back together it only took me 3 hours. Sooo just be a man and git rrr dooone!!!
 
If it helps before I did my timing belt the only other thing I've done is change my oil, so a pretty big jump.

One tip for breaking the crankshaft bolt loose is to use a old belt and use it like a chain wrench, worked like a charm for me. And remember when the key on the crankshaft pulley, I did not notice it and I spent the next whole day trying to figure out why it was wobbling.

Good luck
 
Okay. I think im going to tackle it. I might use my next weekend to get it done. Will post pics! Thanks everyone for the responses!
 
its an easy job man... -the hardest part is the hydraulic tensioner. if you can find a snap-on guy there is a tool that makes this job a cake job. the tool is a "blue point YA9730" it turns this job into a couple hour job. i think when i did my first on, it took me like 7hrs, without the tool, the next one i did, i did with the tool and it was like a 3.5-4hr job. and when i just did mine back in nov, i did the job in like 2-3hrs -timing belt and water pump. anyhow the tool is worth its weight in gold. it runs about $50 and is a life saver. i prevents you from having to pull the AC compressor and having to pull the hydraulic tensioner to compress it in a vice.

http://buy1.snapon.com/catalog/item...675618&supersede=&store=snapon-store&tool=all
 
Last edited:
This kit is way more than you need. A simpler timing kit, plus water pump will probably do.

I just did one on ours last Saturday. Water pump seized and shredded timing belt, destroyed lower timing cover, dented crank sensor. Thank *** for non-interference engine.

The tensioner compressing tool is a tremendous time saver. I did one previously without the tool, and I had to take off PS pump, AC compressor and mounting bracket, and it was a very painful process.

On the timing mark alignment, I haven't found good/clear explanation on how to do this on the crank portion (maybe I wasn't looking hard enough?). Actually it's quite simple. Here's how:

On a new belt, there're three stripe markings: L CAM, R CAM, CR. So first move cam gears and crank more or less into position (doesn't have to be perfect). Now the critical part on the crank: if you take off the timing belt guide (that bigger concave washer once lower timing cover is off), you are looking at the crank timing gear. You'll find a dimple (not those bigger holes that you screw a gear puller to take the timing gear off) that should align with CR stripe on the timing belt. Once your belt CR stripe is aligned with that dimple on the crank timing gear, work your belt around to align to the cam marking with L/R CAM stripes. You can rotate cams to help the alignment. Once in position, use clamps or cable ties (what I used) to lock belt markings to cam markings. Actually I did the cams first (with help of cable ties to lock into position), then the crank.

I might have some pics if you need a visual.

Everything goes downhill from this point on. The most time consuming work was to clean the WP mating surface.

Starter bump works well for the crank bolt.
 
you do not need to line up the marks on the timing belt with the cam gear or crank gear marks. as long as you have everything at top dead center it wont matter. -and before you pull the belt just rotate everything around till the marks on the gears are all pointed up at the 12:00 position. then pull things appart. -be careful as one of the cam gears might want to jump a 1/8 of a turn or so, as its going to be under spring tension. -if it does jump dont worry, its not gonna hurt anything, just put a wrench on the cam bolt and gently turn it back. then after installing the new water pump(make sure when you install the new thermostat that you put the little bar-bell opening at the top) re-install the new timing belt, start with the left(as you are facing the motor) cam and work clock wise. making sure that you leave no slack in the belt as you wrap it around the gears. you will be left with all the slack at the the tensioner pulley.


This kit is way more than you need. A simpler timing kit, plus water pump will probably do.

I just did one on ours last Saturday. Water pump seized and shredded timing belt, destroyed lower timing cover, dented crank sensor. Thank *** for non-interference engine.

The tensioner compressing tool is a tremendous time saver. I did one previously without the tool, and I had to take off PS pump, AC compressor and mounting bracket, and it was a very painful process.

On the timing mark alignment, I haven't found good/clear explanation on how to do this on the crank portion (maybe I wasn't looking hard enough?). Actually it's quite simple. Here's how:

On a new belt, there're three stripe markings: L CAM, R CAM, CR. So first move cam gears and crank more or less into position (doesn't have to be perfect). Now the critical part on the crank: if you take off the timing belt guide (that bigger concave washer once lower timing cover is off), you are looking at the crank timing gear. You'll find a dimple (not those bigger holes that you screw a gear puller to take the timing gear off) that should align with CR stripe on the timing belt. Once your belt CR stripe is aligned with that dimple on the crank timing gear, work your belt around to align to the cam marking with L/R CAM stripes. You can rotate cams to help the alignment. Once in position, use clamps or cable ties (what I used) to lock belt markings to cam markings. Actually I did the cams first (with help of cable ties to lock into position), then the crank.

I might have some pics if you need a visual.

Everything goes downhill from this point on. The most time consuming work was to clean the WP mating surface.


Starter bump works well for the crank bolt.

bumping the starter works great, for both breaking lose the crank bolt and tightening it -just make sure you pull the EFI fuse when doing this so that way you can not accidentally start the truck...
 
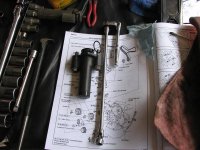
The tensioner tool is for reusing the old tensioner. You're getting a new one with the kit so unless you're at 90K and want to reuse the old tensioner I'd change it. You don't have to touch the a/c bracket. I didn't. Use the unofficial tool setup pictured below to get to the tensioner bolts. You will have to loosen/partially remove a wire harness with plastic bracket that goes around the front of the oil pan to get enough clearance but that's just two bolts. 1/4" ratchet, long extension and a wobbly socket. The tensioner bolts only torque to around 20lbs so they aren't too difficult to break free.
 

Attachments

  • IMG_8669 (Medium).JPG
    IMG_8669 (Medium).JPG
    79.6 KB · Views: 857
its an easy job man... -the hardest part is the hydraulic tensioner. if you can find a snap-on guy there is a tool that makes this job a cake job. the tool is a "blue point YA9730" it turns this job into a couple hour job. i think when i did my first on, it took me like 7hrs, without the tool, the next one i did, i did with the tool and it was like a 3.5-4hr job. and when i just did mine back in nov, i did the job in like 2-3hrs -timing belt and water pump. anyhow the tool is worth its weight in gold. it runs about $50 and is a life saver. i prevents you from having to pull the AC compressor and having to pull the hydraulic tensioner to compress it in a vice.

YA9730, Tensioner Compressor, Timing Belt

Same tool. Better price.

Schley 97300 Toyota 3 4L Timing Belt Tensioner Tool | eBay

!BvYth1!EWk~$(KGrHqV,!jMEv1+0Cq3dBMEVFHQ46Q~~_35.JPG


Just remember, if you plan to swap your hydraulic tensioner, then there is no use for this tool.
 
The tensioner tool is for reusing the old tensioner. You're getting a new one with the kit so unless you're at 90K and want to reuse the old tensioner I'd change it. You don't have to touch the a/c bracket. I didn't. Use the unofficial tool setup pictured below to get to the tensioner bolts. You will have to loosen/partially remove a wire harness with plastic bracket that goes around the front of the oil pan to get enough clearance but that's just two bolts. 1/4" ratchet, long extension and a wobbly socket. The tensioner bolts only torque to around 20lbs so they aren't too difficult to break free.

i have never seen or heard of a tensioner going out, so why replace it? -granted thats not to say it can not go bad -anything can go bad, and i have not researched them or looked for cases of them failing, but all the guys i have talked to at the dealer have never seen one go bad in their 60+ years of combined experience at different dealers and shops. i am at 250+k miles and mine is still doing just fine with no signs of failing or leaking ect. its another part that is not needed. and we have pretty much determined that the "kit" he is looking at is over kill and a waste.
 
you do not need to line up the marks on the timing belt with the cam gear or crank gear marks. as long as you have everything at top dead center it wont matter.
...

This is exactly what I found mostly on the net on how to do it, and it's kinda fuzzy and has potential to mis-align by a tooth (most likely on the crank).

The way I described takes the guessing out of the game, and I believe is the easier way to get it right 100%, every single time. That's why the new belt has those stripes printed on them, and it's dead simple to do. If I ever have to do it again, I'll document it and augment what's available out there to take the mystery/guessing out of it (unless someone beat me to it).
 
oh no yeah, i have just heard and seen so many people get wrapped around the axle about making sure the marks line up... its not needed, because once you turn the motor over two or three times(like you should before buttoning everything back up) the marks wont line back up... they only line up like every 120 revolutions or so...
 
Perhaps we're talking about different marks here. I'm NOT referring to marks at 12 o'clock on the back timing covers. I'm talking about marks directly on the cams themselves and the dimple on the front of the crank timing gear (NOT the alignment mark on the oil pump cover either).

If you align the 2 CAM stripes to the 2 marks on the cams, CR stripe to the dimple on the crank timing gear, you're all set. It doesn't matter if your cam gears/crank are at 1 o'clock or 11 o'clock (relative to the marking on the back of the timing cover or the mark on the oil pump housing). Actually it's advantageous to have them at those positions to make life easier when putting the belt on.
 
Last edited:
Am I the only one that marks gear locations before disassembly? If you guys haven't tried it, I highly suggest it. It completely eliminates the potential to wind up mistiming the engine.

Simple way to put it... if it came in running, follow the marks YOU made and it will go out running. This of course does not work on engines that have stripped or otherwise destroyed the belt (in other words, came in NOT running. lol) OR if you suspect a botched timing job from someone else.

That should be the only time you want to try and make everything line up to the factory marks at tdc. Anything else wastes time, and you may end up doing it twice.

I don't like lining up just the marks on the belt. Mine was printed off a tooth or two. Don't trust the belt. Trust your own marks. I will fight that to the death.

That's a nice tool to use if you don't replace the tensioner. Hang on to that pin that holds the tensioner tight. Most hydraulic ones use the same size pin. Very handy tool. There have been plenty of hydraulic tensioner failures too. It's ignorant to assume it will never happen.

Also another tip... grab yourself some of that yellow, goopy weatherstrip adhesive in a squeeze tube. run a very light bead around your water pump, for example, where the paper gasket will go. set the gasket on it and make sure it's set flat into place. let it sit for a few minutes. This will eliminate the need to fight the gasket and the pump and the bolts while installing it. This works very well on anything that has a sandwiched gasket.
 

Members online

No members online now.

Forum statistics

Threads
278,306
Messages
3,554,045
Members
248,016
Latest member
Advally Service

Trending content

Back
Top