Should I Man Up?

Honestly this was my first tb/wp and it took me 5 hours the first time. Just remove the radiator. It will add a little time but if you slip and put a wrench through it, its expensive!! 2 must have tools to make it quick is a chain wrench and a snap on tool to compress your tensioner without having to remove it. My big mistake was going too fast with the compress tool and cracking my tensioner pulley bracket not realizing and finishing the repair. But the next day when I took it all apart and put it back together it only took me 3 hours. Sooo just be a man and git rrr dooone!!!

You might get a pm in a year or so, or how ever long it takes to drive 10000 miles :D
 
I don't think its over kill. and most people do it well, you are already in there might as well replace stuff that's easy to to get to.
 
Also another tip... grab yourself some of that yellow, goopy weatherstrip adhesive in a squeeze tube. run a very light bead around your water pump, for example, where the paper gasket will go. set the gasket on it and make sure it's set flat into place. let it sit for a few minutes. This will eliminate the need to fight the gasket and the pump and the bolts while installing it. This works very well on anything that has a sandwiched gasket.

The OEM Aisin pump never had a paper gasket. The original just had a groove and used FIPG. Then they switched to a metal/rubber gasket that does fine with no sealant at all If you have a paper gasket, you are using the wrong pump.
 
The OEM Aisin pump never had a paper gasket. The original just had a groove and used FIPG. Then they switched to a metal/rubber gasket that does fine with no sealant at all If you have a paper gasket, you are using the wrong pump.

You make a very good point for the OP as well. Check out the difference between the gasket included with the GMB pump in the second link to the Aisin posted in the first link. Metal/rubber combo vs paper.

Either way, my point of using weatherstrip adhesive was that it makes it much easier to line up the gasket and not have to worry about it dropping out of place during installation. It is NOT meant to be used as a sealant.
 
You make a very good point for the OP as well. Check out the difference between the gasket included with the GMB pump in the second link to the Aisin posted in the first link. Metal/rubber combo vs paper.

Either way, my point of using weatherstrip adhesive was that it makes it much easier to line up the gasket and not have to worry about it dropping out of place during installation. It is NOT meant to be used as a sealant.

Well, you can do it your way. I don't think there is a need for the 'yellow snot' because there are three studs and two alignment dowels on there so this particular gasket stays where it is supposed to without having to use gunk that might get into the system. That's why they stopped using FIPG--it caused problems when people used too much.

DSCN7562.jpg~original


Also, as to the using your own marks thing--how do you know that the guy who put the belt on wasn't off by a tooth when he did it or that it was starting to stretch and jumped one all by itself? Or the crank pulley is loose and starting to shear the key? I've only done three of these, but I checked the metal marks before I took the belts off and all were spot on so no need for my own marks. I use the belt marks on the new belt as a convenience to help you get the hard marks right the first time, in my opinion, but the hard marks are the gold standard. If the metal marks were off at the beginning I would take a hard look at why rather than just repeat it that way.
 
Last edited:
You might get a pm in a year or so, or how ever long it takes to drive 10000 miles :D

Ahhhaha no problem! I'm always down to help a fellow yota guy out. Speaking of wanna help me swap my clutch and throw on my lift tomorrow!?!

?! Ha OP I'd change the belts because you're in there and there is more room to work. Plus who onows when the last time they were changed. I tend to fo over board sometimes on maintenance. But hey I like my stuff running prime!
 
[MENTION=10169]TheDurk[/MENTION] I didn't notice there were dowels and studs on that one. Definitely no need for the gorilla snot on that gasket. I used the water pump as the first thing I thought of. A lot of engines do have paper gaskets and nothing to really line them up. It works for plenty of other gaskets though. Just be smart about it.

As for concerns about making your own marks... Again you have to be smart about it. If you are willing to go this deep into your engine, you should be able to notice if it starts to run rough. If it's for a customer, ask if they have noticed a drop in mileage or power. An engine a tooth off is going to run like crap. If you bought it that way and suspect it was done wrong, check the timing... otherwise if it's just routine maintenance, marking the engine ensures that you don't end up off and it saves time.

As for the crank pulley, hopefully you know to remove that first before marking the gear. You have a point to check the keyway and pulley for any looseness or signs of wear.

Sometimes if you have to set the timing, the marks aren't very clear. Fortunately Toyota does seem to be pretty good about that. Unfortunately for me, when I was rebuilding my engine I didn't know how it ran (junkyard motor) so I set it to the factory marks. The dimple on the crank gear looked like the timing mark on the opposite side. I consulted someone else and the diagram, but we had a disagreement over which was the mark. I should have gone with the one I was going to use as it ended up 180 out. No big deal though.

I don't mind the debate by the way. I know I've only been doing this for about 3-4 years so I'm a n00b, but I have done at least 20 timing belt jobs that I can think of.

 
Last edited:
[MENTION=10169]TheDurk[/MENTION] I didn't notice there were dowels and studs on that one. Definitely no need for the gorilla snot on that gasket. I used the water pump as the first thing I thought of. A lot of engines do have paper gaskets and nothing to really line them up. It works for plenty of other gaskets though. Just be smart about it.

As for concerns about making your own marks... Again you have to be smart about it. If you are willing to go this deep into your engine, you should be able to notice if it starts to run rough. If it's for a customer, ask if they have noticed a drop in mileage or power. An engine a tooth off is going to run like crap. If you bought it that way and suspect it was done wrong, check the timing... otherwise if it's just routine maintenance, marking the engine ensures that you don't end up off and it saves time.

As for the crank pulley, hopefully you know to remove that first before marking the gear. You have a point to check the keyway and pulley for any looseness or signs of wear.

Sometimes if you have to set the timing, the marks aren't very clear. Fortunately Toyota does seem to be pretty good about that. Unfortunately for me, when I was rebuilding my engine I didn't know how it ran (junkyard motor) so I set it to the factory marks. The dimple on the crank gear looked like the timing mark on the opposite side. I consulted someone else and the diagram, but we had a disagreement over which was the mark. I should have gone with the one I was going to use as it ended up 180 out. No big deal though.

I don't mind the debate by the way. I know I've only been doing this for about 3-4 years so I'm a n00b, but I have done at least 20 timing belt jobs that I can think of.

Ok, fair answer. I think things are clearer now for those reading the thread. I thought you were saying to ignore factory marks on the motor and leave timing the way you found it as a general principle. Glad to hear that is not the case and you were just trying to suggest a shortcut. We can agree the marks can be confusing, but they are not going to be wrong. Worth clearing up. I would not button up an engine without confirming the hard marks, however. I don't do this for money, so I double check everything. I'm related to all my 'customers.'

Likewise, worth clearing up that this WP gasket has no need of sealant.
 
Last edited:
I vote man up. The only marks that matter are the ones that come from Toyota. Those would be the ones on the pulleys and their corresponding alignment marks. Line those up, place your t-belt, and spin the crank twice (the cam pulleys are twice the size of the crank) while hold some tention on the belt with a free finger. If your pulley marks (only the pulley marks, disregard the marks on the t-belt) all line up agian "its a bingo!," just pop the tensioner and reassemble.

On this motor, being non-interference, the only thing that will mess up your timing is a misalignment of the "timing"-belt. When you line up the crank pulley marks your #1 is at TDC. Then the marks on your cam pulleys will make turn that into the compression stroke when aligned. Spin them however you feel necessary beforehand, it makes no difference.

Toyota made this one so even I could understand it. Wrench on...
 
Ok, fair answer. I think things are clearer now for those reading the thread. I thought you were saying to ignore factory marks on the motor and leave timing the way you found it as a general principle. Glad to hear that is not the case and you were just trying to suggest a shortcut. We can agree the marks can be confusing, but they are not going to be wrong. Worth clearing up.

Likewise, worth clearing up that this WP gasket has no need of sealant.

Oh yeah definitely not... that would be ignorant. lol. Well I thought I made that explanation but looking back at it, it's not as clear as I thought it was. Don't hate on my late night cell phone posts haha.
 
Oh yeah definitely not... that would be ignorant. lol. Well I thought I made that explanation but looking back at it, it's not as clear as I thought it was. Don't hate on my late night cell phone posts haha.

No hate involved. I appreciate the contribution. I was just trying to help the other readers who haven't done this job.
 
Ok, so now I am back to thinking I will purchase the overkill package and do everything, i figure no harm done if i change a belt out that will never need changing. I will jus do it all. I will also invest in the tool. Thank you everyone!
[MENTION=80102]shadow247[/MENTION]: I think i will use your brain and hands for this job. Let me know what beer you like and how many dead presidents!
 
Ahhhaha no problem! I'm always down to help a fellow yota guy out. Speaking of wanna help me swap my clutch and throw on my lift tomorrow!?!
Dang i wanna help you out too but im doing my rear axle seals and bearings at BAMF tomorrow. If you Don't do your lift tomorrow Im down to help you whenever. fastest lift i've done was 1 hour and 58 mins Maybe i can break PR lol
 
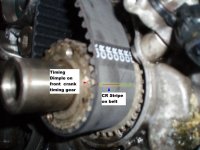
A pic is worth some serious $.

It might be a bit grainy in the pic, but you'll find only 1 dimple on the face of the crank timing gear, more or less around 3 o'clock when the mark on the oil pump cover (12 o'clock) is aligned with the mark on the crank sensor wheel.

OK now I did it :bluejump: This was the missing link for your perfect timing belt job done easily every time.
 

Attachments

  • 5VZFE_Crank.JPG
    5VZFE_Crank.JPG
    124.8 KB · Views: 243
[MENTION=68576]Brian757[/MENTION] You don't need to buy the tool for the hybraulic tensioner, there should be a new one and it comes with a pin that you pull after install. I am certain we could knock this job out in a weekend. PM me and we can work out the details.
 
[MENTION=68576]Brian757[/MENTION] You don't need to buy the tool for the hybraulic tensioner, there should be a new one and it comes with a pin that you pull after install. I am certain we could knock this job out in a weekend. PM me and we can work out the details.

Yeah, I noticed that tool in the pictorial I provided in my first post. I think I am going to purchase that tool, get all of my parts(the overkill one), and I will give you a call.
 

Members online

Forum statistics

Threads
278,307
Messages
3,554,056
Members
248,016
Latest member
Advally Service

Trending content

Back
Top