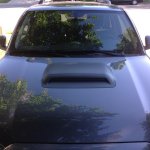
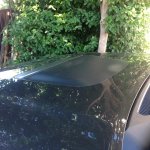
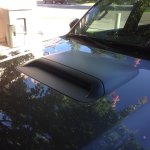
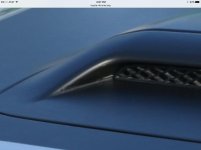
show me your vinyl wrapped hood scoops

The vinyl job was smooth and perfect as mentioned. DIY rattle can Plasti Dip looks like crap generally - it's not an OEM-paint-like finish/texture at all. Now, if you actually spray it out of a gun like the professional guys do it, that can definitely make a huge difference in finish/texture...

But the hood picture in this thread does show major splotchiness/orange peel texture. Might be ok for emblems or trim or even wheels, but not my cup of tea for something massive like a hood or other body panel.
 
yes, it is tougher, vinyl wouldn't have needed to be replaced in that 4 years and would have looked better and more uniform throughout

(also, if your plastidipped wheels have held up it means you aren't offroading your 4runner nearly enough. plastidipped rims look rough after 1 good offroad trip.)

I run MT's on dedicated rims when we off-road in winter. winter roads call for studded tires, which are also on different rims.
*EDIT* also, vinyl wrap your wheels and tell me how they look after a day of hard wheeling, cause I've certainly seen vinyled panels torn up from tree branches

But the hood picture in this thread does show major splotchiness/orange peel texture. Might be ok for emblems or trim or even wheels, but not my cup of tea for something massive like a hood or other body panel.

yep, it absolutely is textured like orange peel, something that I personally really dig. if you want a perfectly smooth finish, I will admit that plasti-dip is probably not the way to go. my main point in all of this is that dip is significantly cheaper, has been extremely durable in every application I have used it for, and does not require professional application to achieve very good results.
 
Last edited:
This is what I will be doing in the next couple weeks.

8e33c8cd49570f9ba8b372b6625d4aa3.jpg


44affaf8befc59ad6010eda813d5e47a.jpg


Marty-MJ
 
I have a full 3m matte black wrap, pics in my garage. I personally like the full wrap better with the color of my truck. I have had it going on its third utah summer and it is an outside truck that does get a indecent amount of sun exposure. The wrap is holding up quite well (knock on wood)

Cool to see stock(?) on that Taco. :)

EDIT: Oh and BTW why does that TRD Pro Taco have Duelers on it instead of those Nitto AT's? (the Nittos are stock right?)
 
Last edited:
haha, yep it was wrapped at UROTC. Like I said, it's hard to notice unless you're inside. The matte black would be more noticeable I think.
I had planned matte black but I may go matte gray, I like that look.

Sent from my HTC6525LVW using Tapatalk
 
This is what I will be doing in the next couple weeks.

8e33c8cd49570f9ba8b372b6625d4aa3.jpg


44affaf8befc59ad6010eda813d5e47a.jpg


Marty-MJ


I would love to do this on my taco because I absolutely hate the glare. I am petrified that it won't come out even. It will drive me crazy. I wonder how they made this one rounded


Sent from my iPhone using Tapatalk
 
I'm sure it was vinyl cut before they applied it, the curve was done on a computer

Sent from my HTC6525LVW using Tapatalk
 
Hey guys and gals,

I made a template the first year I owned the rig, couldn't take the glare.

Pretty easy to do the back half of the scoop, I'm not a professional vinyl guy, but you can find good deals on high quality 3M matte black vinyl on Amazon.

It's one of those projects that "hey what do you have to loose?" A few bucks for vinyl.

The key is to take it slow, watch YouTube videos ect... The new 3M stuff is really amazing to work with and has very small "channels" in the sticky side... This makes it super easy to remove any trapped air. Plus you can peal it back off and reposition it... If you get a wrinkle or crease just hit it with a heat gun and it will return back to its original shape...

Like I said... What do you have to loose...

I'll see if I can find some vinyl install links. I did spend some time in a vinyl shop years ago, but I'm no profession installer. The hardest part was the actual intake. I finally did that about 2 weeks ago, the inside crease is just beyond the limits of the vinyl... But for me, having the vinyl already to do it, I might as well try vs. pay someone.

-A
 

Attachments

  • image.jpg
    image.jpg
    125.9 KB · Views: 7,847
[MENTION=107788]Trail-AMMO[/MENTION] how did you shape your template?

Here are a few more pic's...

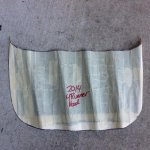
To make the template I used masking tape, basically lay it on the hood and sketch the lines. It can be messy and doesn't have to match side to side. Somewhere in the mess will be the "right" line... Peal the tape off the truck and stick it on something, like an old poster.... cut out the basic shape and find the middle of the scoop. now fold that in half over on its self and cut the "best" line you have to make the pattern mirror both sides.

Use the pattern to cut the vinyl.

I've thought about scanning the pattern into auto cad and then getting them cut on a plotter... Wasn't sure if the cost would equal the demand tho.

-A
 

Attachments

  • IMG_0677.jpg
    IMG_0677.jpg
    137 KB · Views: 5,135
  • IMG_0676.jpg
    IMG_0676.jpg
    130.5 KB · Views: 5,193
  • IMG_0673.jpg
    IMG_0673.jpg
    123.1 KB · Views: 5,886
[MENTION=107788]Trail-AMMO[/MENTION] did you removed the scoop insert during the installation or the vinyl just runs along the edge of the scoop?
 
[MENTION=107788]Trail-AMMO[/MENTION] did you removed the scoop insert during the installation or the vinyl just runs along the edge of the scoop?

when I did the top of the scoop I didn't remove the scoop insert... But later when I wrapped the insert I removed that.

-A
 
Here is my hood and scoop wrapped by professional since I am not good at these delicate tasks.


The scoop insert was removed for the installation. The vinyl follows the hood lines and goes down to the Protex film without overlapping.
 
Here is my hood and scoop wrapped by professional since I am not good at these delicate tasks.


The scoop insert was removed for the installation. The vinyl follows the hood lines and goes down to the Protex film without overlapping.

Can you snap a picture of the inner corner of the scoop, curious if they were able to get the vinyl to flex enough to make that bend.

Also any idea what material they used? Avery? 3M? Ect?

-A
 
Can you snap a picture of the inner corner of the scoop, curious if they were able to get the vinyl to flex enough to make that bend.

Also any idea what material they used? Avery? 3M? Ect?

-A

More details and pictures in my Build thread.

In short, they used 3M 1080. They removed the small black plastic insert in the scoop, the applied two parts of material inside on the top and bottom of the scoop hole. Then they applied a single layer for the remain of the scoop.
.
 
Last edited:
More details and pictures in my Build thread.

In short, they used 3M 1080. They removed the small black plastic insert in the scoop, the applied two parts of material inside on the top and bottom of the scoop hole. Then they applied a single layer for the remain of the scoop.
.


Yup right in there looks the same as mine, just curious if they had better luck. I used a heat gun and worked it for a bit. That area was the hardest part of the install.

-A
 

Attachments

  • image.jpg
    image.jpg
    76.3 KB · Views: 4,908
Yes, they had to put two small pieces inside the hole of the scoop in each corner since the material wasn't sufficient large enough for this area. They are not apparent at all.

Complicated part to wrap he said. I am really glad I didn't try it myself. I would have gone the Plasti-dip way instead.
 

Members online

Forum statistics

Threads
278,316
Messages
3,554,121
Members
248,016
Latest member
Advally Service

Trending content

Back
Top