ShredHead’s Build/Photo/Adventure Thread

Nice Built!
One question about the sp8100, can you dim your light bar with it??

Thanks! Yes the SP8100 allows you to control your output levels to each connection. I haven't played around with it yet so I'm not sure how dim you can actually set your LEDs.
 
Thanks! Yes the SP8100 allows you to control your output levels to each connection. I haven't played around with it yet so I'm not sure how dim you can actually set your LEDs.
Do it allows you to do it on the go like keep your finger on the switch to dim?
 
Rigid Ignite camp/cargo lights

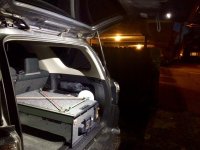
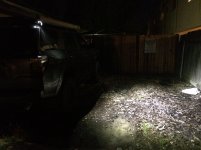
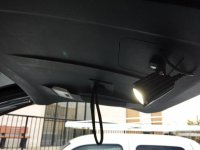
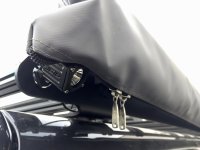
Installed a couple Rigid Industries Ignite LEDs for additional camp & cargo lighting. Super impressed with the output for such a small light! The cargo area is WAY brighter now and I can also rotate the light 360-degrees when the hatch is open to use for extra camp/work lighting. Also mounted one under my ARB awning for some camp lighting. I may add a few more of these eventually if I feel the need more lighting.

Photo Mar 20, 7 35 08 AM.jpg
Photo Mar 20, 7 35 56 AM.jpg


Photo Mar 21, 8 03 24 PM.jpg
Photo Mar 21, 8 10 08 PM.jpg
 

Attachments

  • Photo Mar 20, 7 35 08 AM.jpg
    Photo Mar 20, 7 35 08 AM.jpg
    132.1 KB · Views: 455
  • Photo Mar 20, 7 35 56 AM.jpg
    Photo Mar 20, 7 35 56 AM.jpg
    119.4 KB · Views: 461
  • Photo Mar 21, 8 03 24 PM.jpg
    Photo Mar 21, 8 03 24 PM.jpg
    131.3 KB · Views: 425
  • Photo Mar 21, 8 10 08 PM.jpg
    Photo Mar 21, 8 10 08 PM.jpg
    132.6 KB · Views: 421
Last edited:
Received my Switchpro unit the other day from the latest group buy and got it all wired up to an aux fuse block.

The switch button panel fits perfectly in the OEM switch blank location... I relocated the wiper defroster to the upper blank (it's flipped upside down because it will not fit normally due to the "keyed" blanks).

241354d1488493096-shredhead%92s-15-sr5-build-photo-thread-photo-mar-02-1-21-19-pm.jpg

SwitchPro says on their website that the SP8100 control panel is

  • 4”L x 2”W x .5”H (excluding tabs)
I thought I measured that it wouldn't fit in that spot. What are you measuring as the dimensions for the control panel switch?
 
SwitchPro says on their website that the SP8100 control panel is

  • 4”L x 2”W x .5”H (excluding tabs)
I thought I measured that it wouldn't fit in that spot. What are you measuring as the dimensions for the control panel switch?

Those dimensions are correct. I think the OEM switch location is about 5"L which is just about a perfect fit. I bought the concealed mount style panel and used (2) #6 x 1.5" machine bolts & nuts instead of the supplied all-thread hardware. No modification to the factory dash/cutouts required.
 
4/21/17- Installed 2nd ARB drawer & Canvasback Seatback/cargo liners:

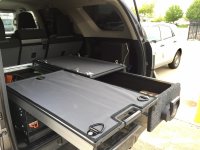
Well, i didn't wait nearly as long as I had originally planned before adding a 2nd ARB Outback drawer. Thanks to the latest ARB Drawer group buy, i couldn't pass this up!

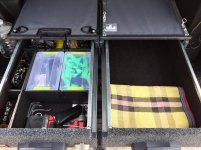
I also called Canvasback and had them make some custom cargo liners for the ARB drawers. They fit perfectly and use velcro to attach to the drawer tops. I also had them make a little canvas strip to go behind the drawers.


My next project will be building a sleeping platform attachment to bolt the back of the drawers. Hopefully ARB will make a side floor kit specifically fit for 5th gens, otherwise I will eventually make some side panels out of wood & carpet.

<a data-flickr-embed="true" href="https://www.flickr.com/photos/julianolson/36293076395/in/datetaken-public/" title="DSC_0546"><img src="https://farm5.staticflickr.com/4319/36293076395_a39b036451_b.jpg" width="1024" height="687" alt="DSC_0546"></a><script async src="//embedr.flickr.com/assets/client-code.js" charset="utf-8"></script>

Photo Apr 24, 9 02 46 AM.jpg
Photo Apr 24, 9 03 49 AM.jpg
Photo Apr 24, 9 05 16 AM.jpg
 

Attachments

  • Photo Apr 24, 9 02 46 AM.jpg
    Photo Apr 24, 9 02 46 AM.jpg
    130.5 KB · Views: 445
  • Photo Apr 24, 9 05 16 AM.jpg
    Photo Apr 24, 9 05 16 AM.jpg
    136.8 KB · Views: 444
  • Photo Apr 24, 9 03 49 AM.jpg
    Photo Apr 24, 9 03 49 AM.jpg
    137.1 KB · Views: 442
Last edited:
WAIT!!! STOP!!!!

Havn't you read the reviews...the SR5 is only for LIGHT off roading.
:der:
if i hear this one more time...i swear i'm going to spit

nice build sir...great photos
 
WAIT!!! STOP!!!!

Havn't you read the reviews...the SR5 is only for LIGHT off roading.
:der:
if i hear this one more time...i swear i'm going to spit

nice build sir...great photos

Thanks! Even a stock SR5 with A-track is pretty capable as it is... plus I was able to get a way better deal on a 4x4 SR5 than a Trail Edition, so i went for the SR5. If I ever find myself really needing a rear locker than I can always add one (they're not cheap), but I really don't plan on it.
 
I saw you on expo portal and checked out your thread today. I really like your pictures a few pages back! They're just beautiful!
 
Those dimensions are correct. I think the OEM switch location is about 5"L which is just about a perfect fit. I bought the concealed mount style panel and used (2) #6 x 1.5" machine bolts & nuts instead of the supplied all-thread hardware. No modification to the factory dash/cutouts required.

Do you have any pictures of how you attached the panel? I have my dash broken down and tried the 1.5" bolts and threaded them into the back of the switchpro panel but its not snug against the dash.
 
Do you have any pictures of how you attached the panel? I have my dash broken down and tried the 1.5" bolts and threaded them into the back of the switchpro panel but its not snug against the dash.

I'll snap a pic for you this afternoon.

I used wing-nuts (threaded onto 1.5"L bolts) to clamp the brackets snug against the backside of the OEM panel blanks... it's hard to explain but simple once you see a picture.
 
Do you have any pictures of how you attached the panel? I have my dash broken down and tried the 1.5" bolts and threaded them into the back of the switchpro panel but its not snug against the dash.

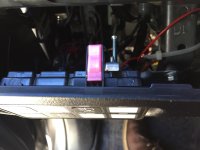
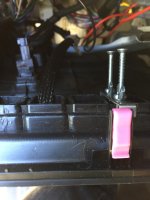
Here is how i mounted my control panel... hope this gives you a better idea!


I only could use 1 of the concealed mounting brackets because the other side didn't line up right with the switch cutouts and i did not want to drill a hole in the plastic for the other bracket, so I just tightened down the one side. So far it has been perfect and does not wiggle or come loose at all.

I think i used 2 or 3"L bolts since I wasn't sure how long i needed the bolts to be, but 1.5" L bolts would be perfect.

2017-06-14_11-58-17_708.jpg

2017-06-14_11-58-56_765.jpg
 

Attachments

  • 2017-06-14_11-58-17_708.jpg
    2017-06-14_11-58-17_708.jpg
    118 KB · Views: 304
  • 2017-06-14_11-58-56_765.jpg
    2017-06-14_11-58-56_765.jpg
    129.2 KB · Views: 307
May 2017 - El Dorado National Forest:


Spent Memorial weekend relaxing in the mountains at El Dorado National Forest (South Tahoe). We camped at Union Valley Reservoir, explored the area and hiked to Bassi Falls.

<a data-flickr-embed="true" href="https://www.flickr.com/photos/julianolson/35446963262/in/datetaken-public/" title="DSC_0326"><img src="https://farm5.staticflickr.com/4284/35446963262_01b1903e2f_b.jpg" width="1024" height="688" alt="DSC_0326"></a><script async src="//embedr.flickr.com/assets/client-code.js" charset="utf-8"></script>

<a data-flickr-embed="true" href="https://www.flickr.com/photos/julianolson/35575675416/in/datetaken-public/" title="DSC_0348"><img src="https://farm5.staticflickr.com/4174/35575675416_86ddc7ec6c_b.jpg" width="1024" height="752" alt="DSC_0348"></a><script async src="//embedr.flickr.com/assets/client-code.js" charset="utf-8"></script>

<a data-flickr-embed="true" href="https://www.flickr.com/photos/julianolson/35575671906/in/datetaken-public/" title="DSC_0384"><img src="https://farm5.staticflickr.com/4022/35575671906_ee1312f5f8_b.jpg" width="1024" height="687" alt="DSC_0384"></a><script async src="//embedr.flickr.com/assets/client-code.js" charset="utf-8"></script>

<a data-flickr-embed="true" href="https://www.flickr.com/photos/julianolson/35446959462/in/datetaken-public/" title="DSC_0377"><img src="https://farm5.staticflickr.com/4102/35446959462_26c2473c9f_b.jpg" width="1024" height="687" alt="DSC_0377"></a><script async src="//embedr.flickr.com/assets/client-code.js" charset="utf-8"></script>


Drove up to a fire lookout tower & heli-pad for a nice view of the surrounding area:

<a data-flickr-embed="true" href="https://www.flickr.com/photos/julianolson/35446955802/in/datetaken-public/" title="DSC_0434"><img src="https://farm5.staticflickr.com/4284/35446955802_175054c325_b.jpg" width="1024" height="687" alt="DSC_0434"></a><script async src="//embedr.flickr.com/assets/client-code.js" charset="utf-8"></script>

<a data-flickr-embed="true" href="https://www.flickr.com/photos/julianolson/35575670386/in/datetaken-public/" title="DSC_0441"><img src="https://farm5.staticflickr.com/4199/35575670386_3d1a2ca428_b.jpg" width="1024" height="687" alt="DSC_0441"></a><script async src="//embedr.flickr.com/assets/client-code.js" charset="utf-8"></script>

<a data-flickr-embed="true" href="https://www.flickr.com/photos/julianolson/35575670146/in/datetaken-public/" title="DSC_0443"><img src="https://farm5.staticflickr.com/4236/35575670146_44aba820a2_b.jpg" width="1024" height="687" alt="DSC_0443"></a><script async src="//embedr.flickr.com/assets/client-code.js" charset="utf-8"></script>
<a data-flickr-embed="true" href="https://www.flickr.com/photos/julianolson/35575669656/in/datetaken-public/" title="DSC_0451"><img src="https://farm5.staticflickr.com/4040/35575669656_9f2d628699_b.jpg" width="1024" height="687" alt="DSC_0451"></a><script async src="//embedr.flickr.com/assets/client-code.js" charset="utf-8"></script>

<a data-flickr-embed="true" href="https://www.flickr.com/photos/julianolson/35575668516/in/datetaken-public/" title="DSC_0459"><img src="https://farm5.staticflickr.com/4210/35575668516_5f9f1e6534_b.jpg" width="1024" height="687" alt="DSC_0459"></a><script async src="//embedr.flickr.com/assets/client-code.js" charset="utf-8"></script>

<a data-flickr-embed="true" href="https://www.flickr.com/photos/julianolson/35575667566/in/datetaken-public/" title="DSC_0462"><img src="https://farm5.staticflickr.com/4208/35575667566_3efb34c4b0_b.jpg" width="1024" height="687" alt="DSC_0462"></a><script async src="//embedr.flickr.com/assets/client-code.js" charset="utf-8"></script>
 
Last edited:
July 2017 - Big Sur, Pacific Coast Highway:

Headed down the coast to Big Sur over the week of the 4th of July. The roads North and South of this section of coast were closed due to extensive road damage from this past winter, so the only access was from Highway 101 via Nacimiento-Fergusson Rd. This stretch of coast felt extremely quiet due to the road closures so it really added to the remoteness of Big Sur.

<a data-flickr-embed="true" href="https://www.flickr.com/photos/julianolson/36256261926/in/datetaken-public/" title="17 Big Sur (114)"><img src="https://farm5.staticflickr.com/4320/36256261926_512670d0e3_b.jpg" width="1024" height="687" alt="17 Big Sur (114)"></a><script async src="//embedr.flickr.com/assets/client-code.js" charset="utf-8"></script>

<a data-flickr-embed="true" href="https://www.flickr.com/photos/julianolson/36130660922/in/datetaken-public/" title="17 Big Sur (139)"><img src="https://farm5.staticflickr.com/4297/36130660922_b2204b54c4_b.jpg" width="1024" height="687" alt="17 Big Sur (139)"></a><script async src="//embedr.flickr.com/assets/client-code.js" charset="utf-8"></script>

<a data-flickr-embed="true" href="https://www.flickr.com/photos/julianolson/35491975623/in/datetaken-public/" title="17 Big Sur (258)"><img src="https://farm5.staticflickr.com/4300/35491975623_741b7110d9_b.jpg" width="1024" height="687" alt="17 Big Sur (258)"></a><script async src="//embedr.flickr.com/assets/client-code.js" charset="utf-8"></script>

<a data-flickr-embed="true" href="https://www.flickr.com/photos/julianolson/35463784074/in/datetaken-public/" title="17 Big Sur (294)"><img src="https://farm5.staticflickr.com/4315/35463784074_5e73c77c0f_b.jpg" width="1024" height="687" alt="17 Big Sur (294)"></a><script async src="//embedr.flickr.com/assets/client-code.js" charset="utf-8"></script>

<a data-flickr-embed="true" href="https://www.flickr.com/photos/julianolson/36130752942/in/datetaken-public/" title="17 Big Sur (330)"><img src="https://farm5.staticflickr.com/4300/36130752942_fd4d1cdac9_b.jpg" width="1024" height="687" alt="17 Big Sur (330)"></a><script async src="//embedr.flickr.com/assets/client-code.js" charset="utf-8"></script>

<a data-flickr-embed="true" href="https://www.flickr.com/photos/julianolson/36130746872/in/datetaken-public/" title="17 Big Sur (333)"><img src="https://farm5.staticflickr.com/4326/36130746872_4096eb3b13_b.jpg" width="1024" height="687" alt="17 Big Sur (333)"></a><script async src="//embedr.flickr.com/assets/client-code.js" charset="utf-8"></script>


We camped a few nights at Kirk Creek and explored the surrounding area, then ended off the trip a bit more luxuriously at Treebones Resort (tent site).

<a data-flickr-embed="true" href="https://www.flickr.com/photos/julianolson/35491927573/in/datetaken-public/" title="17 Big Sur (98)"><img src="https://farm5.staticflickr.com/4325/35491927573_798543a656_b.jpg" width="1024" height="687" alt="17 Big Sur (98)"></a><script async src="//embedr.flickr.com/assets/client-code.js" charset="utf-8"></script>

<a data-flickr-embed="true" href="https://www.flickr.com/photos/julianolson/36165064351/in/datetaken-public/" title="17 Big Sur (227)"><img src="https://farm5.staticflickr.com/4320/36165064351_303bd67696_b.jpg" width="1024" height="687" alt="17 Big Sur (227)"></a><script async src="//embedr.flickr.com/assets/client-code.js" charset="utf-8"></script>


Drove up Los Burros Road (Willow Creek Rd) to catch an EPIC sunset and enjoy a few beers!

<a data-flickr-embed="true" href="https://www.flickr.com/photos/julianolson/36130779782/in/datetaken-public/" title="17 Big Sur (372)"><img src="https://farm5.staticflickr.com/4294/36130779782_70b963643c_b.jpg" width="1024" height="687" alt="17 Big Sur (372)"></a><script async src="//embedr.flickr.com/assets/client-code.js" charset="utf-8"></script>

<a data-flickr-embed="true" href="https://www.flickr.com/photos/julianolson/36297803155/in/datetaken-public/" title="17 Big Sur (404)"><img src="https://farm5.staticflickr.com/4323/36297803155_7cfd95a30e_b.jpg" width="1024" height="687" alt="17 Big Sur (404)"></a><script async src="//embedr.flickr.com/assets/client-code.js" charset="utf-8"></script>

<a data-flickr-embed="true" href="https://www.flickr.com/photos/julianolson/36297804895/in/datetaken-public/" title="17 Big Sur (398)"><img src="https://farm5.staticflickr.com/4304/36297804895_d2edc42a41_b.jpg" width="1024" height="687" alt="17 Big Sur (398)"></a><script async src="//embedr.flickr.com/assets/client-code.js" charset="utf-8"></script>

<a data-flickr-embed="true" href="https://www.flickr.com/photos/julianolson/35463890384/in/datetaken-public/" title="17 Big Sur (415)"><img src="https://farm5.staticflickr.com/4314/35463890384_32bfceca5d_b.jpg" width="1024" height="687" alt="17 Big Sur (415)"></a><script async src="//embedr.flickr.com/assets/client-code.js" charset="utf-8"></script>

<a data-flickr-embed="true" href="https://www.flickr.com/photos/julianolson/35904395380/in/datetaken-public/" title="17 Big Sur (423)"><img src="https://farm5.staticflickr.com/4301/35904395380_bf3eefe4eb_b.jpg" width="1024" height="687" alt="17 Big Sur (423)"></a><script async src="//embedr.flickr.com/assets/client-code.js" charset="utf-8"></script>

<a data-flickr-embed="true" href="https://www.flickr.com/photos/julianolson/35904412480/in/datetaken-public/" title="17 Big Sur (431)"><img src="https://farm5.staticflickr.com/4310/35904412480_459032596c_b.jpg" width="1024" height="687" alt="17 Big Sur (431)"></a><script async src="//embedr.flickr.com/assets/client-code.js" charset="utf-8"></script>
 
Last edited:

Members online

Forum statistics

Threads
278,316
Messages
3,554,110
Members
248,016
Latest member
Advally Service

Trending content

Back
Top