ShredHead’s Build/Photo/Adventure Thread

Glad to see you're enjoying it up in NorCal! One of my favorite places in the U.S!

Like what you have going on with the build and adventures...well played sir! :bravo:

Thanks!! Yes, I've really been enjoying getting out and exploring more often than I did before in my "former life". There's some really cool places in SoCal too, but not like the North.
 
Awesome pics man! Thanks for sharing.

How much lift did the 884 give you up front? planning on going the same route.

Thanks, glad you could enjoy it!

I never took measurements before/after my lift so I'm not positive... but from what others have reported, I think i got between 2 - 2.5" with the Bilsteins set at 0. I think the height is perfect, not super lifted but still enough to fit larger tires without rubbing and still get decent mileage.

I also added aftermarket UCAs although I probably did not need to.... I didn't want to find out after the lift was already installed that my alignment was not in spec, so I bit the bullet... But I have perfect alignment numbers now and it rides great!
 
Last edited:
Love the pics man, reminded me so much of my trip from Oregon down the coast, to Joshua Tree, and then ultimately to Colorado. Such a great route - so much to explore!! Great lookin' rig too.
 
Cargo Platform / Sleeping Platform / Cargo Drawer:

This whole thing has been a work in progress. First it started out as a sleeping platform/storage platform, which worked well for a while. But then i wanted something to keep things organized with, so i built a pull out drawer that uses the platform as the top. I am planning on scrapping the whole cargo platform now and making a dual drawer setup for the rear and having the sleeping extension bolt on when i need to sleep in the car.

----------------
Hey Julian, your build looks great!! I just got my 4Runner on Saturday and plan on building a sleeping platform with cargo drawers when I head up to my parent's house in a few weekends and can use my Dad's tools! Hope all is well :)
-Mandi
 
Bought all the parts for the TRD Cold Air Intake kit using Saker's method and saved about half the cost of the TRD CAI kit! Very easy/straigtforward install once you have all the parts.


Out of curiosity, how many parts are there and what were their costs?


Sent from my iPhone using Tapatalk
 
Bought all the parts for the TRD Cold Air Intake kit using Saker's method and saved about half the cost of the TRD CAI kit! Very easy/straigtforward install once you have all the parts.


Out of curiosity, how many parts are there and what were their costs?


Sent from my iPhone using Tapatalk

Here's a list of the parts I bought (2nd option in post):

http://www.toyota-4runner.org/5th-gen-t4rs/85960-how-guide-trd-cai-installation-16.html#post2368033

I chose to not use the TRD oiled air filter and instead just keep using the OEM paper filters (about $13). You will need to buy a few additional items (listed at the bottom of the post).
 
List of Current Mods:
Exterior:
-Rigid Industries: SAE/DOT Fog Lights

...

Future Plans:
-Rigid Industries D2 Amber Driving lights OR Baja Designs Squadron Amber Driving/Combo Lights (swap out with DOT Fogs)

I was looking at the same lights for replacing my OEM fogs. Can you tell me why you want to swap out the DOT Fogs for the D2's or Squadrons?
 
I was looking at the same lights for replacing my OEM fogs. Can you tell me why you want to swap out the DOT Fogs for the D2's or Squadrons?

No complaints about the Rigid DOT Fogs. I really love the cut off and the output is great, but I want amber fog lights for rain/snow. I have been using an amber lens cover over the DOTs but it blocks out a lot of the light.

I will either add a set of Rigid D2s or BD Squadron amber fogs behind the grill eventually. I'm also thinking I could probably swap the lenses from my Rigid DOT fogs to the Amber D2s and get the same cutoff and be much brighter since the housings are identical... not sure which way I should go.
 
ARB Outback Drawer & Cargo Flat Plate

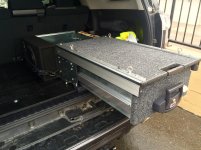
Finally decided to stop wasting my time, effort & money on building a 2nd cargo drawer, so instead I bit the bullet and pulled the trigger on an ARB Outback Solutions drawer (part # RDRF945). If I had the space, tools and time at my new house than I would probably have built my own drawer with a slider on top... but since I don't, ARB was the way to go. I'm definitely happy about this purchase as the quality and construction is unbeatable!
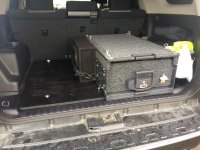
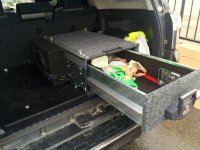
Photo Feb 03, 2 06 41 PM.jpg
Photo Feb 03, 2 06 56 PM.jpg
Photo Feb 03, 2 07 06 PM.jpg


First, I installed a flat plate in the cargo area to secure the drawer and future accessories to. I used 3/4" birch plywood cut to 38 x 41", primed and coated with bed liner. Also installed T-nuts on the underside of the plate to bolt the drawer to. The cargo plate is bolted down to the factory D-ring locations in the front and 1/4" rivnuts inserted through floor pan in the rear.
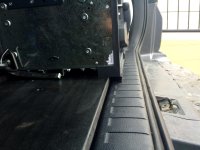
Photo Feb 03, 2 07 29 PM.jpg


Added 1/4" T-Track to the top of the drawer so I can easily add or remove tie down points.
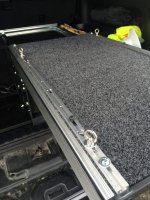
Photo Feb 03, 10 44 56 AM.jpg

Oh yea, can't forget a bottle opener too :beer:
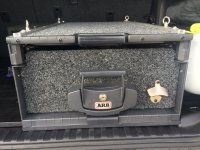
Photo Feb 03, 10 46 46 AM.jpg

Made some DIY dividers out of 1/4" ABS Plastic (I would use 1/8" if I did it again)... Now I can keep all my "junk" neatly organized.

I keep the following in the drawer at all times: Air Compressor/hose, ARB Tire Deflater, Baofeng UV-5R Radio, Katadyn Hiker Pro Water Microfilter, CPR Mask, flintstone/lighter/ziplock baggies/trash bags, buck knife/pocket knife, misc. hand tools, work gloves, D-ring shackles, 30ft recovery strap (behind drawer & seatback), jumper cables, parachord, rope, tie downs/lashing straps, bungee chords, down jacket... I still need to add a good first aid kit too.
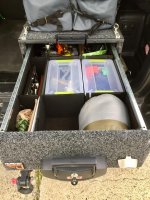

Photo Apr 11, 8 01 18 AM.jpg


.
 

Attachments

  • Photo Feb 03, 2 06 41 PM.jpg
    Photo Feb 03, 2 06 41 PM.jpg
    135 KB · Views: 687
  • Photo Feb 03, 2 06 56 PM.jpg
    Photo Feb 03, 2 06 56 PM.jpg
    136.3 KB · Views: 614
  • Photo Feb 03, 2 07 06 PM.jpg
    Photo Feb 03, 2 07 06 PM.jpg
    137 KB · Views: 616
  • Photo Feb 03, 2 07 29 PM.jpg
    Photo Feb 03, 2 07 29 PM.jpg
    133.4 KB · Views: 609
  • Photo Feb 03, 10 44 56 AM.jpg
    Photo Feb 03, 10 44 56 AM.jpg
    137.9 KB · Views: 613
  • Photo Feb 03, 10 46 46 AM.jpg
    Photo Feb 03, 10 46 46 AM.jpg
    136.4 KB · Views: 614
  • Photo Apr 11, 8 01 18 AM.jpg
    Photo Apr 11, 8 01 18 AM.jpg
    138.4 KB · Views: 304
Last edited:
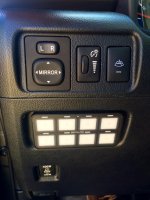
Switch-pro SP8100 Installed

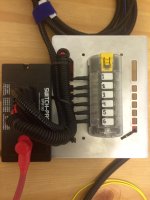
Received my Switchpro unit the other day from the latest group buy and got it all wired up to an aux fuse block.

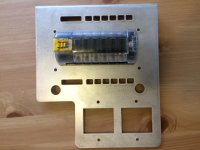
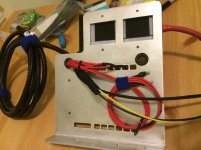
I used the Pelfreybilt Fuse Tray and a BlueSea fuse block with 6 independent circuits. The fuse block was not required for installation but i wanted to keep things as clean as possible and make connecting future accessories easier.

Photo Feb 11, 11 57 46 AM (1).jpg

Photo Mar 06, 6 27 26 PM.jpg

Photo Feb 25, 2 26 31 AM.jpg

The switch button panel fits perfectly in the OEM switch blank location... I relocated the wiper defroster to the upper blank (it's flipped upside down because it will not fit normally due to the "keyed" blanks).

Photo Mar 02, 1 21 19 PM.jpg


UPDATE 3/17/17:
Finished up wiring my Switchpro SP8100 and cleaned up the "rats nest" of wires under my hood. Very happy with how the SP unit functions! Planning to add some camp lighting/back up lights in the near future.

<a data-flickr-embed="true" href="https://www.flickr.com/photos/julianolson/35486812363/in/photostream/" title="DSC_0534"><img src="https://farm5.staticflickr.com/4303/35486812363_708b281073_b.jpg" width="1024" height="687" alt="DSC_0534"></a><script async src="//embedr.flickr.com/assets/client-code.js" charset="utf-8"></script>
<a data-flickr-embed="true" href="https://www.flickr.com/photos/julianolson/35486811643/in/photostream/" title="DSC_0540"><img src="https://farm5.staticflickr.com/4320/35486811643_9499d4bde6_b.jpg" width="1024" height="687" alt="DSC_0540"></a><script async src="//embedr.flickr.com/assets/client-code.js" charset="utf-8"></script>

`
 

Attachments

  • Photo Feb 11, 11 57 46 AM (1).jpg
    Photo Feb 11, 11 57 46 AM (1).jpg
    127.5 KB · Views: 554
  • Photo Feb 25, 2 26 31 AM.jpg
    Photo Feb 25, 2 26 31 AM.jpg
    129.1 KB · Views: 553
  • Photo Mar 02, 1 21 19 PM.jpg
    Photo Mar 02, 1 21 19 PM.jpg
    137.1 KB · Views: 752
  • Photo Mar 06, 6 27 26 PM.jpg
    Photo Mar 06, 6 27 26 PM.jpg
    122.2 KB · Views: 481
Last edited:
Sweet truck and awesome adventures! NorCal is a beautiful place with lots to explore. You'll need to hit Gold Lake; camp there and ride the Downieville trail. Epic 20 miles of downhill through the Sierra Buttes. That's a killer weekend!

I'm wondering, does the grill block the light bar output? Or do you not notice it?
 
Sweet truck and awesome adventures! NorCal is a beautiful place with lots to explore. You'll need to hit Gold Lake; camp there and ride the Downieville trail. Epic 20 miles of downhill through the Sierra Buttes. That's a killer weekend!

I'm wondering, does the grill block the light bar output? Or do you not notice it?

Thanks man. Gold lake and Downieville is definitely on my list! I'm wondering how long it will take for all this snow to melt this season, if it even does... It may be a while before certain trails are accessible due to the snow pack.

I'm sure the grill blocks a small amount of light output, but it's plenty bright anyways so I don't notice it. I've never had it mounted outside of the grill so I don't have anything to compare it to either.
 

Members online

Forum statistics

Threads
278,316
Messages
3,554,111
Members
248,016
Latest member
Advally Service

Trending content

Back
Top