
You are using an out of date browser. It may not display this or other websites correctly.
You should upgrade or use an alternative browser.
You should upgrade or use an alternative browser.
Sniv's Custom Long Travel Build
- Thread starter snivilous
- Start date


snivilous
Senior Member
Made barely any progress lately. Got a new stainless brake line made to replace the one I rubbed through. I bought it from a place called Apex Brakes for $35 shipped, the guy was super cool and can do whatever fittings or colors or lengths, I got a 23" long end to end to compensate for the LT.

And then today all I did was weld on the mounts a little and take apart the drivers side. This weekend I plan to get a lot done since my girlfriend will be out of town. I ordered 24' of 1.75" square tubing for my engine cage, I plan to essentially cut the body off forward of the firewall and have everything bolt to the engine cage which will tie everything together.

And since this is like the most boring post ever, here's a wheeling trip my sister and I did with some guys this weekend.


And then today all I did was weld on the mounts a little and take apart the drivers side. This weekend I plan to get a lot done since my girlfriend will be out of town. I ordered 24' of 1.75" square tubing for my engine cage, I plan to essentially cut the body off forward of the firewall and have everything bolt to the engine cage which will tie everything together.
And since this is like the most boring post ever, here's a wheeling trip my sister and I did with some guys this weekend.


shootmymime
New member
I can't wait to see the Runner on the road again!
I have a feeling it will never be on the road again hehe! if you catch my drift. :car:
snivilous
Senior Member
Finished welding up the passenger side LCA mounts, and then decided to clearance a tiny bit.
My hack job before to clear the shocks and UCA at full bump:

And further hacked:


I cut everything out except the top structure where the fenders mount. Next step is to finish up the mounts and put the suspension back in and use it to figure out where to mount the bump stops and where to route my engine cage to clear the UCA and tire. I don't know if I mentioned it ever but I'm caging the engine bay to start with, and probably tie it into an internal cage next year. I need to brace my shock mounts so said screw it and I'll just tube the front.

I was debating removing all of the body forward of the firewall, but after thinking about it I decided it's more work than I want to do right now and ultimately I'm not building this to be a race spec truck, and I'll save doing a full tube chassis on a different build and not on my daily driven wannabe-prerunner. So: leaving the parts of the body that mount to stuff (radiator, fenders, and headlights essentially) and then tubing the engine bay and reinforcing everything and mounting any remaining electonics and wiring to the engine cage. If I'll lucky I'll start mocking up tube tomorrow after I have the suspension reinstalled.
It dawned on me I have about 10 weeks to research, design, build, test, and tune a linked rear suspension and then drive 500 miles through Wyoming to go to school, so I really need to finish the front and get to the rear.
My hack job before to clear the shocks and UCA at full bump:
And further hacked:
I cut everything out except the top structure where the fenders mount. Next step is to finish up the mounts and put the suspension back in and use it to figure out where to mount the bump stops and where to route my engine cage to clear the UCA and tire. I don't know if I mentioned it ever but I'm caging the engine bay to start with, and probably tie it into an internal cage next year. I need to brace my shock mounts so said screw it and I'll just tube the front.
I was debating removing all of the body forward of the firewall, but after thinking about it I decided it's more work than I want to do right now and ultimately I'm not building this to be a race spec truck, and I'll save doing a full tube chassis on a different build and not on my daily driven wannabe-prerunner. So: leaving the parts of the body that mount to stuff (radiator, fenders, and headlights essentially) and then tubing the engine bay and reinforcing everything and mounting any remaining electonics and wiring to the engine cage. If I'll lucky I'll start mocking up tube tomorrow after I have the suspension reinstalled.
It dawned on me I have about 10 weeks to research, design, build, test, and tune a linked rear suspension and then drive 500 miles through Wyoming to go to school, so I really need to finish the front and get to the rear.

D Farms
New member
the firewall is soft after the pinch weld is cut, beat the crap out of it. you mentioned that shortening the front bumps would net some up travel, when I was clearancing earlier I noticed there was a lot more room for up travel, and the shock has about an inch of unused up travel. I need to cut and fold my fenders firsth though haha.
snivilous
Senior Member
Dropped my spindles off at Toyota yesterday to get the bearings pressed out so I could sand blast them, get a call saying one of the spindles cracked. I haven't picked them up yet but was looking for some advice.
-Buy a set of new (used) spindles, cut the machined bearing section out and fabricate my own spindles around them. The benefit over the other two options is that the spindle would be able to directly bolt into my uniballs and have the steering knuckle integrated into the assembly. Much simpler, stronger, and cleaner than any stock-modified spindle.
-Buy a set of new (used) spindles, gusset them again and then machine an aluminum slug at work instead of the hack job welded puck that I drilled for the uniballs last time.
-Buy a set of race spindles from somewhere (only place I've found is solomotorsports, and I'm not entirely sure they'll adapt to my suspension--and they still require the steering knuckle bolting up).
Obviously option #2 is the fastest and cheapest, and I'm kind of leaning towards that but hesitant based on the fact I've had the steering knuckle snap off already and now had one spindle crack (not sure yet if it was the same side that collapsed). I would feel a lot better having literally 3 critical bolts to the entire spindle versus the 7 of a stock suspension. Thoughts?
[MENTION=89531]Cartzo[/MENTION] [MENTION=14772]shootmymime[/MENTION]
-Buy a set of new (used) spindles, cut the machined bearing section out and fabricate my own spindles around them. The benefit over the other two options is that the spindle would be able to directly bolt into my uniballs and have the steering knuckle integrated into the assembly. Much simpler, stronger, and cleaner than any stock-modified spindle.
-Buy a set of new (used) spindles, gusset them again and then machine an aluminum slug at work instead of the hack job welded puck that I drilled for the uniballs last time.
-Buy a set of race spindles from somewhere (only place I've found is solomotorsports, and I'm not entirely sure they'll adapt to my suspension--and they still require the steering knuckle bolting up).
Obviously option #2 is the fastest and cheapest, and I'm kind of leaning towards that but hesitant based on the fact I've had the steering knuckle snap off already and now had one spindle crack (not sure yet if it was the same side that collapsed). I would feel a lot better having literally 3 critical bolts to the entire spindle versus the 7 of a stock suspension. Thoughts?
[MENTION=89531]Cartzo[/MENTION] [MENTION=14772]shootmymime[/MENTION]
Last edited:
snivilous
Senior Member
As with most projects, life gets in the way at some point; and as per my usual I shoot high and don't hit my personal deadline (at least with the truck). Probably needless to say but my big plans for this summer fell through big time. This is how she is currently still sitting:

The suspension is mostly done. Bump stop cans are welded in, mounts reinforced, limit strap locations are set, new springs waiting to be installed, everything welded and primed right now. I need to touch up the paint on the A-arms and paint the frame, and then put the steering knuckles in double shear which will be easy. Mocking up from a few weeks ago:


As you can see, this is the screwed up spindle where the bearing housing cracked and had a chunk rip out. Two awesome members on here came to the rescue for the spindle replacements, [MENTION=91056]meekie4[/MENTION] offered to send me some 2WD spindles and I could swap my 4WD hubs in and [MENTION=91423]Asaspades93[/MENTION] brought me some old 4WD spindles. The issue right now though is meekie's spindles will cost a fortune to ship to me, and Asa's bearings are seized. Today I put them in the vice with a 3 foot breaker bar and they wouldn't budge. My girlfriend's dad works at a Toyota salvage yard and if I'm lucky I can get some spindles that still have good bearings--if there aren't any useable ones, her dad might be able to hook me up with a place to press the bearings out/in for free and I'll refurbish Asa's spindles. Either route, after that I need to weld new gussets on and then machine an adapter slug for my uniball uppers (not a big deal, i can use one of the lathes at work and pump them out). So that is ISSUE #1--spindles.
Moving on, I am doing a shock cross brace which is now an "engine bay cage".

Nothing super fancy, the main point is to stiffen the shock towers up (the cross brace will bolt in, right now it's just tacked) and then I'm making it so everything will mount to the tubing: relays, fuse boxes, battery, shock reservoirs, etc.

And then since there's essentially no material forward of the firewall, I'm running a beam along the top edge to follow that. It's not tied into the body, but is more of there for protection if something hits me from the side or something happens again where the suspension collapses and the tire shoots upwards. I plan to use some flat sheet metal sections on the inside to keep shit out of the engine bay too. So ISSUE #2 -- finish the engine cage.

Finally, since the transmission, and specifically the torque converter (as far as I can tell) was shitting me when I was driving to school last semester I've decided while the steering rack and suspension is pulled out I'll drop the tranny and replace the torque converter and maybe the oil pump for it. Luckily, since the truck has essentially driven 500 miles on the interstate and that's it since I did the rear main seal, everything is super easy to come apart! I unplugged everything yesterday and just need to disconnect the cross member and bell housing, I think it'll only take 4 hours or so total to pull the tranny this time around. Then swap the torque converters, throw it back in, and hopefully the truck works flawlessly! So finally, ISSUE #3 -- replace torque converter.
Get all that done and tested and working well before going back to school at the end of August. So like I said, lots of plans fell through... On the plus side I have a set of Trail Ready beadlocks being built for me, and will probably put 35" MTRs or MTZs on them and then get some shocks/bumps to run on the outside of the frame in the back; those are up in the air so won't give any ideas on what I'll get. I just want it running reliably, a decent rear suspension, the front suspension working great, and meaty tires I can air down for all the snow wheeling I do. We'll see, right now I'm just hoping to finish it in time...
And the FJ is still doing fine, missing the IFS though.

The suspension is mostly done. Bump stop cans are welded in, mounts reinforced, limit strap locations are set, new springs waiting to be installed, everything welded and primed right now. I need to touch up the paint on the A-arms and paint the frame, and then put the steering knuckles in double shear which will be easy. Mocking up from a few weeks ago:
As you can see, this is the screwed up spindle where the bearing housing cracked and had a chunk rip out. Two awesome members on here came to the rescue for the spindle replacements, [MENTION=91056]meekie4[/MENTION] offered to send me some 2WD spindles and I could swap my 4WD hubs in and [MENTION=91423]Asaspades93[/MENTION] brought me some old 4WD spindles. The issue right now though is meekie's spindles will cost a fortune to ship to me, and Asa's bearings are seized. Today I put them in the vice with a 3 foot breaker bar and they wouldn't budge. My girlfriend's dad works at a Toyota salvage yard and if I'm lucky I can get some spindles that still have good bearings--if there aren't any useable ones, her dad might be able to hook me up with a place to press the bearings out/in for free and I'll refurbish Asa's spindles. Either route, after that I need to weld new gussets on and then machine an adapter slug for my uniball uppers (not a big deal, i can use one of the lathes at work and pump them out). So that is ISSUE #1--spindles.
Moving on, I am doing a shock cross brace which is now an "engine bay cage".
Nothing super fancy, the main point is to stiffen the shock towers up (the cross brace will bolt in, right now it's just tacked) and then I'm making it so everything will mount to the tubing: relays, fuse boxes, battery, shock reservoirs, etc.
And then since there's essentially no material forward of the firewall, I'm running a beam along the top edge to follow that. It's not tied into the body, but is more of there for protection if something hits me from the side or something happens again where the suspension collapses and the tire shoots upwards. I plan to use some flat sheet metal sections on the inside to keep shit out of the engine bay too. So ISSUE #2 -- finish the engine cage.
Finally, since the transmission, and specifically the torque converter (as far as I can tell) was shitting me when I was driving to school last semester I've decided while the steering rack and suspension is pulled out I'll drop the tranny and replace the torque converter and maybe the oil pump for it. Luckily, since the truck has essentially driven 500 miles on the interstate and that's it since I did the rear main seal, everything is super easy to come apart! I unplugged everything yesterday and just need to disconnect the cross member and bell housing, I think it'll only take 4 hours or so total to pull the tranny this time around. Then swap the torque converters, throw it back in, and hopefully the truck works flawlessly! So finally, ISSUE #3 -- replace torque converter.
Get all that done and tested and working well before going back to school at the end of August. So like I said, lots of plans fell through... On the plus side I have a set of Trail Ready beadlocks being built for me, and will probably put 35" MTRs or MTZs on them and then get some shocks/bumps to run on the outside of the frame in the back; those are up in the air so won't give any ideas on what I'll get. I just want it running reliably, a decent rear suspension, the front suspension working great, and meaty tires I can air down for all the snow wheeling I do. We'll see, right now I'm just hoping to finish it in time...
And the FJ is still doing fine, missing the IFS though.

4Running Daily
New member
I'm not really too big a fan of my MTR's on the road. In dirt they're fantastic, but on the street they're awful. Won't balance, dynabeads didn't help. Not gonna be a very fun time for me driving to Phoenix from San Diego and back all the time. Just a warning haha

TCMach
New member
Sucks to hear about the MTRs. My MTZs have been excellent. I currently drive 90 miles a day round trip for my internship so I have had plenty of pavement highway time on them and they are just awesome. I had them balanced once when they were new and they've never had an issue with vibration at regular speed. Currently at 85 I get a death wobble but I try not to go that fast usually haha. Killer tire offroad and I'm 400 miles from 30k on this set and this is my tread at the moment.
 Untitled by Tyler Carvell, on Flickr
Untitled by Tyler Carvell, on Flickr
Last edited:
snivilous
Senior Member
I'm not really too big a fan of my MTR's on the road. In dirt they're fantastic, but on the street they're awful. Won't balance, dynabeads didn't help. Not gonna be a very fun time for me driving to Phoenix from San Diego and back all the time. Just a warning haha
Yea I've been leaning towards the MTZs, mainly since they'll do better in the snow and living in the mountains I need a decent snow tire. I'll probably keep the skinny BFGs as commuting tires to school, I don't want to be running big mud terrains on the interstate like you said

snivilous
Senior Member
My girlfriend hooked me up with some spindles from a salvage yard that have super low miles and the bearings are fine, picked those up today. Also ordered some round aluminum stock to machine for the uniball adapter slug. Today I finally got around to pulling the tranny, took about 3 hours with my girlfriend helping me at the end; not too shabby I think. For reference: a 2001 4Runner has an A340F with a 20 spline torque converter! Got one ordered and should be here Monday.
Yea I'm waiting to see it run reliably and well for once too. But it's gonna be considerably pimped within the next month or two and finally start posting some shock tuning and wheeling stories :thumb:
I was really hoping to see this done when I returned from my trip after 6 months.opcorn:
Yea I'm waiting to see it run reliably and well for once too. But it's gonna be considerably pimped within the next month or two and finally start posting some shock tuning and wheeling stories :thumb:
snivilous
Senior Member
I'm shooting to test drive tomorrow. I swear when it comes to calculating dual rate setups I'm retarded. I had added some spring length to the 800/600 setup when I bought it figuring I could just compress the extra length and then wouldn't have to crank down on the adjusting collar as much. For some reason I didn't factor in the fact the SMALL spring is 600lbs/in and I would have to compress the shit out of it with my shitty little spring compressors :ybrick: So wrapping up today I go and figure I'll put the coilovers together, and there's no way in hell I can compress the 600 enough to get the spring seat on.
LUCKILY I just went through my spreadsheet and punched in what it would be like using my 500lb/in x 6in spring, and it should work great for ride height and flex travel :clap2: Essentially it'll be like the first setup, where the secondary spring is already fully compressed at ride height, but since I have a 25% stiffer spring I shouldn't have to crank down on the adjusting collar more than an inch to get the ride height I want. We'll see if that actually works out that way, but I'm hopeful... It'll look kinda weird since the 500 spring is WAY smaller than the 800 Eibachs I got, but most offroad vehicles look that way I think where they have one spring that is (or almost) fully compressed and is almost like a block to push the primary spring far enough down since they don't make a single spring long enough to use.
Anyways, moving on. This is how she sits currently:

New torque converter is in, tranny is filled with fluid and installed and hasn't leaked (knock on wood) though I haven't fired it up yet. Shock cage is painted and in, but not welded to the frame yet. I'm waiting to finish the spindles and make sure the drivers side is clearing decently where the battery is before I do the final installation welds. I'm really liking the shock cage for mounting everything, it's all high and tight and protected with lots of clearance--excluding the battery, but I moved it as high and inboard as possible so should be a bit better than the stock location.

I won't be using zip ties for the final wire management, this is just mocking up. I'm debating how to handle routing the wiring, I might just be lazy and use hose clamps like how the shock reservoirs will be mounted but we'll see. Sadly, I was forced to use the K&N intake since the stock box would definitely not fit. I plan to use sheet metal, or aluminum honeycomb we have laying around to seal off the engine bay so will do everything possible to protect the K&N from water and will get a prefilter for sure.

The cross brace is tacked on, I'll make it bolt in but for the time being of being lazy and just wanting it to run I'll leave it tacked in. I have some aluminum stock and c-clips sitting here that are ready to be machined for the adapter slugs for the spindles. I'll do that tomorrow, as well as cut off the gussets off the old spindles and weld those on. Once those tasks are done I'll paint the spindles and the suspension will be ready to go. I don't have any high grade LBJ bolts, I have some grade 5 ones and will run a quick stress analysis to make sure they're okay for a test drive (which I'm sure they are) and just won't drive it much.
I'm hopeful by tomorrow night I'll have at least taken it up the road and driven it for the first time in almost 8 months!! Fingers crossed anyhow...
LUCKILY I just went through my spreadsheet and punched in what it would be like using my 500lb/in x 6in spring, and it should work great for ride height and flex travel :clap2: Essentially it'll be like the first setup, where the secondary spring is already fully compressed at ride height, but since I have a 25% stiffer spring I shouldn't have to crank down on the adjusting collar more than an inch to get the ride height I want. We'll see if that actually works out that way, but I'm hopeful... It'll look kinda weird since the 500 spring is WAY smaller than the 800 Eibachs I got, but most offroad vehicles look that way I think where they have one spring that is (or almost) fully compressed and is almost like a block to push the primary spring far enough down since they don't make a single spring long enough to use.
Anyways, moving on. This is how she sits currently:
New torque converter is in, tranny is filled with fluid and installed and hasn't leaked (knock on wood) though I haven't fired it up yet. Shock cage is painted and in, but not welded to the frame yet. I'm waiting to finish the spindles and make sure the drivers side is clearing decently where the battery is before I do the final installation welds. I'm really liking the shock cage for mounting everything, it's all high and tight and protected with lots of clearance--excluding the battery, but I moved it as high and inboard as possible so should be a bit better than the stock location.
I won't be using zip ties for the final wire management, this is just mocking up. I'm debating how to handle routing the wiring, I might just be lazy and use hose clamps like how the shock reservoirs will be mounted but we'll see. Sadly, I was forced to use the K&N intake since the stock box would definitely not fit. I plan to use sheet metal, or aluminum honeycomb
we have laying around to seal off the engine bay so will do everything possible to protect the K&N from water and will get a prefilter for sure.
The cross brace is tacked on, I'll make it bolt in but for the time being of being lazy and just wanting it to run I'll leave it tacked in. I have some aluminum stock and c-clips sitting here that are ready to be machined for the adapter slugs for the spindles. I'll do that tomorrow, as well as cut off the gussets off the old spindles and weld those on. Once those tasks are done I'll paint the spindles and the suspension will be ready to go. I don't have any high grade LBJ bolts, I have some grade 5 ones and will run a quick stress analysis to make sure they're okay for a test drive (which I'm sure they are) and just won't drive it much.
I'm hopeful by tomorrow night I'll have at least taken it up the road and driven it for the first time in almost 8 months!! Fingers crossed anyhow...
shootmymime
New member
Fina-frickenly.
Better be all finished when time comes for me to drive it.
Better be all finished when time comes for me to drive it.
D Farms
New member
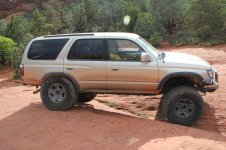
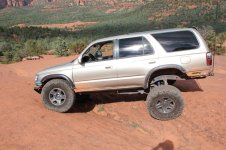
so a while ago you mentioned getting a bit more travel out the stock suspension by simply shortening the bump stops.
in the last months these are the things I have done.
1: trimmed and tubbed front to clear 35s with no rubbing on body at all, 1/2" clearance. it does rub slightly on the frame at full turn no matter the position of the tire travel wise.
2: got 35s and 1.25" wheel spacers on stock wheels.
3: made a 3" body lift with solid aluminum pucks.
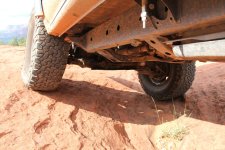
4: aquired poly bumps from absalom and shortened them 1" and put in front position.
then left the old rear bumps. I also extended my rear bump stops and used chevy blazer soft bumps in the back. I cut of the top ring and used it in the front, by squeezing the poly bump into it.
5:then I tapered the body lift from 3" up front to zero in the back.
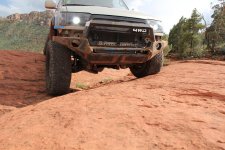
6:went to sedona and measured the travel up front all flexed out. I believe there may be an inch or so more up travel during high speed since the higher force would be able to compress the soft bump stop more than in a flex scenario. anyways 10"+ of travel up front with stock arms tundra 5100s and and tundra trd springs on first perch. also Im running about 1.5" of lift up front and about 2.7" of body lift in the front fender well, so it rides nicely and i dont have stupid looking rake.
in the last months these are the things I have done.
1: trimmed and tubbed front to clear 35s with no rubbing on body at all, 1/2" clearance. it does rub slightly on the frame at full turn no matter the position of the tire travel wise.
2: got 35s and 1.25" wheel spacers on stock wheels.
3: made a 3" body lift with solid aluminum pucks.
4: aquired poly bumps from absalom and shortened them 1" and put in front position.
then left the old rear bumps. I also extended my rear bump stops and used chevy blazer soft bumps in the back. I cut of the top ring and used it in the front, by squeezing the poly bump into it.
5:then I tapered the body lift from 3" up front to zero in the back.
6:went to sedona and measured the travel up front all flexed out. I believe there may be an inch or so more up travel during high speed since the higher force would be able to compress the soft bump stop more than in a flex scenario. anyways 10"+ of travel up front with stock arms tundra 5100s and and tundra trd springs on first perch. also Im running about 1.5" of lift up front and about 2.7" of body lift in the front fender well, so it rides nicely and i dont have stupid looking rake.
Attachments
snivilous
Senior Member
I didn't fire her up, but it's painfully close to being ready. If I ghetto'ified everything I could do it tonight easy. Current issues/tasks:
Need LBJ from Toyotas for steering knuckles
Need to find the nuts for both drive shafts
Repair tranny sensor wiring
Finish extending alternator plug wiring
Finish mounts for both fuse boxes
Need new vertical bolt for steering rack
Need to warranty the last CV at O'reilly
Need to mount shock reservoirs
Really the main issue is extending all the wiring, and I need the LBJ bolts since the grade 5 metric bolts I have don't want to thread into the spindles for some reason and I don't want to screw up the spindles threads by forcing them in. Today I machined the adapter slugs out of 6061. They aren't a press fit but are pretty tight, within 5 thousandths. With everything together you can't feel the slop (which wouldn't be an issue mechanically anyways) and once I get new spindle gussets and weld them I'm betting the spindle will warp enough and press onto the slugs. BIG improvement over the previous welded/drilled slugs I had.


I installed the drivers side suspension and cycled it to check for any clearance issues, as stated before mainly I was worried about battery tray clearance. Good news is I should be able to clear 35s no sweat I think. I will have to chop the firewall and move it back, but that is needed regardless of any tire size I run and isn't a big issue I don't think--and only occurs when turning at full bump. The battery tray and shock cage clears plenty, I couldn't get it to full bump because the truck was lifting off the jack stands before the bump stop was bottoming out but it was within an inch of wheel travel.

I should get my new rims this week (based on the ETA I was given when I ordered) which will stick out way more than the FJ rims, so that will help me clear the wheel wells more and hopefully reduce how much modifying of the body I need to do. I'm stoked I should clear 35s as well as 33s. Right now the 33s stuff inside of the fiberglass perfectly and there's no contact issues when turning, at least as far up travel as the bump stop would give me. I think with the new rims I'll have to chop the fiberglass though, probably just cut it up an inch or two to clear at full bump. We'll see.

I also machined my steering knuckles down the other day, I don't think I ever posted that. So now I don't have to modify the CV or slim down the lower uniball bolt to clear the CV.
Moving on, I installed the steering rack but the vertical bolt is stripped to all hell so have to replace that. Bolted the rear drive shaft in but can't find the nuts for the transfercase studs. I extended some wiring in the front, luckily there isn't much to do. Also extended some hose/vacuum lines to better navigate the shock cage. I used the torch and cut off one of the old spindle gussets but it was pretty butchered so I'm just gonna buy new ones. I won't need them to drive initially so that's not a big deal. Cleaned up the new spindles a bit and cut off the splash guard.
Since the main driver is getting the LBJ bolts since I only have 4 old ones right now, I'm guessing the truck won't roll until Thursday or so. In the meantime I'm gonna try to complete everything I can before the first drive so the front end won't need much (or any) post-work to be able to push it hard. Sorry for the hiccup!
[MENTION=100116]D Farms[/MENTION] that's pretty sweet! We'll have to meet up sometime, if I had another 3rd gen I would go with the most pimped out stock width suspension ever and modify the hell out of it. It's kind of embarrassing how little more travel I'm pulling than you are haha--or until snivs LT rev 2 comes out :bounce:
Need LBJ from Toyotas for steering knuckles
Need to find the nuts for both drive shafts
Repair tranny sensor wiring
Finish extending alternator plug wiring
Finish mounts for both fuse boxes
Need new vertical bolt for steering rack
Need to warranty the last CV at O'reilly
Need to mount shock reservoirs
Really the main issue is extending all the wiring, and I need the LBJ bolts since the grade 5 metric bolts I have don't want to thread into the spindles for some reason and I don't want to screw up the spindles threads by forcing them in. Today I machined the adapter slugs out of 6061. They aren't a press fit but are pretty tight, within 5 thousandths. With everything together you can't feel the slop (which wouldn't be an issue mechanically anyways) and once I get new spindle gussets and weld them I'm betting the spindle will warp enough and press onto the slugs. BIG improvement over the previous welded/drilled slugs I had.
I installed the drivers side suspension and cycled it to check for any clearance issues, as stated before mainly I was worried about battery tray clearance. Good news is I should be able to clear 35s no sweat I think. I will have to chop the firewall and move it back, but that is needed regardless of any tire size I run and isn't a big issue I don't think--and only occurs when turning at full bump. The battery tray and shock cage clears plenty, I couldn't get it to full bump because the truck was lifting off the jack stands before the bump stop was bottoming out but it was within an inch of wheel travel.
I should get my new rims this week (based on the ETA I was given when I ordered) which will stick out way more than the FJ rims, so that will help me clear the wheel wells more and hopefully reduce how much modifying of the body I need to do. I'm stoked I should clear 35s as well as 33s. Right now the 33s stuff inside of the fiberglass perfectly and there's no contact issues when turning, at least as far up travel as the bump stop would give me. I think with the new rims I'll have to chop the fiberglass though, probably just cut it up an inch or two to clear at full bump. We'll see.
I also machined my steering knuckles down the other day, I don't think I ever posted that. So now I don't have to modify the CV or slim down the lower uniball bolt to clear the CV.
Moving on, I installed the steering rack but the vertical bolt is stripped to all hell so have to replace that. Bolted the rear drive shaft in but can't find the nuts for the transfercase studs. I extended some wiring in the front, luckily there isn't much to do. Also extended some hose/vacuum lines to better navigate the shock cage. I used the torch and cut off one of the old spindle gussets but it was pretty butchered so I'm just gonna buy new ones. I won't need them to drive initially so that's not a big deal. Cleaned up the new spindles a bit and cut off the splash guard.
Since the main driver is getting the LBJ bolts since I only have 4 old ones right now, I'm guessing the truck won't roll until Thursday or so. In the meantime I'm gonna try to complete everything I can before the first drive so the front end won't need much (or any) post-work to be able to push it hard. Sorry for the hiccup!
[MENTION=100116]D Farms[/MENTION] that's pretty sweet! We'll have to meet up sometime, if I had another 3rd gen I would go with the most pimped out stock width suspension ever and modify the hell out of it. It's kind of embarrassing how little more travel I'm pulling than you are haha--or until snivs LT rev 2 comes out :bounce:
Similar threads

- Replies
- 0
- Views
- 2K

- Replies
- 2
- Views
- 2K

- Replies
- 2
- Views
- 6K

- Replies
- 19
- Views
- 2K


- Replies
- 2
- Views
- 3K
Forum statistics
Trending content
-

-

-
-
-
Thread 'Fixed: Dead Instrument Cluster in 2003 Toyota 4Runner (Corrosion Issue)'
- TheSpeakGeek
Replies: 9