SOcalTrail's 2011 Trail Edition Beast Build Thread

Ahhhhh hello Danny:llama:

This will just replace the OEM battery. Quite of few other dudes out there have made the swap to the larger OEM battery but they have either cut the plastic batt. tray up or just not used one at all. I'm keeping my ODyssey PC1200 of the other side. That gives me something like 140 Amh / hrs 12V That is a LOT of juice!

LoL , I might have to replace toyota with LlAMA on my front grill

Why not a group by for both trays? Coommmoooooooon :bigok:

:)
 
Why stop there guys, might as well petition for a group buy for every single one of his parts he's ever made. Let's just get it over with all at once :hungry:
 
You guys are killing me…. slowly. HAHA

I gotta steal some of my time from the fiancé this weekend to see about this battery tray, I looked at it a bit last night and it looks pretty straight forward.
 
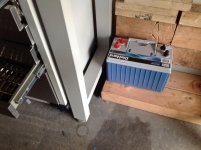
image.jpg

This battery is collecting a lot of dust.... Talk to the wifey and make this tray happen.
 

Attachments

  • image.jpg
    image.jpg
    125.4 KB · Views: 2,108
Since we're all showing off here, this guy's been collecting dust too and waiting for a passenger side battery tray to fit the Group 35, hint hint.


But after seeing all your batteries, I just gotta keep telling myself, size doesn't matter, size doesn't matter :redface:

And of course as luck would have it, I'm asian :dammit:
 
My eyes hurt. I just read through this whole thread from beginning to end.

So many good ideas. I will probably steal the air compressor tank location.
 
Just a teaser pic for now, but my rear bumper, fuel tank, tire carrier is DONE! I just have some detail work to finish and run some lines for the fuel tank and sending unit, but its all bolted on permanently now. Looks incredible.

I will have some better pics after next week. She is going to Line-X to get some coating in a few places back there.

And the crappy teaser pic.

 
Just spent over an hour reading this thread while smoking a cigar, great way to end the evening. Keep up the great work! Wish I had your mad skills Epic 4Runner, makes me want one even more! You ever get up to Lake Arrowhead you can crash at my Cabin and show off your Truck!
 
Showing mine off waiting for group 31 main tray

uvuzapy9.jpg

You guys will be happy to know that I have two pretty nice designs for a Group 31, main batter replacement tray.

I hope to have a prototype cut out for my truck sometime this week.

If this design works, it may be another way for me to make the auxillary battery tray as well. Keep your fingers crossed!
 
A couple more pics of the bumper… nearing completion, I have the appt. with Line-X this friday - that is a surprise.


Another Side - Gained a decent amount of departure angle.


Showing the trim pieces I made to replace the fender flares. The bumper is completely tied into the OEM fenders with a sheet of fabric reinforced rubber. Plenty of room for flexing and makes it look truly integrated.


Another angle (yes, the rivets will be painted over so they are black):


Showing the spindle assy. and the hold mechanism:


Another angle:


Driver's side - latch assy. with ammo can / aux water or jerry can holder:


Rear View:


Massive T6 Aluminum Skid underneath - the Aux fuel tank rests directly on top of this.


Close up of latch - Rubber bumpers - delrin slide pad and safety cord (having a new one made)


Fill nozzle for six fuel tank - still waiting to machine a trim ring for this.


Notice the tow hitch has been relocated and placed through the OEM rear crossmember and fully gusseted on the inside.


Latch Assy.


Rear hatch closed - the fill nozzle for the Aux tank is completely hidden and covered by the overhang of the rear hatch.


Eberything is beefed and gusseted to truly last. The whole bumper was coated with an anti corrosion textured powder coat, all 10.9 metric hardware and grade 8 SAE hardware, tow points are made out of water jet cut .75" mild steel welded directly inline with the frame. The 20mm ammo can is removable with a couple bolts and holds a full sized jerry can or scepter can perfectly with the lid off. The backup cam is relocated to the rear license plate holder.


Anywho - I snapped those shots real quick with my crappy cell phone. After the line x Friday, I will get the DSLR out and get some good day time shots. The cell phone shots do not do this justice.

Overall, I cannot even guess how many hours I have in just the rear bumper project, it turned into much more than I initially imagined. Everything is completely custom and one off, there are no CAD files of this, no possibilities of reproduction… I made the initial mock bumper out of card board and cut individual pieces on the water jet and bent up what I had to.

Cheers all, Im off for a run!

 
Overall, I cannot even guess how many hours I have in just the rear bumper project, it turned into much more than I initially imagined. Everything is completely custom and one off, there are no CAD files of this, no possibilities of reproduction… I made the initial mock bumper out of card board and cut individual pieces on the water jet and bent up what I had to.

Soooooo.... What you're saying is you should have 20 of these ready for sale the start of next week.
 

Members online

Forum statistics

Threads
278,316
Messages
3,554,106
Members
248,016
Latest member
Advally Service

Trending content

Back
Top