Southern Style Offroad Full Length Roof Rack

Installed the rack tonight. Just followed the instructions instead of assembling the rack on the ground first.

Looks great. I'll take pictures tomorrow when it's daylight.

Kind of surprised there are no nuts for the bolts that bolt the rails to the brackets, and there are no nuts for the bolts that bolt the faring onto the rails.

I also wish there were some rubber gaskets when mounting the bracket to the vehicle. If you check out the Gobi instructions, they have like 3 different gaskets. SSO just has the spacers and you get paranoid and glob insane amounts of silicone over everything.

Got my rack in today and just finished installing it, wiring up lights, and mounting RTT.

As for the brackets I had 3 different brackets so I need to call them on monday about it. I believe it is a QC issue.

2 brackets had built in nuts welded to them and were very nicely powdercoated like the rack. one other had the nuts welded but was not powered and covered in rust. the other was not powdered and had no nuts welded.

I put them on for now because I have a camping trip next week but would like to get this QC issue fixed with them soon before the rust stains my roof. should be easy enough to swap out a single bracket on each side. I also did not silicone those bracket bolts yet until they are fixed and a permanent fixture.
 
Here's a pic from this morning:

XaaDbdK.jpg


It was dark before finishing last night. We still got the rack pretty darn centered. The only issue is the edge of the passenger side of the faring is a couple millimeters off the roof. Hopefully, I can think of a way to lower it without doing too much work. I can lower the rubber foot on that side and probably just loosen the faring bolts on that side and press down while tightening again.

Put another thick glob of silicone around what I could reach this morning, too. Still paranoid about water leaks. We'll find out tonight when it storms.

Update:
I can lower the rubber foot on that side and probably just loosen the faring bolts on that side and press down while tightening again.
Yep, that did the trick!
 
Last edited:
Bars

So how many bars are ideal and have you mounted any semi-permanent accessories on it? if so, what kind and how's it working out? Still holding up well after having it for a while? I'm looking to order soon. Thanks


QUOTE=md-lucky;3306537]I received my rack last week and finally had time to install it this weekend.

I thought the packaging was very well done. I didn't have the wood inside the box like others have mentioned, but it was all very well wrapped and in perfect condition.

All of the hardware was in a press sealed compartment bag. Each compartment had a different component that was needed for the install.

I had one extremely minor mistake in my order: they sent the wrong invoice. I was really worried I would have a missing piece or two (I ordered extra bars, for example) but everything was exactly as I ordered it.

Install was very easy except for the win fairing. I will cuss that thing for a month most likely.

Fit and function is outstanding. When I went to square it at the end of tightening most everything down I was astonished at how well it squared and how even everything was. It is a quality product.

My dumb ass didn't order enough bars though so I don't have the rear-most bar. Entirely my fault. Will likely order the last bar I need soon.

Overall I looked at every option available and ultimately decided to purchase this rack. I didn't get a discount or be given any reason to pull punches or tell the truth entirely. So this is 100% my opinion on the product and service.

When looking at other options I considered their lead times too. I knew a gobi would take forever, some of the other products had fit and finish issues, and I sure as hell wasn't going to drill.

I ordered my rack on March 10th, and it arrived at my door on June 10th. Roughly 14 weeks from start to finish. It arrived exactly as I ordered it, professionally packed, was a super straight-forward install and the product itself is outstanding. Would I like to have received it sooner? Yeah. Sure. But I would rather have it take 14 weeks to arrive and have a product that is damn near perfect fit and finish versus getting it 4 weeks later and have nothing but issues.

Your results may vary.[/QUOTE]
 
Last edited:
Also, do you have to remove the bars to add accessories or are there cutouts that I can't see in the pictures? I'm hoping to carry some kayaks on my but will eventually get a rooftop tent. Thanks for the help
 
Also, do you have to remove the bars to add accessories or are there cutouts that I can't see in the pictures? I'm hoping to carry some kayaks on my but will eventually get a rooftop tent. Thanks for the help

everytime you need to add accessories you need to remove the bar to insert T-nuts into the slots. I just did my rack last night and my RTT. I am leaving the bars always attached to the RTT because it is easier to unbolt the bar than to unbolt the tent everytime.
 
Here's a pic from this morning:

XaaDbdK.jpg


It was dark before finishing last night. We still got the rack pretty darn centered. The only issue is the edge of the passenger side of the faring is a couple millimeters off the roof. Hopefully, I can think of a way to lower it without doing too much work. I can lower the rubber foot on that side and probably just loosen the faring bolts on that side and press down while tightening again.

Put another thick glob of silicone around what I could reach this morning, too. Still paranoid about water leaks. We'll find out tonight when it storms.

Update:

Yep, that did the trick!

Looking forward to seeing this in person!
 
Looking forward to seeing this in person!
Can anyone recommend any clues of what to look for to make sure the silicone seal is good and not leaking?

The headliner seems thick enough that it would take quite a bit of water for it to start soaking. The rear driver side bracket is pretty easy to check since the jack compartment gives me easy access inside the wall.

Here's some examples of my I-don't-know-what-I'm-doing silicone job:

M9RKn6k.jpg

iq39n2W.jpg

lrUqpbA.jpg
 
Last edited:
Drove through a severe storm last night. It took about an hour and a half to get through, so I was hit with quite a bit of rain (albeit while moving).

When I got home, there were not visual signs of leakage.

This morning I parked my vehicle out in the sunlight (it's about 80 degrees here) for a couple hours. No window fogging.

Then I pulled the interior paneling off the driver's side B pillar. No obvious signs of water having been in there (streaks) on that side. There are wires with exposed tips at the bottom of the pillar, so you definitely don't want water getting in there.

For now I think I'm going to leave the rack alone. I was going to back the bolts out, silicone each side of the bracket slot (because of the design, there's a gap on each side which exposes bolt threads), put plumbers tape on the top of the bolt threading, re-bolt, and cover with silicone. However, if there's no evidence of a leak, I'd rather not destroy a potentially good thing only to redo it and cause a problem. I'll probably just throw a small kit of silicone, Loctite, and plumbers tape in my cargo box in case I encounter an issue on the road.

More pics:

bU4Xy5z.jpg


q4BR1mf.jpg


atTsv4n.jpg
 
For all interested parties, there's going to be a tax day sale starting next week that gives 15% off the SSO all aluminum roof racks.

Like [MENTION=105481]3wbdriver[/MENTION] mentioned, we have been working closely with our customers from the first batch of racks to ensure that the product was on par with their expectations. We have identified and corrected a few things that are all now standard features on all current units.

We've also developed a line of accessories specifcally for our racks that will continue to grow every month. We've got a set of 40" light bar brackets in testing phase now that should make it to the website in March, as well. A flush mounted light bar in the wind fairing is also in development.

Please dont hesitate to ask us any questions here or through email/ live chat on our website.

5th Gen 4Runner Roof Rack & Southern Style OffRoad

Do you all plan to fabricate more accessories for the rack?
 
So since i have gotten mine mounted and tested i figured i would post a review of the product and service.

The rack itself is great quality and the fit is very very precise. It was not hard to mount it by myself, but it took me a while to make sure everything was perfect - measure twice install once. The powder finish is very nice and durable and the rack is very sturdy yet lightweight.

I will say that yes it did take exactly 12 weeks for delivery of my rack. I already figured this from the start so it was no big deal to me. If timing is an issue for you or you cannot wait, this rack is not for you. The fit and finish is very worth the wait though and i would do it all over again.

I did have one issue with 2 of the mounts having poor QC and they were dirty and not powdercoated like they got picked up off the shop floor. I contacted them and they immediately tried to send out replacements via usps. The labels got damaged and it got sent to lost mail depot. Contacted sso again and they immediately sent out replacements via fedex. Now that is great customer service!

I did use the rusty mounts for a week as i had a camping trip planned. I mounted up my smittybilt xl rtt and it performed great. Roof rack was sturdy with no movement and never did i feel i questioned the stability or strength. It was definitely 100% solid.

I got the mounts in yesterday and replaced the unfinished mounts and siliconed it all up(did not want to silicon the rusty mounts to the car). And now everything is perfect.

The instructions they include were very detailed and as long as you follow them perfectly you can easily mount it up alone. It took me about 3 hours total to get the oem rack off and sso fully mounted and aligned without any help.

I would highly recommend them as a company with great customer service and a top quality product. Just make sure you are prepared to wait and ok with it. I went in with this expectation and it was a great experience and my beat purchase yet.
 
The powder finish is very nice and durable and the rack is very sturdy yet lightweight.

I love the coating on the rack. It seems to have a little bit of elasticity to it. It compresses a bit without chipping when you bolt things down, and it's a bit forgiving when you nick/scratch it. I don't know what they're using, but it's amazing.

I got the mounts in yesterday and replaced the unfinished mounts and siliconed it all up(did not want to silicon the rusty mounts to the car). And now everything is perfect.

The instructions they include were very detailed and as long as you follow them perfectly you can easily mount it up alone.

I would encourage folks to to do some additional work on the mounting bolts after completely following the instructions.

The brackets have slots so you can adjust the positioning of the rack. However, because of this, about 3/4 cm of bolt is exposed where the bolt passes through the bracket. After finishing the entire instructions process (so the rack is locked in place), I backed out each bolt 1-by-1, added silicone to fill in the space on either side of the bolt (above the spacer), wrapped the top half of the bolt in plumbers tape, bolted back down, and then added some additional silicon around the rubber washer.
 
everytime you need to add accessories you need to remove the bar to insert T-nuts into the slots. I just did my rack last night and my RTT. I am leaving the bars always attached to the RTT because it is easier to unbolt the bar than to unbolt the tent everytime.

Also, do you have to remove the bars to add accessories or are there cutouts that I can't see in the pictures? I'm hoping to carry some kayaks on my but will eventually get a rooftop tent. Thanks for the help

I did some searching and came across this hardware. I have it on order and it should be here by next week. It will eliminate the need to remove the bars.

(QTB-010-A) 10 Series Quarter-Turn, Drop In Stud – 1/4-20 – Nickel plated | TNUTZ

I also bought some extra bars from this site to complete the rack. If you do as well, make sure you get the milling for the screws on the ends.
 
I havent removed the fairing to look. I did not do the clear vinyl. My plan is to do the entire roof matte black if/when it becomes an issue.

Thanks, if you get a chance to look I would love to know. I have been reluctant simply because of this. I have been curious if things have gotten any better since I had my last full-length rack twenty years ago.

The wrap is a fantastic idea. I too had considered getting my whole roof done, it is just that black would not be so great living in the desert. LOL, I considered white, holy crap my truck would look pretty comical. Having the hood matte black is already a bit. BUT just having a clear strip laid down on the leading edge... :thumbs: thanks for the mini brainstorm :)
 
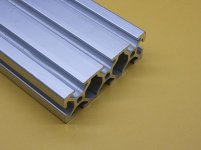
Those that want to buy more bars follow the link below and save some money.
(Bar length is 47" and elect tapping both ends)
EX-1030 – 1″ x 3″ Smooth T-Slotted Aluminum Extrusion – NEW | TNUTZ

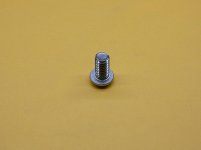
Dont forget to pickup some screws as well
(1/4-20, 3/4" long)
(STAINLESS) Button Head Socket Cap Screw | TNUTZ


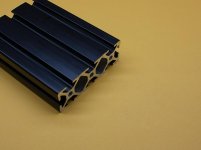
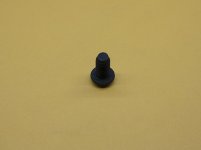
If you like the black look, here are the links for screws and bars
EX-1030-BLACK – 1″ x 3″ BLACK Smooth T-Slotted Aluminum Extrusion – NEW | TNUTZ

Black Button Head Socket Cap Screw | TNUTZ
 

Attachments

  • EX-1030.jpg
    EX-1030.jpg
    46.1 KB · Views: 846
  • EX-1030-BLACK.jpg
    EX-1030-BLACK.jpg
    36.1 KB · Views: 861
  • 5-16-18-BH-SS.jpg
    5-16-18-BH-SS.jpg
    26.4 KB · Views: 845
  • 5-16-18-BH.jpg
    5-16-18-BH.jpg
    24.3 KB · Views: 849
Since 2017 Black Friday?....zero leaks.

That's good -- although anecdotal. Having the bolt exposed is a clear entry point for water. Even if the water doesn't make its way into the roof, it can do damage to the bolt inside the threading.

I'd definitely recommend putting plumbers tape on the bolt and sealing the exposed portion of the bolts with silicone. I don't think it makes sense for anyone to infer that's a ridiculous suggestion.
 
That's good -- although anecdotal. Having the bolt exposed is a clear entry point for water. Even if the water doesn't make its way into the roof, it can do damage to the bolt inside the threading.

I'd definitely recommend putting plumbers tape on the bolt and sealing the exposed portion of the bolts with silicone. I don't think it makes sense for anyone to infer that's a ridiculous suggestion.

I filled the bolt hole with silicone as well and put it all over the bolt threads. My OEM rack bolts had orange silicone on them as well.
 
That's good -- although anecdotal. Having the bolt exposed is a clear entry point for water. Even if the water doesn't make its way into the roof, it can do damage to the bolt inside the threading.

I'd definitely recommend putting plumbers tape on the bolt and sealing the exposed portion of the bolts with silicone. I don't think it makes sense for anyone to infer that's a ridiculous suggestion.

No one “inferred” anything. I just stated, no leaks here since install. Period.
 

Members online

Forum statistics

Threads
278,317
Messages
3,554,128
Members
248,016
Latest member
Advally Service

Trending content

Back
Top