Stealth LED light bar install

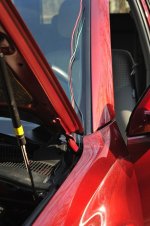
running the wires separately (if they come bundled) makes it easier to slip them under the window moulding.

along_the_window_channel.jpg

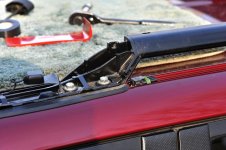
I ran the wires up and under the front foot of the roof rack and put a connector right behind the foot so I could remove the light bar if needed for service.

under_the_rack_foot.jpg

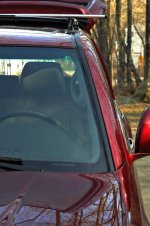
Running a single pass of black electrical over the edge of the window moulding pretty well hides the wires and prevents them from moving. You don't notice the tape from more than a few feet away.

taped_window_channel.jpg
 

Attachments

  • along_the_window_channel.jpg
    along_the_window_channel.jpg
    76.6 KB · Views: 5,501
  • under_the_rack_foot.jpg
    under_the_rack_foot.jpg
    81.4 KB · Views: 5,564
  • taped_window_channel.jpg
    taped_window_channel.jpg
    84.7 KB · Views: 2,046
How are everyone's mounts and light bars holding up? Being mounted so close to the roof, has anyone experienced any flex/impacts to the roof over harsh roads or bumps?

I really like this mounting method and I'm about to pull the trigger on one of these light bars since I do a lot of long distance driving in the winter darkness.
 
Mine has been perfect, no flexing, no touching the roof, etc. Have had multiple car washes, long distance trips etc and everything is great. The only thing I have noticed is the bars color is changing slightly to bronze-ish.
 
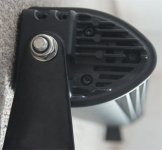
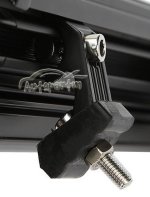
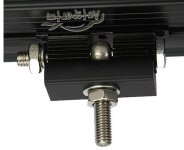
For this set-up, which would be the best mounting brackets (on the light bar) to use? I've seen 3 different styles of mounting brackets; there maybe more, but these are the common ones I've seen.
 

Attachments

  • Endcpas.jpg
    Endcpas.jpg
    26.4 KB · Views: 1,883
  • autopartm 120w.jpg
    autopartm 120w.jpg
    48.8 KB · Views: 1,879
  • autopartm 200w.jpg
    autopartm 200w.jpg
    57.5 KB · Views: 1,834
For this set-up, which would be the best mounting brackets (on the light bar) to use? I've seen 3 different styles of mounting brackets; there maybe more, but these are the common ones I've seen.

You will need to use Option B to mount the light bar as the OP has.
 
Mine has been perfect, no flexing, no touching the roof, etc. Have had multiple car washes, long distance trips etc and everything is great. The only thing I have noticed is the bars color is changing slightly to bronze-ish.

Awesome, thanks for the info. I've read lots of reports of the Chinese bars discoloring, sounds like their anodizing reacts to the heat generated by the leds.
 
I'm just thinking out loud here but that has to be a better way of running the wires from top to bottom other than peeling back the molding on the windshield. Anyone done it any different way with success?
 
I'm just thinking out loud here but that has to be a better way of running the wires from top to bottom other than peeling back the molding on the windshield. Anyone done it any different way with success?

Some drill the roof and seal with a rubber grommet but doing that with my truck would make me very nervous.....:fear:
 
My bar pulls 20A think 12G should be sufficient to run from the relay to the bar? [MENTION=77955]jdkilroy[/MENTION] that looks like 12-14?
 
Awesome, thanks for the info. I've read lots of reports of the Chinese bars discoloring, sounds like their anodizing reacts to the heat generated by the leds.

No worries. I highly doubt the discoloration has been caused by heat from the LED's, these things barely get hot. It started discoloring from just sitting in the sun, and moisture. This has only happened on the rear of the bar, which in my case with the roof basket, is impossible to see. The front part of the bar is still dark black.

Some drill the roof and seal with a rubber grommet but doing that with my truck would make me very nervous.....:fear:

I've seen some people do it too, but I just don't like the idea of hacking into the car like this. I think it is best to keep the mods to bolt-on stuff that doesn't compromise the integrity of the vehicle. Just my $0.02 however...to each his own.
 
My bar pulls 20A think 12G should be sufficient to run from the relay to the bar? [MENTION=77955]jdkilroy[/MENTION] that looks like 12-14?

[MENTION=55855]zopperman[/MENTION]: Pretty sure its 14 ga stranded. My rooftop bar is rated at about 85 watts so the load is only a little over 6 amps. Puts out ~ 7000 lumens.
 
[MENTION=55855]zopperman[/MENTION]: Pretty sure its 14 ga stranded. My rooftop bar is rated at about 85 watts so the load is only a little over 6 amps. Puts out ~ 7000 lumens.

I just used 10 and 12 all over. Wired it up today. Holy hell.
 
I just used 10 and 12 all over. ...

Hard to argue that bigger isn't better when it comes to electricity... I checked my wiring this AM and they are 12 ga and I would not want to use anything less.

The circuitry in the Baja Designs lights will protect the unit and the wiring if it senses an overload situation; I'm betting other makes have similar electronics to manage the light.
 
Pics!!!! I want to see the difference between single and dual row.

I'll take some output shots at night. This thing is a beast. The throw is a little wimpy, but it's so bright. I'll be mounting ditch style HIDs by the mirrors to get a little more throw type light. I'd say this bar is effective to about 1500 ft. The HIDs I'd suspect would be more in the 3500 range according to what I've read in TW. Keep in mind my bar is a 60/30 combo pattern it's basically a flood light though
 
[MENTION=98618]brandoc0mmand0[/MENTION] [MENTION=92884]snivilous[/MENTION]

bar


low beam (keep in mind, I have HIDs in projectors) ETA: highs were on in this pic too, but my highs are just halogen and they suck


bar alone


bar + low + high

 
Last edited:
[MENTION=98618]brandoc0mmand0[/MENTION] [MENTION=92884]snivilous[/MENTION]

bar


low beam (keep in mind, I have HIDs in projectors) ETA: highs were on in this pic too, but my highs are just halogen and they suck


bar alone


bar + low + high


I want to put these one but worried about the light that should shine in through sunroof
 
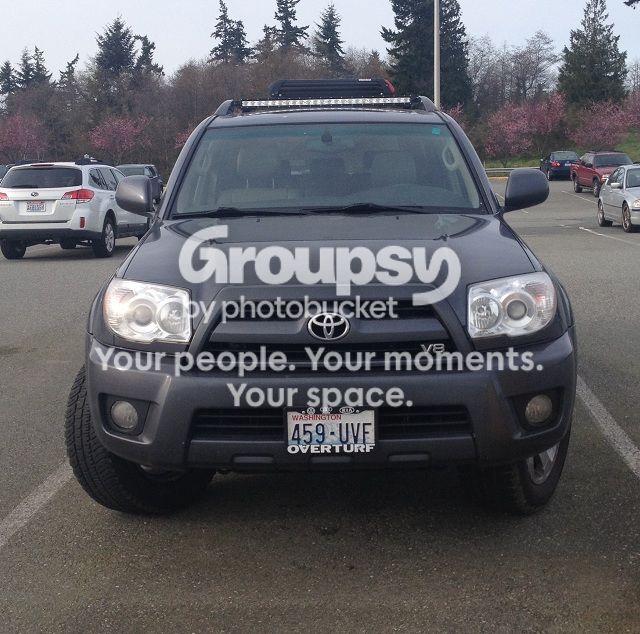
As requested, here are some more pictures of the light bar I installed on the stock roof rack of my 2006 Limited. The hardest part of the install wasn't actually the mounting of the bar, but routing the wires in a way that they remained hidden. I got my 40" bar from Exploration Outfitters, although there are a multitude of other Totron dealers online as well.

1IMG_0800_zps68aeca3a.jpg~original


Next to a buddy at work:

79ec6752-d4b1-4b5e-9b08-9adc8b676c5a_zps620831fb.jpg~original


Sunroof and ski rack are still fully fuctional:

66593044-ffa4-45ee-b254-7a80aadb31bc_zps10109cfc.jpg~original


Needed for the install:

40” Totron Single Row spot/flood combo light bar with wiring harness

C0FFD646-0D17-48E2-B861-ED74DDFA79EF-2178-000000D5ABE8AB3B_zpsb46e79c4.jpg~original

2 – 6” angle brackets from Home Depot

f50d4b79-48b1-4ff1-a7b7-e16bde4eddf7_zps5dfd5c11.jpg~original

4 – 1/4”–20 x 1/2” bolts (I used a security-style head, similar to the hardware you see on bathroom stalls)

2 - 1/4"-20 x 3/4" bolts

2 – 1/4"–20 Nylocks

4 – 1/4"–20 ‘draw bolt’ kits (you will only need the threaded plates from these assemblies)

549acd56-d63d-4371-9bae-230c44f2d8e3_zps6f786b12.jpg~original

Installation -

This picture pretty much says it all.

08F9C3AD-9783-4EFF-96A5-293FA81984CE-2178-000000C69B51D0C8_zps67df5b14.jpg~original

I loosely pre-assembled the brackets onto the bar on the ground, and then lifted everything into place. The threaded plates from the draw bolts are pretty trick – they will fit through the slot on your roof rack rail, and when you start to tighten them down, they will spin about 45 degrees and then lock in place against the upper and lower sides of the slot.

Depending on the bracket, you may have to change the hole locations to raise or lower the height of your bar. I have mine set at about 1/8” above the surface of the roof.

Wiring –

The first thing I did was to strip the plastic sleeve off of the wires leading to the bar from the relay. I hid the large wiring connector under the roof rack rail cap, then pulled back the windshield trim slightly and stuffed the two wires underneath. I then routed the wires though the hood hinge hole and mounted my relay to an existing bolt next to the fuse box.

632f93f4-711b-4ee9-b5e8-c557eadc99f9_zps1a337e65.jpg~original

Here was the tedious part –

You have to disassemble the connector between the supplied switch and relay in order to route the wires through the firewall the way I did. Using an optics screwdriver, I was able to pop the contacts out of the connector housing. I then cut off the little rubber nipple on the large firewall grommet and stuffed the wires through from the inside.

5905d11c-bc87-4678-8d78-84b2a201df4d_zps5715f598.jpg~original

Reassemble the plug, mount your switch, and you should be ready to rock and roll!

Total install was less than an hour. For comparison, here are some pics of the side of a building from about 50 feet away.

Low beams and fogs:

F5FDC22A-8789-40C2-B13C-87707B35C52E-2178-000000C6E7880053_zps412ac5a6.jpg~original


High beams and fogs:

03164186-5631-4948-BC8D-CE765055BAA0-2178-000000C6E468D878_zpsc0fddba3.jpg~original


High beams, fogs, and LED bar:

CE52FB15-4742-4EE7-BA40-E213AC18FB1D-2178-000000C6E1281F11_zps14f66aa3.jpg~original


LED only:

05ACD3BD-11EF-41F0-886B-BA2F725471D4-2178-000000C6DD7D5183_zps569f1db8.jpg~original

The iPhone is not very good for pictures like this...and I didn't pick the best setting either. This bar is much brighter than it appears, and 'throws' light much farther than the stock headlights. Next time around though, I'd probably go with the flood pattern only, because I don't really need the ability to see a mile down the road.

I would have preferred the 40" Rigid SR series for this install due to its reduced height and higher output...but alas, Grover Clevelands don't grow on trees.

How is the light when it shines into sunroof?
 

Members online

Forum statistics

Threads
278,310
Messages
3,554,080
Members
248,016
Latest member
Advally Service

Trending content

Back
Top