
You are using an out of date browser. It may not display this or other websites correctly.
You should upgrade or use an alternative browser.
You should upgrade or use an alternative browser.
Stripped Front Diff. Hex Drain Bolt
- Thread starter josh.bunch
- Start date


Drcoffee
Senior Member
I just rounded out my drain bolt on my front diff. Although not ideal I was able to use the pump for the quart bottle and put the longer hose on the inlet side. Then feed it deep into the diff thru the fill hole. I'm pretty sure I removed over a quart of oil and considering that it had probably never been done before, it's good enough for now. One thing I noticed was the oil that drained out seemed thinner than what it should be.

Benski
Member
Reviving this thread because my front differential 12mm drain bolt is stripped. The last time I changed all of my drive train fluids I couldn't get the front diff. drain bolt out and it got stripped. I tried again today, but I started with the fill bolt which came out without a problem. I felt inside, and the fluid was low, but the fluid on the bolt and on my finger looked good. I tried again with the drain bolt without any luck, so I just topped it off with fluid and I'm not going to sweat it. I won't have to worry about it for several years and I'll just use the pump and fill method next time.

cblock406
Member
Reviving this thread because my front differential 12mm drain bolt is stripped. The last time I changed all of my drive train fluids I couldn't get the front diff. drain bolt out and it got stripped. I tried again today, but I started with the fill bolt which came out without a problem. I felt inside, and the fluid was low, but the fluid on the bolt and on my finger looked good. I tried again with the drain bolt without any luck, so I just topped it off with fluid and I'm not going to sweat it. I won't have to worry about it for several years and I'll just use the pump and fill method next time.
Wow, I just stripped mine on Friday. My rear diff drain plug was WAY too tight too (gotta love PO's.) I vacuumed out as much fluid as I could through the fill plug and topped it off with fresh fluid. Saving this battle for another day.

diverscale
Member
I had mine seized too. Even hitting it with the impact, impact hex sockets and 150psi did nothing.
I welded a large nut on it, and it pretty much unscrewed like a new plug after the heat.
Buying a welder just for this will nearly pay for itself.
Also, the welded bolt will help for future removal with a much better leverage
I welded a large nut on it, and it pretty much unscrewed like a new plug after the heat.
Buying a welder just for this will nearly pay for itself.
Also, the welded bolt will help for future removal with a much better leverage
Last edited:
Knew I should have learned to weld. Did the same thing as you all. Rear, transfer front fill all went smoothly...then came the last one, front diff drain plug. I could tell somebody had already started on strip it. I banged a the 10 mm in and was able to get a lot of torque on it but finally started stripping it completely. So disappointed.
Only good part is the fluid still looked good so I guess I'll just leave it. Probably going to think about it every time I drive though Hate doing a half ass job.
Only good part is the fluid still looked good so I guess I'll just leave it. Probably going to think about it every time I drive though Hate doing a half ass job.

Snowden
New member
Front diff drain bolt hex head stripped
Good grief...my turn... on the plus side I started with the rear differential then the transfer case which, thankfully, both went well. Then came the front diff, and yup, as others have done, managed to round out the drain side hex head.
Let me first start by clarifying one point that is also very conflicting when doing a search. "What size is the front differential hex head for the fill and drain plug?" It turns out that in my 1998 SR5, the fill plug is a 10mm hex while the drain plug is a 12mm hex. So logical isn't it..... NO !!
Anyway with that piece of the puzzle out of the way I then proceeded with the front diff. Started with the top as is recommended and fortunately that one came lose. But no way on the drain plug. I had presoaked it in PB Blaster and used a breaker bar but nothing going. I wished I'd tried heat but I had thought that with the fill side coming lose I wouldn't have an issue with the bottom one. So I now join the ranks of trying to figure out my next move to getting it off. Since I do not weld I don't see the 'welding a nut to the head' as an easy option for me.
In the meantime today, I tried getting a small diameter hose in the fill side to use a hand pump to suck out the old oil but the gears inside the diff wouldn't let the hose past and down to the bottom. So for now my front differential oil is not changed. Crap.
What is it about this one bottom nut that seems to always get too tight does anyone have any idea..? I had Toyota change it the last time, is it possible Toyota just has the wrong torque spec for this nut and way overtightens it I wonder? Is there some intense heat in the differential that causes the bottom bolt thread to fuse to the case?
:wtf: .
Good grief...my turn... on the plus side I started with the rear differential then the transfer case which, thankfully, both went well. Then came the front diff, and yup, as others have done, managed to round out the drain side hex head.
Let me first start by clarifying one point that is also very conflicting when doing a search. "What size is the front differential hex head for the fill and drain plug?" It turns out that in my 1998 SR5, the fill plug is a 10mm hex while the drain plug is a 12mm hex. So logical isn't it..... NO !!
Anyway with that piece of the puzzle out of the way I then proceeded with the front diff. Started with the top as is recommended and fortunately that one came lose. But no way on the drain plug. I had presoaked it in PB Blaster and used a breaker bar but nothing going. I wished I'd tried heat but I had thought that with the fill side coming lose I wouldn't have an issue with the bottom one. So I now join the ranks of trying to figure out my next move to getting it off. Since I do not weld I don't see the 'welding a nut to the head' as an easy option for me.
In the meantime today, I tried getting a small diameter hose in the fill side to use a hand pump to suck out the old oil but the gears inside the diff wouldn't let the hose past and down to the bottom. So for now my front differential oil is not changed. Crap.
What is it about this one bottom nut that seems to always get too tight does anyone have any idea..? I had Toyota change it the last time, is it possible Toyota just has the wrong torque spec for this nut and way overtightens it I wonder? Is there some intense heat in the differential that causes the bottom bolt thread to fuse to the case?
:wtf: .

TheDurk
Elite Member
Good grief...my turn... on the plus side I started with the rear differential then the transfer case which, thankfully, both went well. Then came the front diff, and yup, as others have done, managed to round out the drain side hex head.
Let me first start by clarifying one point that is also very conflicting when doing a search. "What size is the front differential hex head for the fill and drain plug?" It turns out that in my 1998 SR5, the fill plug is a 10mm hex while the drain plug is a 12mm hex. So logical isn't it..... NO !!
Anyway with that piece of the puzzle out of the way I then proceeded with the front diff. Started with the top as is recommended and fortunately that one came lose. But no way on the drain plug. I had presoaked it in PB Blaster and used a breaker bar but nothing going. I wished I'd tried heat but I had thought that with the fill side coming lose I wouldn't have an issue with the bottom one. So I now join the ranks of trying to figure out my next move to getting it off. Since I do not weld I don't see the 'welding a nut to the head' as an easy option for me.
In the meantime today, I tried getting a small diameter hose in the fill side to use a hand pump to suck out the old oil but the gears inside the diff wouldn't let the hose past and down to the bottom. So for now my front differential oil is not changed. Crap.
What is it about this one bottom nut that seems to always get too tight does anyone have any idea..? I had Toyota change it the last time, is it possible Toyota just has the wrong torque spec for this nut and way overtightens it I wonder? Is there some intense heat in the differential that causes the bottom bolt thread to fuse to the case?
:wtf: .
It's not the threads, it's the flange ring and the compression washer that fuse to the diff case. The road salt gets in there and it locks up. Anyway, that was my theory after struggling to get mine out several years ago. Since then, I have slathered that compression washer, the outside of the diff, and that flange ring on the plug with anti-seize. The threads I don't worry about as they get fluid on them. I have always gotten mine out with no issue once I started doing this. 19 years and still the factory hex plugs.
Last edited:

96RedRunner
Senior Member
Good grief...my turn...:wtf: .
Come ooon man, is'nt that my we tinker on our toyota's!
All part of it, hammer n cold chisel St Runner mentioned works good,
Never seize The Durk mentioned your good forever.

mtbtim
Elite Member
Good grief...my turn... on the plus side I started with the rear differential then the transfer case which, thankfully, both went well. Then came the front diff, and yup, as others have done, managed to round out the drain side hex head.
Let me first start by clarifying one point that is also very conflicting when doing a search. "What size is the front differential hex head for the fill and drain plug?" It turns out that in my 1998 SR5, the fill plug is a 10mm hex while the drain plug is a 12mm hex. So logical isn't it..... NO !!
Anyway with that piece of the puzzle out of the way I then proceeded with the front diff. Started with the top as is recommended and fortunately that one came lose. But no way on the drain plug. I had presoaked it in PB Blaster and used a breaker bar but nothing going. I wished I'd tried heat but I had thought that with the fill side coming lose I wouldn't have an issue with the bottom one. So I now join the ranks of trying to figure out my next move to getting it off. Since I do not weld I don't see the 'welding a nut to the head' as an easy option for me.
In the meantime today, I tried getting a small diameter hose in the fill side to use a hand pump to suck out the old oil but the gears inside the diff wouldn't let the hose past and down to the bottom. So for now my front differential oil is not changed. Crap.
What is it about this one bottom nut that seems to always get too tight does anyone have any idea..? I had Toyota change it the last time, is it possible Toyota just has the wrong torque spec for this nut and way overtightens it I wonder? Is there some intense heat in the differential that causes the bottom bolt thread to fuse to the case?
:wtf: .
Hey Ash, the same damn thing happened to me on my 2000. I wasn't sure how to get it out so I brought it to Toyota. After paying them $150, they had it out. How did they do it? A hammer and chisel just like [MENTION=124742]St Runner[/MENTION] and [MENTION=142122]96RedRunner[/MENTION] have both said. I was thinking about trying this method but chickened out thinking I'd screw something up.
On Sean's rig, I was sure the plug was going to strip. I was using my longest pry bar and I was literally standing on it with all my weight while Sean was underneath pushing on the head of the pry bar so it wouldn't slip out of the plug. The damn thing actually broke free. Since then, I've broken them free on several different rigs including my 98 with 100% success. I don't know if this is luck or what.
Ash, if you want, I could help you out Wednesday or Thursday this week. Maybe we could shoot a video of the hammer and chisel technique. Let me know.
Ron Burgandy
New member
Take a dremel and square out the hole until you can get a 1/2" socket wrench in it. Weld a nut on if you can't get it that way.

Sent from my iPad using Tapatalk Pro
Sent from my iPad using Tapatalk Pro
Last edited:
Snowden
New member
What measures do you take to avoid the chisel slipping and damaging the differential...? I am tempted to take the 12mm socket and ask a muffler shop to weld that into the drain plug. That's got to be a lot cheaper than the $150 Toyota charged Tim [MENTION=120071]mtbtim[/MENTION].
Tim I'll check my schedule when I'm back at work tomorrow and see if Wednesday or Thursday is a possibility for me to take the day off, that's a kind offer thanks. If I can and if we go the chisel route I'll need to purchase one is there a specific size or brand that is recommended for the task?
@Ron Burgundy What dremmel bit did you use to get those cuts that's pretty dead nuts on I have to say!! How did you manage to square that out so well in such a small hole..?
Tim I'll check my schedule when I'm back at work tomorrow and see if Wednesday or Thursday is a possibility for me to take the day off, that's a kind offer thanks. If I can and if we go the chisel route I'll need to purchase one is there a specific size or brand that is recommended for the task?
@Ron Burgundy What dremmel bit did you use to get those cuts that's pretty dead nuts on I have to say!! How did you manage to square that out so well in such a small hole..?
A hammer and cold chisel is old school and brutal but when you are left with no options it is very effective. Start a notch on the edge of the plug and hammer in a counterclockwise direction. Cursing helps lubricate the threads for easy removal
Last edited:
Ron Burgandy
New member
@Ron Burgundy What dremmel bit did you use to get those cuts that's pretty dead nuts on I have to say!! How did you manage to square that out so well in such a small hole..?
believe it was a cylinder looking deburring tool. it was actually pretty easy
Sent from my iPhone using Tapatalk

St Runner
Member
The drain and fill plugs sit proud a few mm, thats enough to get a chisel on it. You will need a larger cold chisel because you really need to pound on it while holding it in your hand but you don't need a huge one like a brick chisel. Make sure it has a good edge on it and put a notch in the edge of the plug hitting it towards the middle of the plug. Then you can rotate the chisel so you are hitting it in the direction it needs to turn (counterclockwise). As long as you are always hitting it from right to left of the 4runner and not from the front to the back you won't damage the case. Just give a look after every couple of whacks to check. There is nothing quite like pounding away under your vehicles while cursing loudly to truly impress your neighbors

theesotericone
New member
Good grief...my turn... :wtf: .
Yep. There a PIA.
Here's what I ended up doing to get mine out.
http://www.toyota-4runner.org/2970970-post323.html

thenightman
New member
If for some reason you, [MENTION=120071]mtbtim[/MENTION] and [MENTION=102606]infamousRNR[/MENTION] can't chisel it out, I can weld an m12 in the stripped out hole for you. I welded an m10 in mine, and it did the trick. Having a diff drop would make it even easier. I have a lot of confidence in those guys though
Snowden
New member
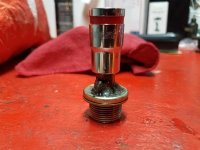
So after deliberating, the direction we ended up going in was to weld the 12mm hex into the drain plug. I was reluctant to want to pound on a chisel trying to slowly turn it counterclockwise for fear it would slip off and mar the diff housing. With the hex socket tack welded in place the drain plug easily loosened with barley much effort at that point. Probably the heat did help some with that as well but I'm sure with the socket firmly secured made most of the difference.
Tim [MENTION=120071]mtbtim[/MENTION] met up with me down at his buddy Wes' shop in Morgan Hill, One Off Customs, and Wes welded the hex socket into the dp. Tim wanted to do a video so he'll have that available on his YT Channel Timmy The Toolman. Tim did a great job of narrating and providing instructional ideas for a various solutions so I'll let his video be the guide rather than me typing a whole lot of 'you could do's' here.
Also, when I bought the replacement drain plug from Toyota (PN# 90341-24014) the replacement DP is now a 10mm hex, to match the fill plug. So next time around I now only need one 10mm hex socket. Great.
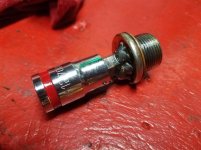
Tim [MENTION=120071]mtbtim[/MENTION] met up with me down at his buddy Wes' shop in Morgan Hill, One Off Customs, and Wes welded the hex socket into the dp. Tim wanted to do a video so he'll have that available on his YT Channel Timmy The Toolman. Tim did a great job of narrating and providing instructional ideas for a various solutions so I'll let his video be the guide rather than me typing a whole lot of 'you could do's' here.
Also, when I bought the replacement drain plug from Toyota (PN# 90341-24014) the replacement DP is now a 10mm hex, to match the fill plug. So next time around I now only need one 10mm hex socket. Great.
Attachments

Last edited:


