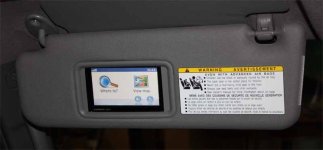
Just wanted to share how I integrated my Garmin 265 unit in my 4runner's sunvisor. I don't use my nav that much, but I wanted it to be integrated and accessible when I needed it, out of the way when I didn't. The sunvisor's on the 4gen 4runners are pretty thick, so I thought it would be a great place to stick the GPS. Now I punch in my nav and flip the visor up to listen to turn-by-turn directions, dropping it down if I need to see the map or make any adjustments.
Here are pics of the final result.
There are bazillion ways to do this mod, but here are some tips based on my experience and the general steps if you do it yourself. There are two tricky parts to this mod: (1) getting the wires to run through the post and to power the GPS and (2) modifying the USB connector to lay flush on the back of the garmin unit. ** Usual Disclaimer--proceed at your own risk. This is destructive mod--you obviously can't restore your visor once you start cutting on it, and I take no responsibility if you mess up your car, your gps or yourself **
(1) The USB connector combined with the thickness of my Garmin (265WT) is too thick for the visor, so I set out modifying a mini-USB connector to lay flush against the back of the unit. (Note: The newer garmins like the 1300 are significantly thinner than the previous version; you may be able to just get a right angle adapter and not have to mess with this step. Some other GPS units already have a more flush-type connector or use a side-mounted adapter.) For my unit, I stripped all the plastic cladding from a spare mini-USB connector, pulled the connector out, and used a file to modify the metal jacket on the end so that it could be bent at a 90-degree angle. I then insert the connector back into the jack and bent it at 90-degrees so it lays flat against the GPS and only adds a few millimeters. Took me 2 tries to get it right, but the mini-USBs are cheap and I had lots of spares around (from old phones, USB peripherals, etc.). You will need only the red and black for power--I didn't use the FM antennae built into the power cord for traffic on my GPS.
(2) Use the 4runner sunvisor that has NON-lighted mirrors. (The lighted visor uses a long visor post with built in wiring, but the wiring it is extremely difficult to access--I know I trashed my original visor and ended up getting a non-lighted one from ebay to do this mod. In addition the visor light is connected to the always-on 12-volt power, which is in turn connected to a contact switch *and* an position switch which cuts power to the light depending on visor position and the position of the mirror door. The visor post is encased in a closed aluminum track inside the visor as well.) On the non lighted visor, the visor post ends roughly where the middle of the mirror is, so you can run wires and access them much more easily.
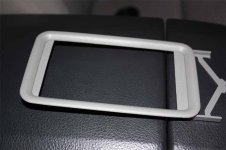
(3) Start by removing the mirror by gently prying up the end closest to the post. Once it snaps free you can slide the entire mirror assembly out and disassemble it. As seen in the picture, I trimmed/modified the bezel and used it as the bezel for the GPS.
(4) Obtain a flush-mount bracket to hold the GPS. The used the one that come with the unit and used an Xacto saw to cut off the ball-mount, but I'm pretty sure you can buy a flush mount from an aftermarket source. Test fit the bracket into the cavity left by the mirror. This will give you an idea where you'll need to cut the visor plastic to allow room for the mounting bracket. Ultimately, you'll glue the bracket into the visor to hold the GPS.
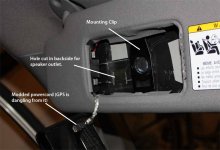
(5) You will have to cut a hole in the black plastic inside the visor near the top of the cavity to access the end of the visor post. Proceed carefully and slowly with this, make the hole only as large as you need The end of the visor post has a plastic cap on it. Use a narrow long shank screwdriver to pop the end cap off. No you can route the wires into the visor.
(5) Cut and trim the plastic in the visor to hold your bracket, then glue the bracket in place. You may need to shim the bracket depending on how deeply it sits in the cavity and how thick your GPS unit is.
(6) Modify the mirror bezel (or make one from scratch) to give it a finished appearance. I had to trim plastic from mine and add some spacers to each side (left and right, as shown). The nice part is it matched the visor color and snaps into place using the existing table.
(7) I bought a hardwire kit from overstock.com for $13.00 to convert 12-volt to the 5-volts required to power the GPS. Ran the wires up the A-piller, behind the headliner and through the post. Now wire everything up to the nav's USB connector, noting which connector on the mini-USB should be read or black.
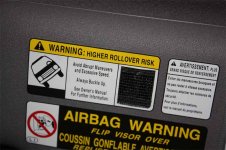
(8) Once you've use the bracket as a template to position the gps, you may want to cut hole through to the other side of the visor so you can hear the speaker better. Suggestion: **This should be the last thing you do in this mod--you may be perfectly satisfied with the speaker volume without cutting a hole in the back side of the visor. I ended up cutting a hole, but I'm not sure it made a huge difference. I covered the hole with some fiberglass screening and carefully glued the vinyl down around the edges, as shown).
Hope you like it, and that it inspires your own mod.
Here are pics of the final result.
There are bazillion ways to do this mod, but here are some tips based on my experience and the general steps if you do it yourself. There are two tricky parts to this mod: (1) getting the wires to run through the post and to power the GPS and (2) modifying the USB connector to lay flush on the back of the garmin unit. ** Usual Disclaimer--proceed at your own risk. This is destructive mod--you obviously can't restore your visor once you start cutting on it, and I take no responsibility if you mess up your car, your gps or yourself **
(1) The USB connector combined with the thickness of my Garmin (265WT) is too thick for the visor, so I set out modifying a mini-USB connector to lay flush against the back of the unit. (Note: The newer garmins like the 1300 are significantly thinner than the previous version; you may be able to just get a right angle adapter and not have to mess with this step. Some other GPS units already have a more flush-type connector or use a side-mounted adapter.) For my unit, I stripped all the plastic cladding from a spare mini-USB connector, pulled the connector out, and used a file to modify the metal jacket on the end so that it could be bent at a 90-degree angle. I then insert the connector back into the jack and bent it at 90-degrees so it lays flat against the GPS and only adds a few millimeters. Took me 2 tries to get it right, but the mini-USBs are cheap and I had lots of spares around (from old phones, USB peripherals, etc.). You will need only the red and black for power--I didn't use the FM antennae built into the power cord for traffic on my GPS.
(2) Use the 4runner sunvisor that has NON-lighted mirrors. (The lighted visor uses a long visor post with built in wiring, but the wiring it is extremely difficult to access--I know I trashed my original visor and ended up getting a non-lighted one from ebay to do this mod. In addition the visor light is connected to the always-on 12-volt power, which is in turn connected to a contact switch *and* an position switch which cuts power to the light depending on visor position and the position of the mirror door. The visor post is encased in a closed aluminum track inside the visor as well.) On the non lighted visor, the visor post ends roughly where the middle of the mirror is, so you can run wires and access them much more easily.
(3) Start by removing the mirror by gently prying up the end closest to the post. Once it snaps free you can slide the entire mirror assembly out and disassemble it. As seen in the picture, I trimmed/modified the bezel and used it as the bezel for the GPS.
(4) Obtain a flush-mount bracket to hold the GPS. The used the one that come with the unit and used an Xacto saw to cut off the ball-mount, but I'm pretty sure you can buy a flush mount from an aftermarket source. Test fit the bracket into the cavity left by the mirror. This will give you an idea where you'll need to cut the visor plastic to allow room for the mounting bracket. Ultimately, you'll glue the bracket into the visor to hold the GPS.
(5) You will have to cut a hole in the black plastic inside the visor near the top of the cavity to access the end of the visor post. Proceed carefully and slowly with this, make the hole only as large as you need The end of the visor post has a plastic cap on it. Use a narrow long shank screwdriver to pop the end cap off. No you can route the wires into the visor.
(5) Cut and trim the plastic in the visor to hold your bracket, then glue the bracket in place. You may need to shim the bracket depending on how deeply it sits in the cavity and how thick your GPS unit is.
(6) Modify the mirror bezel (or make one from scratch) to give it a finished appearance. I had to trim plastic from mine and add some spacers to each side (left and right, as shown). The nice part is it matched the visor color and snaps into place using the existing table.
(7) I bought a hardwire kit from overstock.com for $13.00 to convert 12-volt to the 5-volts required to power the GPS. Ran the wires up the A-piller, behind the headliner and through the post. Now wire everything up to the nav's USB connector, noting which connector on the mini-USB should be read or black.
(8) Once you've use the bracket as a template to position the gps, you may want to cut hole through to the other side of the visor so you can hear the speaker better. Suggestion: **This should be the last thing you do in this mod--you may be perfectly satisfied with the speaker volume without cutting a hole in the back side of the visor. I ended up cutting a hole, but I'm not sure it made a huge difference. I covered the hole with some fiberglass screening and carefully glued the vinyl down around the edges, as shown).
Hope you like it, and that it inspires your own mod.