
Tell us about your aftermarket front bumper installation.

Clearly there's a problem with my Addicted bumper bracket! I'm out of town for next three 3 weeks. It'll be there when I get back!

Looking back at the pics you posted of the pinch bolt holes not lining up, mine did that at first, too. I hadn't ground the welds from the stock end caps down quite flush with the frame. I'm talking 1/16" or so little bit of old weld goober here and there but the bracket is such a snug fit it put it way off. Once I fixed that, the bolts were still a bit of a fight to get through but nothing a couple of mallet taps didn't fix. A little more work to get in but I'd rather that than it be super loose and "shift" around under winching, contact with rocks ect. Good Luck when you get back at it!
 
Looking back at the pics you posted of the pinch bolt holes not lining up, mine did that at first, too. I hadn't ground the welds from the stock end caps down quite flush with the frame. I'm talking 1/16" or so little bit of old weld goober here and there but the bracket is such a snug fit it put it way off. Once I fixed that, the bolts were still a bit of a fight to get through but nothing a couple of mallet taps didn't fix. A little more work to get in but I'd rather that than it be super loose and "shift" around under winching, contact with rocks ect. Good Luck when you get back at it!


I hadn't done that at first, and made the correction after my first test fit to the frame. Where the problem lies is with the spacing between the elongated holes on the bottom of the bracket in relation to holes on the top of the bracket (the holes I took the photo of). If I cut/grind the frame back to the point of lining up the holes on top of the frame with the bolt holes on top of the bracket, the elongated holes in the bottom of the bracket will no longer line up with weld nuts on the bottom of the frame. And it's a lot more than 1/16th of an inch!

I appreciate that feedback. I just wish that was the solution! I don't want all of the holes elongated in order to make it fit, either. That leaves the potential for the entire bracket/bumper assembly to shift under load (unless the bracket is welded to the frame, which Addicted recommends). I'll make an update when I get it straightened out [emoji1303]
 
My CBI hybrid was a pain to install. To matter how I tweaked things, I could only get half the bolts to line up at most. Ended up having to take a die grinder to 5 or 6 holes to get the bolts to line up. Wasn't happy.

It looks good, but if I had to do it over again, I'd probably have somebody local fab one up to look similar to what I have. Same goes for my DIY rear bumper project.
 
I bought & installed the Shrockworks with no problems. I ordered the single center hoop because it's angled away from the vehicle & I like the way it looks better than the 3 hoops. I also read in my research here that people were having problems accessing their hood latch with the 3 hoop version.

I ordered mine unfinished & made sure it fit perfect before I painted it.
It did take some grinding & sanding to get it to slide between the brackets but my angle grinder made it a quick fix. I left the fit tight because i didn't want it to move when winching. After I painted it & let it cure, I rubbed some axle grease on the flanges & bumper so it would slide right in without scratching the new paint.

I did most of the work by myself with the help of a floor jack & some wood. I did ask my GF to lend a hand a few times because this bumper is heavy & if it moves the wrong way you can scratch your fenders with the ends of the bumper.
 
The Shrockworks front bumper is one stout piece of metal. Installation is definitely is not a one man job unless you are a fan of pulleys, leavers, and good old Roman engineering. My installation was a bit of a handful.

We cut off the frame flanges, welded in the new endcaps, had to do a bit of grinding to get the frame mounts to seat flush with the frame. But when it came time to mounting the bumper to the frame, it was a no go. The mounting brackets did not have enough room to allow the bumper to sit between the two guide rails. We used various devices to try to spread the mounting bracketso enough to mount the bumper. We finally got it sorted, but it was not easy. Now I am kinda wishing that I went with the Pre Runner center only guard tube. The Pre Runner tube is angled enough away so as to let you work on the front without taking the FB off, which seems like a huge PITA.

I might look at switching my FB out for another option that is not as formal fitting.

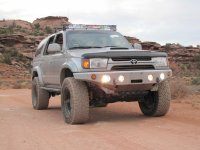
If I were you I'd just cut the hoops off. The bumper will still be bad ass. I almost ordered mine without the hoop to copy [MENTION=57546]4-Ripcord[/MENTION]s old truck.
 

Attachments

  • 4ripcord.jpg
    4ripcord.jpg
    58.7 KB · Views: 1,609
Last edited:
If I were you I'd just cut the hoops off. The bumper will still be bad ass. I almost ordered mine without the hoop to copy [MENTION=57546]4-Ripcord[/MENTION]s old truck.

Yeah, I was thinking about that. But I didn't want to start hacking this awesome bumper up. I like the Pre Runner style center tube facing out. And you are right, even the no tubes looks pretty bad ass. If things don't work out, I will have some options.

I do like the idea of the AOR weighing less overall though. It's got to make for an easier one man job sort of thing. The Shrockworks is one heavy sob. One thing that I DO really like about the Shrockworks is the recovery points. I often have to park in the city and those recovery points make for EXCELLENT first points of contact for other vehicles backing into your vehicle. A sort of vehicle defense, much in the same way rock sliders offer. No one has hit me yet, but I imagine that it would not go well for someone's plastic bumper.
 
Thanks for the writeup, I have been looking for a new bumper to replace my bent up one from the PO. What you have looks great on your 4r
 
Yeah, I was thinking about that. But I didn't want to start hacking this awesome bumper up. I like the Pre Runner style center tube facing out. And you are right, even the no tubes looks pretty bad ass. If things don't work out, I will have some options.

I do like the idea of the AOR weighing less overall though. It's got to make for an easier one man job sort of thing. The Shrockworks is one heavy sob. One thing that I DO really like about the Shrockworks is the recovery points. I often have to park in the city and those recovery points make for EXCELLENT first points of contact for other vehicles backing into your vehicle. A sort of vehicle defense, much in the same way rock sliders offer. No one has hit me yet, but I imagine that it would not go well for someone's plastic bumper.

What are you going to do about the end plates you welded to the frame?

An angle grinder with a cutting disk will cut the hoops off & an 80 grit sanding disk will smooth out the top. The AOR is a nice looking bumper though. Good luck with what ever route you go.
 

Members online

Forum statistics

Threads
278,316
Messages
3,554,124
Members
248,016
Latest member
Advally Service

Trending content

Back
Top