
You are using an out of date browser. It may not display this or other websites correctly.
You should upgrade or use an alternative browser.
You should upgrade or use an alternative browser.
The Idiot Thread
- Thread starter Friggin Idiot
- Start date


Friggin Idiot
Senior Member
Sweet progress and build thread man! Overall how satisfied are you with the Cooper AT3? I am considering them in p285/70r17 since they are the lightest tire in that dimension.
Actually I've been very happy with them. They've been wearing slowly, but I've been using the truck off-road a lot more than I ever did with the KO2s. There's still a ton of tread left, and lots of good grip. On that TN trail I had my first experience driving over loose rock and was pretty impressed. I was going to do a 20kmi review on them, but honestly everything I was going to say has already been said in the AT Tire Thread. You can't go wrong with proven performance!
Friggin Idiot
Senior Member
05Jun2018 73,698mi
For the past week or so I've been fighting the URD Mk3 exhaust to keep it contained, literally. The band clamp on the connection at the front of the muffler just doesn't seem to put enough pressure on the connection. Hence there's an exhaust leak, and after on big bump the pipe even bounced out of the muffler and jammed on the end of if misaligned and very loud.
After fiddling with it repeatedly I think I found the culprit.... me!
I'm pretty sure that I cut the mid-pipe a little too short. Because of the weight of the muffler and shortness of the mid-pipe it tends to bow down at this junction, and the band clamp there isn't up to the job.
With my one day off this week I decided to attack the problem with a different style of clamp, the style that overlaps both sides of a slip/lap joint. Unfortunately nobody locally had a stainless version in stock, so I just grabbed the cheap galvanized one for now and ordered a couple of the stainless ones to put on later (why not do the rear as well?).
After install it certainly seems more secure, and is no longer sagging down. I didn't have time for a test drive before heading out for the evening, but made sure to hit plenty of potholes and speedbumps at higher than normal speed to test it. The noise level is down, actually the quietest it's ever been since Mk3 install. Which leads me to believe that the clamp was never fully holding the muffler to the mid-pipe as designed. But knowing that this solves the problem is reassuring, I'll be happier once I have the stainless clamps installed.
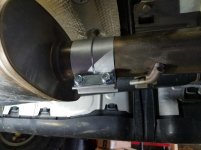
For the past week or so I've been fighting the URD Mk3 exhaust to keep it contained, literally. The band clamp on the connection at the front of the muffler just doesn't seem to put enough pressure on the connection. Hence there's an exhaust leak, and after on big bump the pipe even bounced out of the muffler and jammed on the end of if misaligned and very loud.
After fiddling with it repeatedly I think I found the culprit.... me!
The muffler (Magnaflow) was pretty hefty and required helping hands. Since it has no hangers of its own it's supported by the tailpipe and the mid-pipe. I don't know if it was intentional by design or accidental but my mid-pipe was a little too long. A little time with the angle grinder and it was the appropriate length.
I'm pretty sure that I cut the mid-pipe a little too short. Because of the weight of the muffler and shortness of the mid-pipe it tends to bow down at this junction, and the band clamp there isn't up to the job.
With my one day off this week I decided to attack the problem with a different style of clamp, the style that overlaps both sides of a slip/lap joint. Unfortunately nobody locally had a stainless version in stock, so I just grabbed the cheap galvanized one for now and ordered a couple of the stainless ones to put on later (why not do the rear as well?).
After install it certainly seems more secure, and is no longer sagging down. I didn't have time for a test drive before heading out for the evening, but made sure to hit plenty of potholes and speedbumps at higher than normal speed to test it. The noise level is down, actually the quietest it's ever been since Mk3 install. Which leads me to believe that the clamp was never fully holding the muffler to the mid-pipe as designed. But knowing that this solves the problem is reassuring, I'll be happier once I have the stainless clamps installed.
Attachments

Last edited:

Friggin Idiot
Senior Member
11Jun2018
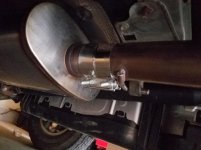
The galvanized clamp worked at sealing the leak, and the stainless long term solutions arrived. Upon further inspection there was a leak after the muffler as well, so it's a good thing I ordered two of them. Unfortunately changing out the clamp behind the muffler means dropping the mid-pipe and muffler. Disassembly is the easy part.
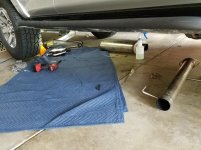
Reattaching everything alone is a daunting task. It's not exactly easy to hold the unsupported weight of the muffler up while aligning it with the tailpipe. To complicate matters the slip fit of the muffler had been compressed by the previous clamps so it no longer just slipped into place, on either end. I ended up fitting the mid-pipe to the muffler, leaving the clamp loose, using a jack to hold up the muffler enough to slip the mid-pipe back into the rubber hangers, then fit the muffler back to the tailpipe. After that it was just tightening up the clamps on both sides of the muffler and then reattaching the mid-pipe to the y-pipe. In the end I got it, but I've not tested it yet.
On initial install we had connected the mid-pipe to the muffler last, which I think may also play a part in why we had some flex there. Having installed this exhaust a second time, I believe the last connection that should be tightened should be the mid-pipe to y-pipe connection, which is a designed flex point.
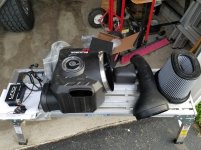
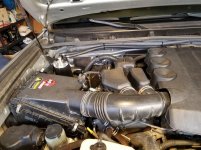
In preparation for the URD/Whipple Supercharger I had to remove some mods, namely the URD MAF calibrator and aFe MomentumGT CAI. Removal was about as easy as installation, with the exception that the band clamps on the CAI seized about halfway out, making them barely loose enough to remove from the truck. I've pinged aFe about replacement bands. When reinstalling the stock intake I wiped off most of the mud, removed the hydrocarbon filter, and added an aFe Magnum Flow ProDry-S filter. I've left the battery disconnected overnight to reset the ECU after removing the MAF calibrator. Since I was removing HP with the CAI, I felt obliged to add it back with stickers!
The galvanized clamp worked at sealing the leak, and the stainless long term solutions arrived. Upon further inspection there was a leak after the muffler as well, so it's a good thing I ordered two of them. Unfortunately changing out the clamp behind the muffler means dropping the mid-pipe and muffler. Disassembly is the easy part.
Reattaching everything alone is a daunting task. It's not exactly easy to hold the unsupported weight of the muffler up while aligning it with the tailpipe. To complicate matters the slip fit of the muffler had been compressed by the previous clamps so it no longer just slipped into place, on either end. I ended up fitting the mid-pipe to the muffler, leaving the clamp loose, using a jack to hold up the muffler enough to slip the mid-pipe back into the rubber hangers, then fit the muffler back to the tailpipe. After that it was just tightening up the clamps on both sides of the muffler and then reattaching the mid-pipe to the y-pipe. In the end I got it, but I've not tested it yet.
On initial install we had connected the mid-pipe to the muffler last, which I think may also play a part in why we had some flex there. Having installed this exhaust a second time, I believe the last connection that should be tightened should be the mid-pipe to y-pipe connection, which is a designed flex point.
In preparation for the URD/Whipple Supercharger I had to remove some mods, namely the URD MAF calibrator and aFe MomentumGT CAI. Removal was about as easy as installation, with the exception that the band clamps on the CAI seized about halfway out, making them barely loose enough to remove from the truck. I've pinged aFe about replacement bands. When reinstalling the stock intake I wiped off most of the mud, removed the hydrocarbon filter, and added an aFe Magnum Flow ProDry-S filter. I've left the battery disconnected overnight to reset the ECU after removing the MAF calibrator. Since I was removing HP with the CAI, I felt obliged to add it back with stickers!
Attachments




Last edited:

007Tacoma
New member
In preparation for the URD/Whipple Supercharger I had to remove some mods, namely the URD MAF calibrator and aFe MomentumGT CAI.
What did you think of the difference between this setup and stock?

delgadtn
New member
8Nov17 66,986 mi
In my install of my SSO bumper I removed the baffles for the A/C condenser since I had forgotten to cut them to fit with the bumper. In my excitement about the bumper and fatigue from doing the install I left them somewhere.... somewhere they got tossed into the recycling. Since doing so I've noticed a couple things:
A) This summer my A/C didn't seem as cool as it had been
B) I'm getting progressively more tire rub while reversing with more than 3/4 of a turn of the wheel
In the SSO [MENTION=110183]SouthernSS[/MENTION] instructions online version 2.3 it appears that they say to simply remove the baffles. It appears that you followed the instructions but had problems down the road as above and that you fixed those problems by adding back modified baffles? Thanks for this. I have one on order and don’t want to run in to problems down the road.
Sent from my iPhone using Tapatalk Pro
Friggin Idiot
Senior Member
What did you think of the difference between this setup and stock?
Honestly I really liked it better. If I didn't order the SC I would have been very happy to keep the aFe & MAF calibrator. The intake had a nice sound to it, lower pitched and more throaty than stock. The butt dyno said it had more power. With calibrator installed I saw MPG go up 1.5-2mpg as well as another small power increase. More air in, more air out principle so it was a nice pairing with the Y-pipe & Mk3 exhaust.
Overall I was very happy with the truck in this configuration, until I was at 80F, 2000FT up, climbing a three quarter mile 8% grade. It was certainly better than stock even there, but it still left me wondering about how it would fair dragging the 3000lbs of boat I didn't bring on my trip in May. I think it would have done it fine, especially for how little I drive that route with the boat.
However, I saw URD's Whipple supercharger and became interested. My intention was to follow the threads and see the others who did it, along with see what input [MENTION=106176]wfo9[/MENTION] had for that design. But looking at a schedule of 6-day work weeks every single week between my vacation in May and the vacation in October, I figured, "Got to have something to spend that overtime money on right!?" I've never had a super- or turbo- charged vehicle, and already love my modded 4Runner, just want it to have more power, so why not add one? In retrospect I should probably adult a little better and save for recreational land, retirement, or something sporty like an Impreza to mod for fun on pavement. Instead I'll have one of the few supercharged 5th gen's, and I plan to keep it for several hundred thousand miles.
Supercharger aside, would I run that setup again, certainly! The only thing I might do differently would be trade the MAF calibrator for URD's UCON-EMS package with a set of long tube headers in addition to the intake, Y-pipe, & exhaust. If I had to use a budget or wife-approved list of mods, go for the Y-pipe, intake, and MAF Calibrator.
Friggin Idiot
Senior Member
16Jun18 74,008mi
OEM Air Box Mod
I remembered seeing this somewhere when I was switching back to the OEM intake last week. But I couldn't find where I'd seen it, and didn't want to start cutting up stuff without knowing more about it. It was in the instructions for FJ Cruiser URD/Whipple Supercharger. The 4Runners don't have the fan-blade particle separator in the intake tube from the fender that the FJ's do, so I didn't have to remove that.
I forgot to take a picture before I started, but basically it's just shortening the tube that feeds into the lower air box.
It's easier to remove the lower air box than work in the truck, but you need to remove the upper air box first. Loosen the clamp for the intake tube from the upper air box, disconnect the MAF sensor wire, use a standard screwdriver to apply leverage to the wire holder on the back side of the box and top of box near MAF sensor, pop the clamps, remove upper air box and filter. To remove lower air box from the truck, you need a 12mm socket on an extension for the 3 bolts holding it in place. There's a wire holder on the back side that will pop out using a screwdriver. Slide lower air box towards engine to free from hole in fender then lift out. The scoop which extends into the fender well is removable, and I suggest removing that as it made it easier to work with the air box. I considered leaving it off permanently, but when I saw that it is what seals the air box against the fender elected to reattach it.
This would also be a good point to remove the hydrocarbon filter (HCF) from the upper air box. I just used a sharp pocket knife to cut it free from a couple of the plastic welds, then pried up on the rest.
First I tried rough cutting with a ripsaw wheel on a dremel. The dremel did fine, but the tool was just too long to work inside the air box. I kept hitting the back of the tool and the wire on the other side of the air box making the cuts sloppy. I also scuffed up some other places on the air box because of this. A Dremel Trio or Micro would probably worked better. I did pull out the drill and immediately put it back away seeing it would have the same problem.
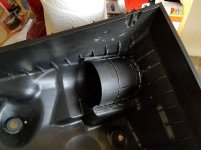
I was able to do a much better job using an oscillating tool. The offset of the tool was helpful, and the long flat blade made it easier to cut without hitting other pieces in the air box. I finally got the big piece out and made some smaller finer cuts using the oscillating tool.
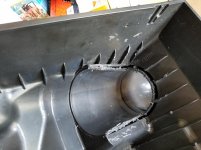
Then I went back to the dremel with a sanding cylinder. Except the cylinder was leaving a surface rougher than I would have liked. The inside of the air box is smooth, so I wanted to get as close to that as I could. I tried a grinding/polishing tool, but that wasn't much better and quickly became clogged with plastic. In the end a small wire brush on the dremel worked the best for smoothing things out.
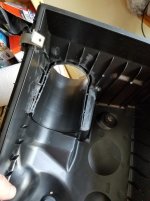
Initial start up and some revving of the engine sounded better than it was. Seemed lower pitched, not as whiny. Not quite back to the level of the aFe intake, but better than stock. More to come after some driving around.
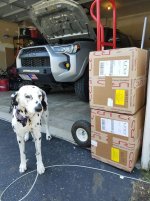
While I was working on the air box, Fedex arrived with some very expensive packages from URD. The package with the headers should be in Tuesday. The truck goes to the shop on 28Jun for the installation.
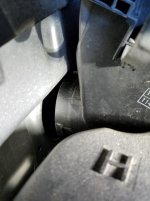
EDIT: 25Mar2019 ~82,4??mi
I removed the inlet scoop from the lower air box. It no longer seals against the fender, but I'm hoping I'll pull more air this way. Some of it will be warmer from the engine compartment, but I didn't pick up the TRD Inlet which would fix that. [MENTION=51033]97BlackAckCL[/MENTION] did it though, and maybe I'll try that as well. (Toyota Part #PTR03-35090-AC)
OEM Air Box Mod
I remembered seeing this somewhere when I was switching back to the OEM intake last week. But I couldn't find where I'd seen it, and didn't want to start cutting up stuff without knowing more about it. It was in the instructions for FJ Cruiser URD/Whipple Supercharger. The 4Runners don't have the fan-blade particle separator in the intake tube from the fender that the FJ's do, so I didn't have to remove that.
I forgot to take a picture before I started, but basically it's just shortening the tube that feeds into the lower air box.
It's easier to remove the lower air box than work in the truck, but you need to remove the upper air box first. Loosen the clamp for the intake tube from the upper air box, disconnect the MAF sensor wire, use a standard screwdriver to apply leverage to the wire holder on the back side of the box and top of box near MAF sensor, pop the clamps, remove upper air box and filter. To remove lower air box from the truck, you need a 12mm socket on an extension for the 3 bolts holding it in place. There's a wire holder on the back side that will pop out using a screwdriver. Slide lower air box towards engine to free from hole in fender then lift out. The scoop which extends into the fender well is removable, and I suggest removing that as it made it easier to work with the air box. I considered leaving it off permanently, but when I saw that it is what seals the air box against the fender elected to reattach it.
This would also be a good point to remove the hydrocarbon filter (HCF) from the upper air box. I just used a sharp pocket knife to cut it free from a couple of the plastic welds, then pried up on the rest.
First I tried rough cutting with a ripsaw wheel on a dremel. The dremel did fine, but the tool was just too long to work inside the air box. I kept hitting the back of the tool and the wire on the other side of the air box making the cuts sloppy. I also scuffed up some other places on the air box because of this. A Dremel Trio or Micro would probably worked better. I did pull out the drill and immediately put it back away seeing it would have the same problem.
I was able to do a much better job using an oscillating tool. The offset of the tool was helpful, and the long flat blade made it easier to cut without hitting other pieces in the air box. I finally got the big piece out and made some smaller finer cuts using the oscillating tool.
Then I went back to the dremel with a sanding cylinder. Except the cylinder was leaving a surface rougher than I would have liked. The inside of the air box is smooth, so I wanted to get as close to that as I could. I tried a grinding/polishing tool, but that wasn't much better and quickly became clogged with plastic. In the end a small wire brush on the dremel worked the best for smoothing things out.
Initial start up and some revving of the engine sounded better than it was. Seemed lower pitched, not as whiny. Not quite back to the level of the aFe intake, but better than stock. More to come after some driving around.
While I was working on the air box, Fedex arrived with some very expensive packages from URD. The package with the headers should be in Tuesday. The truck goes to the shop on 28Jun for the installation.
EDIT: 25Mar2019 ~82,4??mi
I removed the inlet scoop from the lower air box. It no longer seals against the fender, but I'm hoping I'll pull more air this way. Some of it will be warmer from the engine compartment, but I didn't pick up the TRD Inlet which would fix that. [MENTION=51033]97BlackAckCL[/MENTION] did it though, and maybe I'll try that as well. (Toyota Part #PTR03-35090-AC)
Attachments





Last edited:
Friggin Idiot
Senior Member
05Jul2018 74,350 mi
URD/Whipple 2.3L Twin Screw Supercharger Kit
URD Spec-U Long Tube Headers
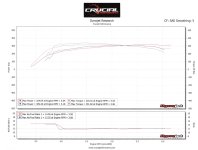
Just back from the dyno run after the URD/Whipple SC install.
OEM Flywheel Spec: 270 hp, 278 ft-lbs
Measured Drivetrain Loss: 19.7% HP, 21.2% TQ
OEM Calculated RWP: 217 hp, 219 ft-lbs
Dyno Run RWP: 324 hp, 341 ft-lbs
Calculated Flywheel: 410 hp, 433 ft-lbs
OEM 0-60 7.7s
As modified 26Jul18 0-60 6.63s, 0-99 17.3s
Warning, there was a CEL active with these runs due to a bad connection in the throttle body control extension harness. I think that caused the rough start on the blue line run.

URD/Whipple 2.3L Twin Screw Supercharger Kit
URD Spec-U Long Tube Headers
Just back from the dyno run after the URD/Whipple SC install.
OEM Flywheel Spec: 270 hp, 278 ft-lbs
Measured Drivetrain Loss: 19.7% HP, 21.2% TQ
OEM Calculated RWP: 217 hp, 219 ft-lbs
Dyno Run RWP: 324 hp, 341 ft-lbs
Calculated Flywheel: 410 hp, 433 ft-lbs
OEM 0-60 7.7s
As modified 26Jul18 0-60 6.63s, 0-99 17.3s
Warning, there was a CEL active with these runs due to a bad connection in the throttle body control extension harness. I think that caused the rough start on the blue line run.
Attachments

Last edited:
007Tacoma
New member
05Jul2018 74,850 mi
Just back from the dyno run after the URD/Whipple SC install. Dyno charts will post when I get them.
OEM Flywheel Spec: 270 hp, 278 ft-lbs
Measured Drivetrain Loss: 27%
OEM Calculated RWP: 197 hp, 203 ft-lbs
Dyno Run RWP: 323 hp, 344 ft-lbs
Calculated Flywheel: 410 hp, 436 ft-lbs
Damn! That was fast!
Marine0369
Member
05Jul2018 74,850 mi
Just back from the dyno run after the URD/Whipple SC install. Dyno charts will post when I get them.
OEM Flywheel Spec: 270 hp, 278 ft-lbs
Measured Drivetrain Loss: 27%
OEM Calculated RWP: 197 hp, 203 ft-lbs
Dyno Run RWP: 323 hp, 344 ft-lbs
Calculated Flywheel: 410 hp, 436 ft-lbs
Have they recommended any upgrades to the transmission?

2016 4Runner SR5
Senior Member
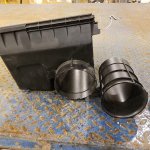
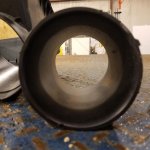
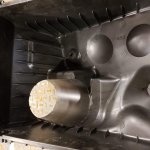
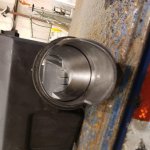
For the air box, knock that restrictor out. Cutting it is OK but doesn't remove the whole restriction. It literally just pops out of the air box.
Attachments
Friggin Idiot
Senior Member
For the air box, knock that restrictor out. Cutting it is OK but doesn't remove the whole restriction. It literally just pops out of the air box.
I thought about that once I popped the scoop off and saw it was detachable. But by that time I'd spent so much time cutting that I hated to give up on it, and I was short on time. I also wasn't sure if when the tube was removed if it would be as smooth inside. Glad to see that it is, and also less restrictive. Either way, cutting or removal, we're still far ahead of the FJ crowd.
No, URD includes everything that needs upgraded in the kit. I had the shop add the transmission cooler after some comments [MENTION=106176]wfo9[/MENTION] made about his Magnuson kit and the transmission temps rising when the torque converter is released in lieu of downshifting. I don't have gauges as of yet, so I'm still being cautious about it. There's a new Kenwood head unit w/iDataLink Maestro capability already on the way.Have they recommended any upgrades to the transmission?
Last edited:
Friggin Idiot
Senior Member
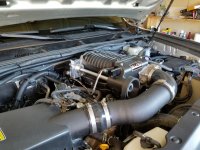
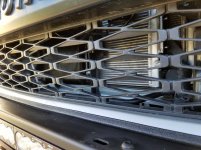



Friggin Idiot
Senior Member
16Jul2018 74,664 mi
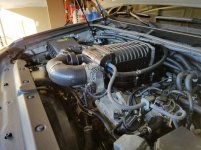
Since the URD/Whipple Supercharger install I've been getting an exhaust smell in the cabin when re-circulation mode was off. Of course the first thing I checked was the headers, no apparent leaks of course. After a call to the performance shop, the owner suggested it could be the oil catch can, which is mounted on the passenger firewall directly in front of the cabin air intake. Today I got by his shop, we talked, investigated, disassembled the catch can, and came to realize that the lines to the PCV valve and intake had somehow gotten swapped. With the swap the can of course was not flowing properly, leaving crankcase fumes to build up in the can and exhaust into the engine compartment. Replace everything we removed, swap the lines to proper locations, and sent on my way hoping that was the issue. Not 10 miles down the road I discovered that seemed to solve it. With less pressure build-up in the crank and the can, the engine runs smoother now too.
When I got home I popped the hood to check for leaks, and ensure the lines had remained secure only to find a new problem.....
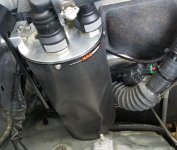
Now this was the original McNally catch can, which I said felt thin and cheap. Thankfully they had already sent me the revised version of the can which I spent this evening swapping out. Hopefully it stands up better than the original.
EDIT 7/20/18: When we swapped the lines, I didn't realize that there are one-way valves on the outer two posts. So we were pulling a vacuum without any relief, while also not reliving anything from the PCV or valve cover. We've since moved the lines around, and run another. So PCV runs to center post, outer post runs to vacuum on supercharger, other outer post runs to the intake tube. The valve cover line was T'd into the PCV line.
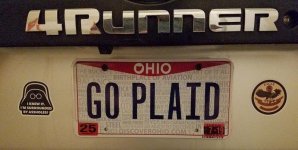
My registration came up for renewal right after the supercharger install, and I thought it might be fun to have a sci-fi themed plate again instead of the usual humbug. My father considers the angular 4Runner front end akin to the forehead of a Klingon. It fit so I've been running with that idea since I got the truck. With the supercharger, it becomes a different machine. I considering going with something like WARP9, or MAK IT SO, only to find them already in use. Instead I settled on this appropriate reference from another universe....
Since the URD/Whipple Supercharger install I've been getting an exhaust smell in the cabin when re-circulation mode was off. Of course the first thing I checked was the headers, no apparent leaks of course. After a call to the performance shop, the owner suggested it could be the oil catch can, which is mounted on the passenger firewall directly in front of the cabin air intake. Today I got by his shop, we talked, investigated, disassembled the catch can, and came to realize that the lines to the PCV valve and intake had somehow gotten swapped. With the swap the can of course was not flowing properly, leaving crankcase fumes to build up in the can and exhaust into the engine compartment. Replace everything we removed, swap the lines to proper locations, and sent on my way hoping that was the issue. Not 10 miles down the road I discovered that seemed to solve it. With less pressure build-up in the crank and the can, the engine runs smoother now too.
When I got home I popped the hood to check for leaks, and ensure the lines had remained secure only to find a new problem.....
Now this was the original McNally catch can, which I said felt thin and cheap. Thankfully they had already sent me the revised version of the can which I spent this evening swapping out. Hopefully it stands up better than the original.
EDIT 7/20/18: When we swapped the lines, I didn't realize that there are one-way valves on the outer two posts. So we were pulling a vacuum without any relief, while also not reliving anything from the PCV or valve cover. We've since moved the lines around, and run another. So PCV runs to center post, outer post runs to vacuum on supercharger, other outer post runs to the intake tube. The valve cover line was T'd into the PCV line.
My registration came up for renewal right after the supercharger install, and I thought it might be fun to have a sci-fi themed plate again instead of the usual humbug. My father considers the angular 4Runner front end akin to the forehead of a Klingon. It fit so I've been running with that idea since I got the truck. With the supercharger, it becomes a different machine. I considering going with something like WARP9, or MAK IT SO, only to find them already in use. Instead I settled on this appropriate reference from another universe....
Attachments


Last edited:
Friggin Idiot
Senior Member
19Jul2018 64,778 mi
Kenwood DNX-995S
iDataLink Maestro RR
New Maestro Radio Solution Thread - Very Helpful!
This upgrade was so fun, I had to do it twice! Actually I attempted a modded install, then went back and used the proper kit. I liked the latter more, but the former worked just fine too.
Parts List including Crutchfield Suggested Install Kit (14+)
Kenwood DNX-995S CD/DVD/NAV/Wireless Android Auto
Metra 40-LX11 Antenna Adapter
Metra AX-TOYUSB OEM USB Port Adapter
Scosche TA2106B Dash Kit (It's Silver, NOT Black)
iDataLink ADS-MRR Interface Module
iDataLink HRN-RR-TO2 OEM Integration Adpater
Additional Parts
iDataLink ACC-SAT-TO2 - Allows use of OEM GPS antenna with aftermarket head unit
Kenwood CA-C3AV A/V Cable - Allows retention of OEM Aux Input Port
Metra 99-8227S Dash Kit - Not recommended
Install Prep
Lots of wiring to figure out here, I called Crutchfield tech support not less than 3 times. Admittedly twice were to see if we missed something, and they hadn't told me I needed a couple harnesses. They made good on customer service and sent them to me. Over the course of several hours, I soldered the connections together between the harnesses, and used heat shrink for a safe and clean connection. It's still a huge bundle of wires to deal with, and plastic connectors all over the place. Once I had both dash kits I removed the lower trim piece below the passenger side temperature knob, and took them all to a local auto body & paint shop. They did really well matching the paint, though it was $100 per dash kit!
EDIT 28Jul18: Paint code used by shop Bentley, LR9V Diamond Black Metallic
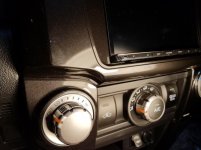
The biggest pain I hadn't planned on was the dash kit. No matter which one you use, it requires some work. The vents, vent adjustment wheel trims, and hazard light switch, and center display lower trim all need to be transferred over. A long handled jewler's philips is invaluable here.
It's easiest to remove the center display lower trim panel (screws on back and slide out), then the vents (tabs in each corner first, then top and bottom tabs), then the vent adjustment wheel trims (screws on back, come off the front), and hazard switch (tabs on back, comes out through front). Reverse order for the install into the new dash kit.
Installation #1 - Metra Kit
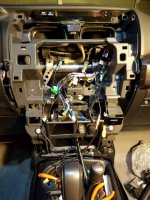
I liked the clean lines of the Metra kit from the start. Looking at how everything mounted up, I wanted to try something. The OEM radio mounts to metal brackets held in place by the 4 10mm bolts along the bottom, in addition to the metal bracket on the backside of the main panel (where all the large buttons and knobs are). It always felt nice and secure, so I wanted to keep as much of that as possible. The Metra kit allows of this possibility, but you have to grind down a locating nub on each side of the OEM brackets to mount them to an aftermarket double-DIN radio (the arrow).
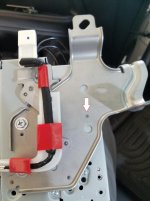
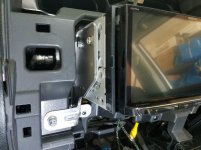
Once those nubs are ground off, you can reinstall the OEM brackets to the aftermarket radio. Make all the connections, install the radio in the dash, and install the Metra kit over top of the radio. Add the trim piece around the end, and it's set. It actually worked better than I thought. I was in a rush to finish before work so I didn't get to tuck everything away as neatly as I liked.
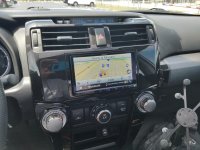
Sadly at the end of the day, I have to agree with the others I've read here: The Metra dash kit is crap. The plastic and finish are cheap, and the fitment is poor. There's gaps left between dash sections, including center display lower trim, and on both sides of the kit where it meets the dash. While it might be good enough for someone, I'm a perfectionist so it had to come out.
Round #2 - Scosche Kit
In addition to not liking the fitment of the Metra dash kit, some Friggin Idiot forgot to install the included microphone to the Kenwood. So I had to use speakerphone while running errands today because bluetooth doesn't work without a microphone!. The USB cable I wired for Android Auto was too long for it actually to work, so I also needed to change that. So I had to pull everything out, and while I was at it wanted to see how the Scosche kit looked.
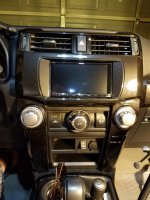
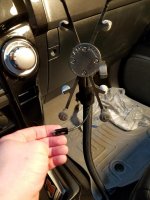
OEM brackets won't work with the Scosche kit without some major modification to the back side of the dash kit which would ruin it for it's intended instructions. I wasn't up for this, so just decided to put it in following the instructions. I used the prescribed Kenwood USB extension cable along with the Samsung cable, it was enough to get Android Auto to work. Yes this has wireless Android Auto, but my current phone doesn't support it. Instead of leaving the wire flopping around when not in use, I ran it under the loom for the X-Grip stand so it's held in place when not in use.
Kenwood DNX-995S
iDataLink Maestro RR
New Maestro Radio Solution Thread - Very Helpful!
This upgrade was so fun, I had to do it twice! Actually I attempted a modded install, then went back and used the proper kit. I liked the latter more, but the former worked just fine too.
Parts List including Crutchfield Suggested Install Kit (14+)
Kenwood DNX-995S CD/DVD/NAV/Wireless Android Auto
Metra 40-LX11 Antenna Adapter
Metra AX-TOYUSB OEM USB Port Adapter
Scosche TA2106B Dash Kit (It's Silver, NOT Black)
iDataLink ADS-MRR Interface Module
iDataLink HRN-RR-TO2 OEM Integration Adpater
Additional Parts
iDataLink ACC-SAT-TO2 - Allows use of OEM GPS antenna with aftermarket head unit
Kenwood CA-C3AV A/V Cable - Allows retention of OEM Aux Input Port
Metra 99-8227S Dash Kit - Not recommended
Install Prep
Lots of wiring to figure out here, I called Crutchfield tech support not less than 3 times. Admittedly twice were to see if we missed something, and they hadn't told me I needed a couple harnesses. They made good on customer service and sent them to me. Over the course of several hours, I soldered the connections together between the harnesses, and used heat shrink for a safe and clean connection. It's still a huge bundle of wires to deal with, and plastic connectors all over the place. Once I had both dash kits I removed the lower trim piece below the passenger side temperature knob, and took them all to a local auto body & paint shop. They did really well matching the paint, though it was $100 per dash kit!
EDIT 28Jul18: Paint code used by shop Bentley, LR9V Diamond Black Metallic
The biggest pain I hadn't planned on was the dash kit. No matter which one you use, it requires some work. The vents, vent adjustment wheel trims, and hazard light switch, and center display lower trim all need to be transferred over. A long handled jewler's philips is invaluable here.
It's easiest to remove the center display lower trim panel (screws on back and slide out), then the vents (tabs in each corner first, then top and bottom tabs), then the vent adjustment wheel trims (screws on back, come off the front), and hazard switch (tabs on back, comes out through front). Reverse order for the install into the new dash kit.
Installation #1 - Metra Kit
I liked the clean lines of the Metra kit from the start. Looking at how everything mounted up, I wanted to try something. The OEM radio mounts to metal brackets held in place by the 4 10mm bolts along the bottom, in addition to the metal bracket on the backside of the main panel (where all the large buttons and knobs are). It always felt nice and secure, so I wanted to keep as much of that as possible. The Metra kit allows of this possibility, but you have to grind down a locating nub on each side of the OEM brackets to mount them to an aftermarket double-DIN radio (the arrow).
Once those nubs are ground off, you can reinstall the OEM brackets to the aftermarket radio. Make all the connections, install the radio in the dash, and install the Metra kit over top of the radio. Add the trim piece around the end, and it's set. It actually worked better than I thought. I was in a rush to finish before work so I didn't get to tuck everything away as neatly as I liked.
Sadly at the end of the day, I have to agree with the others I've read here: The Metra dash kit is crap. The plastic and finish are cheap, and the fitment is poor. There's gaps left between dash sections, including center display lower trim, and on both sides of the kit where it meets the dash. While it might be good enough for someone, I'm a perfectionist so it had to come out.
Round #2 - Scosche Kit
In addition to not liking the fitment of the Metra dash kit, some Friggin Idiot forgot to install the included microphone to the Kenwood. So I had to use speakerphone while running errands today because bluetooth doesn't work without a microphone!. The USB cable I wired for Android Auto was too long for it actually to work, so I also needed to change that. So I had to pull everything out, and while I was at it wanted to see how the Scosche kit looked.
OEM brackets won't work with the Scosche kit without some major modification to the back side of the dash kit which would ruin it for it's intended instructions. I wasn't up for this, so just decided to put it in following the instructions. I used the prescribed Kenwood USB extension cable along with the Samsung cable, it was enough to get Android Auto to work. Yes this has wireless Android Auto, but my current phone doesn't support it. Instead of leaving the wire flopping around when not in use, I ran it under the loom for the X-Grip stand so it's held in place when not in use.
Attachments







Last edited:

57buick
New member
19Jul2018 64,778 mi
Kenwood DNX-995S
iDataLink Maestro RR
New Maestro Radio Solution Thread - Very Helpful!
This upgrade was so fun, I had to do it twice! Actually I attempted a modded install, then went back and used the proper kit. I liked the latter more, but the former worked just fine too.
Sucks they only make the kit in silver but I am planning to wrap mine in vinyl soon. Probably carbon fiber that matches the console around the shifter.
Similar threads
- Replies
- 3
- Views
- 39K


- Replies
- 2
- Views
- 3K


- Replies
- 2
- Views
- 3K


