Timing Belt/Water Pump Replacement DIY

I decided to err on the side of peace of mind and bought a new 180* T-stat. It wasn't hard to switch it out at all. The hardest part was dropping the heavy duty Skid plate.

The first one I installed was a Beck Arnley (don't know why I bought it. I don't trust BA products). The replacement one is a Fail-Safe. The dealer is too far from me to get this done on time.
 
So glad I came across this tread. I just replaced my Tstat since Im doing the timing belt. Pulled the old one out and it was at 12 o'clock, put the new one in same way. Thought it was all good... Fortunately I ran into another snag, so I didn't have everything put back together. So changing the tstat down to 6'oclock was pretty easy :) So glad that everyone shares info like this on the forums!

Mean Kitty
 
Can't find a write up for the special tool you can make to get the tensioner bolt off or the part number for the tensioner bolt. Can anyone help with that?
 
Can't find a write up for the special tool you can make to get the tensioner bolt off or the part number for the tensioner bolt. Can anyone help with that?

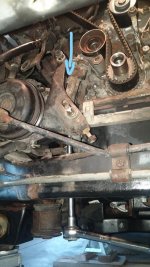
From what I understand, you just get a 1/4" drive universal (wobble) and a long extension, and you can just unbolt the tensioner from underneath without having to remove the A/C bracket. A good TB kit should come with a new tensioner, so ne need to actually compress the one you have. Hope that helps.
 
Just finished my job. Haven't started the engine yet, here's my notes:

- Jiggle valve was at 1 or 2 oclock from previous owners replacement. I put the new one at 6.

- Don't get the belt dot (on the front of the crankshaft gear) confused with the TDC dot on the back of the sprocket (the larger one closest to the engine). Was only obvious after the fact for me. :) They are 6 or 7 teeth apart. Pretty sure I fixed this error. We'll see tomorrow morning when I start it up.

- not alot of writeups/videos mention how to put the new timing belt back on. I removed the idler between the L/R pulleys and reinstalled it after the belt was properly in place. Be careful to thread the idler bolt in straight. I think my receiving threads in the block were a bit worn so I used some lock tite.

*crossing my finger to start the engine tomorrow morning
 
I had a tuff time and felt like I started pulling my thumb nail off getting the belt on the drivers side cam sprocket in the correct cog position. That was the hardest part to me.


Sent from my iPhone using Tapatalk
 
Installing my new belt, I aligned all my timing marks and the belt markings are also lined up, but when I crank the engine around and my timing marks line up again with the pulleys and crank, my belt marks have shifted 1 cog relative to the pulley and crank markings. Uniformly, but still not in line with the timing marks.

So is my belt sized wrong? Anyone else seen this?
 
The belt marks will only line up with the rest when you first install it and then once every blue moon.

As long as the cam and crank marks line up each time you rotate you're good.
 
Stupid question. This may be obvious if I actually crawled under the radiator and looked, but I'll ask anyway because I'm lazy.

All the write-ups I've seen say "drain coolant, disconnect hose, remove radiator". Umm, I was under the impression our radiator also circulated transmission fluid through it. Hence the whole pink milkshake thing. But nobody says anything about removing those hoses, draining trans fluid, etc... before pulling the radiator out.

So, yeah, what's up with that?
 
Stupid question. This may be obvious if I actually crawled under the radiator and looked, but I'll ask anyway because I'm lazy.

All the write-ups I've seen say "drain coolant, disconnect hose, remove radiator". Umm, I was under the impression our radiator also circulated transmission fluid through it. Hence the whole pink milkshake thing. But nobody says anything about removing those hoses, draining trans fluid, etc... before pulling the radiator out.

So, yeah, what's up with that?

If you remove the rad you just have to plug the transmission lines and the rad ports.

I never removed my rad when changing the timing belt and water pump.
I did put a piece of cardboard on the motor side of the rad to protect it.
 
Stupid question. This may be obvious if I actually crawled under the radiator and looked, but I'll ask anyway because I'm lazy.

All the write-ups I've seen say "drain coolant, disconnect hose, remove radiator". Umm, I was under the impression our radiator also circulated transmission fluid through it. Hence the whole pink milkshake thing. But nobody says anything about removing those hoses, draining trans fluid, etc... before pulling the radiator out.

So, yeah, what's up with that?

I have done it a couple times and just remove the lines and plug them real quick. the tranny fluid will drain out of the radiator so make sure you have a small container to catch that and that's it. just make sure your fluid level is good when you get it all put back together.
 
I have done it a couple times and just remove the lines and plug them real quick. the tranny fluid will drain out of the radiator so make sure you have a small container to catch that and that's it. just make sure your fluid level is good when you get it all put back together.

Sharpie pens work great for plugging the transmission lines.
 
You can get cheep plastic 3/8" male Union fittings to join the two trans cooler lines together to stop the dripping. I have a bunch of barbed hose fittings so I use them or a spare magnefine in line filter to join he two hoses.


Sent from my iPhone using Tapatalk
 
Tensioner

I had read it is possible to remove the tensioner without removing the AC bracket. I had removed the AC from the bracket but was struggling with the bracket which lead me to find that option. It involved using a 1/4" drive 10mm socket with a 1/4" universal joint (wobble joint) with a 12" extension. I converted from 1/4" to 3/8" with an adapter at the end of the extension. There is space coming straight up from underneath to access the rear bolt. I've attached a pic I took to try to help anyone else that tries this option. I had tried different angles of attack before I found this angle and it was relatively easy. I believe it would be possible to leave the AC bolted in place but not certain as I had unbolted it already.
 

Attachments

  • Inked0611171314_LI.jpg
    Inked0611171314_LI.jpg
    90.2 KB · Views: 3,005
I had read it is possible to remove the tensioner without removing the AC bracket. I had removed the AC from the bracket but was struggling with the bracket which lead me to find that option. It involved using a 1/4" drive 10mm socket with a 1/4" universal joint (wobble joint) with a 12" extension. I converted from 1/4" to 3/8" with an adapter at the end of the extension. There is space coming straight up from underneath to access the rear bolt. I've attached a pic I took to try to help anyone else that tries this option. I had tried different angles of attack before I found this angle and it was relatively easy. I believe it would be possible to leave the AC bolted in place but not certain as I had unbolted it already.

Is this also valid for a 3rd gen?
 
I used the aircabinman kit from ebay and it worked out great. I'm also slightly dumber than the average rock, and it was pretty easy, even for me. There's some guy on youtube called safetydang or something like that who has a good video. It is nice to have a large space to be able to lay out all the parts and plenty of random sockets, wrenches and other stuff to use. I borrowed a friends shop who has a gob of tools. Also, I used a chain wrench from harbor freight and an old cut up auxiliary belt to break loose the crankshaft pulley bolt. it worked out well and I didn't need to buy or make a service tool.
 
Water pump sealant

I just got mine back together and now see I should have used some sealant on the water pump gasket. Has anyone had an issue of they didn't use it?
I am also debating if I should put the old radiator back in. Its a 2000 and has 157K on it. Suggestions needed.
 

Members online

Forum statistics

Threads
278,316
Messages
3,554,106
Members
248,016
Latest member
Advally Service

Trending content

Back
Top