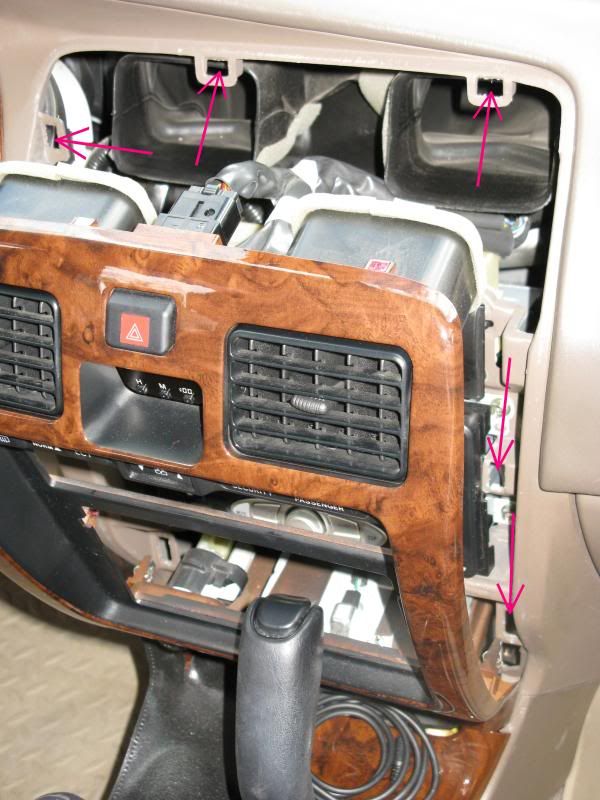
I wanted to write this to hopefully help someone else in need of a DIY with more photos, etc.
Insert the "Do this at your own risk, I'm not responsible for hospital bills or car explosions" Note here.
Over the years I've come to realize doing almost anything on cars is much simpler than it appears at first, but I also always like to have as much info as possible before starting a project, so here it is.
I purchased an Alpine headunit (single din) that came free with 2 harnesses, a tray to go under the headunit and full set of easy to follow instructions.
I didn't take any photos splicing the wiring harnesses together. This can be done a number of ways, so I didn't really want to get into it. I simply use electrical tape and a razor blade. Sounds "caveman-like" but works perfectly and looks decent. Simply expose 1/4-1/2" wires (the Alpine harness came with fully insulated wires whereas the 2 harnesses that connect to the car had trimmed insulation already, or Vice Versa I forget now), twist them together, bend down onto its own insulation and cover with a couple loops of electrical tape. Do this individually for each 2 wire connection of course and then at the end I tape all the wires together so they're not flying around in the back of the unit/dash. I have done at least 10 units this way over last 10 years and had absolutely no issues. The nice and more correct way to do it is to use a combination of 1 or all of these... small wire nuts, solder, heat-shrink, etc. Again, whatever you do make sure to take all precautions necessary to not electrocute yourself and not blow up your car later.
I used the following links for reference (they all have great pointers that helped me know exactly what to do).
http://www.toyota-4runner.org/3rd-g...nner-digital-clock-revived-tooth-surgery.html
http://www.toyota-4runner.org/3rd-gen-t4rs/124628-3rd-gen-stereo-head-unit-install-w-pics.html
http://www.toyota-4runner.org/3rd-gen-t4rs/67508-3rd-gen-dash-clock-fix.html#post573064
NOTE: I used a few photos from the above links in my DIY below (credited the members who took them, Mom and CoFlyFisher) so if that's against the rules I can remove them. Hope they don't mind.
Once I started working on mine I realized it was a piece of cake job so I wanted to take photos and make a nice DIY. I'll try to be as detailed as possible in photos and descriptions, but there are 3-4 photos I wish I had and didn't get. No big deal at all.
FAIR WARNING: There are 60+ photos, so let them load before you think something is crashing
All photos can be seen in my album here (https://www.flickr.com/photos/130074049@N07/albums/72157661280821838/with/37526532326/), but I'll link them all below so it's easier to follow the DIY.
Lastly, some photos were taken at the "wrong times" but they still explain the step well. For example, I took photos of the trim removal and some other things while putting things back together rather than initially taking them apart, but I promise it's exactly the same.
Onto the actual install...
Here are all the tools I used... For the headunit install, all you need is a phillips screwdriver (drill makes things quicker, just be careful when reinstalling), flat screwdriver or anything else to pry things and a knife/razor/blade to trim wire insulation when connecting the harnesses. A magnet is a good idea to help removing one bolt in particular so it doesn't fall into the dash. I used the 10mm socket to loosen trim under the steering column, but this is only because I was installing a microphone with my headunit. I used the rest of the stuff for my clock fix/soldering.
<a data-flickr-embed="true" href="https://www.flickr.com/photos/130074049@N07/23722942528/in/album-72157661280821838/" title="Toyota 1997 4Runner Headunit Install Tools"><img src="https://farm5.staticflickr.com/4452/23722942528_e12f42a376_b.jpg" width="768" height="1024" alt="Toyota 1997 4Runner Headunit Install Tools"></a><script async src="//embedr.flickr.com/assets/client-code.js" charset="utf-8"></script>
First thing you do is lift the e-brake and open the center console compartment to allow removal of the trim piece. Then you simply lift up on the tray/trim around the e-brake. There are clips in the front by the shifter...
<a data-flickr-embed="true" href="https://www.flickr.com/photos/130074049@N07/37526532326/in/album-72157661280821838/" title="Toyota 1997 4Runner Headunit Install (1)"><img src="https://farm5.staticflickr.com/4484/37526532326_b44c41bd91_h.jpg" width="1024" height="768" alt="Toyota 1997 4Runner Headunit Install (1)"></a><script async src="//embedr.flickr.com/assets/client-code.js" charset="utf-8"></script>
Couple at the top by the compartment and a couple in the middle where it bends...
<a data-flickr-embed="true" href="https://www.flickr.com/photos/130074049@N07/37575220941/in/album-72157661280821838/" title="Toyota 1997 4Runner Headunit Install (2)"><img src="https://farm5.staticflickr.com/4443/37575220941_ace20b92bb_h.jpg" width="768" height="1024" alt="Toyota 1997 4Runner Headunit Install (2)"></a><script async src="//embedr.flickr.com/assets/client-code.js" charset="utf-8"></script>
Once all are unclipped, just slide it over the e-brake handle and put to the side (no need to disconnect any of the stuff under there, unless for some reason you decide to sit in the driver seat while working, in which case you can just put this on the passenger side of course)
<a data-flickr-embed="true" href="https://www.flickr.com/photos/130074049@N07/23722948338/in/album-72157661280821838/" title="Toyota 1997 4Runner Headunit Install (3)"><img src="https://farm5.staticflickr.com/4479/23722948338_7cd39b71cb_h.jpg" width="1024" height="768" alt="Toyota 1997 4Runner Headunit Install (3)"></a><script async src="//embedr.flickr.com/assets/client-code.js" charset="utf-8"></script>
<a data-flickr-embed="true" href="https://www.flickr.com/photos/130074049@N07/37575220761/in/album-72157661280821838/" title="Toyota 1997 4Runner Headunit Install (4)"><img src="https://farm5.staticflickr.com/4455/37575220761_542c3f89d8_h.jpg" width="1024" height="768" alt="Toyota 1997 4Runner Headunit Install (4)"></a><script async src="//embedr.flickr.com/assets/client-code.js" charset="utf-8"></script>
Then lift up from the back on the trim around the shifter.. Same concept here, a few clips but comes right up. I didn't remove this piece, rather just unclipped and pulled a bit to the rear to allow removal of the big center trim piece that surrounds the headunit, AC, etc...
<a data-flickr-embed="true" href="https://www.flickr.com/photos/130074049@N07/23722947838/in/album-72157661280821838/" title="Toyota 1997 4Runner Headunit Install (5)"><img src="https://farm5.staticflickr.com/4446/23722947838_555a762ba2_h.jpg" width="1024" height="768" alt="Toyota 1997 4Runner Headunit Install (5)"></a><script async src="//embedr.flickr.com/assets/client-code.js" charset="utf-8"></script>
<a data-flickr-embed="true" href="https://www.flickr.com/photos/130074049@N07/37575220581/in/album-72157661280821838/" title="Toyota 1997 4Runner Headunit Install (6)"><img src="https://farm5.staticflickr.com/4492/37575220581_f24d0782f4_h.jpg" width="1024" height="768" alt="Toyota 1997 4Runner Headunit Install (6)"></a><script async src="//embedr.flickr.com/assets/client-code.js" charset="utf-8"></script>
<a data-flickr-embed="true" href="https://www.flickr.com/photos/130074049@N07/23722947708/in/album-72157661280821838/" title="Toyota 1997 4Runner Headunit Install (7)"><img src="https://farm5.staticflickr.com/4478/23722947708_690903f8f2_h.jpg" width="1024" height="768" alt="Toyota 1997 4Runner Headunit Install (7)"></a><script async src="//embedr.flickr.com/assets/client-code.js" charset="utf-8"></script>
Next, remove all the little knobs for the AC controls... (Note: Putting all the control levers to the center helps in both removal and installation of the face plate)
<a data-flickr-embed="true" href="https://www.flickr.com/photos/130074049@N07/37575220451/in/album-72157661280821838/" title="Toyota 1997 4Runner Headunit Install (8)"><img src="https://farm5.staticflickr.com/4461/37575220451_c7e29be472_h.jpg" width="1024" height="768" alt="Toyota 1997 4Runner Headunit Install (8)"></a><script async src="//embedr.flickr.com/assets/client-code.js" charset="utf-8"></script>
MISSING PHOTO... I forgot to take a photo removing the AC control face plate... I copied 1 photo here from user Mom's DIY linked to above, which clearly shows how to remove the plate. I used a small plastic blade, but anything fairly thin and somewhat hard will work.. butterknife, etc. Just make sure to protect the plastic if using anything sharp

The A/C button will come off with the face plate. This is perfectly normal as you'll see in the photos below how it plugs into the back of the actual control unit. This will also be your guide for reinstalling the face plate...
<a data-flickr-embed="true" href="https://www.flickr.com/photos/130074049@N07/23722947498/in/album-72157661280821838/" title="Toyota 1997 4Runner Headunit Install (9)"><img src="https://farm5.staticflickr.com/4482/23722947498_8122606951_h.jpg" width="1024" height="768" alt="Toyota 1997 4Runner Headunit Install (9)"></a><script async src="//embedr.flickr.com/assets/client-code.js" charset="utf-8"></script>
Here is the faceplate removed... We'll be removing the two screws in order to free up the center console trim...
<a data-flickr-embed="true" href="https://www.flickr.com/photos/130074049@N07/37575220241/in/album-72157661280821838/" title="Toyota 1997 4Runner Headunit Install (10)"><img src="https://farm5.staticflickr.com/4470/37575220241_eb714d29ac_h.jpg" width="1024" height="768" alt="Toyota 1997 4Runner Headunit Install (10)"></a><script async src="//embedr.flickr.com/assets/client-code.js" charset="utf-8"></script>
<a data-flickr-embed="true" href="https://www.flickr.com/photos/130074049@N07/23722947338/in/album-72157661280821838/" title="Toyota 1997 4Runner Headunit Install (11)"><img src="https://farm5.staticflickr.com/4478/23722947338_0b699bc285_h.jpg" width="1024" height="768" alt="Toyota 1997 4Runner Headunit Install (11)"></a><script async src="//embedr.flickr.com/assets/client-code.js" charset="utf-8"></script>
One screw is on the lower right of the AC unit...
<a data-flickr-embed="true" href="https://www.flickr.com/photos/130074049@N07/23722947208/in/album-72157661280821838/" title="Toyota 1997 4Runner Headunit Install (12)"><img src="https://farm5.staticflickr.com/4477/23722947208_c6f27c767c_h.jpg" width="1024" height="768" alt="Toyota 1997 4Runner Headunit Install (12)"></a><script async src="//embedr.flickr.com/assets/client-code.js" charset="utf-8"></script>
The other is on the left side of the AC unit and recessed/hidden, so it's best to use a magnetized bit in order not to drop it. This is all the high tech I had at my disposal...
<a data-flickr-embed="true" href="https://www.flickr.com/photos/130074049@N07/23722947108/in/album-72157661280821838/" title="Toyota 1997 4Runner Headunit Install (13)"><img src="https://farm5.staticflickr.com/4470/23722947108_46c92702f1_h.jpg" width="1024" height="768" alt="Toyota 1997 4Runner Headunit Install (13)"></a><script async src="//embedr.flickr.com/assets/client-code.js" charset="utf-8"></script>
<a data-flickr-embed="true" href="https://www.flickr.com/photos/130074049@N07/23722946918/in/album-72157661280821838/" title="Toyota 1997 4Runner Headunit Install (14)"><img src="https://farm5.staticflickr.com/4444/23722946918_251169ca9f_h.jpg" width="1024" height="768" alt="Toyota 1997 4Runner Headunit Install (14)"></a><script async src="//embedr.flickr.com/assets/client-code.js" charset="utf-8"></script>
<a data-flickr-embed="true" href="https://www.flickr.com/photos/130074049@N07/23722946878/in/album-72157661280821838/" title="Toyota 1997 4Runner Headunit Install (15)"><img src="https://farm5.staticflickr.com/4509/23722946878_07f3d5e6a6_h.jpg" width="1024" height="768" alt="Toyota 1997 4Runner Headunit Install (15)"></a><script async src="//embedr.flickr.com/assets/client-code.js" charset="utf-8"></script>
Insert the "Do this at your own risk, I'm not responsible for hospital bills or car explosions" Note here.
Over the years I've come to realize doing almost anything on cars is much simpler than it appears at first, but I also always like to have as much info as possible before starting a project, so here it is.
I purchased an Alpine headunit (single din) that came free with 2 harnesses, a tray to go under the headunit and full set of easy to follow instructions.
I didn't take any photos splicing the wiring harnesses together. This can be done a number of ways, so I didn't really want to get into it. I simply use electrical tape and a razor blade. Sounds "caveman-like" but works perfectly and looks decent. Simply expose 1/4-1/2" wires (the Alpine harness came with fully insulated wires whereas the 2 harnesses that connect to the car had trimmed insulation already, or Vice Versa I forget now), twist them together, bend down onto its own insulation and cover with a couple loops of electrical tape. Do this individually for each 2 wire connection of course and then at the end I tape all the wires together so they're not flying around in the back of the unit/dash. I have done at least 10 units this way over last 10 years and had absolutely no issues. The nice and more correct way to do it is to use a combination of 1 or all of these... small wire nuts, solder, heat-shrink, etc. Again, whatever you do make sure to take all precautions necessary to not electrocute yourself and not blow up your car later.
I used the following links for reference (they all have great pointers that helped me know exactly what to do).
http://www.toyota-4runner.org/3rd-g...nner-digital-clock-revived-tooth-surgery.html
http://www.toyota-4runner.org/3rd-gen-t4rs/124628-3rd-gen-stereo-head-unit-install-w-pics.html
http://www.toyota-4runner.org/3rd-gen-t4rs/67508-3rd-gen-dash-clock-fix.html#post573064
NOTE: I used a few photos from the above links in my DIY below (credited the members who took them, Mom and CoFlyFisher) so if that's against the rules I can remove them. Hope they don't mind.
Once I started working on mine I realized it was a piece of cake job so I wanted to take photos and make a nice DIY. I'll try to be as detailed as possible in photos and descriptions, but there are 3-4 photos I wish I had and didn't get. No big deal at all.
FAIR WARNING: There are 60+ photos, so let them load before you think something is crashing
All photos can be seen in my album here (https://www.flickr.com/photos/130074049@N07/albums/72157661280821838/with/37526532326/), but I'll link them all below so it's easier to follow the DIY.
Lastly, some photos were taken at the "wrong times" but they still explain the step well. For example, I took photos of the trim removal and some other things while putting things back together rather than initially taking them apart, but I promise it's exactly the same
. Onto the actual install...
Here are all the tools I used... For the headunit install, all you need is a phillips screwdriver (drill makes things quicker, just be careful when reinstalling), flat screwdriver or anything else to pry things and a knife/razor/blade to trim wire insulation when connecting the harnesses. A magnet is a good idea to help removing one bolt in particular so it doesn't fall into the dash. I used the 10mm socket to loosen trim under the steering column, but this is only because I was installing a microphone with my headunit. I used the rest of the stuff for my clock fix/soldering.
<a data-flickr-embed="true" href="https://www.flickr.com/photos/130074049@N07/23722942528/in/album-72157661280821838/" title="Toyota 1997 4Runner Headunit Install Tools"><img src="https://farm5.staticflickr.com/4452/23722942528_e12f42a376_b.jpg" width="768" height="1024" alt="Toyota 1997 4Runner Headunit Install Tools"></a><script async src="//embedr.flickr.com/assets/client-code.js" charset="utf-8"></script>
First thing you do is lift the e-brake and open the center console compartment to allow removal of the trim piece. Then you simply lift up on the tray/trim around the e-brake. There are clips in the front by the shifter...
<a data-flickr-embed="true" href="https://www.flickr.com/photos/130074049@N07/37526532326/in/album-72157661280821838/" title="Toyota 1997 4Runner Headunit Install (1)"><img src="https://farm5.staticflickr.com/4484/37526532326_b44c41bd91_h.jpg" width="1024" height="768" alt="Toyota 1997 4Runner Headunit Install (1)"></a><script async src="//embedr.flickr.com/assets/client-code.js" charset="utf-8"></script>
Couple at the top by the compartment and a couple in the middle where it bends...
<a data-flickr-embed="true" href="https://www.flickr.com/photos/130074049@N07/37575220941/in/album-72157661280821838/" title="Toyota 1997 4Runner Headunit Install (2)"><img src="https://farm5.staticflickr.com/4443/37575220941_ace20b92bb_h.jpg" width="768" height="1024" alt="Toyota 1997 4Runner Headunit Install (2)"></a><script async src="//embedr.flickr.com/assets/client-code.js" charset="utf-8"></script>
Once all are unclipped, just slide it over the e-brake handle and put to the side (no need to disconnect any of the stuff under there, unless for some reason you decide to sit in the driver seat while working, in which case you can just put this on the passenger side of course)
<a data-flickr-embed="true" href="https://www.flickr.com/photos/130074049@N07/23722948338/in/album-72157661280821838/" title="Toyota 1997 4Runner Headunit Install (3)"><img src="https://farm5.staticflickr.com/4479/23722948338_7cd39b71cb_h.jpg" width="1024" height="768" alt="Toyota 1997 4Runner Headunit Install (3)"></a><script async src="//embedr.flickr.com/assets/client-code.js" charset="utf-8"></script>
<a data-flickr-embed="true" href="https://www.flickr.com/photos/130074049@N07/37575220761/in/album-72157661280821838/" title="Toyota 1997 4Runner Headunit Install (4)"><img src="https://farm5.staticflickr.com/4455/37575220761_542c3f89d8_h.jpg" width="1024" height="768" alt="Toyota 1997 4Runner Headunit Install (4)"></a><script async src="//embedr.flickr.com/assets/client-code.js" charset="utf-8"></script>
Then lift up from the back on the trim around the shifter.. Same concept here, a few clips but comes right up. I didn't remove this piece, rather just unclipped and pulled a bit to the rear to allow removal of the big center trim piece that surrounds the headunit, AC, etc...
<a data-flickr-embed="true" href="https://www.flickr.com/photos/130074049@N07/23722947838/in/album-72157661280821838/" title="Toyota 1997 4Runner Headunit Install (5)"><img src="https://farm5.staticflickr.com/4446/23722947838_555a762ba2_h.jpg" width="1024" height="768" alt="Toyota 1997 4Runner Headunit Install (5)"></a><script async src="//embedr.flickr.com/assets/client-code.js" charset="utf-8"></script>
<a data-flickr-embed="true" href="https://www.flickr.com/photos/130074049@N07/37575220581/in/album-72157661280821838/" title="Toyota 1997 4Runner Headunit Install (6)"><img src="https://farm5.staticflickr.com/4492/37575220581_f24d0782f4_h.jpg" width="1024" height="768" alt="Toyota 1997 4Runner Headunit Install (6)"></a><script async src="//embedr.flickr.com/assets/client-code.js" charset="utf-8"></script>
<a data-flickr-embed="true" href="https://www.flickr.com/photos/130074049@N07/23722947708/in/album-72157661280821838/" title="Toyota 1997 4Runner Headunit Install (7)"><img src="https://farm5.staticflickr.com/4478/23722947708_690903f8f2_h.jpg" width="1024" height="768" alt="Toyota 1997 4Runner Headunit Install (7)"></a><script async src="//embedr.flickr.com/assets/client-code.js" charset="utf-8"></script>
Next, remove all the little knobs for the AC controls... (Note: Putting all the control levers to the center helps in both removal and installation of the face plate)
<a data-flickr-embed="true" href="https://www.flickr.com/photos/130074049@N07/37575220451/in/album-72157661280821838/" title="Toyota 1997 4Runner Headunit Install (8)"><img src="https://farm5.staticflickr.com/4461/37575220451_c7e29be472_h.jpg" width="1024" height="768" alt="Toyota 1997 4Runner Headunit Install (8)"></a><script async src="//embedr.flickr.com/assets/client-code.js" charset="utf-8"></script>
MISSING PHOTO... I forgot to take a photo removing the AC control face plate... I copied 1 photo here from user Mom's DIY linked to above, which clearly shows how to remove the plate. I used a small plastic blade, but anything fairly thin and somewhat hard will work.. butterknife, etc. Just make sure to protect the plastic if using anything sharp
The A/C button will come off with the face plate. This is perfectly normal as you'll see in the photos below how it plugs into the back of the actual control unit. This will also be your guide for reinstalling the face plate...
<a data-flickr-embed="true" href="https://www.flickr.com/photos/130074049@N07/23722947498/in/album-72157661280821838/" title="Toyota 1997 4Runner Headunit Install (9)"><img src="https://farm5.staticflickr.com/4482/23722947498_8122606951_h.jpg" width="1024" height="768" alt="Toyota 1997 4Runner Headunit Install (9)"></a><script async src="//embedr.flickr.com/assets/client-code.js" charset="utf-8"></script>
Here is the faceplate removed... We'll be removing the two screws in order to free up the center console trim...
<a data-flickr-embed="true" href="https://www.flickr.com/photos/130074049@N07/37575220241/in/album-72157661280821838/" title="Toyota 1997 4Runner Headunit Install (10)"><img src="https://farm5.staticflickr.com/4470/37575220241_eb714d29ac_h.jpg" width="1024" height="768" alt="Toyota 1997 4Runner Headunit Install (10)"></a><script async src="//embedr.flickr.com/assets/client-code.js" charset="utf-8"></script>
<a data-flickr-embed="true" href="https://www.flickr.com/photos/130074049@N07/23722947338/in/album-72157661280821838/" title="Toyota 1997 4Runner Headunit Install (11)"><img src="https://farm5.staticflickr.com/4478/23722947338_0b699bc285_h.jpg" width="1024" height="768" alt="Toyota 1997 4Runner Headunit Install (11)"></a><script async src="//embedr.flickr.com/assets/client-code.js" charset="utf-8"></script>
One screw is on the lower right of the AC unit...
<a data-flickr-embed="true" href="https://www.flickr.com/photos/130074049@N07/23722947208/in/album-72157661280821838/" title="Toyota 1997 4Runner Headunit Install (12)"><img src="https://farm5.staticflickr.com/4477/23722947208_c6f27c767c_h.jpg" width="1024" height="768" alt="Toyota 1997 4Runner Headunit Install (12)"></a><script async src="//embedr.flickr.com/assets/client-code.js" charset="utf-8"></script>
The other is on the left side of the AC unit and recessed/hidden, so it's best to use a magnetized bit in order not to drop it. This is all the high tech I had at my disposal...
<a data-flickr-embed="true" href="https://www.flickr.com/photos/130074049@N07/23722947108/in/album-72157661280821838/" title="Toyota 1997 4Runner Headunit Install (13)"><img src="https://farm5.staticflickr.com/4470/23722947108_46c92702f1_h.jpg" width="1024" height="768" alt="Toyota 1997 4Runner Headunit Install (13)"></a><script async src="//embedr.flickr.com/assets/client-code.js" charset="utf-8"></script>
<a data-flickr-embed="true" href="https://www.flickr.com/photos/130074049@N07/23722946918/in/album-72157661280821838/" title="Toyota 1997 4Runner Headunit Install (14)"><img src="https://farm5.staticflickr.com/4444/23722946918_251169ca9f_h.jpg" width="1024" height="768" alt="Toyota 1997 4Runner Headunit Install (14)"></a><script async src="//embedr.flickr.com/assets/client-code.js" charset="utf-8"></script>
<a data-flickr-embed="true" href="https://www.flickr.com/photos/130074049@N07/23722946878/in/album-72157661280821838/" title="Toyota 1997 4Runner Headunit Install (15)"><img src="https://farm5.staticflickr.com/4509/23722946878_07f3d5e6a6_h.jpg" width="1024" height="768" alt="Toyota 1997 4Runner Headunit Install (15)"></a><script async src="//embedr.flickr.com/assets/client-code.js" charset="utf-8"></script>
Last edited: