Transmission Cooler

Looking forward to your writeup- I will probably be installing one this summer- and maybe some rear airbags for when I tow my camper.


I couldn’t find airbags for the 4R. I used Airlift for my Pathfinder. If ya sourced them pls let me know. Thx


Sent from my iPhone using Tapatalk
 
Alright so I just did this in my 2016 TP in preparation for towing soon. Here's the process I used
I used the B&M 70264 Amazon.com: B&M 70264 SuperCooler Automatic Transmission Cooler: Automotive

I also nabbed an additional length of 11/32 hose Amazon.com: Derale 13003 Transmission/Engine Oil Hose: Automotive (I probably didn't really need the second length but I didn't want to get into a situation where I needed more and didn't have it).

And a 2 pack of 3/8" male-male barb fittings Gasher 2 Pieces Brass Hose Barb Reducer, 3/8 Inch to 3/8 Inch Barb Hose ID with 4 Hose Clam, Brass Barb Reducer SPLICER Fitting Fuel/AIR/Water/Oil/Gas/WOG: Amazon.com: Industrial & Scientific

Also needed is a couple hose clamps, a half-quart of Toyota WS ATF, and about 7 metric 6mmx1.0 about 1" long bolts/nuts/washers combos.

I used stock unused threaded holes for 3 mounting points.
1) Lower passenger side bolts directly to one of those holes and begins the fitment process.
2) drilled one tiny hole into the body brace for lower driver side hole and did a thru-bolt with nut. Be carefull since there's the A/C condenser close, but not bad at all.
3) The top passenger side strap wasn't long enough so I used 2 that came in the kit, stacked and staggered to make longer, thru-bolted together in 2 holes to prevent pivoting. Slight bend to change the plane for mounting. Thru-bolted to cooler, OEM hole in radiator support
4) OEM threaded hole for top drive side bracket, mark bracket and drill a hole in it to match cooler mount hole. Thru-bolt to cooler after drilling.

a46616bcef2bf9f6759bcc193df3c783.jpg


So I only had to drill one hole in the body brace, and one hole in one bracket that came with the kit. Didn't have to use any other previously used mounts for anything.

I didn't get a good picture becuase it was getting late but I loomed each hose with leftover 3/4" wire loom, ran it loosely up into an already foam-coated slot and then into a hole thru the radiator support above where the A/C hard line comes in.

697b5f3968766e818fa2df44424cbbef.jpg


I tapped into the lines up top only. I ran the truck for a long time the day before and used an infrared laser thermometer and verified the blue marked hose (the one with the offset bend) was about 15-20 degrees cooler. This was the driver side of radiator hose, and the flatter of the 2 lines from transmission in case anyone is curious.
73bd7f85835b05fd86325cbefbf2da1f.jpg


So my new cooler lower hose looped down and back up to the pipe shown above. The 11/32 hose is extremely tight on the OEM metal hardline. Took quite a bit of power and wiggling to install it. But that means it's a great fit. The upper hose was attached right there using the male-male barb fitting to stock hose using a new clamp. This way I figure I could bypass and go back to OEM if needed.

I did this with truck ice cold. Lost ZERO fluid this way. I used a turkey baster to inject 1/2 quart of WS ATF VERY SLOWLY into the OEM hose before connecting to barb fitting to accommodate the slight increase in system volume. Very clean this way. Minimal spillage, and zero original fluid loss. Didn't check fluid level, probably won't. Since I didn't lose any, I figured I'm plenty safe. An ounce or 2 one way or the other cant be that detrimental. If anything it's probably a handful of ounces overfilled.

I'm gonna run some more checks using my laser thermometer the more I drive it to see how hot things get. Original temp was about 185 on hot side pipe up top, and 170 on the cooler one. Both hard lines from transmission were 200 so that wasn't a useful measurement in determining flow.

 
Last edited:
I’ve been wanting to add a transmission cooler but I already have too much stuff in front of the condenser. I’m leaning towards installing one of these aluminum radiators by CSF to keep things cool with the increased capacity. My old 240Z would overheat all the time before I added a Mishimoto Aluminum radiator. Anyone install one these???


CSF's All-Aluminum Heavy-Duty Radiator for the 5th Gen Toyota 4Runner - CSF Racing
Yes I installed one at the same time as my supercharger. I didn't notice an improvement so I still installed an aux cooler.

Sent from my SM-N970U using Tapatalk
 
Alright so I just did this in my 2016 TP in preparation for towing soon. Here's the process I used
I used the B&M 70264 Amazon.com: B&M 70264 SuperCooler Automatic Transmission Cooler: Automotive

I also nabbed an additional length of 11/32 hose Amazon.com: Derale 13003 Transmission/Engine Oil Hose: Automotive (I probably didn't really need the second length but I didn't want to get into a situation where I needed more and didn't have it).

And a 2 pack of 3/8" male-male barb fittings Gasher 2 Pieces Brass Hose Barb Reducer, 3/8 Inch to 3/8 Inch Barb Hose ID with 4 Hose Clam, Brass Barb Reducer SPLICER Fitting Fuel/AIR/Water/Oil/Gas/WOG: Amazon.com: Industrial & Scientific

Also needed is a couple hose clamps, a half-quart of Toyota WS ATF, and about 7 metric 6mmx1.0 about 1" long bolts/nuts/washers combos.

I used stock unused threaded holes for 3 mounting points.
1) Lower passenger side bolts directly to one of those holes and begins the fitment process.
2) drilled one tiny hole into the body brace for lower driver side hole and did a thru-bolt with nut. Be carefull since there's the A/C condenser close, but not bad at all.
3) The top passenger side strap wasn't long enough so I used 2 that came in the kit, stacked and staggered to make longer, thru-bolted together in 2 holes to prevent pivoting. Slight bend to change the plane for mounting. Thru-bolted to cooler, OEM hole in radiator support
4) OEM threaded hole for top drive side bracket, mark bracket and drill a hole in it to match cooler mount hole. Thru-bolt to cooler after drilling.

a46616bcef2bf9f6759bcc193df3c783.jpg


So I only had to drill one hole in the body brace, and one hole in one bracket that came with the kit. Didn't have to use any other previously used mounts for anything.

I didn't get a good picture becuase it was getting late but I loomed each hose with leftover 3/4" wire loom, ran it loosely up into an already foam-coated slot and then into a hole thru the radiator support above where the A/C hard line comes in.

697b5f3968766e818fa2df44424cbbef.jpg


I tapped into the lines up top only. I ran the truck for a long time the day before and used an infrared laser thermometer and verified the blue marked hose (the one with the offset bend) was about 15-20 degrees cooler. This was the driver side of radiator hose, and the flatter of the 2 lines from transmission in case anyone is curious.
73bd7f85835b05fd86325cbefbf2da1f.jpg


So my new cooler lower hose looped down and back up to the pipe shown above. The 11/32 hose is extremely tight on the OEM metal hardline. Took quite a bit of power and wiggling to install it. But that means it's a great fit. The upper hose was attached right there using the male-male barb fitting to stock hose using a new clamp. This way I figure I could bypass and go back to OEM if needed.

I did this with truck ice cold. Lost ZERO fluid this way. I used a turkey baster to inject 1/2 quart of WS ATF VERY SLOWLY into the OEM hose before connecting to barb fitting to accommodate the slight increase in system volume. Very clean this way. Minimal spillage, and zero original fluid loss. Didn't check fluid level, probably won't. Since I didn't lose any, I figured I'm plenty safe. An ounce or 2 one way or the other cant be that detrimental. If anything it's probably a handful of ounces overfilled.

I'm gonna run some more checks using my laser thermometer the more I drive it to see how hot things get. Original temp was about 185 on hot side pipe up top, and 170 on the cooler one. Both hard lines from transmission were 200 so that wasn't a useful measurement in determining flow.


Did you put the B&M in series? Which line did you actually tap in to?
 
Did you put the B&M in series? Which line did you actually tap in to?


Short answer:
Yes, B&M in series. I tapped in at the lines below the coolant overflow bottle. I circled it here.
1e3b9dfbfbb24394ee6c9b4539a2543d.jpg

I seperated the connection, connected lower B&M (desired input) to the hardline (radiator output). I then connected the upper B&M (desired output) to the factory rubber hose by using a 3/8" male-male barb fitting and 2 clamps. Never even dropped the skid plate. Didn't spill a single drop working with truck ice cold.

Long explanation:

The hard line portion of the circled connection goes down to driver side of radiator, and the rubber hose portion connects to the flatter of the 2 hard lines coming off the transmission at the lower passenger side of the engine. I've read things in this thread that dispute that however. Well, one person has said the bent lower line at the engine is the return-to-transmission line, and I've read the driver side connection of radiator is the return-to-transmission line which contradict each other. The way I verified is a laser thermometer after having the truck pretty hot for awhile and of those 2 lines pictured, the one I used was like 15-20 degrees cooler, indicating to me that it was the output of the OEM cooler. It was also marked in blue, so I said F it and went for it. Now, I haven't been able to drive the truck for any real extended period of time to get the transmission super hot, but what I can say is the lower connection of the B&M (which should be my input) is about 5-10 degrees hotter than the upper connection (which should be my output). So what this indicates to me is that I got it right. Those numbers are for a short trip across town and back so the cooler was likely in "bypass" mode as the lines only indicated like 90 degrees.

I was thinking about the whole, "choosing the wrong line thing" and I honestly doubt it would be that big of a deal:
1) the B&M cooler is non directional. There's no indication of input or output. The recommendation is to have the input the lower connection, but there is no specification of mounting it with the connections to the right or the left. Therefore I consider it non directional.
2) putting any additional cooler in line is going to provide more cooler capability to some extent, regardless of where it is in the chain
3)let's say I'm wrong (and from what I gather most folks based on this thread) and now B&M is not only prior to radiator cooler but also input is on top connection. So the hot ass tranny fluid gets cooled prior to entering the radiator portion... Doesn't that mean the coolant would therefore be working less hard to remove the heat? Since it would be a cooler fluid than what it was designed for to begin with upon entering? If anything I would guess the ATF would actually cool down the coolant and reduce engine temps a bit. So really, either way would still help. But I'm not a fluid-thermodynamisist. Just some guy trying to tow a travel trailer.
 
Last edited:
Agree on all points, so tapping into either line for series should make no difference.

As you stated (point 3), the ONLY difference I could see is that if you PRE-cooled the fluid with the B&M before going into the radiator section, you MAY be able to improve the heat transfer in that section due to lower temps going in. Just speculation.

Wouldn’t be terribly hard to experiment both ways.

Thanks for all the detail. I did a B&M on two 3rd gens... one in series and one bypass but I can’t for the life of me remember how I did it.

I’m probably going with the Derale cooler. May add a manually controlled fan later if warranted.
 
Last edited:
Short answer:
Yes, B&M in series. I tapped in at the lines below the coolant overflow bottle. I circled it here.
1e3b9dfbfbb24394ee6c9b4539a2543d.jpg

I seperated the connection, connected lower B&M (desired input) to the hardline (radiator output). I then connected the upper B&M (desired output) to the factory rubber hose by using a 3/8" male-male barb fitting and 2 clamps. Never even dropped the skid plate. Didn't spill a single drop working with truck ice cold.

Long explanation:

The hard line portion of the circled connection goes down to driver side of radiator, and the rubber hose portion connects to the flatter of the 2 hard lines coming off the transmission at the lower passenger side of the engine. I've read things in this thread that dispute that however. Well, one person has said the bent lower line at the engine is the return-to-transmission line, and I've read the driver side connection of radiator is the return-to-transmission line which contradict each other. ...

I do not have auxiliary (aftermarket\add on) Transmission Cooler, but I can tell that hardline (“metal tube”) -with blue marking (circled in your picture) is for sure the return-to-transmission line (the fluid after radiator goes back to transmission using that line).

I know that because I recently did a lot of research on that and consequently did the full Transmission fluid change using Torque Converter pump method- and I used that hardline to pump the fluid out by connecting my drain house to that “metal tube”.
 
Agree on all points, so tapping into either line for series should make no difference.

As you stated (point 3), the ONLY difference I could see is that if you PRE-cooled the fluid with the B&M before going into the radiator section, you MAY be able to improve the heat transfer in that section due to lower temps going in. Just speculation.

Wouldn’t be terribly hard to experiment both ways.

Thanks for all the detail. I did a B&M on two 3rd gens... one in series and one bypass but I can’t for the life of me remember how I did it.

I’m probably going with the Derale cooler. May add a manually controlled fan later if warranted.


That's about what I figured. If the ATF were to be cooler than the coolant going in, however, that means the ATF would be pulling heat away from coolant and actually heating back up potentially. Either way, helping the system out as a whole is what's important.

I do not have auxiliary (aftermarket\add on) Transmission Cooler, but I can tell that hardline (“metal tube”) -with blue marking (circled in your picture) is for sure the return-to-transmission line (the fluid after radiator goes back to transmission using that line).


I know that because I recently did a lot of research on that and consequently did the full Transmission fluid change using Torque Converter pump method- and I used that hardline to pump the fluid out by connecting my drain house to that “metal tube”.


Oh awesome! That makes me feel better! The limited B&M instructions recommend cooler being after the radiator cooler so as far as I can tell its correct. Thanks for that.
 
Agree on all points, so tapping into either line for series should make no difference.

As you stated (point 3), the ONLY difference I could see is that if you PRE-cooled the fluid with the B&M before going into the radiator section, you MAY be able to improve the heat transfer in that section due to lower temps going in. Just speculation.

Wouldn’t be terribly hard to experiment both ways.

Thanks for all the detail. I did a B&M on two 3rd gens... one in series and one bypass but I can’t for the life of me remember how I did it.

I’m probably going with the Derale cooler. May add a manually controlled fan later if warranted.
I added a small push fan on my B&M. It helps because when you come off an Interstate into stop and go traffic, your temps can climb when the air flow slows down. I flip the switch for about 10 minutes or so and then the temps drop back down 10 to 15*. Heat index has been 105 - 110 average the last couple weeks here in Florida, add some hot pavement to that and it starts to creep up to 120. Helps a lot when I go off road too.
 
Hayden 679 Rapid-Cool Plate and Fin Transmission Cooler Install

I recently installed a Hayden 679 on my 2016 4Runner SR5. I have the factory tow package and tow a 3,400# travel trailer but noticed that my trans temps climb near 250+ when going over mountain passes. My highest temp was when I first purchased the trailer and I spiked at 279. I use an UltraGauge MX to monitor temps and tow in Sport Mode.

The cooler fit nicely and with the Hayden mounting bracket kit I secured the cooler in front of the A/C Condenser. Like many I tapped into the cool return, marked blue and from the driver's side of the radiator, and ran that hose in series to the top of the new cooler. For the return from the new cooler I tapped into the hose, blue, near the transmission.

Haven't towed yet but average temps are running 25+ degrees cooler.

Before installing the cooler and since I had been running consistently hot I wanted to change my trans fluid. I checked with my local Toyota dealer and they wanted $252 for pulling the drain plug and refilling, once. I ended up buying 6 quarts of tranny fluid (Toyota ATF WS from Amazon) and some gaskets and changed the fluid twice over a week for about $70. Including the price of the cooler I spent less than half of what the dealership wanted for a single fluid change.
 
Last edited:
New install B&M Trans Cooler

I added a small push fan on my B&M. It helps because when you come off an Interstate into stop and go traffic, your temps can climb when the air flow slows down. I flip the switch for about 10 minutes or so and then the temps drop back down 10 to 15*. Heat index has been 105 - 110 average the last couple weeks here in Florida, add some hot pavement to that and it starts to creep up to 120. Helps a lot when I go off road too.

I recently installed the B&M #70274 cooler and obviously had an immediate reduction when pulling 3,500lb TT. However, temps still got up to around 200-205F when TC not locked up on a flat Texas interstate (25mph head wind). Prior to cooler install I had seen 235F on the same highway. Still have some temp concerns when I start pulling in the mountains. Will be doing a drain and fill more often just as a precaution. Have considered adding a push fan for stop and go though it won't help me on the highway.
 
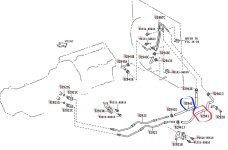
Here's the 5th gen parts diagram also showing that the more U shaped hard line, that most have the blue mark on, is the right one to tap into.

32921 / 32941 is named 'cooler inlet'
32922 / 32942 is named 'cooler outlet' - where you want to tap into post stock cooling
 

Attachments

  • trans.jpg
    trans.jpg
    116.3 KB · Views: 516

Members online

Forum statistics

Threads
278,309
Messages
3,554,066
Members
248,016
Latest member
Advally Service

Trending content

Back
Top