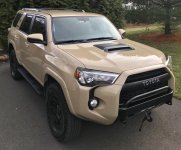
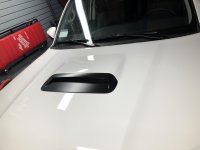
So I posted a few pics in the 'TRD Pro' forum of my hood scoop insert, that I recently removed and painted satin black. I've had a few members PM me and ask for the removal process, so I've listed the steps below. It is pretty straightforward, with just a few precautionary items.
First, Here are a few pics of my TRDP with the mod (not to be obvious, but it used to be white). To be honest, I was inspired by the Bushwacker 4R shown on their site...and yes, my next step is to install the fender flares :wink2:
View attachment 221433
View attachment 221434
View attachment 221435
Okay so now on to the removal process. All you will need is a pair of (small) needle-nose pliers, and an 11mm socket/wrench.
Step 1: Remove the hood insulation pad. There are 10 plastic rivets that hold this in place (circled in red). Start with the rear of the hood, and work your way up to the front, allowing the two inserts (circled in blue) to keep it from falling out on you. Tip - do not try and pull the rivets out...you will break them. There is enough play that you can actually wiggle the needle-nose pliers under the head of the rivets to grip their necks, allowing you to compress them so they come right out. The necks only compress one way, so you'll have to turn them a bit until they feel them disengage.
View attachment 221436
Step 2: Once the pad is out, remove the four 11mm bolts.
View attachment 221437
Steps 3/4: There are three plastic rivets with ears (one orange in the center, and two blue on the sides). Grab the orange one with your pliers and turn it counter-clockwise. It will turn just enough to clear the ears from the hole. Then, insert your pliers through the hole far enough to (gently) grip/compress the ears on the blue ones. Apply a small amount of upwards pressure, and you will feel them release. Be careful, the blue ones are a bit flimsy.
View attachment 221438 View attachment 221439
Step 5: The insert is hinged on the back. After you complete the above, simply lift from the front and pull it out. Once it is out, you can remove the thin 'faux grill insert' piece, by compressing the 4 tabs on the backside of it.
View attachment 221440
Easy-peasy. Now you are ready to mask, and paint. I tried plasti-dip (my first time messing with it) in my garage, and it yielded dismal results. I followed all instructions (light coats at specified distance), but it seemed to flash before it made contact with the insert, leaving a sandpaper-like texture. I attribute this to the heat/humidity in Houston, I guess. I peeled it off and took it to my buddy's place, who has a small paint booth (I used PPG Satin Black, and it matches the front grill to a T). Once you're all done, just reverse the steps above for the install.
I personally, love the look against the white...but think it would look killer on any color TRD Pro (or blacked out trail). On a side note, I also painted my roof rails the same satin black - I thought it was ridiculous that Toyota did not do this to begin with (along with the rear lettering). Happy trails!