Tutorial: Shipping a Sport hood on Greyhound from Texas to California

SURF RUNNER

Senior Member
I just SOLD the pristine (SILVER 001) Sport hood to [MENTION=81106]Cytronus[/MENTION] in Redwood City, California. http://www.toyota-4runner.org/sale-t4r-items/186775-fs-3rd-gen-oem-millennium-silver-highlander-sport-edition-scooped-hood-b-cs-texas.html

This Sport hood is going to be shipped on Greyhound from Bryan, Texas to Redwood City, California. This thread will serve as a tutorial and a place for updates on the progress of the shipment. I use the term "tutorial" because I am learning how to ship these hoods too - NOT because I'm an expert telling everyone how to do it.

I have been on the receiving end of a Greyhound shipment of my Stellar Blue Sport hood from Long Beach, California to Bryan, Texas. Here is that thread for reference... http://www.toyota-4runner.org/3rd-gen-t4rs/183299-help-needed-wilmington-long-beach-cali-area-bought-stellar-bue-sports-hood.html

Below is a link to my initial plans to box, crate, and protect the hood during shipment. I'm using a lot of what [MENTION=67746]Brentif[/MENTION] figured out shipping my hood to me. One thing I am going to do different is to build the crate inside the box - I think that this will make it stronger. If you have any thoughts please post them here. No one that I know has a ton of experience shipping hoods. It certainly isn't easy. Because Brent and I had success shipping on Greyhound that is what Dave (Cytronus) and I are going to use as well. For Greyhound the hood has to be angled in to make the width requirement. Greyhound restricts the weight of the box and contents to 100lbs. This is probably as challenging as a wrestler trying to make weight, but it can be done.

http://www.toyota-4runner.org/sale-t4r-items/186775-fs-3rd-gen-oem-millennium-silver-highlander-sport-edition-scooped-hood-b-cs-texas-3.html#post1912727

From the post linked above:
So far my crating and boxing plans include:
- A box option for an angled hood shipment (A flat box is too wide for Greyhound; For Greyhound total weight of box must be under 100lbs)
- A box option for a horizontal hood shipment
- Building and inserting a 2x4 crate tightly INSIDE either box
- Shrinkwrapping the hood to prevent scratches (Brent's idea)
- Attach a TO: shipping label to the hood inside the box
- Something like styrofoam on the points and corners
- Wrap hood completely with bubble wrap
- Secure the hood so that it doesn't move around
- Spray foam inside the box to help secure and protect the hood (Brent's idea)
- Other appropriate packing materials
- Plenty of packing tape on the outside of the box
- FRAGILE and HANDLE WITH CARE labels on the outside of box

Is this a solid plan to start with? Any other suggestions?

MillenniumSilverSportHood004.jpg~original


MillenniumSilverSportHood001.jpg~original


MillenniumSilverSportHood005.jpg~original


StellarBlueSportHood045.jpg~original
 
Last edited:
Register to hide this ad
Greyhound requirements for shipping

The maximum weight per package is 100 pounds. The extreme measurements of length, width, and height shall not exceed 30" x 47" x 82".
 
Hood shipping suggestions

SURF RUNNER, thanks for the hood and for starting this thread! I'm stoked to get the sport hood and have been searching forever. I did a ton of Google and Forum searching on hood shipping and here are the consistent methods that led to success.

First, we should know that the most common damage points are: 1) the edges (paint scraping off, rubbing against wood or cardboard or bumping into things through the packaging and 2), the corners get bent, specifically and more frequently, those nearest the windshield. They bend very easily when bumped into anything and cannot be bent back into shape.

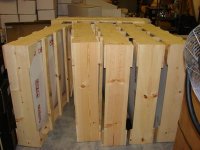
High volume, large body shops and collision centers often order hoods that arrive from the factory or parts distributors in hood-specific packaging. They're usually wood crates/pallet boxes with special foam, etc. It's a great idea to call the local shops and see if they either have one you could have or find out when the next one is coming that you can have. You might even offer a little cash, say $20 for an undamaged one. Should reduce the time it takes to package your hood up with a custom box.

Extreme measures must be taken to protect the corners!!!!

Success Factors:

1) Wood Crate or Palletized Box
It seems from many car forum searches that successful shipping without any damage depends highly on having a rigid, wooden or palletized crate or box inside of a cardboard box. A cardboard box by itself with just foam and bubble wrap inside has a 100% damage rate no matter how much foam and protective cushion goes in.

2) Shrink wrap the entire hood with several coats
Shrink wrap the entire hood several times over with an industrial grade shrink wrap. It's clear plastic and looks like food covering plastic wrap only much more durable, designed for shipping.

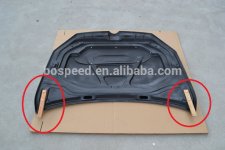
3) Bolt on plywood pieces in the corners (nearest windshield at the hinge mounts)
Having a piece of plywood bolted on in each corner that extends beyond the outer edge (I'd say by about an inch) of the hood corner will keep the corners from folding or bending during shipping. I've attached a photo for reference. The corners should be extra padded in addition to this.

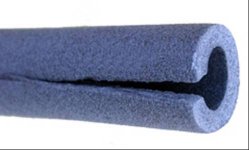
3) Cover every edge with pipe foam (photo attached)
Every inch of the hood's edges should be protected with pipe foam that's secured with a tape that won't cause paint damage - 3M or blue painters tape should do the trick. Do NOT use duct tape or electrical tape. It's best if the pipe foam is applied after the hood is shrink wrapped so when the pipe foam is taped down to the hood, the tape adhesive won't touch the paint on the hood directly. Pipe foam is available at Home Depot, Lowe's, etc. Kids swimming pool foam floater tubes may also work really well and may possibly be cheaper.

4) Wrap the entire hood in bubble wrap

5) Affix the hood into the box with plenty of foam, cardboard and support to keep it from bouncing or shifting around once inside the box.

6) Pad the heck out of all corners!
Lots of foam should be applied in all the corners.
I really like the spray foam idea for the corners to augment the foam. I don't have spray foam experience - is is soft and shock absorbing or is it stiff, hard and rigid?
 

Attachments

  • wood to protect corners1.jpg
    wood to protect corners1.jpg
    84.8 KB · Views: 3,192
  • Pipe_Insulation.jpg
    Pipe_Insulation.jpg
    17.5 KB · Views: 2,825
  • palletizedhoods.jpg
    palletizedhoods.jpg
    50.8 KB · Views: 2,672
Last edited:
Good stuff! Man I swear I was 5 seconds from buying that hood a few weeks ago. But then my silver truck sold :(

Could've picked it up as well. Father lives in hempstead. Thankfully I picked up an 01 Sport
 
Planning and Strategy

[MENTION=81106]Cytronus[/MENTION]

Thanks for your very informative post. I especially like your idea about the foam piping and the wood slats bolted on the underside extending past the points.

My plan is to have a lot of redundancy in the construction and packing of this hood box, but there will always be the protection vs weight issue to be under 100lbs. Obviously strong, lightweight materials will work best.

The spray foam that Brent used was fairly hard when it was dry, but it helps keep the hood in the exact angle and position that you intended. The hood will be shrink wrapped and bubble wrapped before anything else, so that should protect it from harder packing materials.

As far as bolting on the two slats we will have to figure that out. There is one large hole towards the point end that could be used with perhaps a rectangular style bolt that fits in the hole. The other hole that could be used is very small, so I'm not sure what to do there.

I've done a lot of measuring and modeling with angles and came up with an optimum box size of 46" x 62" x 25". This is slightly longer and taller than Brent's revised box (the one that made weight). After a lot of measuring in my cargo bay this size should also barely fit inside my 4Runner with the second row down.

You can't find a box with the dimensions we need. I was all set to order a custom box at https://www.boxjedi.com/. There is no minimum. Here was what I had selected:
- 62" x 46" x 24.25" (25" depth is what I wanted, but it exceeds the width blank maximum... 24.25" still works)
- Regular Slotted Container (RSC)
- Double corrugated wall (275#DW)

The price was $27.88 and I was OK with that. I was expecting shipping of $10-$12. Obviously they ship these boxes as flat cardboard. I was all set to order when the shipping options came up. I had a choice of $130 or $131 for shipping! For one damn cardboard box. Anyway, back to the drawing board. I've sent a quote to a custom box company in Flower Mound, Texas Home | The Custom Box Company, so I'm waiting to hear back from them.

As I've done more research on boxes I'm realizing that a Full Overlap Carton (FOL) will provide more protection than a RSC, so we'll go with a FOL.

As far as the hood boxes from the body/collision shops that is a great idea, but it only works as a box within a box, because a flat box will not work on Greyhound because of the 47" maximum width restriction. The hood is almost 45" from the midpoint of the points at the windshield (on a straight line) to the center of the lip at the grille. This leaves 2" for the box, frame, packing materials, wood slats protecting the points, space for extra protection, etc. On Greyhound a flat box will not work. I'm not sure that putting a flat hood box inside our 62" x 46" x 25" box will work or optimize the protection vs weight issue. We want maximum protection with minimum weight to make it under Greyhound's 100lb restriction.

The box will have a wood frame built and inserted on the inside of the box (tightly fit against the walls of the box). I'm thinking about stapling the frame to the box from the outside of the box. I also want to find some metal or plastic corner protectors to put on the inside of the box. Placing them on the four inside bottom corners of the box is easy, but placing them on the four top corners will be a little trickier.

The next step is to take a Sport hood to the Bryan Greyhound station and see how much it weighs on their scale. That will let us know what we have to work with as far as weight to be under 100lbs. Brent was way over the first time, but he thought that the scale at the Long Beach Greyhound station was giving bad weights. All that really matters is what the scale at the Bryan Greyhound station reads, not the actual weight of the hood as stated from the factory. Does anyone have that figure? I am guessing that a Sport hood weighs between 45lbs and 55lbs.

MillenniumSilverSportHood007.jpg~original
 
Last edited:
Greg, thank you for the detail and all your efforts. Let me know how it goes with The Custom Box Co. I'd rather get it right so if I need to cover any additional costs/labor, I'm willing.
 
Ordered the Custom Box

Everything I do is covered under what you already paid, so don't worry about that.

[MENTION=81106]Cytronus[/MENTION]

I just ordered a box that I am picking up this weekend. It is a RSC with inside dimensions of 62" x 46" x 24.5". The outside width of the box will be just under 46.5". It is double-walled corrugated construction. This company could not make a FOL box in this larger size, but this will work nicely for us. The price was $67 to order one custom box, but once I perfect the size I can probably order a larger quantity for around $25 a box. Part of this for me is just figuring all of this stuff out. I think that having the right box is a big step in the right direction.

You might want to call Greyhound Package Express and get a quote for a box 62.5" x 46.5" x 25" and 100lbs from Bryan, Texas to your nearest station. You can go ahead and pay for it if you want, but there isn't a rush. It will probably be a half a pound under the weight and very close on the outside dimensions. If there is a partial refund due to size or weight differences it will only be $1 or $2. They will give you a shipping label which you can scan and email to me.
 
Last edited:
Test Weigh-In at Greyhound - Scale Reads Low!

I don't know if you can see this in the photo, but the Greyhound station in Bryan is showing 34.5 pounds on their scale. I got on the floor and looked under the hood to make sure that it was all on the scale and it was. I also stood up the hood on the scale and the weight was the same. This hood has to be well over 50lbs. This is a good thing that this scale is off as far as reading weight way too low. I still want to get the actual weight at 100lbs or slightly under. I don't want to go to Greyhound with a box over 100lbs and then find out that they just recalibrated their scales. In addition, I want to make sure that I can get one of these boxed under 100 pounds in case I have to do it again.

Various.jpg~original
 
Last edited:
Too bad the scale at the Long Beach location wasnt off like that. Just so you are aware I used two cans of spray foam, the extra expanding kind form Home Depot. That should give you some sort of reference. Also I think my original crate probably had 4 pounds of screws in it!
 
Custom Box - Picking it up, Transporting, Putting it Back Together, Taping

[MENTION=67746]Brentif[/MENTION]

Thanks for the info on the spray foam.

Yeah... it looks like the Bryan scale is 20lbs light and the Long Beach scale was 20lbs heavy. I still want to try to legitimately get it there under 100lbs. That way I know the full Sport hood box will work anywhere (except Long Beach!). I'm sure they also calibrate those scales from time to time. DOES ANYONE KNOW THE FACTORY STATED WEIGHT OF A 99-02 SPORT HOOD?


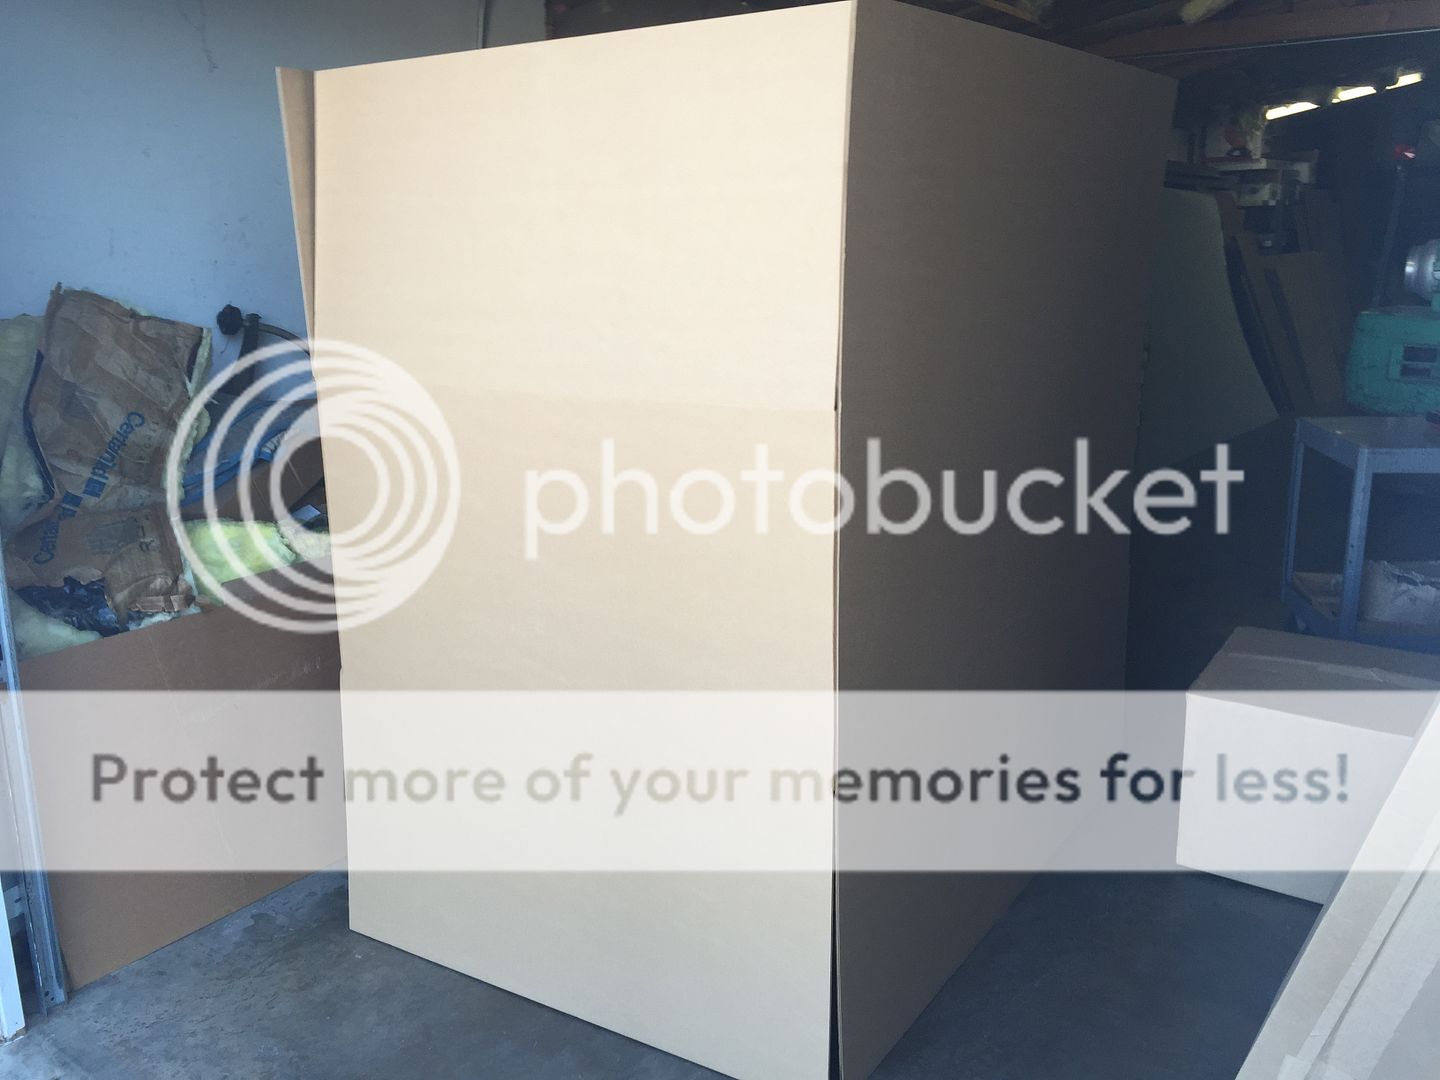
So I picked up the custom hood box in Dallas and combined the trip with a salvage yard binge where I saw about 100 3rd Gen 4Runners. The unfolded box was massive as you can see - it is taller than my 4Runner. I figured out a way to fold it up and get it in the cargo bay. I think that getting a box like this is the way to go. The double wall corrugated cardboard is very sturdy. I will tweak the exact dimensions with what I learn from this shipment.

Sport%20Hood%20Box%20001.jpg~original


The unfolded box is taller than my 4Runner
Sport%20Hood%20Box%20002.jpg~original


It barely fits in back... it is against the headrest and you can see where it is at the tailgate end.
Sport%20Hood%20Box%20003.jpg~original


Unfolded 2 or 3 of these could fit in back
Sport%20Hood%20Box%20004.jpg~original


When I got back home I had to put the box back together. It didn't hurt the box to fold it to get it in the back of my 4Runner, but I wanted to make sure to put it together to make sure it was as good as before.

The first thing I did was measure it. The inside width dimension was supposed to be 46", which should be well under 46.5" on the outside. As you can see it is closer to 47" than I would have liked. Greyhound won't ship anything over 47".
Hood%20055.jpg~original


This box is massive unfolded. You can see how it just sort of takes over my apartment
Hood%20051.jpg~original


This is the only place where the box was taken apart to fit in my 4Runner
Hood%20048.jpg~original


These creases are where I folded it, but there was no permanent loss of structural integrity
Hood%20049.jpg~original


With gorilla glue you need to dampen one surface with water and then apply the gorilla glue on the other surface. You don't need a bunch of this stuff.
Hood%20050.jpg~original


I taped it really tight to make sure that the gorilla glue held
Hood%20052.jpg~original


More brown box tape inside and out
Hood%20053.jpg~original


Now it is starting to look like a box again
Hood%20056.jpg~original
 
Last edited:
Prepping and Protecting the Hood

3M Blue Painters Tape (All purpose/recommended for metal surfaces)
Protecting%20Hood%20003.jpg~original


Applied to all edges, creases and curves
Protecting%20Hood%20006.jpg~original


Extra on the points and corners
Protecting%20Hood%20007.jpg~original


Toggle bolt kit
Protecting%20Hood%20010.jpg~original


The nail is just to keep it from piveting
Protecting%20Hood%20012.jpg~original


Protects the points which are the most frequently damaged parts on a shipped hood
Protecting%20Hood%20013.jpg~original


Every seam on the inside of this box was reinforced with box tape
Protecting%20Hood%20016.jpg~original


Initial test fit
Protecting%20Hood%20017.jpg~original


I bought four of these and went back to get a fifth. When a slit is cut down the length of the tubes they grip on the edges of the hood like a pit bull!
Protecting%20Hood%20025.jpg~original


The tubes along the windshield edge and the grille edge did not even need to be cut.
Protecting%20Hood%20029.jpg~original


I cut some extra tube to attach to both sides to protect the scoop insert
Protecting%20Hood%20030.jpg~original
 
Last edited:
Greyhound GPX from Bryan, TX 77803 to Hayward, CA 94541 is $149.00 with automatic undeclared insurance value of up to $100 but with declared value up to $1000. Still $149. So make sure to ask for coverage for the appropriate value of your item. I stated $500.

The packaging looks great! !!
 
Cost: Supplies, Gas and Time

I'm still working on the rest of this tutorial, but for this post I want to try and cover everything it took me to ship a Sport hood on Greyhound. If the hood is damaged in any way the entire project is a failure, so every effort must be made to guarantee (as much as possible) that the hood arrives in California in the same condition as it left Texas. This means lots of redundancy.

As of this post the hood box has already been dropped off at Greyhound. Overall, this took more effort and time than I had anticipated. I want to comprehensively cover all of the costs (including time) to give anyone else shipping a Sport hood a realistic expectation of what is involved. Please keep in mind that I am not complaining here... just posting what I have learned. I am fortunate to have been through this experience and I learned a ton. If there is a next time it will cost less money and take less time. I combined the Dallas trip with a salvage yard expedition, so I made the trip to Dallas about more than just picking up a custom box. However, I would not have gone to Dallas if it were not for the box. Obviously there may be closer alternatives in Houston, but this is how I did it this time. The custom box was key for me in getting this done. As you will see later it made an interior frame unnecessary and was very good from a strength and weight persepctive.

For someone else the supplies wouldn't cost you as much as they cost me because you will probably have some of these items at home. I live in a small studio apartment and don't buy a lot of stuff like this because I don't have room to store it (and I haven't needed it recently).

MATERIALS (before tax):
$67 - Custom Box - 62" x 46" x 24.5", double corrugated, 275lbs, RSC (The Custom Box Company)
$12 - Two small rolls of bubble wrap (U-Haul)
$14 - Medium roll of stretch wrap (U-Haul)
$9 - 2 rolls of brown box tape (U-Haul)
$10 - 2 rolls of Scotch clear packing tape (CVS)
$5 - Blue 3M Multipurpose Painters tape (Home Depot)
$0 - Gray Duct Tape (Already had some at home)
$19 - Giant roll of large bubble bubble wrap (Home Depot)
$13 - Toggle bolt, extra bolts, wood pedestal, and assorted size nails for wood extensions to protect points (Home Depot)
$5 - Gorilla glue (Home Depot)
$4 - Full size clear mattress cover (U-Haul)
$16 - Three cans of rapidly expanding spray foam (Home Depot)
$20 - Five 3" diameter swimming pool styrofoam tubes (Academy)
$0 - Styrofoam (Furniture stores)
$210 = $194 plus Texas 8% sales tax ($15.52) is just under $210

GAS
$65 - Drive to Dallas to pick up custom box
$15 - Driving around town buying and looking for supplies
$15 - Searching for styrofoam
$95

TIME
7 hours - Dallas trip
4 hours - Driving around town for supplies and styrofoam
1 hour - Researching online
1 hour - Prepping and taping box
1 hour - Installing wood extensions to protect points
2 hours - Protecting and packaging hood
2 hours - Positioning hood into box, spray foam, adding styrofoam, etc.
1 hour - Loading, transporting, and unloading hood box at Greyhound
1 hour - Waiting on Greyhound, Greyhound admin stuff
20 Hours

Supplies.jpg~original


Hood%20003.jpg~original


Protecting%20Hood%20025.jpg~original


Protecting%20Hood%20010.jpg~original
 
Last edited:
Completing the Packaging of the Hood

I added another foam tube along the windshield end and joined it with the wood pedestals so they didn't stick out and potentially cause more damage than they prevent.
Hood%20007.jpg~original


This foam tubing is really easy to work with...
Hood%20009.jpg~original


The hood is starting to look very well-protected at this point
Hood%20010.jpg~original


After bubble wrapping the surfaces I wrapped one continuous sheet of large bubble bubble wrap around the outside edge of the hood
Hood%20011.jpg~original


After adding a bunch of bubble wrap everywhere I added some large white styrofoam panels to both sides of the hood
Hood%20012.jpg~original


Duct tape around the corners and points
Hood%20013.jpg~original


I inserted the hood into a full size mattress cover. As you can see this is a good size for the Sport hood with some leftover to wrap around and tape
Hood20014.jpg~original


Here is the hood (underneath side) inside the mattress cover all taped up. The hood is a lot easier to handle with the mattress cover on it. Now I am finally ready to box the hood.
Hood%20016.jpg~original
 
Last edited:
Boxing the Hood

Test fit... the hood only fits at an angle now, so that makes everything easier.
Hood%20017.jpg~original


Protecting the bottom inside edges of the box
Hood%20021.jpg~original


Styrofoam used in appliance boxes. I used this under the hood to keep it at an angle and protect the bottom.
Hood%20022.jpg~original


The hood goes in for real this time. The grille edge of the hood is facing the bottom edge of the box
Hood%20023.jpg~original


Rapidly expanding spray foam is applied to both sides of the hood (grille edge) on the bottom edge of the box
Hood20024.jpg~original


The guys I work with gave me all of the appliance styrofoam. They made these two spray foam "pies" as a joke and made me promise that I would use them... I did!
Hood%20025.jpg~original


Now I'm almost ready to add the styrofoam to fill all of the empty space and protect the hood...
Hood20026.jpg~original


Added some styrofoam edges to the top of the box
Hood%20028.jpg~original


Adding in styrofoam
Hood%20029.jpg~original


I shook the box and added some more
Hood%20030.jpg~original


Lots of box tape and spray painted "FRAGILE"
Hood%20031.jpg~original


All four sides read "UP"
Hood%20032.jpg~original
 
Last edited:
Loading, Transporting, Unloading, Greyhound

I already knew this from when I picked it up in Dallas, but this box doesn't fit in the 4Runner cargo bay. Even if it were a few inches narrower in width the wheel humps would prevent the box from sliding in.
Hood%20033.jpg~original


Always have furniture blankets handy
Hood%20034.jpg~original


It looks like a balancing act from this angle
Hood%20035.jpg~original


I drove the 4 miles to downtown Bryan 30mph... stopped and checked halfway there to make sure everything was still OK
Hood%20036.jpg~original


The small Greyhound signage doesn't make for a great photo op
Hood%20037.jpg~original


I then find out that the Bryan Greyhound station is open from 9:00am to 11:00am and then opens again from 4:00pm to 6:00pm on the weekends. So they are closed from 11:00am to 4:00pm which is when most people probably need their services on a Saturday afternoon. Anyway, I got there at 11:30am and turned around and went straight home!

Back home around 3:30pm praying for no rain and getting ready for the return trip
Hood%20038.jpg~original


Back in historic downtown Bryan
Hood%20039.jpg~original


Waiting for Greyhound to open at 4:00pm... They finally opened their doors at 4:45!
Hood%20041.jpg~original


Length
Hood%20044.jpg~original


Width
Hood20043.jpg~original


Height
Hood%20045.jpg~original


The final weigh-in...
Hood%20047.jpg~original


78lbs! Probably closer to 98lbs since this scale is reading low on weight. As you probably know by now if it is over 100lbs Greyhound won't take it.
Hood%20046.jpg~original


The weekend guy didn't know how to process a prepaid GPX shipment, so I left the box there (in a secure area right by the desk) and I'll have to go back early Monday morning to finalize everything.

MillenniumSilverSportHood004.jpg~original
 
Last edited:
Final photo of the hood box in Texas

The next photo of this hood box should be taken from the state of California. I went to Greyhound at 7:45 this morning just to make sure that they had everything they needed since the weekend guy didn't know how to process a prepaid shipment. They already had decals and plastic pouches on the box as you can see. It was all ready to go and waiting for the 10:15am bus.

Final%20photo%20of%20box.jpg~original
 
It is on the way... hasn't arrived yet. It should be there any day now. Greyhound usually gives a 7-10 day window for arrivals.
 

Members online

Forum statistics

Threads
278,317
Messages
3,554,129
Members
248,016
Latest member
Advally Service

Trending content

Back
Top