Valve Cover Gasket is leaking oil....

What exactly are the half moons and cam plugs on the rear of the head? I'm looking at the valve cover gasket set seen here: 95 04 Toyota 4Runner Tacoma T100 Tundra 3 4L 5VZFE DOHC Valve Cover Gasket Set | eBay

Are the half moons and cam plugs included in this set? If not how do I find them?

Thanks,
Nate

Here's the thread I used mostly to reference this job:http://www.toyota-4runner.org/3rd-g...e-cover-gasket-replacement-part-s-n-pics.html

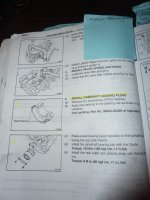
While reading through this thread, I found links to a Yotatech thread with more good information. Just search and you'll find all the info. you need to do this repair. Like I mentioned in one of my previous comments, you can remove the half moons (4 total) one on each end of the heads with a pair of channel locks. I taped the jaws of a medium-sized channel locks and was able to remove them without too much difficulty. You could probably use the right size vise grips as well. One side of the head is harder than the other because there's less room to get the jaws of the channel locks in there to grip it. After a few attempts, I finally got them all out. You just have to scrape off the old RTV sealant on the head and half moons and then use new sealant when you reinstall them.

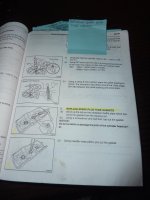
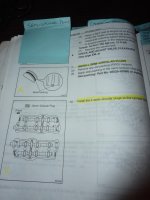
After removing the bolts for the bearing caps that hold the cam plugs, I was able to pull them off without much force using the same pair of taped channel locks. There's a plate on the back of the heads that I guess is there to help keep the cam plug in but I didn't have to remove that plate in order to get the plug out. It just came out when I pulled up on the cam bearing cap. I removed the old plugs by hand, put the new ones in and used RTV on the bearing caps where the FSM showed to apply it.

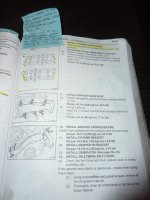
I have the Factory Service Manual that helped me with this repair but you could probably get away without having one if you read through the threads on this subject which are very informative. When you're ready to put the valve covers back on, you need to put RTV in 8 places on each head. Basically at each side of the half moons and each corner of the cam if that makes sense.

If you want, send me a message with your cell phone number and I can take pictures of the relevant pages out of the FSM for this repair and text you the pictures.
 
Here's some pics from the FSM to help those that would like to try doing this repair themselves:
 

Attachments

  • P1030322.jpg
    P1030322.jpg
    127.3 KB · Views: 1,757
  • P1030323.jpg
    P1030323.jpg
    129.9 KB · Views: 2,532
  • P1030324.jpg
    P1030324.jpg
    121.4 KB · Views: 3,033
  • P1030325.jpg
    P1030325.jpg
    132.9 KB · Views: 2,197
You are all awesome!!

I sold my 1994 wrangler because I think the 4Runner is what I need, and want. I as also a member of the wrangler forum and I never got as much specialized advice as I have here on my first post. Seriously, I've had 3 people in my area offer to help me in person!!?! That is freaking awesome. Thank you all so much. Hopefully my 4Runner is as kind to me as this forum! As I suspect it will be.:thumb3:
 
By the way, I used Toyota factory FIPG sealant for this repair. I don't know why I kept calling it RTV. Guess I heard it somewhere and just kept repeating it. Anyway, you can find everything you need and for a good price on-line. Don't get ripped off at the dealership.
 
[MENTION=120071]mtbtim[/MENTION],

The FSM is available in the 3rd gen in a sticky, in both online and PDF format :)

[MENTION=136525]nbizzle[/MENTION], this is one of the best forums you will ever encounter, auto wise.

Like stir_fry said, don't get your parts for this job from eBay. Stick to Camelback Toyota for stuff like the cam plugs and valve cover bolt washers.

For the gaskets, you could go OEM with Camelback or go with a Fel-Pro set/kit.
 
[MENTION=79826]absalom[/MENTION] [MENTION=120071]mtbtim[/MENTION] and everyone else, Thank you all for your offers to help and many resources. I work full-time and go to school full-time so I have very little time to dedicate to do somewhat big jobs even with help. So, I got lazy and went to Firestone to have the job done.

Some complaints: First, they called me and said they noticed a crack in the drivers side valve cover. I said ok, order the part but definitely order it from Toyota. The mechanic said thats what were going to do. When I went to pick up my truck I took a look at the old valve cover and it was a very small hairline crack that was barely perceivable. This gave me confidence that they were paying attention. Also, while they had the top of the engine apart I had them do the timing belt, water pump, thermostat, drive belts, a transmission flush, and a high mile oil change.

Trying to get all the regular maintenance out of the way.

So, when I went to pick up the truck first thing I noticed was they had broken the plastic clips that hold the plug wires to the timing belt cover. So, I had them order new ones, they couldn't find the clips without the wires so they put on new wires as well. Which was cool although my wires were already relatively new.

I took a look at the new valve cover and it said "MADE IN CHINA". I was pissed. I know Toyota parts are not made in China. So, I drove home and the next day I heard an uninformed clicking coming from the front of the new valve cover. It was the heat shield near the oil fill hole that had broken off and was bouncing up and down on my valve springs. What the f**k. I took it back, ordered the new valve cover from Camelback Toyota, and picked it up myself since it was a Saturday, and they had to basically redo the whole job.

Runs great now.

Don't order your Toyota parts from the cheapest manufacturer.

Thanks again for everybody's advice. Even though I took the lazy route I was well informed to know what I was looking at and sufficiently annoy the mechanics with my questions and specifics.

Thanks again!
 
Last edited:
Oh, also they had to replace a vacuum tube and it was to big on one side so it was leaking a little. They also fixed this issue.
 
[MENTION=79826]absalom[/MENTION] [MENTION=120071]mtbtim[/MENTION] Some complaints: First, they called me and said they noticed a crack in the drivers side valve cover. I said ok, order the part but definitely order it from Toyota. The mechanic said thats what were going to do. When I went to pick up my truck I took a look at the old valve cover and it was a very small hairline crack that was barely perceivable. This gave me confidence that they were paying attention. Also, while they had the top of the engine apart I had them do the timing belt, water pump, thermostat, drive belts, a transmission flush, and a high mile oil change.

Trying to get all the regular maintenance out of the way.

So, when I went to pick up the truck first thing I noticed was they had broken the plastic clips that hold the plug wires to the timing belt cover. So, I had them order new ones, they couldn't find the clips without the wires so they put on new wires as well. Which was cool although my wires were already relatively new.

I took a look at the new valve cover and it said "MADE IN CHINA". I was pissed. I know Toyota parts are not made in China. So, I drove home and the next day I heard an uninformed clicking coming from the front of the new valve cover. It was the heat shield near the oil fill hole that had broken off and was bouncing up and down on my valve springs. What the f**k. I took it back, ordered the new valve cover from Camelback Toyota, and picked it up myself since it was a Saturday, and they had to basically redo the whole job.

And this is why I refuse to take my vehicles to an auto shop if I know i can do it. Sorry you had such an issue.
 
Hey Guys,

Here's a comprehensive video regarding doing the Valve Cover Gasket Job. It was a collaboration of [MENTION=102606]infamousRNR[/MENTION] and myself. We're hoping it helps out a lot of people wanting to tackle this job themselves and avoid the steep labor rates at a local shop or the dealership.

If you have any questions, please ask. If you have comments on how you like it or how we can do a better job, please let us know. Enjoy!

<iframe width="560" height="315" src="https://www.youtube.com/embed/N5fAXAuGozI" frameborder="0" allowfullscreen></iframe>
 
I just did the valve cover gasket replacement 3 days ago. It's not hard but it's time consuming especially if you do like I did and write down the steps you took to take things apart and also took pictures for reference later if you get confused putting it back together. I also labeled hoses and electrical connections to make reassembly much more straight forward. I used the write-ups on this forum as a reference and then went for it. Most of the oil coming down looked to be from the back of the valve covers so I suspected either my cam plugs or the rear half moons were leaking. Some people said they put RTV on the cam plugs themselves but I decided not to since the FSM didn't mention putting any on the plug itself. I used a pair of channel locks wrapped with some tape to remove the half moons and they came out fairly easily but one side of each head is harder to get a grip on the half moon due to spacing. The driver side valve cover was the harder side due to the wiring loom in the way, and like others reported, the plastic harness for the wires was brittle and cracked in a few places when I was wrenching on it to get the valve cover out and in. I just reinforced the plastic wiring loom with some metal tape like you use for heating duct work and it looks like it will be fine. I put RTV on all the areas of the head the FSM suggested and reinstalled them with the new valve cover bolt washers. I also did the spark plug tube grommets and used the FSM recommendation of deforming the grommet by pounding it from one side with a screw driver and hammer and then prying it out. I bent the little retaining tabs out of the way, installed the new ones with a 32mm socket as suggested in the FSM, bent the tabs back down and it was pretty easy. No cursing required.

I've never owned a torque wrench. I just use the appropriate amount of force based off the bolt or nut size and use common sense knowing the properties of leverage. If I'm tightening smaller bolts, I use a 3/8" drive and I choke up of the ratchet to reduce how much leverage I have with the tool. For bigger bolts, I use a 1/2" drive and may use all the leverage I can get from the ratchet. I think if I was building an engine or something more critical, I would probably invest in a good torque wrench, but so far, I've done pretty well just by feel and I haven't busted bolts off. Things have stripped on me before but I think that was more from the threads being bad than from me over-tightening something. For the valve covers, I choked up on my 3/8" drive and I slowly tightened the bolts using a crossing pattern until they were all cinched up fairly tight. I honestly don't understand how you could crack the valve cover unless there was some type of gap between the cover and the head by tightening down one side completely and then trying to tighten the other side causing a flexing off the metal. If you tighten the bolts down evenly, I would think you would break the bolt before cracking the valve cover, because the bolts are fairly small.

The job took me around 8 hours. Much longer than others reported, but like I said, I took my sweet time writing down all the steps I took and taking pictures also. Using my notes, I reversed the procedure and crossed off things on the list as I put them back together so I wouldn't miss anything. In addition, I drew a diagram of the spark plug wire configuration, noted the configuration of the bolts and nuts that came off the upper and lower plenums and also labeled the other bolts and nuts that came off so I wouldn't be guessing where they went later.

So, in a very drawn out way, I'm saying you can definitely do this is you are mildly mechanically inclined and have the patience to take the necessary steps like I did to make the process much more straight forward and eliminate any guesswork. These Toyota forums are awesome and have saved me a lot of money. The parts for this job ran me around $130 on-line. I bought the two valve cover gaskets, 2 cam plugs, 2 plenum gaskets, the 16 valve cover bolt washers, and the six spark plug tubes grommets. It took me a while to finally generate the motivation to tackle this job and I'm glad I finally rose to the challenge. Out of curiosity, I got a couple quotes for this job, one from a Toyota dealership and one from an reputable shop specializing in Toyota repairs. The dealer quoted me around $1000 and the other shop was $650. I'm guessing if I shopped around, I probably would find a shop willing to do it for much less too.

The money savings doing this job was great, but more importantly, the sense of accomplishment doing your own repairs and the confidence you gain to take on future repairs is definitely worth more.

Excellent post. I plan to do this work on my T4R-02 soon and have a few questions based on another post elsewhere:
A user complained of too much pinging noise while driving and a few members there suggested "... be gentle with the valve cover bolts. Too tight and they pull on the rocker assembly and open the valve clearance. ... You could also be tightening the valve cover too much causing the valve to hit the cover."

Q1 - Is it true that the Valves could hit the Cover if one torques the bolts more than 53 in-lbs as required per spec? If so, then would you recommend the use of either a double valve cover gasket or liberally coating one gasket with FIPG on both sides to get it thicker?
Q2 - Each Valve Cover bolt has a metallic washer with a ~ 3mm rubber grommet bonded to it. I have never seen the use of such a rubber grommet in any Volvo, VW or Audi car that I had used through 30+ years, many of them with more than 200K miles. BTW, those cars never exhibited such massive oil leakage at this location as the T4R. So, what is the reason Toyota uses this type of Grommet design?
Q3 - My hypothesis about the root cause of this failure is the Grommet's shrinkage over time which in turn results in lowering the applied pressure of the Valve Cover's sealing surface with that of the Cylinder Head. What is your opinion?
 
Excellent post. I plan to do this work on my T4R-02 soon and have a few questions based on another post elsewhere:
A user complained of too much pinging noise while driving and a few members there suggested "... be gentle with the valve cover bolts. Too tight and they pull on the rocker assembly and open the valve clearance. ... You could also be tightening the valve cover too much causing the valve to hit the cover."

Q1 - Is it true that the Valves could hit the Cover if one torques the bolts more than 53 in-lbs as required per spec? If so, then would you recommend the use of either a double valve cover gasket or liberally coating one gasket with FIPG on both sides to get it thicker?
Q2 - Each Valve Cover bolt has a metallic washer with a ~ 3mm rubber grommet bonded to it. I have never seen the use of such a rubber grommet in any Volvo, VW or Audi car that I had used through 30+ years, many of them with more than 200K miles. BTW, those cars never exhibited such massive oil leakage at this location as the T4R. So, what is the reason Toyota uses this type of Grommet design?
Q3 - My hypothesis about the root cause of this failure is the Grommet's shrinkage over time which in turn results in lowering the applied pressure of the Valve Cover's sealing surface with that of the Cylinder Head. What is your opinion?

I don't think the VC could hit anything in the top end if too tight. With the proper torque, there is about a 1mm space between the VC and the head so I'm pretty sure there's more space under there than that.
Don't use ant FIPG anywhere but where the FSM prescribes.

Cant tell you the reason for the rubber bonded washers on the VC bolts but I replaced all mine when I did the job and I haven't had any leaks since.

There's some validity to your hypothesis about the shrinkage although I think it more happens in the VC gasket itself, which seemingly makes the bolts seem loose and people think they back out so they tighten them up a little and the leak stops. I put a little blue loctite on my bolts just to rule out the possibility of the bolts backing out.
 
I don't think the VC could hit anything in the top end if too tight. With the proper torque, there is about a 1mm space between the VC and the head so I'm pretty sure there's more space under there than that.
Don't use ant FIPG anywhere but where the FSM prescribes.

Cant tell you the reason for the rubber bonded washers on the VC bolts but I replaced all mine when I did the job and I haven't had any leaks since.

There's some validity to your hypothesis about the shrinkage although I think it more happens in the VC gasket itself, which seemingly makes the bolts seem loose and people think they back out so they tighten them up a little and the leak stops. I put a little blue loctite on my bolts just to rule out the possibility of the bolts backing out.
Thx very much for taking time to reply. Much appreciated. I think you meant 1 cm NOT 1mm clearance btwn the valve cover and the rocker arms, correct? :-)!
While I agree with you the valve cover gasket takes most of the setting over time while being under compression of 53 in-lbs, the bolt grommet does take a setting too. I have one out right now and it is about 25-30% compressed from its original, appx. thickness of about 3 mm. So, I am thinking to completely remove this grommet and instead use either an aluminum or metal washer. What do you think?
Finally, the valve cover bolts are only M6, very thin IMO. If I remember correctly, the typical valve cover bolt is M8, correct? Yep, I will clean each bolt, then re-install it using Blue Loctite for better lock-setting as you wrote. Thx again for your time.
 
I don't think the VC could hit anything in the top end if too tight. With the proper torque, there is about a 1mm space between the VC and the head so I'm pretty sure there's more space under there than that.
Don't use ant FIPG anywhere but where the FSM prescribes.

Cant tell you the reason for the rubber bonded washers on the VC bolts but I replaced all mine when I did the job and I haven't had any leaks since.

There's some validity to your hypothesis about the shrinkage although I think it more happens in the VC gasket itself, which seemingly makes the bolts seem loose and people think they back out so they tighten them up a little and the leak stops. I put a little blue loctite on my bolts just to rule out the possibility of the bolts backing out.

I agree with John's response.

The shrinkage of the grommets causing the bolts to loosen up is solid hypothesis and something I thought of as well when I was doing my valve cover gaskets.

I like the idea of using blue loctite and wish I would have done this when doing mine.
 
I agree with John's response.

The shrinkage of the grommets causing the bolts to loosen up is solid hypothesis and something I thought of as well when I was doing my valve cover gaskets.

I like the idea of using blue loctite and wish I would have done this when doing mine.
Thx very much for your input especially since you are the "pioneer" on this topic :--)!
The only reason I can think of at the moment justifying the use of the bolt grommet is that it might reduce vibration or slippage between the valve cover and the cylinder head plus maintain more controlled pressure on the valve cover gasket due to its different thermal expansion/contraction coefficient properties as compared to those of the aluminum valve cover and cylinder head. Even so, I believe it causes MORE problems as WE know that it might try to solve per Toyota possible, original design thinking. In any event, I will think about it a bit more and most likely I will replace the bolt grommets completely with either aluminum or metallic washers.
 
Thx very much for taking time to reply. Much appreciated. I think you meant 1 cm NOT 1mm clearance btwn the valve cover and the rocker arms, correct? :-)!
While I agree with you the valve cover gasket takes most of the setting over time while being under compression of 53 in-lbs, the bolt grommet does take a setting too. I have one out right now and it is about 25-30% compressed from its original, appx. thickness of about 3 mm. So, I am thinking to completely remove this grommet and instead use either an aluminum or metal washer. What do you think?
Finally, the valve cover bolts are only M6, very thin IMO. If I remember correctly, the typical valve cover bolt is M8, correct? Yep, I will clean each bolt, then re-install it using Blue Loctite for better lock-setting as you wrote. Thx again for your time.

Sorry, that was a little unclear. When properly torqued, the space between the edge of the VC and the edge of the head, right where the gasket seals, is about 1mm. Not the clearance between the VC and the rockers. Too tight and the gasket squashes under the VC and the VC itself could crack. Too loose and it may leak.
 
Sorry, that was a little unclear. When properly torqued, the space between the edge of the VC and the edge of the head, right where the gasket seals, is about 1mm. Not the clearance between the VC and the rockers. Too tight and the gasket squashes under the VC and the VC itself could crack. Too loose and it may leak.

I will add to this that it's my belief the valve covers end up cracking because they didn't tighten them down evenly. Anything with multiple fasteners, whether they be nuts or bolts, should be tightened down Gradually and Equally. If you tighten one side of the valve cover most of the way before you start tightening down the other side, you will create a situation where you're asking the metal to bend into place. With the valve cover being a cast piece, it's not going to bend, it's going to break. I believe over-zealous mechanics with their impact ratchets or cordless ratchets trying to work quick in this type of application can easily tighten one side too much before getting to the other side and that's asking for trouble.

If you are tightening everything down gradually and equally (I suggest a crossing pattern), you will not crack a valve cover. I think you have a much better chance of busting the bolt before cracking the valve cover if you were actually tightening them down properly. If you don't own a torque wrench, choke up on a 3/8" ratchet and get them fairly snug.

And that's all I want to say about that. Happy Wrenching!
 
Sorry, that was a little unclear. When properly torqued, the space between the edge of the VC and the edge of the head, right where the gasket seals, is about 1mm. Not the clearance between the VC and the rockers. Too tight and the gasket squashes under the VC and the VC itself could crack. Too loose and it may leak.

after third generation does anyone know if toyota continued the practice of using these rubber mounted VC bolts?
 
I will add to this that it's my belief the valve covers end up cracking because they didn't tighten them down evenly. Anything with multiple fasteners, whether they be nuts or bolts, should be tightened down Gradually and Equally. If you tighten one side of the valve cover most of the way before you start tightening down the other side, you will create a situation where you're asking the metal to bend into place. With the valve cover being a cast piece, it's not going to bend, it's going to break. I believe over-zealous mechanics with their impact ratchets or cordless ratchets trying to work quick in this type of application can easily tighten one side too much before getting to the other side and that's asking for trouble.

If you are tightening everything down gradually and equally (I suggest a crossing pattern), you will not crack a valve cover. I think you have a much better chance of busting the bolt before cracking the valve cover if you were actually tightening them down properly. If you don't own a torque wrench, choke up on a 3/8" ratchet and get them fairly snug.

And that's all I want to say about that. Happy Wrenching!
@ mtbtim, [MENTION=107674]JRZEE2000TR4LTD[/MENTION], @ baja1:
Each of you have made excellent pts IMO.
1. Yes, the valve cover is more likely to crank when is NOT tightened slowly and in the typical "X" pattern.
2. I am also curious to know IF Toyota has discontinued the use of a grommet under each valve cover bolt and has switched to the use of M8 instead of M6 bolts as most car manufacturers use. My bet is Toyota has done so assuming it analyzes either repair data from their numerous Service depts. or follows-up the data exchanged in forums such as ours. I have already decided to use one M6 -18mmx1.5mm (ODxThickness) Brass washer per each valve cover bolt instead of the rubber grommet. I am convinced Toyota has laid a golden egg with a significant design blunder both in this case and with the notorious Bellcranks defect of the e or hand/park brake (you can read my post here for more details on how I solved that problem.)
 
about these torque values....I just bought a set of NAPA felpro VC gaskets, they're blue rubber as are the sparkplug grommets. tighten more or less than what the torque calls for? does anyone really use a torque wrench on valve covers? sealant on rubber? (no instructions enclosed)
thank you!
 
about these torque values....I just bought a set of NAPA felpro VC gaskets, they're blue rubber as are the sparkplug grommets. tighten more or less than what the torque calls for? does anyone really use a torque wrench on valve covers? sealant on rubber? (no instructions enclosed)
thank you!
You must torque each bolt down to 53 in-lbs with a Torque-Wrench both gradually (ex. 20, 40, and then 53 in-lbs) and in criss-cross mode to minimize stress on the valve cover and eliminate valve cover cracking. You can buy a 1/4" drive Torque-Wrench with in-lbs scale from Freight Harbor for about $20-$25.
 

Members online

Forum statistics

Threads
278,316
Messages
3,554,120
Members
248,016
Latest member
Advally Service

Trending content

Back
Top