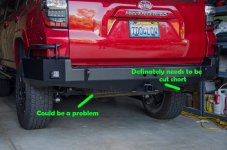
Warthog Build and Adventure Thread

Heh, so far I've let ORW do most of the heavier work myself :D I did put the rack on myself!

My first big job myself will be the bumper. Crosses fingers for that...

4runner is great for camping in when travelling alone. Drive, park, sleep in back. Comfortable in all weather!

LOL

One of the many reasons I'm on the hunt...not many TEP's left for 2014 model year. I've found 3 that I will be inquiring about this week, if at all possible.
 
Thinking about getting a transmission cooler even though I'm not towing anything (yet).

Off-roading this weekend, 5-10 mph for 10 miles up steep terrain with an outside temp of 95F got the trans fluid out temp to 230F. I'm assuming that for this slow pace off-roading type use it would need a fan as well?

Do not want to kill my tranny or even the fluid unnecessarily.

I just put one in when I flushed my tranny. I was doing up to 240 going to Mammoth and averaging about 190ish...since the flush and cooler I haven't seen anything above 193 - and that is extreme stop and go traffic - 405 parking lot stuff. 135-150 is more like the average now. I wouldn't hesitate to recommend a flush and/or cooler.
 
I love your plate! Very cool.

Thanks, took a while to find something nice :D "I DO 4LO" was taken and just about everything else I tried :)

I just put one in when I flushed my tranny. I was doing up to 240 going to Mammoth and averaging about 190ish...since the flush and cooler I haven't seen anything above 193 - and that is extreme stop and go traffic - 405 parking lot stuff. 135-150 is more like the average now. I wouldn't hesitate to recommend a flush and/or cooler.

Yeah I guess that's definitely on my todo list :)
 
Holy Cr*p!

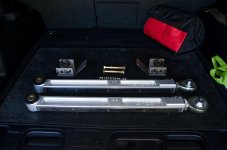
Look at these beefy mo' fo's!

Lower Trailing Arms.jpg

The pictures on the website did not do these things justice!

After witnessing someone on the trail bash the heck out of their lower tailing arm mount and other pictures of pretzel stock arms after a little rock hit, I decided to upgrade the trailing arms from Icon and get some mount skids from Total Chaos.

Initially was going for some cheaper but decent arms but the company's website/phone support led me into ordering the wrong thing and I had to cancel, claimed it doesn't fit the 2014. Decided to go to Icon who, while expensive as heck, I've so far come to trust with parts and ordering. Came just 3 days later and they are a thing of unparalleled beauty :D

Hope to get them on this weekend.
 

Attachments

  • Lower Trailing Arms.jpg
    Lower Trailing Arms.jpg
    78.1 KB · Views: 3,307
Last edited:
Icon lower links/trailing arms install

This morning I installed my Icon rear lower links / trailing arms.

Oooooo shiney!

TAInstalled1.jpg

The arms came with install instructions where were ok. But missing some detailed info that would have been ice for generally novice wrenchers.

Here are some missing details:

Getting the old arms off. If your old arms are trashed they come off pretty easy, but mine were new and required some finesse.

Jacked the car up by the diff, then set it back down on jack stands on the frame just in front of the front link mounts. Then lowered the diff jack till the wheels were hanging on their own. They should be only barely touching the ground or floating.

Remove the parking brake cable guide from the link.

Next is to loosen the front bolt. Don't loosen the nut, it is self locking and will be harder to break loose. After breaking the bolt loose then take the nut off. Now try to turn the bolt with your fingers. If you can then you can pull it out and take the rear bolt off. If the bolt is still tight, slowly jack the diff back up, like one pump at a time till the front bolt is loose enough to pull out.

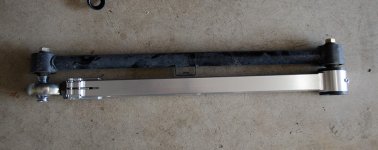
Once the old trailing arm is off, you need to adjust the new trailing arm to be the exact same length (assuming you are not changing your pinon angle). The instructions tell you to do this but don't say exactly how. I figured out that by placing the bolts through the old link you could use that to set the length of the new link easily like so:

TAAdjustment.jpg

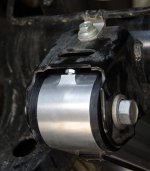
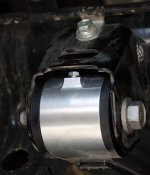
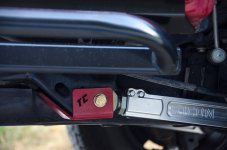
So once they are the same length you just simply bolt in the new trailing arm. But there was one small problem on my setup. There is a tiny bolt on the rear link of the arm. (For oiling?) Unfortunately it does not completely clear the link mount. Fully stuffing the wheel could shear the nut right off. I used a square jawed pipe wrench and gently bent the lip of the mount out of the way just enough for it to clear. Before on left, after on right.

TArmNut1.jpgTArmNut2.jpg

one more little detail was that trying to bolt the parking break cable back on didn't go as smooth as it should have. I had to bend the anti-rotation tab in towards the bolt hole in order to get both of them to line up to get the bolt into the new arm.

Finally, torque all bolts to specification. The trailing arm adjustment bolts are explained in the instructions from icon, and for my 2014, the main mounting bots were to 96lbs. And again, torque on the bold heads, not the nuts.

All in all a relatively easy upgrade, though it was more exercise than I've had in months and still wore me out :D

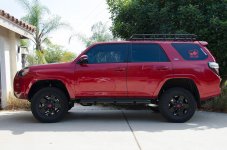
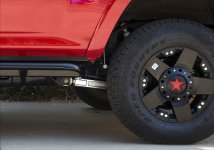
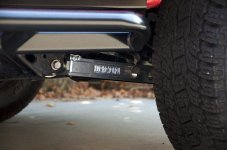
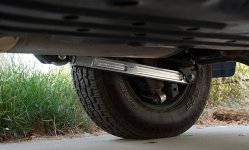
Some installed pictures. I tried to find some good pictures of them installed before I bought them and was generally disappointed in the quantity and quality of such pics. So including the top image, here are some nice ones for everyone from now on.

TAInstalled2.jpg

TAInstalled3.jpg

TAInstalled4.jpg

Oh, one last thing. I bought a set of Total Chaos rear link mount skids. They would have fit fine with the old links but they don't fit at all with the new one. The picture above shows why, the ball joint knuckle is HUGE and extends well below the frame of the mount which the skids covered up. So I can either plasma cut the bottom of the skid so that the knuckle passes through it, or I'll just need to make my own.

Since I think I DO want to protect the knuckle itself, I'll probably just weld up my own skids...
 

Attachments

  • TArmNut1.jpg
    TArmNut1.jpg
    87.9 KB · Views: 3,253
  • TArmNut2.jpg
    TArmNut2.jpg
    81.8 KB · Views: 3,287
  • TAAdjustment.jpg
    TAAdjustment.jpg
    56.8 KB · Views: 3,436
  • TAInstalled1.jpg
    TAInstalled1.jpg
    121.9 KB · Views: 3,359
  • TAInstalled2.jpg
    TAInstalled2.jpg
    82.6 KB · Views: 3,283
  • TAInstalled3.jpg
    TAInstalled3.jpg
    69.6 KB · Views: 3,339
  • TAInstalled4.jpg
    TAInstalled4.jpg
    105.1 KB · Views: 3,394
Last edited:
Great mod and write up! Thanks for the walkthrough and pics. Maybe you should send Icon your write up as it is hard to believe that they would not have addressed the issues you found. Also curious to see what you come up with for the rear link mount skids. Still, I might consider the same.
 
Is it necessary to add coil springs in the back? How much lift do you get from the Blistein that you have in the rear?
 
Is it necessary to add coil springs in the back? How much lift do you get from the Blistein that you have in the rear?

No noticeable lift by themselves. Better performance definitely, but the lift is required to get you well off your bump stops so the rear end can travel. The bilstiens can handle a 2 inch lift and are at their sweet spot.

SO the shocks alone do improve the ride, but the lift makes a big difference between really enjoying the desert or trail and cursing when you are constantly flying around in your car without much provocation as you are constantly bouncing off your bumpstops :D
 
I appreciate the feedback. I just got some Fox 2.5 non coil with some Fox rear suspension that can give me 2 to 3' lift. Most people have told me that I dont need the coil springs which is weird. Most likely I am going to purchase them before mess the rear of my TE.
 
I appreciate the feedback. I just got some Fox 2.5 non coil with some Fox rear suspension that can give me 2 to 3' lift. Most people have told me that I dont need the coil springs which is weird. Most likely I am going to purchase them before mess the rear of my TE.

Please post a review when you get them... Are you going with remote resi?
 
I appreciate the feedback. I just got some Fox 2.5 non coil with some Fox rear suspension that can give me 2 to 3' lift. Most people have told me that I dont need the coil springs which is weird. Most likely I am going to purchase them before mess the rear of my TE.

Well the fox rears are probably high pressure shocks which may give you some small lift. But... I would guess maybe 0.5 to one inch at most? 2-3 inches without changing the rear springs doesn't sound right. But I never researched those specific shocks :noidea:
 
DannyLlama, I will post a review once I get them up and running. I am not getting the ones with reservoir just because I dont get to offroad that often. I do maybe 2 weeks per year and some very light offroad with the family when we go camping.

Warthhog, I spoke with a buddy yesterday and he said the same thing you did. I do need to get the coils becasue that is what will give me the lift i need for the rear. I placed my order last week and will get it by next week.

I see the pictures of yours, and I cant wait to get mine built up. I got my 2014 TE back in September last year so I have been in pain for almost a year.
 
Love the build. Did you go with the P-rated or E-rated Toyo's? I'm a little disappointed there's no C or D option as I don't necessarily want the harsh ride of an E-rated tire.
 
Love the build. Did you go with the P-rated or E-rated Toyo's? I'm a little disappointed there's no C or D option as I don't necessarily want the harsh ride of an E-rated tire.

Thanks :)

I got the P rated and run them at 35 PSI on highway. You can hear them at 60+ not too loud but they make some noise. Luckily not like whining or droning just road noise.

They have performed very well for the few off-road outings I got in before the summer head killed my trips to the desert. Gravel, wash, dune and rock they worked great! I haven't tried mud snow or ice yet.

My only complaint is that they are not visually very aggressive. Though the 285s were!
 
New bumper!!!!

Well look what arrived! Got some work to do now.


Packaging
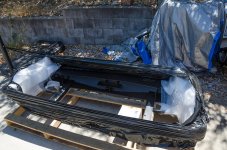
CBI-Rear01.jpg


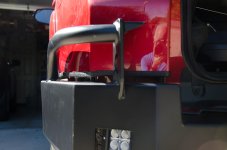
Unwrapped. It's HUGE! I weight is here and the bumper alone was 140 pounds powder coated. Plus another 5 for the bolts and brackets. As you can see I did not get the swing arm.
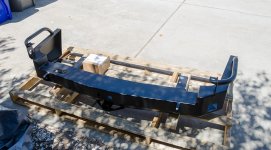
CBI-Rear02.jpg


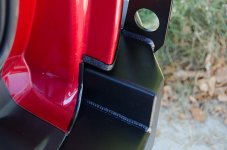
And like so many others, damaged in shipment :( The corners need some cardboard on them for added protection, or maybe even fully boxed. It's a shame to have such nice work marred during shipment.

I'm not sending I back though, I'll just grind down the powder coat and paint it...
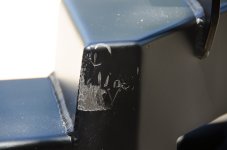
CBI-Rear03.jpg


One last shot of the back as it is now... There's no going back from here!
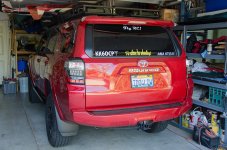
CBI-Rear04.jpg


Lots of plastic to remove. Protect the bumper cover well! That paint can be scratched by even looking at it!
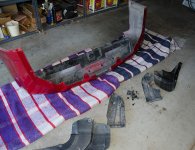
CBI-Rear05.jpg


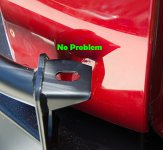
Tow hook, Styrofoam, bumper cover mount brackets all removed. Instructions said to cut off two other bumper cover mount brackets sticking down from fender but I just bent them up out of the way a little (Might not have even been necessary). JUST in case I DO want to "go back" way in the future.

Leave on the trailer lighting socket. I initially took it off too but there was no reason for that.

Also have the exhaust hanger unhooked which is necessary. Now there seems to be differing opinions on this but in my case, with a 2014, in the end it turns out that it is necessary to cut off the end of the pipe about 2 inches in back (towards the back of the car) from the hanger. When I got done no amount of bending the hanger would get the exhaust far enough from the bumper to prevent banging.

I plan on re routing it out to the side, but I wish I had cut it off at this stage because now that the bumper is installed, cutting it at that point is going to be much harder. (I have another picture down below that shows the problem.
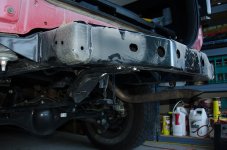
CBI-Rear06.jpg


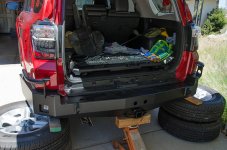
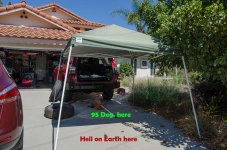
Next day, pulled out in driveway for better access. First test fit. I initially had a friend hold the right side up while I put the bolts in using the tires on the left for support.
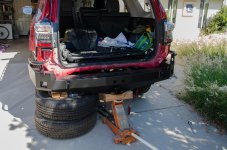
CBI-Rear07.jpg


Temp quickly rose to a sweltering 95 by 10 am and lasted till the job was done. Ghod forbid you left a tool in the sun! :D

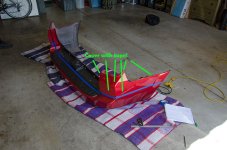
At this point I mounted with a couple of bolts so I could measure the distance from top of bumper cover to the bumper. There were some numbers floating around but they are different for different years and so I decided to measure myself.

My final cut numbers were:
At 5 1/4 inches from the tip of the fender flare, 5 1/2 inches down.
At 16 inches from the tip of the fender flare, 5 3/4 inches down.
From bottom of corner of rear light closest to liftgate, 9 1/2 inches down.

Now I don't want to be responsible for any bad cuts, so if not sure, measure yourself. This was on a 2014 SR5, even the trail or Ltd may be different. Also, This gives my a 3/4 inch gap without the rubber trim, about 5/8 with. This may or may not be enough depending on how hard you wheel your rig!
CBI-Rear08.jpg


More...

 

Attachments

  • CBI-Rear01.jpg
    CBI-Rear01.jpg
    138.4 KB · Views: 3,865
  • CBI-Rear02.jpg
    CBI-Rear02.jpg
    99.8 KB · Views: 3,895
  • CBI-Rear03.jpg
    CBI-Rear03.jpg
    125.8 KB · Views: 3,828
  • CBI-Rear04.jpg
    CBI-Rear04.jpg
    104.6 KB · Views: 3,879
  • CBI-Rear05.jpg
    CBI-Rear05.jpg
    115.1 KB · Views: 3,908
  • CBI-Rear06.jpg
    CBI-Rear06.jpg
    73.6 KB · Views: 3,838
  • CBI-Rear07.jpg
    CBI-Rear07.jpg
    101 KB · Views: 3,850
  • CBI-Rear08.jpg
    CBI-Rear08.jpg
    120.9 KB · Views: 3,833
Last edited:
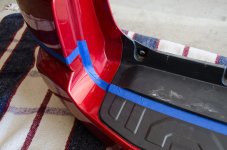
Taping. After measuring and taping the cut line, learn from my mistake and tape up completely over the area you are keeping, at least the areas that stick out like under the lights and the edges to prevent unnecessary paint scratches.
CBI-Rear09.jpg


This corner gave me fits for a bit till I saw a picture of [MENTION=62034]Keemonrunnin[/MENTION] 's install where he thankfully had a picture with the lift gate open.

One other thing I did here that may not have been a good idea, I decided to leave an inch extra plastic in the black area because I'd seen other cuts right up against the little lip there on the upper side of the tape and it didn't look so hot. Well it turns out that you really do need to cut close to the lip because everything south of that will stick out under the tailgate when it's closed and it is not very clean looking. I'm not taking my bumper off to fix it now though!!!

CBI-Rear10.jpg


Ok, test fit with the bumper trim and bumper on. It turned out almost perfect, but the trimming was a little low on the pass side so had to take off and retrim a bit.

Also in this picture, you can see I finally got smart about propping up the bumper. Using the tires and a 2x4, I could slide the bumper in, bolt up for testing, then unbolt and slide out to install or remove the bumper trim as needed without anyone's help. If you do this from the start, you only need someone to help lift the bumper up there once and then it's a one man job.

CBI-Rear11.jpg


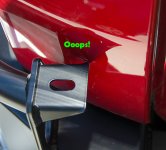
I did have one small fitment issue, which I didn't notice till I'd already smacked into the bumper cover on both sides ugh :( It was my fault though, I asked CBI to weld a couple of antenna tabs on for me so it wasn't like an engineered thing on their part.

CBI-Rear12.jpg


All better! Quick work with an angle grinder with cutoff wheel and things are fine.

CBI-Rear13.jpg


My gap. (Need to work the trim up a little neater) It's a fairly even 5/8 of an inch. Looks really good, we'll see if it's enough :D

CBI-Rear14.jpg


Some door edge trip to finish off the painted edges

CBI-Rear15.jpg


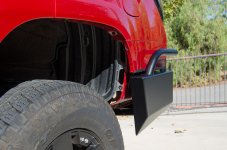
This is what is left under your wheel well. I'm going to fab up some mud flaps myself in the near future to cover up all that void space and keep from flinging dirt/mud all into places hard to wash out.

CBI-Rear16.jpg
 

Attachments

  • CBI-Rear09.jpg
    CBI-Rear09.jpg
    84.7 KB · Views: 3,871
  • CBI-Rear10.jpg
    CBI-Rear10.jpg
    72.1 KB · Views: 3,849
  • CBI-Rear11.jpg
    CBI-Rear11.jpg
    96.3 KB · Views: 3,858
  • CBI-Rear12.jpg
    CBI-Rear12.jpg
    94.1 KB · Views: 4,049
  • CBI-Rear13.jpg
    CBI-Rear13.jpg
    102.1 KB · Views: 3,786
  • CBI-Rear14.jpg
    CBI-Rear14.jpg
    114.9 KB · Views: 3,845
  • CBI-Rear15.jpg
    CBI-Rear15.jpg
    58.4 KB · Views: 3,826
  • CBI-Rear16.jpg
    CBI-Rear16.jpg
    77.6 KB · Views: 3,832
Last edited:
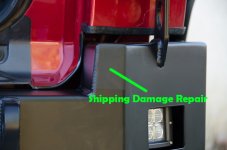
Fixed? Here is where the shipping damage was. It's REALLY hard to find paint to match black powder coat. Flat black is too flat and semi gloss is too glossy. The flat looked the best though. It's visible if you look for it, but not too noticeable over all.

CBI-Rear17.jpg


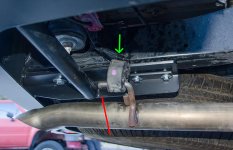
Here is my final exhaust situation. In this photo I have removed the hanger spacer from the upper mount completely and am just letting it ride on the bottom. This is of course not acceptable long term. The red line is where I'm going to cut it and should have cut it during initial prep work.

Eventually I will get it routed out the side though.

CBI-Rear18.jpg


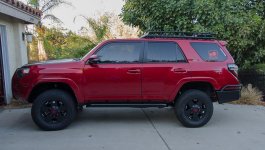
Side view

CBI-Rear19.jpg


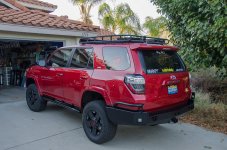
Rear view

CBI-Rear20.jpg


Clearance view. Initially I thought there was better clearance in the corners but comparing it to the original bumper picture it looks about the same. The trailor wiring socket should probably be relocated, as well as the exhaust, and you can see the spare tucks up nicely (265/r70/17) But will still drag over ledges. I like the idea of getting a 255 under there!

CBI-Rear21.jpg

So a little bit more work to go, but with the extra 2 inch lift since my last outing I'm already a lot better off over stock.


Final numbers:

Total install time: 7 hours with a lunch break, numerous water breaks and a cloth change break after sweating everything soaking wet half way through.

Bumper weight: 145 pounds - 10 pounds of stuff taken off = 135 pounds extra weight.

Rear spring compression: 0 inches? I have the icon 2 in lift springs (2.5 inches in reality). Before install I had someone sit on the bumper to see what the deflection would be and it was about 1/2 inch at 180 pounds. After the install though, remeasured and the driver side did not change at all, Pass is down 1/4 in so closer to level. ?!?!? Don't ask me but happy :D

Overall clearance: About the same, maybe slightly better.

Sway: The same.

Nose Dive: Slightly less.

Lessons learned:
1) Cut off the tip before doing anything with the bumper. There was no way to keep my exhaust from banging on the bumper support no matter what I did after install. Now that it is fully installed (and not wanting to remove it) It's going to be a LOT harder to cut off now.

2) The trailer light socket does not have to be removed. No one said it did but since EVERYTHING else was coming off I took it off and it hung and got in my way. Just leave it on.

3) I used a ratchet tie-down anchored on the spare tire chain crane to pull the exhaust out of the way for the install.

4) Tape a lot of the area you are going to keep on the bumper cover. Especially the humps under the lights and around any edges.

5) If you set up something to support the bumper on both sides to within an inch of the proper height (I used two stacked tires on each side), you can get someone to help you lift the bumper up onto the supports once, then you can by yourself complete the entire rest of the job by yourself.
 

Attachments

  • CBI-Rear17.jpg
    CBI-Rear17.jpg
    129.9 KB · Views: 3,832
  • CBI-Rear18.jpg
    CBI-Rear18.jpg
    72 KB · Views: 4,109
  • CBI-Rear19.jpg
    CBI-Rear19.jpg
    114.7 KB · Views: 3,837
  • CBI-Rear20.jpg
    CBI-Rear20.jpg
    138.9 KB · Views: 5,699
  • CBI-Rear21.jpg
    CBI-Rear21.jpg
    83.6 KB · Views: 3,853

Members online

Forum statistics

Threads
278,312
Messages
3,554,089
Members
248,016
Latest member
Advally Service

Trending content

Back
Top